P15
da Vinci Color mini
Function Operation and Instructions
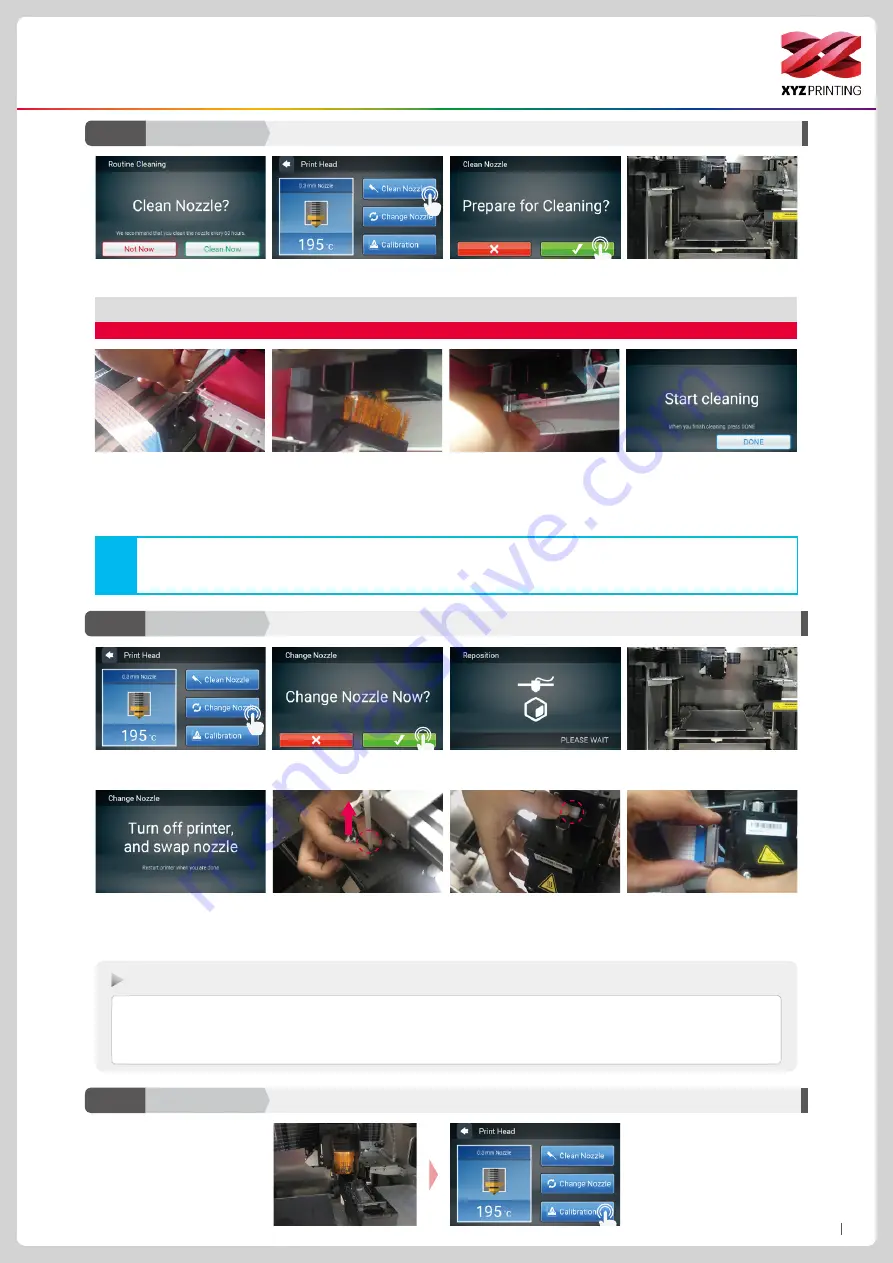
Clean Nozzle
D2-1
Print-Head
Change Nozzle
D2-2
Print-Head
2. Tap Clean Nozzle in the print
head section.
1. Please clean the nozzle after
printing 60 hours.
3. Check if cleaning is necessary. Tap Check to clean it.
Note: do not touch the metal part of the print head as it becomes hot during the operation.
4. Inset the feed hole cleaning wire
into the feed hole and push it down-
wards to drive out the filament from
the print head. (It is recommended
that the operation is performed from
the top of the machine.)
6. Insert the print head cleaning wire
into the nozzle from the bottom to
clean it.
5. Remove the filament residue from
the print head with a wire brush.
7. After the cleaning operation is
completed, tap DONE.
When the temperature of the print head reaches the operating temperature, the cleaning operation will start.
In order to prevent print quality from impact due to residual and accumulated filament, which results in poor discharge, after
long-term use of print nozzle, it is recommended to enable the "CLEAN NOZZLE" (nozzle cleaning) function of the printer every
60 hours of print to clear residuals with nozzle cleaning wire or feeding path cleaning wire. (Filament should be unloaded from
the extruder and remove the guide tube before cleaning the feeding path.)
Note
2. Tap to confirm that you want to
change the nozzle.
6. Change the print head from above
the machine. (If there is a guide tube
installed, please make sure that the
material has been returned and then
removed the guide tube.)
1. Tap Change Nozzle.
3. Wait until the print head moves to
a proper position for change.
7. Press the white release button to
separate the print head.
4. The position of the print head
change is shown above.
5. Turn off the power before chang-
ing the print head.
8. Hold the print head with one hand
and remove the bus with the other.
The removal of the print head is
completed.
Installation sequence of new print head:
1. Connect the bus.
2. Press the white release button on the print head and assemble the print head and the mechanism. After attaching the print head, check to
see that it is secure and does not shake.
3. Turn on and use the printer.
This function can be operated
if the printing device is
colliding with the ink
service station at which will
automatically calibrated to the
correct position.
Calibration
D2-3
Print-Head


