


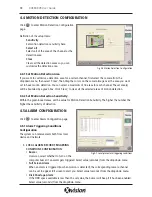


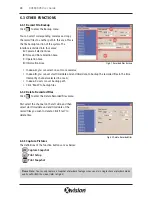


6.3 OTHER FUNCTIONS
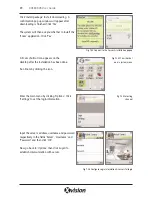
6.3.1 Record File Backup
Click to enter the Backup menu.
You can select corresponding cameras and copy
the record files to another path in this area. This is
the file backup function of the system. The
interface is divided into four areas:
A:
Camera Selection Area
B:
Time and Date Selection Area
C:
Operation Area
D:
Information Area
• In
area A
, you can select one or more cameras;
• In
area B
, you can set start time/date and end time/date, to backup the recorded files in the time
interval by channels selected in area A;
• In
area C
users can set backup path
• Click
‘Start’
to backup files.
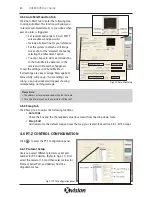
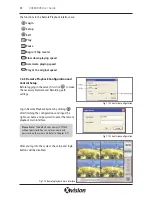
6.3.2 Delete Recorded Files
Click to enter the Delete Recorded Files menu.
First select the channel on the left side, and then
select start time/date and end time/date of the
record files you wish to delete. Click ‘Start’ to
delete files.
6.3.3 Capture Pictures
The definitions of the function buttons are as below:
Capture Snapshot
Print Setup
Print Snapshot
28
XUSB4DVR User Guide
Fig 6.7 Recorded files Backup
Fig 6.8 Delete Recorded Files
Please Note:
You can only capture a Snapshot of playback footage when you are in single channel playback mode
and have PAUSED the video. (refer to Fig6.2)


