


12
Version 1 – GBR (05/05/2020)
D-502-0173
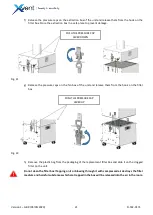
Fig. 8
Fig. 9
Fig. 10
-
fasten the arms using self-tapping screws 4, 2x9 (included in the arm package) into the pre-made hole on
each side of the tubed.
-
use appropriate force when tightening the screws to prevent damage to the arm tube
-
fastening must be done thoroughly to prevent the arm from accidentally disconnecting and resulting
damage to the arm and additional possible damage to property or injuries.
-
slide the assembled arm into the tube mounted on the unit
-
check the function of the arm by turning it into any position. Subsequently, check the positioning
functionality of the flexible arm end by setting into any position. In case of need to extend the flexible
part of the arm, pull at it to extend it by approx. 15 cm. Turning, positioning, and extending of the arm
should be possible without using excessive force.
3.2.2.
Installation of a protective sleeve
-
The sleeve is disposable and is used for easier disinfection of the exhaust arm.
-
To pull the protective sleeve on the unit, follow this procedure:
a)
Unwind and tear the protective sleeve from the supplied package
b)
Slide the protective slide on the exhaust arm in the direction away from the exhaust nozzle and
secure it using a clamping clip (included in the package) on each end of the arm.