background image


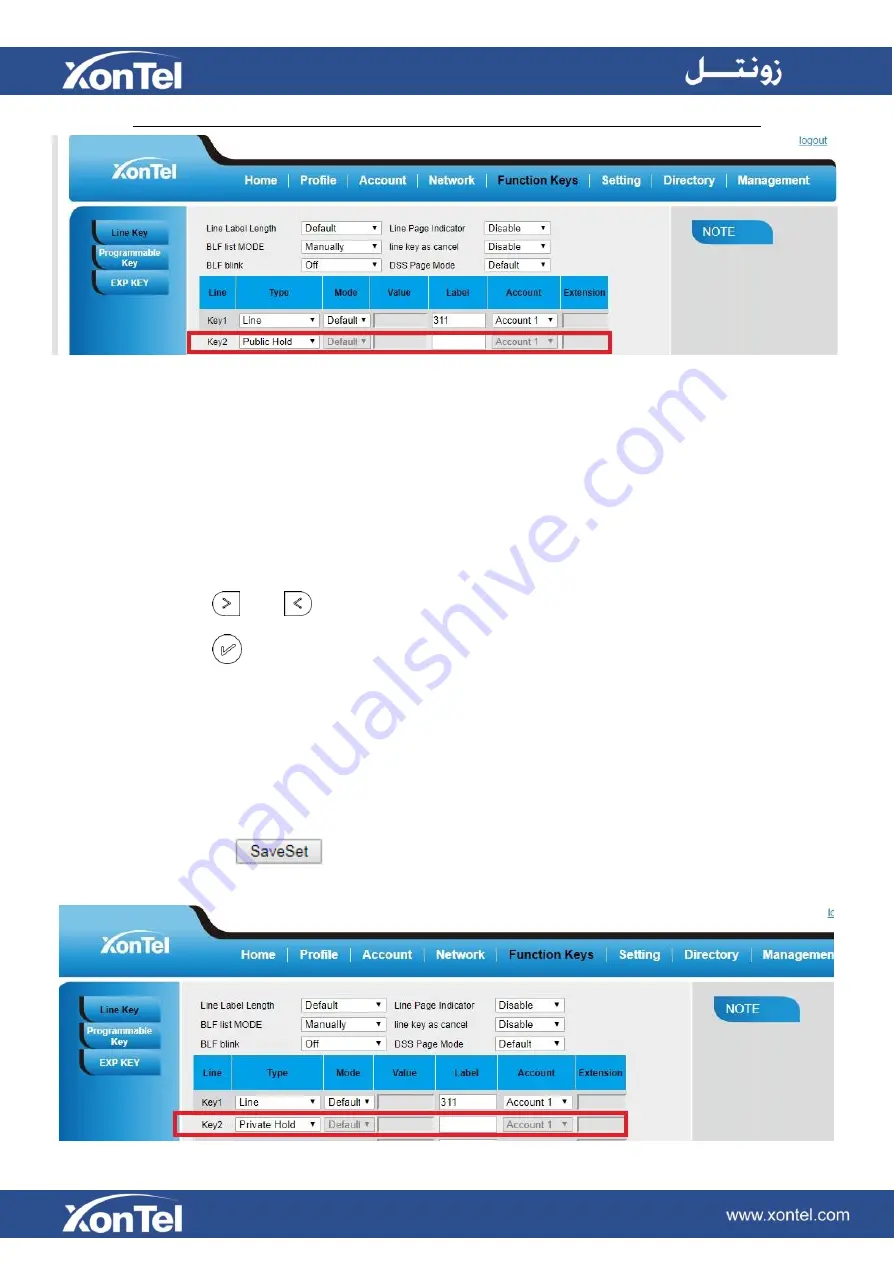
Private Hold


The key can be configured as a private hold key. During a conversation, all members belonging to that 

particular SLA group can use this key to hold the call, but only the initiator can resume the call. 


To configure the Private hold via Phone interface 


1. 

Press Menu →Features →Function Keys →Line Keys as Function Keys → Line Key2(for example) 

2.  Press   

   and 

  key to select the Private Hold in the Type field. 

3.  Press   

   or Save soft key to save the configuration 


To configure private hold via Web Interface 


1. 

Click Function Keys 

→Line Key. 


2. 

Select the desired Key and select Private Hold in the Type. 


3. 

Click the  

   button to save the configuration. 

Summary of Contents for XT-25G

Page 1: ...XonTel XT 25G User Manual...

Page 2: ...ut prior written permission from XonTel Safety Instructions To use the Phone please follow the instructions in this usermanual This phone is only for indoor use And also avoid in high humidity water a...

Page 3: ...interference in a residential installation This equipment generates uses and can radiate radio frequency energy and if not installed and used in accordance with the instructions may cause harmful inte...

Page 4: ...Instruction 26 Power Indicator LED 26 Line LED Line or Line Key set as Line 26 BLF or BLF List Key LED Line Line Key set as BLF 27 Shared Line LED 27 Other Key Led 28 User Interface 28 Line Key Funct...

Page 5: ...5 Show Missed Calls 86 Auto Logout Time 86 Reboot in Talking 86 Detect IP Conflict 87 Redial Mode 87 Keypad Lock 87 Suppress DTMF Display 89 Suppress DTMF Display Delay 89 Check Syn With Authenticate...

Page 6: ...rt for BLF Pickup 120 BLF List 121 Voice Message 122 Direct Pickup 124 Group Pickup 125 Call Park 127 Intercom 128 Intercom Barge 129 DTMF 130 Prefix 131 Local Group 132 XMLGroup 133 LDAP 134 XML Brow...

Page 7: ...8 System Log 159 Upgrade 160 Configuration File 162 Troubleshooting 163 Why is the phone LCD screen blank 163 Why does the phone display Network Unavailable 163 Why can t I get a dial tone 163 Where t...

Page 8: ...Getting Started Packing List The package contains the following parts please check if all the items are not missed 1 The phone station 2 The phone stand...

Page 9: ...3 Handset 4 Headset cord 5 Ethernet cable...

Page 10: ...Phone Installation 1 Attach the phone stand...

Page 11: ...2 Connect the Handset and optional Headset 3 Connect the Network and Power...

Page 12: ...n The phone finishes the initialization process by loading the saved configuration The phone LCD screen will display Booting And then show Initializing during the initialization The IP Phone will upgr...

Page 13: ...ask default gateway DNS server Status You can view the system status of your phone via phone user interface or web user interface The information of phone status includes Information e g Model IP MAC...

Page 14: ...2 Press Menu Status Network 3 Press Menu Status Network IPV4...

Page 15: ...4 Press Menu Status Network IPV6 5 Press Menu Status Account XT 25G support 16 accounts...

Page 16: ...work Registration To register via phone interface 1 Press Menu Settings Advanced Setting default password xontel Accounts 2 Select the desired account 3 Select Enable for Account active 4 Select the d...

Page 17: ...o press 1 on the keypad then you will find the Additional Information When the current input method is ABC abc 2ab Pressing 1 you will find Pressing 0 you will find Pressing you will find Pressing you...

Page 18: ...t Basic 6 Select Yes for Account Active 7 Select the desired Profile 8 Fill the SIP User ID Authenticate ID Authenticate Password and other accountinformation 9 Click to save the configuration Note 1...

Page 19: ...you can switch the account by pressing right or left navigation key The Line keys are also can be used as other function keys 4 Soft Key This area shows the soft key labels The default soft key label...

Page 20: ...cate the power status Line keys The phone supported up to 4 accounts 1 Steady green idle interface during acall 2 Blink red a call incoming Soft keys Labels automatically to identity their context sen...

Page 21: ...ce call Line Keys To be configured as different function as 1 Line 2 Speed Dial 3 BLF 4 BLF List 5 Voice Mail 6 Direct Pickup 7 Group Pickup 8 Call Park 9 Intercom 10 DTMF 11 Prefix 12 Local Group 13...

Page 22: ...n Unregistered 41 Broadsoft Group Speaker Press this button to place a call in hands free mode Redial To dial the previous dialed number To act as send key Volume To increase the volume To decrease th...

Page 23: ...Icon Preview Icon Description Network down Line Registered succeed Line Unregistered Line Ringing Speed Dial BLF BLF Ringing BLF Talking Speakerphone mode Handset mode Headset mode Voice messages...

Page 24: ...Text message Mute Do Not Disturb Volume is 0 SRTP Hold Dialed calls Received calls Missed calls Forward calls Conference Keypad locked Pick up Call Park...

Page 25: ...Intercom Paging DTMF Prefix XML Group Local Group XML Browser LDAP Broadsoft Group Conference Forward Transfer Hold Redial Call Return Record Stop Recording Group Listening...

Page 26: ...hat the LED setting all set as Yes Power Indicator LED LED Status Description Blinked green Ringing or have missed call Steady Green Idle status Power on Off Powered off Line LED Line or Line Key set...

Page 27: ...tatus Stay red Other member of the SCA group s led status when a member of the SCA group in Private hold status Blinked green every 500ms a member of the SCA group in public hold status Blinked red ev...

Page 28: ...te the phone user interface which allows the user to execute all call operation tasks and basic configuration changes directly on the phone In addition you can use the web user interface to access all...

Page 29: ...sic Setting Language Time Date Time Date Format DHCP Time Ring Tone Headset Font Size Advanced Setting Accounts Network Phone Setting Auto Provision Display Display Mode Wallpaper Screensaver Others F...

Page 30: ...Direct Pickup Group Pickup Call Park Intercom DTMF Prefix Local Group XML Group XML Browser LDAP Network Directories Conference Forward Transfer Hold DND Redial Call Return SMS...

Page 31: ...Record URL Record Paging Group Listening Public Hold Private Hold Hot Desking ACD Zero Touch URL Network Group Multicast Paging Group Call Park CallPark Retrieve Pull Call Shared Line Broadsoft Group...

Page 32: ...he basic configuration as the Time Language and Volume General Settings Web Login 1 Get the IP address Press Menu Status Information 2 Input the IP Address in the web browser 3 Input the user name def...

Page 33: ...C and phone should be in the same segment When registering the accounts in web and the server port is not 5060 the SIP Server should be set as SIP Server s IP address server port for example 192 168 0...

Page 34: ...is xontel To change to password via Phone Interface 1 Press Menu Settings Advanced Setting password default xontel Phone Setting Set Password 2 Enter the current PWD xontel new password and confirm th...

Page 35: ...icon and others all text description To Configure Display mode via Phone interface 1 Press Menu Display Display Mode 2 Select Text or Icon 3 Press Save soft key to save the configuration To Configure...

Page 36: ...Language The default Phone interface language is English To change the language via Phone interface 1 Press Menu Settings Basic Setting Language 2 Press or Save soft key to save the configuration...

Page 37: ...selection The available languages depend on the language packs currently loaded to the IP phone To change the language via Web Interface 1 Setting Preference Web Language LCD Language 2 Select the nec...

Page 38: ...Menu Display Wallpaper 2 Press and or press Switch soft key to display the differentpictures 3 Press or Save soft key to save the selected picture as thewallpaper To change the wallpaper via Web inte...

Page 39: ...h and Static Photo Time Logo When the screensaver works it will show Time and logo in turns Photo Switch All screensaver pictures display one by one Static Photo Only the selected picture will display...

Page 40: ...d Static Photo 4 Press or Save soft key to save the selected configuration To disable screen saver via Phone interface 1 To press Menu Display Screensaver 2 Press and or press Switch soft key to Choos...

Page 41: ...Setting Preference 2 Choose the picture wanted to use as screensaver 3 Click to save the upload picture To delete upload screen saver phone via Web interface 1 Setting Preference 2 Select the photo t...

Page 42: ...o via Web interface 1 Click Setting Preference 2 Choose the Time out as 1 min or 2 5 10 30minute 3 Enter the desired value in the Text Logo field 4 Click to save the configuration To wake up screen sa...

Page 43: ...ng via Phone interface 1 Topress Menu Settings Basic Setting Time Date SNTPSettings 2 Press or to change the Timezone 3 Fill the NTP Server1 NTP Server2 and select the mode of Daylight Saving 4 Press...

Page 44: ...isplay 3 Press and to change date display format among Y M D year month day M D Y month day year D M Y day month year 4 Press or Save soft key to save theconfiguration To configure the DHCP time via P...

Page 45: ...To configure the DHCP Option 100 1 Topress Menu Settings Date Time DHCP Option 100 2 Select Yes for the DHCP SIP Server 3 Click to save the configuration...

Page 46: ...admin password xontel default 2 Setting Date Time NTP Server 3 Fill the value in the blank 4 Click to save the configuration To change the Time Zone and Date Display Format via Web interface 1 Settin...

Page 47: ...To change the SIP Date Override Time via Web interface 1 Setting Date Time SIP Date Override time 2 Select Yes or No forSIP Date Override Time 3 Click to save the configuration...

Page 48: ...me Account 2 Select desired Account 3 Click to save the configuration To change the Daylight Saving Time via Web interface 1 Setting Date Time Daylight Saving Time 2 Select Disable or Enable or Auto f...

Page 49: ...n Many countries have used the DST at various times details vary by location The DST can be adjusted automatically from the time zone configuration Typically there is no need to change thissetting LED...

Page 50: ...ace 1 Press Menu Features Key as Send 2 Press and key to select the enablechoice 3 Press or Save soft key to save the configuration To cancel Key as Send via Phone interface 1 Press Menu Features Key...

Page 51: ...tic IP address manually When switch DHCP Static IP and PPPoE to each other or change the Static IP on Web interface it will show the warning of restart as following IPv4 If you set IP Mode to IPv4 IP...

Page 52: ...Advanced Setting password xontel Network WAN Port IPv4 DHCP mode 2 Click Save and restart the phone To configure a static IP address via Phone interface 1 Press Menu Settings Advanced Setting password...

Page 53: ...an set a WAN port to be a PPPoE port The PPPoE port will perform a PPP negotiation to obtain the IP address Contact your system administrator or for the PPPoE user name and password To configure PPPoE...

Page 54: ...Static or PPPoE 3 Fill the necessary information 4 Click and restart the phone IPv6 If you set IP Mode to IPv6 IP phone will use IPv6 address IPv6 has two network modes DHCP Static To configure IPv6...

Page 55: ...configure DHCP via Phone interface 1 Press Menu Settings Advanced Setting password xontel Network WAN P o r tIPv6 DHCP mode 2 Click Save and restart the phone To configure a static IP address via Pho...

Page 56: ...3 Click OK and restart the phone To configure Network via Web interface 1 Click Network Basic IPv6 setting 2 Select the desired Type DHCP Static 3 Fill required fields 4 Click and restart the phone...

Page 57: ...6 address The settings of DHCP Static and PPPoE are same as above To configure IPv4 IPv6 via Phone interface 1 Press Menu Settings Advanced Setting password xontel Network WAN Port IP Port Mode 2 Pres...

Page 58: ...ort 3 Click for the setting PC Port Three modes for PC port bridge connect to Expansion Module and router To configure PC Bridge via Phone interface 1 Press Menu Settings Advanced Setting password xon...

Page 59: ...e 3 Click the OK button then the phone willreboot To configure Bridge via Web interface 1 Click Network PC Port 2 Select As Bridge 3 Click and the phone will reboot automatically To configure Router v...

Page 60: ...To configure PC Connect to Expansion Module via Web interface 1 Click Network PC Port 2 Select Connect to Expansion Module 3 Click and the phone will reboot automatically...

Page 61: ...eing disturbed The local Directory can add up to 1000 contacts A To add contacts list into local directory To add contacts manually via Phone interface 1 Press Menu Directory Local Contacts 2 Press Ad...

Page 62: ...the necessary information as Name Phone number 5 Press Save soft key or to add the contacts successfully To add contacts via Web interface 1 Click Directory Directory 2 Enter the name number and some...

Page 63: ...kList 2 Press Group soft key 3 Press Add soft key 4 Enter the Name and select the Ring Tone 5 Press Save soft key or to add the Group successfully 6 Enter the added Group then press Add softkey 7 Ente...

Page 64: ...t the targeted one 3 Press Option soft key Add to Blacklist 4 Edit the necessary information as Name Phone number 5 Press Save soft key or to add successfully Upload Contacts photo via Web interface 1...

Page 65: ...When you place a call from the contact the phone idle screen will show the contact photo...

Page 66: ...Click Import XML to import the contact list To export an XML file of contact list via Web interface 1 Click on Directory Directory 2 Click Export XML to export the contact list To import a CSV file of...

Page 67: ...Book 2 Fill the path of the remote file in the Phone Book URL field For example http 192 168 0 106 Phonebook Remote_Phonebook remotephonebook xml 3 Fill the Name and then click to save the configurati...

Page 68: ...atches the search criteria the record will be displayed on the IP PHONE LCD 3 Fill LDAP Number Filter This parameter specifies the number attributes for LDAP searching 4 Fill Server Address Fill the d...

Page 69: ...2 Select LDAP in the Type field 3 Click to save the configuration To configure LDAP Key via Phone interface 1 Press Menu Features Function Keys Line Keys as Function Keys Line Key 2 2 Select LDAP in...

Page 70: ...interface 2 Click the button and select the Local contactslist 3 Click the More soft key then you can see the Search soft key 4 Click the Search soft key you can enter the desired part of name or par...

Page 71: ...e maintains call history lists of Dialed Calls Received Calls Missed Calls and Forwarded Calls The call history list supports up to 100 entries in all on Phone interface and more than 1500 items You c...

Page 72: ...t the desired entry 4 Press the Option soft key and then select Detail from the promptlist 5 The detailed information of the entry appears on the LCD screen To delete an entry from the call history li...

Page 73: ...aled Calls and Forwarded Calls 3 Press the Option soft key and then select Delete All from the promptlist 4 Press the OK soft key 5 Press the OK soft key to confirm the deleting or the Cancel soft key...

Page 74: ...he desired history item and click Tel Number 3 Then the call is dialed on phone To Dial a call from Call History via Phone interface 1 Press History soft key or press Menu History Local History 2 Pres...

Page 75: ...can adjust the type and volume of the ring tone To adjust the Ring Tone Type via Phone interface 1 Press Menu Settings Basic Setting Ring Tone 2 Press and to select the aimed one 3 Press or Save soft...

Page 76: ...To adjust the Ring Tone Type via Web Interface 1 Setting Preference Ring Tones 2 Select the wanted one 3 Click to save the configuration...

Page 77: ...e Ring Tone via Phone Interface 1 Press Directory 2 Select the target contact 3 Press Detail soft key to edit the contact 4 Press and to select the wanted Ring Tone for the contact 5 Press Save soft k...

Page 78: ...To configure Distinctive Ring Tone via Web Interface 1 Directory Directory Contact 2 Choose the Ring Tone you want touse 3 Click to save the configuration...

Page 79: ...Volume You can adjust the volume for the phone by the volume keys and To adjust the Ring tone volume via Phone interface 1 To press and on the idlepage 2 To press and while the phone is ringing...

Page 80: ...To adjust the handset volume via Phone interface To press and during a call in handsetmode To adjust the headset volume via Phone interface To press and during a call in headset mode...

Page 81: ...hone interface To press and during a call in speakermode Voice Mail Tone This option can set whether to play the beep for phone s voice mail 1 Click the Setting Preference 2 Select On or Off for Voice...

Page 82: ...r Off for Play Hold Tone 3 Click for the setting Play Hold Tone Delay When you hold the phone How many seconds to play beep 1 Click the Setting Preference 2 Set the value for Play Hold Tone Delay 3 Cl...

Page 83: ...2 011 replace digit 2 with 011 when dialing To configure dial plan via Web interface 1 Click Account Basic Dial Plan 2 Fill the value in dial plan field 3 Click to save the configuration...

Page 84: ...lick Web interface Setting Preference 2 Fill the blank of No Key Entry Timeout for example 5 seconds 0 means never timeout you should press the send key the dial out thenumber 3 Click the button to sa...

Page 85: ...ber e g 110 119 120 in the Emergency field 3 Click to save the configuration Label Scroll When setting function keys you need to set the label of the function keys If the words are too long to show on...

Page 86: ...on LCD To configure Show Missed Calls via Web interface 1 Click the Setting Preference 2 Select Yes or No for Show Missed Calls 3 Click for the setting Auto Logout Time Set the Web login timeout 1 Cl...

Page 87: ...o ways 1 To redial the last placed call from the IP Phone 2 To redial the call from all calls list 1 Click the Setting Preference 2 Set Direct Mode or Select Mode for Redial Mode 3 Click for the setti...

Page 88: ...ad Lock via Web interface 1 Click Web interface Setting Features 2 Tochoose the PhoneLock 3 Tofill the Phone Unlock Pin and Auto Lock Time Out 4 Fill the Emergency Number when the phone is Lock only E...

Page 89: ...y In order to ensure safety in Call process you can choose whether to hide DTMF 1 Click the Setting Preference 2 Select On or Off to Suppress DTMF Display Delay 3 Click for the setting Check Syn With...

Page 90: ...Other features settings Action URL To configure action URL via Web interface 1 Click Setting Action URL 2 Fill the needed values in the designated blank spaces 3 Click to save the setting...

Page 91: ...some status For example what the soft key displays when dialing or talking To configure Soft key via Web interface 1 Click Setting Softkey Layout 2 Select Enable for Custom Softkey 3 Select Call Stat...

Page 92: ...an define them as some specific feature and it works only on the idle page To configure Programmable Key via Web interface 1 Click Function Keys Programmable Key 2 Select the desired Key to set 3 Clic...

Page 93: ...ll by Handset 1 Pick up the handset or press a line key and dial the necessary number 2 Press or or press the Send soft key then the call is sending To place a call by Headset 1 Press the light is Gre...

Page 94: ...Directory soft key On the idle page or Menu History Directory 2 Press and to select the targeted one 3 Press the Send soft key or or or the corresponding line key then the call is sending Making two c...

Page 95: ...call by handset Pick up the handset and now the conversation is built To receive a call by headset Press and now the conversation is built To receive a call by hands free speaker 1 Option 1 Press dire...

Page 96: ...To set incoming call show mode via Web interface 1 Click Setting Preference 2 Select the desire mode for the incoming call show mode 3 Click to save the setting Auto Answer Enable auto answer feature...

Page 97: ...wer 3 To click to save theconfiguration Call Hold When using the hold feature the Hold icon will show on the display To make a call on hold during three modes To hold a call under handset mode 1 Press...

Page 98: ...resume the call onhold Call Transfer This phone supports Blind Attended and Semi Attended Transfer Blind Transfer When you use this feature you can 1 Press or Transfer soft key during the conversation...

Page 99: ...transfer completed Semi Attended Transfer 1 Press or Transfer soft key during the conversation the call is on hold now 2 Enter the number transfer to and press the send soft key or or then you can he...

Page 100: ...reference Three Way Call Release Type Transfer 2 A place a call to B B answer A place a call to C again C answer Apress the Conference soft key then A B and C will establish meeting 3 A press the End...

Page 101: ...and B are in conversation A wants to bring C D and E in a conference 2 A press the Conference soft key the call is placed onhold 3 A enter the number of C and then press send soft key or 4 C answer t...

Page 102: ...m administrator 4 To realize the 5 way conference the line should be allavailable 8 D answer the call 9 A press or the Conference soft key then A B C and D are now in a conference and now this is 4 wa...

Page 103: ...umber 1 Press Menu Features Call Forward Always Forward 2 Press and to select the enable choice 3 Enter the Forward Tonumber 4 Press or Save soft key to save theconfiguration To configure busy forward...

Page 104: ...r ed after some time 1 Press Menu Features Call Forward No Answer Forward 2 Press and to select the enable choice 3 Enter the Forward To number and After RingTimes 4 Press or Save soft key to save the...

Page 105: ...Target Number 4 Fill the After Ring Time 5 Click to save the configuration To cancel the forward feature via Phone Interface Press the key to disable the forward feature Press Menu Features Call Forw...

Page 106: ...number from the Directory when you press the forward key To configure dynamic forward Forward an incoming call during the ringing 1 When the phone is ringing press Forward softkey 2 Enter the forward...

Page 107: ...Function Keys Line Keys as Function Keys Line Key2 for example 2 Press and key to select the Call Return in the Typefield 3 Press or Save soft key to save theconfiguration To configure the Call Return...

Page 108: ...or voicemail your LCD screen will prompt for call back as shown in figure If you press the Callback the phone will dial the Callback phone number To configure the Call Back via Web interface 1 Click...

Page 109: ...ng Tone 1 Click Setting Features 2 Select Call Waiting On and Call Waiting Tone On To Change the Call Waiting Tone time via Web interface 1 Click Setting Tones 2 Change the Tone Time as you want for e...

Page 110: ...u Features Anonymous Call Account ID 1 2 Press and to select the enable choice in Anonymous Call filed 3 Enter the Call On Code optional Call Off Code optional 4 Press or Save soft key to save theconf...

Page 111: ...anonymous call 1 Press Menu Features Anonymous Call Account ID 1 2 Press and key to select the enable choice in Rejectionfiled 3 Press or Save soft key to save theconfiguration To cancel rejecting an...

Page 112: ...voice while you can hear their voice Call mute applies to all modes handset headset and speaker phone To mute the call during a call including a conference call 1 Press the Mute key then the Mute key...

Page 113: ...and you can see the mute icon shown on the Top of the LCD on idle page To enable DND feature via Phone interface Press the DND soft key when the phone is idle and then shown on the LCD To disable DND...

Page 114: ...off hook auto dial 3 Press or Save soft key to save the configuration To configure Hotline auto dial via Web Interface 1 Setting Features HotLine 2 Fill the number in the Hotline Number and HotlineTi...

Page 115: ...own in figure If you press OK your LCD will prompt Auto Redial Interval and Auto Redial Times To configure Auto Redial via Web Interface 1 Click Setting Features Auto Redial 2 Select On or Off for Aut...

Page 116: ...eys Line support three Mode Default lock and float Default mode If there is an incoming call the phone won t navigate to the set line key account page if the line key page is set as line type and curr...

Page 117: ...ess and key to select the Speed Dial in the Type field 3 Enter the targeted Number 4 Press or Save soft key to save the configuration Then the selected Line Key will work as Speed Dial To configure Sp...

Page 118: ...e a BLF key via Phone interface 1 Press Menu Features Function Keys Line Keys as Function Keys Line Key2 for example 2 Select the targeted Line Key 3 Press and key to select the BLF in the Type field...

Page 119: ...this option is enabled when you use the BLF feature to monitor a specific phone whether it is busy or free you can see this message on the LCD as shown in the following figure To configure Visual Ale...

Page 120: ...monitor a specific phone whether it is busy or free you can hear beep To configure Audio Alert for BLF Pickup via Web Interface 1 Click Setting Features Call Pickup Audio Alert for BLF Pickup 2 Selec...

Page 121: ...ogin and click Account Basic 2 Fill the Eventlist BLF URL and click to save the configuration 3 To configure BLF List keys 3 1 Click Function Keys Line Key 3 2 Select the BLF List in the Type field 3...

Page 122: ...re via Phoneinterface 1 Press Menu Messages Voice Mail Set Voice Mail 2 Enter the Account No 1 2 3 4 5 6 16 3 Press or Save soft key to save the configuration To configure Voice Mail Line Key via Web...

Page 123: ...inconvenient for them to answer the call Follow the voice prompt from the system server to leave a voice mail and then hang up To listen to voice mails When the Phone interface prompts receiving new...

Page 124: ...ter the Value 4 Press and key to select the Account ID 5 Press or Save soft key to save the configuration Then the selected Line Key will work as Direct Pickup Note This feature is not available on al...

Page 125: ...this feature you can pick up the specified group that you want incoming calls To configure the Pickup via Phone interface 1 Press Menu Features Function Keys Line Keys as Function Keys Line Key2 for...

Page 126: ...k Function Keys Line Key 2 Select the desired Line Key and select Group Pickup in the Type 3 Enter the group pickup code or the direct pickup code followed the desired phone number in the Value field...

Page 127: ...2 Press and or press Switch soft key to select the Call Park type 3 Select the Account ID 4 Enter the call park code in the Valuefield 5 Press or Save soft key to save theconfiguration To configure t...

Page 128: ...tercom in the Typefield 3 Enter the intercom codes followed by desired number in the Value field 4 Select the Account ID 5 Press or Save soft key to save the configuration Then the selected Line Key w...

Page 129: ...er by Call Info 1 Click Profile 2 Select the desired profile from the pull down list of Profile in the Profile field 3 Click Advanced 4 Enable the Allow Auto Answer By Call Info 5 Click the button to...

Page 130: ...e the configuration To configure the DTMF via Phone Interface 1 Press Menu Features Function Keys Line Keys as Function Keys Line Key2 for example 2 Press and key to select the DTMF in the Typefield 3...

Page 131: ...s Line Keys as Function Keys Line Key2 for example 2 Press and key to select the Prefix in the Typefield 3 Enter the Value with number that you want to set as prefix 4 Press or Save soft key to save t...

Page 132: ...ys Line Key2 for example 2 Press and key to select the Local Group in the Typefield 3 Press or Save soft key to save theconfiguration To configure the Local Group via Web interface 1 Click Function Ke...

Page 133: ...s as Function Keys Line Key2 for example 2 Press and key to select the XML Group in the Type field 3 Press and key to select the remote phonebook 4 Press or Save soft key to save the configuration To...

Page 134: ...tures Function Keys Line Keys as Function Keys Line Key2 for example 2 Press and key to select the LDAP in the Typefield 3 Press or Save soft key to save theconfiguration To configure the LDAP via Web...

Page 135: ...Phone Interface 1 Press Menu Features Function Keys Line Keys as Function Keys Line Key2 for example 2 Press and key to select the XML Browser in the Type field 3 Fill the access URL for xmlbrowser 4...

Page 136: ...e via Phone Interface 1 Press Menu Features Function Keys Line Keys as Function Keys Line Key2 for example 2 Press and key to select the Conference in the Typefield 3 Press or Save soft key to save th...

Page 137: ...e the Forward via Phone Interface 1 Press Menu Features Function Keys Line Keys as Function Keys Line Key2 for example 2 Press and key to select the Forward in the Typefield 3 Enter the Number to forw...

Page 138: ...s Function Keys Line Key2 for example 2 Press and key to select the Transfer in the Typefield 3 Enter the Number to transfer to 4 Press or Save soft key to save theconfiguration To configure Transfer...

Page 139: ...ce 1 Press Menu Features Function Keys Line Keys as Function Keys Line Key2 for example 2 Press and key to select the Hold in the Typefield 3 Press or Save soft key to save the configuration To config...

Page 140: ...ne Interface 1 Press Menu Features Function Keys Line Keys as Function Keys Line Key2 for example 2 Press and key to select the Group Listening in the Typefield 3 Press or Save soft key to save thecon...

Page 141: ...ion Keys Line Key2 for example 2 Press and key to select the DND in the Type field 3 Press or Save soft key to save theconfiguration To configure DND via Web Interface 1 Click Function Keys Line Key 2...

Page 142: ...an redial the last placed call from the IP Phone To configure Redial via Web Interface 1 Click Function Keys Line key 2 Select the desired Key and select Redial in the Type 3 Enter the Label displayed...

Page 143: ...nput the content of SMS and click Send To send SMS via Phone interface 1 Click Menu Messages Text Message Set SMS 2 Enter the contents in the blank field 3 Press the Send button 4 Select the account i...

Page 144: ...Keys as Function Keys Line Key2 for example 2 Press and key to select the SMS in the Type field 3 Press or Save soft key to save the configuration To configure SMS via Web Interface 1 Click Function K...

Page 145: ...Function Keys Line Keys as Function Keys Line Key2 for example 2 Press and key to select the Record in the Typefield 3 Press or Save soft key to save theconfiguration To configure the record via Web...

Page 146: ...res Function Keys Line Keys as Function Keys Line Key2 for example 2 Press and key to select the URL Record in the Typefield 3 Fill the Value 4 Press or Save soft key to save theconfiguration To confi...

Page 147: ...elect the Paging in the Typefield 3 Enter the paging code followed the number 4 Press and key to select the Account ID 5 Press or Save soft key to save theconfiguration To configure the Paging via Web...

Page 148: ...this call is placed on private hold no other member of the SCA group will be able to resume that call To enable share call appearance the user would need to register the share line account on the phon...

Page 149: ...key can be configured as a public hold key During a conversation all members belonging to that particular SLA group can use this key to hold or resume a call To configure the Public hold via Phone int...

Page 150: ...igure the Private hold via Phone interface 1 Press Menu Features Function Keys Line Keys as Function Keys Line Key2 for example 2 Press and key to select the Private Hold in the Typefield 3 Press or S...

Page 151: ...og in a new account which allows many users to share the phone resource in different times To use this feature first you need to configure a Hot Desking key in the advance settings To configure the ho...

Page 152: ...the XonTel XT 25G IP Phone allows the ACD system to distribute calls from large volumes of incoming calls to the registered IP phone users To use this feature first you should configure an ACD key in...

Page 153: ...Features Function Keys Line Keys as Function Keys Line Key2 for example 2 Press and key to select the Zero Touch in the Typefield 3 Press or Save soft key to save the configuration To configure the ze...

Page 154: ...RTP stream to the pre configured multicast address addresses without involving SIP signaling You can configure the phone to receive an RTP stream from pre configured multicast listening address addre...

Page 155: ...e active call it will be ignored automatically If Disabled is selected from the pull down list of Paging Barge the voice call in progress will take precedence over all incoming multicast paging calls...

Page 156: ...rable via Web interface only To configure multicast listening addresses via Web interface 1 Click Directory Multicast Paging 2 Select the desired value from the pull down list of Paging Barge 3 Select...

Page 157: ...one interface 1 Press Menu Settings Advanced Setting default password xontel Phone Setting Factory Reset 2 Press OK soft key in the warning page To set Factory Reset via Web interface 1 Click Manageme...

Page 158: ...Feature To use pcap via Web interface 1 Click Management Tools 2 Click Start and then operation the phone 3 When finish the operation click Stop and then click Export 4 Then you ll get the Pcap captu...

Page 159: ...System Log To download system log via Web interface 1 Click Management Configuration 2 Click to download the system Log 3 Then you ll get the system log file syslog tgz...

Page 160: ...directory of the HTTPserver 3 Visiting http 192 168 0 254 fm fw920M rom on localhost by browser to verify the HTTP Server If visiting http 192 168 0 254 fm fw920M rom on another computer and it not p...

Page 161: ...e g TFTP HTTP FTP HTTPS server is not responding there are no code image files available for upgrade or checksum test fails etc the XT 25G will stop the TFTP HTTP FTP HTTPS process and simply boot usi...

Page 162: ...nagement Configuration Configure File 2 Click the or then you can get a file cfg bin or cfg xml To Restore a configuration file 1 Click Management Configuration Configure File 2 Select the xxx bin or...

Page 163: ...on the phone and the Ethernet cable is not loose Ensure that the switch or hub in your network is functioning well If the problem still persists Contact your system administrator for moreinformation...

Page 164: ...How to download XML Configuration Click Management Configuration...

Page 165: ...How to Import Trusted CA certificate Click Management Trusted CA...

Page 166: ...How to Import Server CA certificate Click Management Server CA...

Reviews: