background image

Scanning

18

Xerox 7600 Scanner User’s Guide

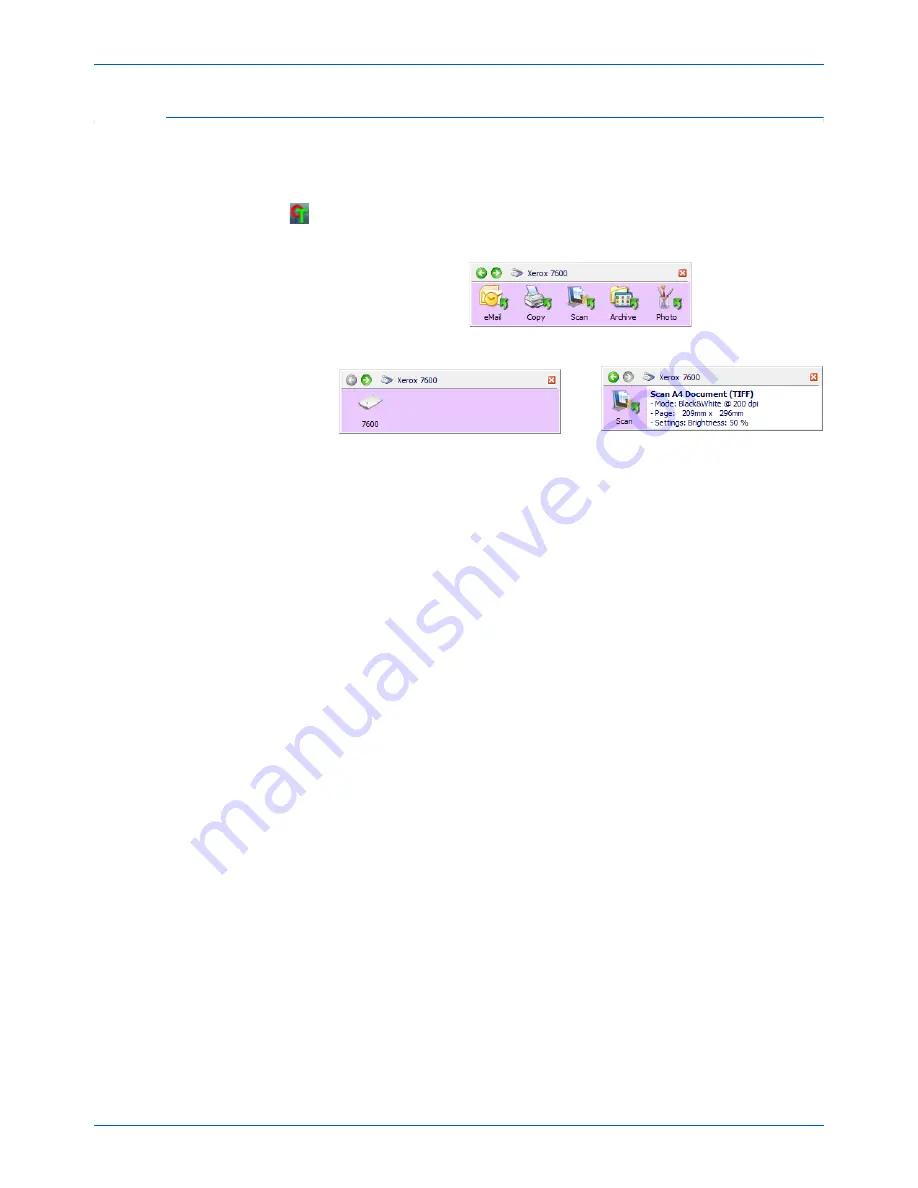
Features of the One Touch Button Panel

The One Touch Button Panel is your on-screen set of controls for the 
scanner. From the panel you can access the hardware settings for your 
scanner and configure the One Touch buttons.

Click on the One Touch icon to open the panel.

The Title Bar

Green arrows—click to cycle through the panel’s 3 views.

Scanner icon—click to open the scanner’s hardware properties.

Red “X”—click to close the One Touch panel.

The Button View

Left-click

 on a Destination Application icon to start scanning.

Right-click 

on a Destination Application icon to open the One Touch 

Properties.

The Detail View

Left-click

 on a Destination Application icon to start scanning.

Right-click 

on a Destination Application icon to open the One Touch 

Properties.

Double-click

 on the detailed information to open the One Touch 

Properties.

The Hardware View

Left-click 

on the scanner icon to return to the Button view.

Right-click

 on the scanner icon to open the scanner’s hardware 

properties.

The Button View

The Hardware View

The Detail View

Summary of Contents for X76007D-WU

Page 1: ...7600 user s guide scanner...

Page 2: ...7600 scanner user s guide...

Page 3: ...emark of ZyLAB International Inc ZyINDEX toolkit portions Copyright 1990 1998 ZyLAB International Inc All Rights Reserved All other products mentioned herein may be trademarks of their respective comp...

Page 4: ...ttons 20 Selecting New Settings for a Button 21 Creating a New Scan Configuration 23 Editing or Deleting Scan Configurations 29 Configure Before Scan 30 Selecting Document and Page Format Options 33 S...

Page 5: ...canner 71 Uninstalling the Scanner and One Touch Software 71 Uninstalling the PaperPort Software 71 To Install Another Driver 71 Xerox 7600 Scanner Specifications 72 Xerox 7600 Spare Part List 72 Noti...

Page 6: ...mputer With its innovative hinged lid you can also lay books flat on the scanner to scan the book pages What s in the Box Before starting the software installation please check the contents of the box...

Page 7: ...utton panel Scans to the appropriate application indicated by the button For example pressing the Email button scans the document then opens your Email program with the image of the scanned document a...

Page 8: ...or are High Color 16 bit or True Color 24 bit or 32 bit Resolution set to at least 800 x 600 pixels To set your monitor s colors and resolution Open the Windows Control Panel Double click on Display t...

Page 9: ...will differ based on the software your computer is running in each case you should allow the installation to proceed if that option is available Alternatively you can turn off the AntiVirus or AntiSpy...

Page 10: ...e disc s Main Menu window opens NOTE If the disc does not start check the following Make sure the disc drive s door is completely shut Make sure the disc was inserted in the drive in the proper direct...

Page 11: ...Guide 5 On the Main Menu select Install Products 6 Make sure the boxes for Nuance PaperPort and Scanner Driver are checked 7 Click Install Now NOTE The software provided with your scanner may differ s...

Page 12: ...t software will not be installed 4 On the Customer Information window accept the current values or enter new information then click Next 5 On the Setup Type window keep the default Setup Type and clic...

Page 13: ...4 Click Next A window opens with image quality samples asking you to select an image for your Color Space setting The Color Space setting sets the default gamma value for the scanner so scanned items...

Page 14: ...power Your computer recognizes that a scanner has been plugged into the USB port and automatically loads the appropriate software to run the scanner Do not proceed until you receive a message that you...

Page 15: ...ndow To see a quick overview about accessing and navigating the One Touch Button Panel click More When you re finished reading the additional information click OK 5 Click OK to complete the installati...

Page 16: ...ion Particularly for children these fun programs provide ways to organize and display your scanned images Collage Creator includes all the fun of traditional collage building but leaves out all the me...

Page 17: ...on your computer 2 Click the name of a User Guide you want to view and it will open in Acrobat Reader Use the Acrobat Reader Save command to save that User Guide on your computer 3 Return to the User...

Page 18: ...the bottom right corner of the screen 2 Choose Check for Online Updates from the pop up menu 3 Follow the instructions on the screen and register your scanner by entering your scanner s serial number...

Page 19: ...scanner button except you click an icon that represents the scanner button See Scan from the One Touch Button Panel on page 17 TWAIN Interface The TWAIN interface is also for scanning from various pro...

Page 20: ...n the scanner Scan with the Scanner Buttons Pressing a scanner button scans the item then sends the image to the Destination Application associated with the button Scanning Paper Documents or Photogra...

Page 21: ...erox 7600 scanner has an innovative hinged lid so you can lay books flat on the scanner glass to scan their pages 1 Open the scanner lid and place a book on the glass 2 Align the edges of the pages wi...

Page 22: ...e of the item with the reference marks on the scanner and close the scanner lid 2 Click on the One Touch icon in the Windows notification area at the lower right corner of the screen 3 The button pane...

Page 23: ...ties Red X click to close the One Touch panel The Button View Left click on a Destination Application icon to start scanning Right click on a Destination Application icon to open the One Touch Propert...

Page 24: ...in the internet options of Internet Explorer Copy Scans the item and sends the image to your printer Scan Scans the item and opens the PaperPort software where you can process the image or send it to...

Page 25: ...tion list 3 Select a file format in the Select Format panel 4 Select a scanning configuration in the Select Configuration list 5 Click on OK to save the changes 6 Press the button on the scanner that...

Page 26: ...hat this application opens immediately after scanning is complete Select the Destination Application that will open when you are finishedscanning You use the destination application to view and work w...

Page 27: ...ats that apply to Microsoft Outlook The icon names indicate their file types See Selecting Document and Page Format Options on page 33 for more information about the available formats Button tabs clic...

Page 28: ...changes Cancel closes the window without accepting any changes Creating a New Scan Configuration The scan configurations are where you select the scanning resolution brightness mode color black white...

Page 29: ...he scanned image However higher dpi settings take longer to scan and produce larger files for the scanned images Brightness and Contrast Drag the sliders to the right or left to adjust the brightness...

Page 30: ...etween them Improvements and Settings Only the options that apply to the selected scanning mode on the Scan Settings tab are available Reduce Moire Patterns Moire patterns are wavy rippled lines that...

Page 31: ...t to change the color settings As you do the image changes to show the effects of the new settings Saturation the strength or purity of a color Hue the color your eyes see as reflected from the image...

Page 32: ...ill automatically be cropped around its edges to fit on the page Center image on page The image will be printed in the center of the page instead of at the top right corner Maintain aspect ratio The a...

Page 33: ...the Storage Layout options you want All documents are in the root The scanned documents are saved in the root of the folder specified in the Storage Location Documents are put into folders by month w...

Page 34: ...3 Click OK to close the One Touch Properties window NOTE Your scanner comes with a number of configurations pre set at the factory To ensure that your scanner will always have a set of correct scan c...

Page 35: ...n The option Configure Before Scan can be used when you want to scan multiple pages and have them appear in one file To set Configure Before Scan 1 Open the One Touch Properties window 2 Click the tab...

Page 36: ...pages 1 Put the page on the Flatbed Glass and close the lid 2 When the TWAIN Interface opens select the appropriate scan settings for your document 3 Click the Scan button on the TWAIN Interface 4 Af...

Page 37: ...start over but select the correct Picture Type before scanning No Scanning stops but all pages scanned in this batch up to this point are not deleted and the TWAIN interface remains open You can place...

Page 38: ...Text Formats on page 35 for details Create Single Image Files The TIFF and PDF formats support multiple page documents If you are scanning as a TIFF or PDF file and want one file created for each ima...

Page 39: ...s You may want to select PDF as the format when scanning text pages that do not require OCR processing or other processing The PDF format is also used to put multi page documents on web sites as pdf r...

Page 40: ...ic file format is the file name extension on the text format icon As you select Destination Applications that are text applications the text format icon changes to match the file type of the applicati...

Page 41: ...file format used by Microsoft Excel HTML Document The htm file format used to create web pages 4 Click OK or Apply on the One Touch Properties window Selecting Options for a Button The One Touch Opti...

Page 42: ...ts in a folder or sending them to a CD burner to create a CD containing the scanned documents Fax and Print is for sending your scanned documents directly to your printer or fax software for faxing St...

Page 43: ...ges the scanned documents by the type of file such as doc or jpg If you also want to group them by date you can choose the week and month options Setting Destination Application Properties The differe...

Page 44: ...scanned items 1 Select the PaperPort folder where you want the file of the scanned image to be located 2 Click OK Text Documents Properties These properties apply to Microsoft Word Microsoft Excel and...

Page 45: ...ns 3 Click Browse to find the application you want to add to the list When you select the application using the Browse button steps 1 and 2 on the dialog box are automatically filled in and the applic...

Page 46: ...he computer s screen When a computer screen is set to a lower resolution bitmap images with a higher resolution may be too big to fit on the screen Converting the bitmap image to match the screen reso...

Page 47: ...nts are in the root The scanned documents are saved in the root of the folder specified in the Storage Location Documents are put into folders by month week or type Folders are created based on your s...

Page 48: ...find the correct AOL folder Please contact AOL for more information about the folder location in which AOL stores attachments 3 If you need to change your email client or any other internet options cl...

Page 49: ...option you want for the OCR conversion of your documents Auto orient page Select this option to check the page orientation and automatically rotate an improperly oriented page image so the text is rec...

Page 50: ...urn to CD as the Destination Application 3 Choose a Page Format and a Scan Configuration 4 Click OK 5 Now start scanning using the button you selected to use to scan and burn to a CD 6 Open the One To...

Page 51: ...n Application You cannot choose a page format for this option because the actual Destination Application is not selected until after you press the scanner button 3 Choose a Scan Configuration 4 Click...

Page 52: ...onfiguration that has the settings for the image on the HTML page 6 Click OK 7 Put the document on the scanner glass and close the lid 8 Press the scanner button you ve set up for HTML scanning When s...

Page 53: ...OCR process into editable text and numbers before being stored To transfer documents to storage 1 Press the button you ve set up to transfer to storage A button that has been set to scan to a storage...

Page 54: ...he next set of documents to store them in their folder Setting up multiple folders for transfer to storage 1 Using Microsoft Windows create the folders that you want to use for storing scanned items 2...

Page 55: ...8 Click the Browse button 9 Select the folder you created for storing the scanned documents 10 Click OK The selected folder will now be set as the Storage Location such as Business Receipts 11 Click O...

Page 56: ...separate folders Scan to multiple storage folders 1 Open the One Touch Properties window 2 Select one of the configurations you created for storage 3 Click OK The One Touch Properties window closes T...

Page 57: ...canner User s Guide 6 Click OK The One Touch panel will show the name of the other configuration 7 Now scan the next set of documents When scanning is finished the two sets of documents are stored in...

Page 58: ...u use to open it you can still use the instructions in this User s Guide for scanning with your Xerox 7600 scanner To access the TWAIN interface from other software please refer to their user s guides...

Page 59: ...utton on your scanner will bring up the TWAIN interface Open the TWAIN interface from an application Each TWAIN compliant software application has its own specific steps to open the TWAIN interface bu...

Page 60: ...ic Interface on page 56 Advanced Interface The Advanced Interface includes all the settings of the Basic Interface plus a wide range of more advanced settings such as color saturation gamma and hue Se...

Page 61: ...nd white option from the Picture Type menu 3 Choose a resolution from the Resolution DPI menu 4 Choose a page size from the Page Size menu 5 Click the Preview button The scanner scans the item and dis...

Page 62: ...ou want to scan A dotted outline shows the selected area in the image You can now move or resize the outline to select the specific area you want to scan 2 To move the dotted outline put the pointer i...

Page 63: ...ith this setting to turn its colors into grey shades Black White is for letters memos pen and ink drawings and other black and white material 4 Click the Preview button to preview the image before sca...

Page 64: ...ar in PaperPort or other TWAIN application you re using Adjusting the Image with the Advanced Interface You can adjust the scan settings on the Advanced Interface to produce the best possible image fo...

Page 65: ...of the preset resolutions for typical scanned items click one of the options in the list 2 To set the resolution manually drag the Resolution slider to the left to decrease the resolution or to the ri...

Page 66: ...available for Color and Grayscale configurations To adjust the brightness and contrast 1 Drag the Brightness slider to the left to make the item darker or to the right to make the item lighter 2 Drag...

Page 67: ...tones Saturation is the strength or purity of a color and hue is the color your eyes see as reflected from the image To adjust the color settings 1 Drag the Gamma Saturation and Color Hue sliders to t...

Page 68: ...e area you want to scan 3 The dotted outline shows the selected area in the image Note that the selected area has the number 1 in its upper left corner indicating it is your first selected area You ca...

Page 69: ...ches and pixels The Scan Info Box The following figure shows the information on the Scan Info box The Scan Info box shows the size and position of the area The selected scan area These are the images...

Page 70: ...the preset profiles for example Black White Configurations Custom 2 Adjust the settings as required and then click the Save As button The Save Profile dialog box opens 3 Type a name for the new profil...

Page 71: ...ows Image Acquisition WIA for acquiring images from scanners digital cameras and other digital devices This section shows how to use Microsoft Paint to scan using the WIA interface but you can use Pap...

Page 72: ...6 If necessary adjust the settings of the previewed image Change the button selection for the type of image Change the size of the scanned image To do this click and hold the mouse pointer over one of...

Page 73: ...s for scanning Brightness and Contrast Drag the sliders to the right or left to adjust the brightness and contrast of the scanned image Resolution DPI Click the menu arrow and choose the dots per inch...

Page 74: ...nformation Problem The scanner won t scan What s wrong Check for one of these possible problems Is the cable loose or not plugged in securely Inspect the cable connection Make sure the USB cable is pl...

Page 75: ...l One Touch 4 0 using the steps on page 71 then reinstall it using the steps starting on page 5 Problem If the USB cable is disconnected during a scan the scanner does not reconnect when the USB cable...

Page 76: ...move these software programs The One Touch 4 0 software is removed from your computer 5 Unplug the USB cable from the scanner 6 Close all open windows and restart your computer Uninstalling the PaperP...

Page 77: ...nal Maximum item size 8 5 x 11 69 inches 21 6 x 29 7 cm Light source Cold cathode fluorescent lamp Interface USB 1 1 Full Speed Scanner dimensions Height 1 4 inches 33 mm Width 10 1 inches 257 mm Leng...

Page 78: ...act the product certification Please contact your Xerox representative for more information Section 2 EMC This equipment has been tested and found to comply with the limits for a Class B digital devic...

Page 79: ...ntenance function that is not specifically described in this documentation Never remove covers or guards that are fastened with screws There are no operator serviceable areas within these covers Never...

Page 80: ...entative or by contacting Environment Heath and Safety The Document Company Xerox Bessemer Road Welwyn Garden City Herts AL7 1HE England Telephone 44 0 1707 353434 Agency Standard Underwriters Laborat...

Page 81: ...ited States you may also refer to the Electronic Industries Alliance web site http www eiae org Perchlorate Material This product may contain one or more Perchlorate containing devices such as batteri...

Page 82: ...dimensions of the original Postal Money Orders Bills Checks or Drafts of money drawn by or upon authorized officers of the United States Stamps and other representatives of value of whatever denomina...

Page 83: ...Exchequer bill paper or revenue paper 4 The public seal of Canada or of a province or the seal of a public body or authority in Canada or of a court of law 5 Proclamations orders regulations or appoi...

Page 84: ...notes and cheques Bank and government bonds and securities Passports and identification cards Copyright material or trademarks without the consent of the owner Postage stamps and other negotiable inst...

Page 85: ...80 Xerox 7600 Scanner User s Guide...

Page 86: ...el 32 Contrast 24 61 68 D Destination Application 20 OCR 21 text file format 35 Device Settings Tab 27 Document Format 20 Document Management 37 documentation 3 dots per inch 60 dpi 60 68 DVD ROM driv...

Page 87: ...at 36 rtf file format 36 ruler units 64 S saturation 26 62 Scan Configuration 20 Scan Info box 64 scan multiple pages 31 Scan Settings Tab 24 scan with event forwarding 46 scanner connecting 9 trouble...

Page 88: ...05 0751 000...

Reviews: