background image

Tools

WorkCentre 5019/5021
User Guide

8-3

Changing the settings

1.

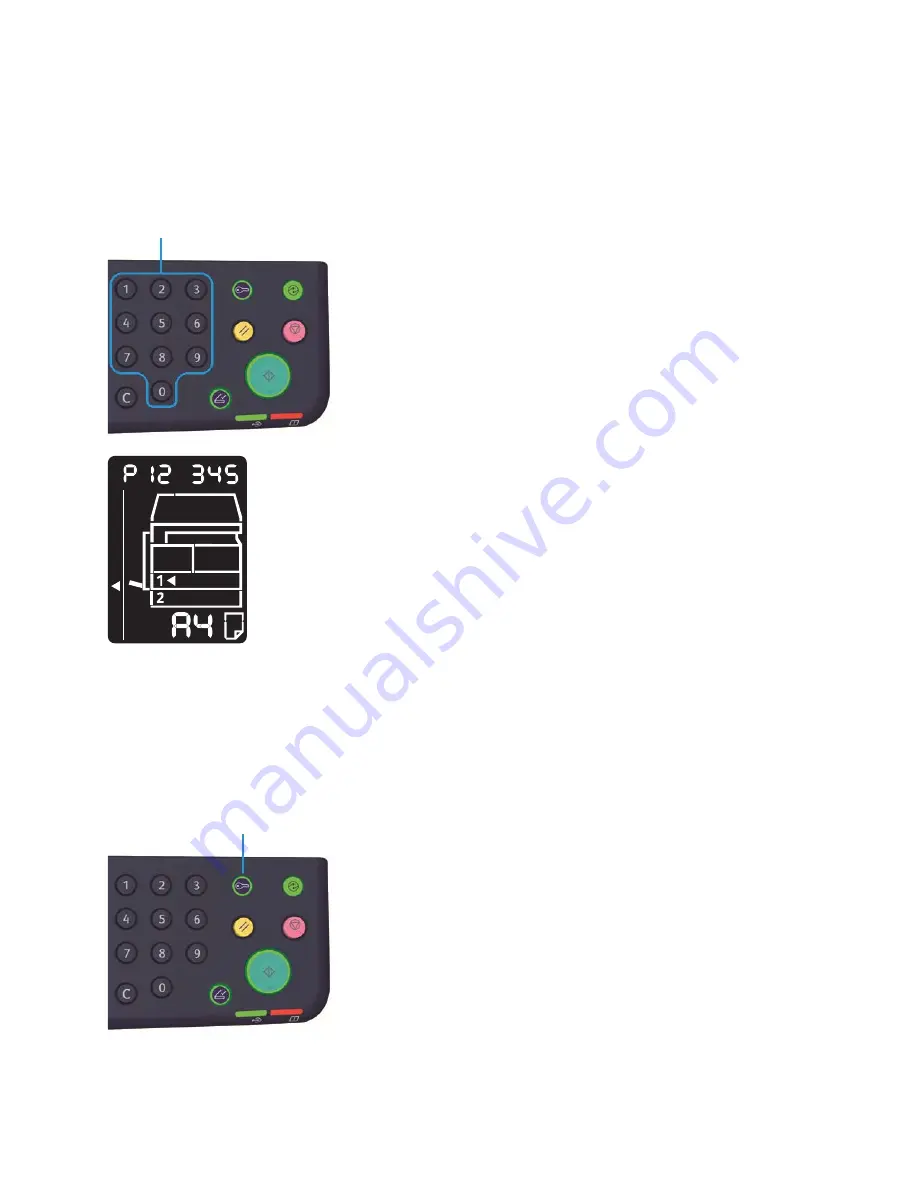
Enter a program number using the numeric keypad.

For more information, refer to 

System administrator program list 

on page 8-4.

2.

Press the 

Start

 button to confirm the entered value.

Exiting System Administration mode

Press the 

Log In/Out

 button.

Note 

The 

Log In/Out

 button light goes off when the machine exits System Administration mode.

Numeric keypad

Log In/Out button

Summary of Contents for WorkCentre 5019

Page 1: ...September 2012 702P00733 WorkCentre 5019 5021 User Guide...

Page 2: ...ation in the United States and or other countries Microsoft Windows Windows Server Windows XP Windows Vista and Windows 7 are trademarks or registered trademarks of Microsoft Corporation Microsoft pro...

Page 3: ...1 Radio frequency emissions Class A 1 11 Product safety certification UL CB 1 11 Environment 1 12 About licenses 1 12 Libcurl 1 12 FreeBSD 1 13 MD5 1 13 Legal notice 1 15 2 Environment settings Suppor...

Page 4: ...ne in Multiple Account mode 3 18 4 Loading paper Paper types 4 1 Supported paper weights and sheet counts 4 2 Supported paper type 4 2 Unusable paper 4 6 Storing and handling paper 4 6 Loading paper 4...

Page 5: ...1 Placing the document 6 1 Using the scan feature 6 5 Loading scan data using a PC based application 6 6 Stopping the scan job 6 7 7 Print Major print driver functions 7 1 Printing 7 2 Stopping the p...

Page 6: ...16 Unable to print 11 16 Print output problems 11 16 Scan problems 11 18 Unable to scan 11 18 Unable to load scan data to a PC 11 18 Scan image quality problems 11 19 Error codes 11 21 Paper jams 11 2...

Page 7: ...the machine This guide describes how to operate the machine and the precautions you should follow during operation To get the most out of the machine and to use it effectively be sure to read this gu...

Page 8: ...how to set the paper perform everyday maintenance make machine status settings and perform troubleshooting Print Driver Help The help describes print features and operations Guides for optional compon...

Page 9: ...scan feature 7 Print Describes the basic printing operations 8 Tools Describes System Administration mode as well as how to change the default settings 9 Machine status Describes how to check the faul...

Page 10: ...is guide as follows Long Edge Feed LEF LEF orientation Loading the document or paper in portrait orientation when viewed from the front of the machine Short Edge Feed SEF SEF orientation Loading the d...

Page 11: ...et This is a safety feature If the plug doesn t fit to the outlet contact an electrician to replace the outlet to avoid risk of electric shock Never use an earthed adapter plug to connect the product...

Page 12: ...witch off and unplug the machine when it is not used over weekends or long holidays Failure to do so may cause deterioration of the insulation and eventually electric shock or fire Once a month switch...

Page 13: ...injuries Locate this product on a level and sturdy surface that can withstand its weight Otherwise if tilted the product may fall over and cause injuries Locate this product in a well ventilated area...

Page 14: ...emperature 50 90 F 10 32 C Humidity 35 85 When the product is left in a chilly room and the room is rapidly warmed up by heater dew condensation may form inside the product and cause a partial deletio...

Page 15: ...so increases the risk of fire and explosion from electric sparks igniting inside the vacuum cleaner If you spill a large volume of toner contact your local Xerox representative Never throw a toner car...

Page 16: ...of warning and caution labels Always follow all warning instructions marked on or supplied with this product WARNING To avoid the risk of burn injury and electric shock never touch the area with the H...

Page 17: ...l environment This product generates uses and can radiate radio frequency energy and if not installed and used in accordance with the customer documentation may cause harmful interference to radio com...

Page 18: ...oftware for any purpose with or without fee is hereby granted provided that the above copyright notice and this permission notice appear in all copies THE SOFTWARE IS PROVIDED AS IS WITHOUT WARRANTY O...

Page 19: ...ESS FOR A PARTICULAR PURPOSE ARE DISCLAIMED IN NO EVENT SHALL THE FREEBSD PROJECT OR CONTRIBUTORS BE LIABLE FOR ANY DIRECT INDIRECT INCIDENTAL SPECIAL EXEMPLARY OR CONSEQUENTIAL DAMAGES INCLUDING BUT...

Page 20: ...age Digest Algorithm in all material mentioning or referencing the derived work RSA Data Security Inc makes no representations concerning either the merchantability of this software or the suitability...

Page 21: ...ples of items that may be illegal to copy or print in your country Currency Banknotes and checks Bank and government bonds and securities Passports and identification cards Copyright material or trade...

Page 22: ...Before using the machine WorkCentre 5019 5021 User Guide 1 16...

Page 23: ...ine to a computer with a USB cable Scan feature The machine supports the scan feature using the USB interface connection This feature can be used to load scan data from a TWAIN compatible or WIA compa...

Page 24: ...ect the USB cable 1 Press the power switch to the Off position to turn the power off Note Check that the machine status diagram display is off 2 Connect a USB cable to the USB 1 1 2 0 interface connec...

Page 25: ...he CD ROM Documentation HTML included on the CD ROM Be sure to restart the computer immediately after installing the scan driver Print Driver Name Description Xerox WorkCentre XXXXX Click Print Driver...

Page 26: ...nstallation tool on the Driver CD Kit CD ROM Follow the instructions provided in the CD ROM Documentation HTML included on the CD ROM Uninstalling other software To uninstall other software installed...

Page 27: ...ct overview This chapter lists the name of each machine component and describes basic operations such as how to turn the power on off and use the control panel Machine components This section describe...

Page 28: ...es and prints are delivered here facing down 5 Front cover Open this cover to replace consumables 6 Tray 1 standard tray Load paper here 7 Tray 2 One Tray Module Optional Optional tray Load paper here...

Page 29: ...turn the machine s power off No Component Description 1 Power switch Switches the power of the machine on and off For more information refer to Power source on page 3 6 2 Power cord connector Connect...

Page 30: ...er Guide 3 4 Inside No Component Description 1 Toner cartridge Contains toner the powder used to form the image 2 Drum cartridge Contains photoconductors 3 Fusing unit Fuses toner on paper Do not touc...

Page 31: ...nent Description 1 Document feeder cover Open this cover to remove any jammed paper 2 Inner cover Open this cover to remove any jammed paper 3 Document guides Aligns the edges of documents 4 Document...

Page 32: ...tly longer than normal depending on the device configuration Switch the power off at the end of the day or when not using the machine for an extended period of time 1 Press the power switch to the On...

Page 33: ...While a job is being copied While a job is being scanned When switching the power off wait 5 seconds after outputs have been delivered When powering the machine on after it has been switched off wait...

Page 34: ...between the power off temperature and the Ready temperature Sleep mode Sleep mode minimizes power consumption by shutting off the power to all components except the controller Warm up time in Sleep m...

Page 35: ...t of the machine For more information contact our Customer Support Center For more information on how to set the time interval for Low Power mode and or Sleep mode refer to System settings on page 8 5...

Page 36: ...the ID Card Copy feature While the ID Card Copy feature is selected the button is lit For more information refer to ID card copy on page 5 15 3 Original Size button Press this button to specify the sc...

Page 37: ...ave entered 14 Paper Supply button Press this button to select a tray to use The tray indicator next to the selected tray moves to the next tray on the machine status diagram every time the button is...

Page 38: ...time the button is pressed For more information refer to Original type on page 5 14 22 Collated button Press this button to set collate when copying multiple copies The selection switches between sor...

Page 39: ...nlarge display area Displays the specified zoom ratio within a range of 25 to 400 When automatic detection is selected Aut is displayed Also displays the total number of copied pages User ID System Ad...

Page 40: ...e 10 3 Drum Cartridge This icon lights when the drum cartridge needs to be replaced in the near future Prepare a new drum cartridge No error code is displayed at this point The icon blinks when the dr...

Page 41: ...ea blinking When a paper document jam occurs or any cover is open the notification area blinks as shown below When any paper or document jam occurs will also appear Front cover Left cover A One tray m...

Page 42: ...bs Single Account mode A single password is set on the machine in the Single Account mode Only those who have the password can execute copy jobs on the machine Note Password entry is not required for...

Page 43: ...password is the same as the system administrator s password used for entering System Administration mode from the control panel For information refer to Entering System Administration mode on page 8...

Page 44: ...g In Out button remains lit while you are logged in to the machine Notes You do not need to log in to the machine for a scan job or print job To log out press the Log In Out button again Logging in to...

Page 45: ...ow to select an account mode in the system settings refer to Account mode settings on page 8 8 1 Enter an account number using the numeric keypad The account number you entered appears in the display...

Page 46: ...achine status diagram 3 Enter the password that corresponds to the account number that you just entered using the numeric keypad For security reasons as you enter each digit of the password a hyphen a...

Page 47: ...the password is correct the machine enters Copy mode and 1 appears in the display The Log In Out button remains lit while you are logged in to the machine Notes You do not need to log in to the machin...

Page 48: ...Product overview WorkCentre 5019 5021 User Guide 3 22...

Page 49: ...s may result in paper jams lower print quality malfunctions or damage to the machine If you wish to use paper other than the paper recommended by Xerox contact our Customer Support Center Notes Do not...

Page 50: ...Duplexing 2 sided printing The following paper types are supported for automatic duplexing Lightweight 60 to 63 gsm Plain 64 to 90 gsm Heavyweight 91 to 110 gsm Bypass tray only Supported paper type S...

Page 51: ...well and reload it in the tray 80 Plain Business 80 Plain Before copying or printing fan the paper well and reload it in the tray Express 70 Plain 80 Plain Performer 75 Plain 80 Plain Business 70 Pla...

Page 52: ...iplomat 80 Plain PAPER ONE COPIER PAPER 70 Plain Colour Impression 90 Plain PaperOne 80 Plain XeroxOne 80 Plain X treme Platinum 80 Plain Attitude 70 Plain PerfectPrint 80 Plain LQ PAPER 80 Plain Hori...

Page 53: ...ain XEROX ONE 80 Plain WARRIOR 70 Plain Performer 80 Plain Before copying or printing fan the paper well and reload it in the tray Professional 80 Plain Xerox Undertones Several Colours 80 Plain Recyc...

Page 54: ...bends or warping Please adhere to the following points when loading paper in a tray Align the stack of paper neatly before loading it in a tray Do not use creased or wrinkled paper Do not use warped...

Page 55: ...ot be selected with automatic tray selection Tray 2 is an optional component When the machine runs out of paper during copying or printing select the tray containing the paper of the same size and ori...

Page 56: ...ould cause the machine to tilt or fall causing injury 2 For Tray 1 push down the metal plate to the bottom of the tray 3 Load the paper with the side to be copied or printed facing up Align the leadin...

Page 57: ...opying on the paper that cannot be set in Tray 1 or 2 use the Bypass tray For printing specify the settings on the Paper Output tab using the print driver Also specify the type of paper to be loaded N...

Page 58: ...st the paper feed entrance Notes Do not load mixed paper types in a tray Do not load paper above the maximum fill line Doing so could cause paper jams or machine malfunctions The machine may not be ab...

Page 59: ...nformation on how to change the paper size and orientation settings refer to Setting the paper size on page 4 13 Changing the paper size for Trays 1 and 2 1 Pull out the tray until it stops Notes Whil...

Page 60: ...aper with the left side of the tray Note Do not load paper above the maximum fill line Doing so could cause paper jams or machine malfunctions 6 Push the tray in gently until it stops Notes When pushi...

Page 61: ...le the machine is processing a job 1 Press the Paper Supply button to select a tray where the paper you will specify the paper size and orientation is loaded In the machine status diagram the tray ind...

Page 62: ...selected tray The selected paper size and orientation are displayed in the machine status diagram The Start button lights up blinking during the settings 4 Press the Start button to confirm the setti...

Page 63: ...keep the print quality Refer to Supported paper type on page 4 2 1 Enter System Administration mode Refer to Entering System Administration mode on page 8 2 2 Press the program number of the tray that...

Page 64: ...fter the entered program number blinks twice the new setting is confirmed 5 After you confirm the setting press the Log In Out button and exit System Administration mode Note When you exit System Admi...

Page 65: ...is required Contact your local Xerox representative Document feeder Supported document sizes You can place documents of the standard sizes in the document feeder When a document is placed in the docu...

Page 66: ...e it Follow the steps below to place documents in the document feeder You can place single or multiple sheet documents 1 Remove any paper clips or staples from the document before placing it in the do...

Page 67: ...document glass A5 A4 A4 A3 B5 B5 B4 8 5 11 8 5 11 8 5 13 8 5 14 11 17 16K 16K and 8K Note The document size is not detected when using the document glass For setting the paper size and orientation re...

Page 68: ...over Note When using the document glass make sure to close the document cover after finishing your copy job 2 Place the document face down and align it against the top left corner of the document glas...

Page 69: ...sword For more information on advanced settings refer to Advanced copy settings on page 5 9 For more information on entering a password refer to Entering System Administration mode on page 8 2 Enterin...

Page 70: ...fed through the machine If a problem occurs an error code appears in the machine status diagram For information on error codes refer to Error codes on page 11 21 Placing a document on the document gla...

Page 71: ...Copy WorkCentre 5019 5021 User Guide 5 7 After all the documents have been scanned press the Last Original button to start copying Last Original button...

Page 72: ...Copy WorkCentre 5019 5021 User Guide 5 8 Stopping a copy job To cancel the currently copying job press the Stop button Stop button...

Page 73: ...ing multiple sets of copies P 11 Reduce Enlarge Sets a reduction or enlargement factor P 12 Original Size Sets the document size P 13 Original Type Sets the document type P 14 Lighten Darken Adjusts t...

Page 74: ...ize display Aut automatic paper selection Automatically determines the tray holding the appropriate paper based on the document size and the specified zoom ratio Note When using the automatic paper se...

Page 75: ...l documents are scanned press the Last Original button Off the light is off Uncollated The machine outputs the specified number of copies and sorts sheets by page On The machine outputs sheets sorted...

Page 76: ...100 The machine makes the copy the same size as the document Aut automatic zoom ratio The machine automatically sets an appropriate zoom ratio by calculating the document size and the specified paper...

Page 77: ...the image may be cut off Make sure to choose an appropriate document size Press the Original Size button to select a document size In the machine status diagram the selected document size and the orie...

Page 78: ...ocument is placed in the document feeder the machine automatically detects a document size from the supported standard sizes Original type To set the type of document to optimize copies press the Orig...

Page 79: ...to scan documents containing light objects Dark 1 Creates copies with a fairly dark density Use this setting to scan documents containing fairly light objects Normal Creates copies with the same densi...

Page 80: ...change the zoom ratio manually Follow the steps below to use the ID Card Copy feature 1 Place an ID card face down slightly away from the top left corner of the document glass and then close the docum...

Page 81: ...r Supply button to select a tray In the machine status diagram the tray indicator lights up on the selected tray and its paper size and orientation are displayed on the paper size display 4 Press the...

Page 82: ...ing edge setting and place the document in landscape orientation It is not copied properly for short edge binding when either the document or the paper is set for portrait orientation or is using the...

Page 83: ...or 4 documents together on the same page Selecting Pages per Side automatically sets a zoom ratio that will enable the documents to fit on the page Notes Align the top edge of the paper against the t...

Page 84: ...efer to Feature settings on page 8 11 Background suppression You can set the background suppression level When this feature is enabled the document s background noise is removed during copying When th...

Page 85: ...parately You can set erase frame in System Administration mode For more information refer to Feature settings on page 8 11 Auto rotation You can set the machine to rotate the scanned data when copying...

Page 86: ...accounting is given below Display set the password Display the total number of copied impressions Display set the maximum number of impressions permitted for copying Clear the total number of impress...

Page 87: ...ilable to load documents Document feeder Single sheet Multiple sheets Document glass Single sheet Bound documents such as books Note The document feeder is not available for some models An optional co...

Page 88: ...o 128 gsm for 2 Sided documents can be placed in the document feeder and scanned The document feeder accepts the following number of sheets Note To avoid paper jams use the document glass for mixed si...

Page 89: ...the side to scan or the front surface of a 2 Sided document facing up Note The document indicator lights up when a document is placed in the document feeder If the indicator is not lit place the docum...

Page 90: ...ustom CAUTION Do not apply excessive force to hold thick document on the document glass It may break the glass and cause injuries Follow the steps below to place a single sheet document or bound docum...

Page 91: ...chine supports the scan feature using the USB connection The monochrome binary scan only The file name of the scanned data is displayed in the format YYMMDDHHMMSS extension where YY Year 4 digits MM M...

Page 92: ...to install the scan driver refer to Installing the scan driver on page 2 3 The items you can set will vary according to the TWAIN compatible and WIA compatible applications you are using The supporte...

Page 93: ...rkCentre 5019 5021 User Guide 6 7 Stopping the scan job To cancel the current scanning job On the machine Press the Stop button On the computer Press Cancel on the screen displayed while scanning Stop...

Page 94: ...Scan WorkCentre 5019 5021 User Guide 6 8...

Page 95: ...ounted options information has been set into the print driver Functions that have been disabled do not display Function Description Multiple Up Prints a multiple page document on a single page 2 Sided...

Page 96: ...19 5021 print driver screen 1 Select Print from the application s File menu 2 Select Xerox WorkCentre XXXXX Note XXXXX is displayed as either 5019 or 5021 depending on the model of your machine 3 If n...

Page 97: ...chine Press the Stop button On the computer 1 Double click the printer icon located on the task bar in the lower right corner of the screen 2 Select the document name that you desired to cancel and th...

Page 98: ...Print WorkCentre 5019 5021 User Guide 7 4...

Page 99: ...nal component is required For more information contact our Customer Support Center This chapter describes the functions you can change settings for and provides the settings procedures System settings...

Page 100: ...2 Use the numeric keypad to enter the password and then press the Start button Notes The password is initially set to 1111 The password can be changed For more information refer to System settings on...

Page 101: ...r more information refer to System administrator program list on page 8 4 2 Press the Start button to confirm the entered value Exiting System Administration mode Press the Log In Out button Note The...

Page 102: ...number Menu item Description Value default setting 1 Year Set the year for the machine s system clock 2010 2031 2 Month Set the month for the machine s system clock 1 12 3 Day Set the day for the mach...

Page 103: ...consumption by shutting off power to all components except the controller Warm up time in Sleep mode is longer than in Low Power mode 1 239 minutes 102 Auto Reset Timer Set the amount of time the mach...

Page 104: ...artridge To exit the error code screen press any button on the control panel 0 Do not display 1 When switching the machine on and off 2 When the Auto Reset timeout is reached 208 Error Display of Drum...

Page 105: ...or password 0 9 Default 1 404 5th digit of the System Administrator Password Set the 5th digit for the system administrator password 0 10 When the password is 4 digit enter 10 Default 1 405 6th digit...

Page 106: ...0001 602 Account Number 2 Password Specify account number 2 s password using three digits 4 6 digit numbers Default 0002 603 Account Number 3 Password Specify account number 3 s password using three...

Page 107: ...number 4 0 No Limit 255 1 1 000 615 Account Number 5 Copy Job Limit Specify the maximum number of copy pages allowed for account number 5 0 No Limit 255 1 1 000 616 Account Number 6 Copy Job Limit Spe...

Page 108: ...umber of copies made under account number 5 7007 Account Number 6 Copy Count Shows the total number of copies made under account number 6 7008 Account Number 7 Copy Count Shows the total number of cop...

Page 109: ...reset 3003 Erase Frame Copying Set the amount for Erase Frame 0 50 mm Default 2 mm 3004 Original Type Copying Set the default setting for Original Type 1 Text 2 Text Photo 3 Photo 3005 Lighten Darken...

Page 110: ...6 8 5 14 7 8 5 13 9 A4 10 8 5 11 14 B5 16 8 5 11 17 5 5 8 5 18 A4 19 A5 23 B5 134 Expected document size Set the default document size when the program number 206 is set to 3 1 11 17 2 A3 5 B4 6 8 5 1...

Page 111: ...ument size Set the default document size when the program number 206 is set to 5 1 11 17 2 A3 5 B4 6 8 5 14 7 8 5 13 9 A4 10 8 5 11 14 B5 16 8 5 11 18 A4 19 A5 23 B5 134 Expected document size 3009 2...

Page 112: ...de of square Set the size one side of square when scanning a document using the ID Card Copy feature 86 297 mm Default 100 mm 3014 Binding side for 2 Sided copying Set the binding side when the docume...

Page 113: ...ion mode Job History Report Shows the job execution results Prints the results of the most recent jobs up to 10 jobs worth Notes When the Job History exceeds 10 jobs each new job replaces the oldest j...

Page 114: ...nting press the Log In Out button to exit System Administration mode Note When you exit System Administration mode the Log In Out button light goes off Checking the job counter You can check the numbe...

Page 115: ...the statuses of consumables such as toner cartridge and drum cartridge under the Consumables on the System Settings Report output Toner Status Shows the toner cartridge status OK Replacement is not c...

Page 116: ...nistration mode on page 8 2 2 Enter the program number of the group that you want to check press the Start button Copied impressions Copy limit Program number Description 7002 Copied impressions by Us...

Page 117: ...return to the program number input screen press the Stop button 4 When you finish checking press the Log In Out button and exit System Administration mode Note When you exit System Administration mode...

Page 118: ...Machine status WorkCentre 5019 5021 User Guide 9 6...

Page 119: ...ontact your local Xerox representative WARNING Never throw a toner cartridge into an open flame Remaining toner in the cartridge may catch fire and cause burn injuries or explosion If you have a used...

Page 120: ...ns Near heat generating devices Areas exposed to direct sunlight Dusty areas When using consumables periodic replacement parts carefully read precautions for use Precautions for use are instructed on...

Page 121: ...oner cartridges not recommended by Xerox may degrade image quality and performance Use only toner cartridges recommended by Xerox When the remaining amount of toner is low the machine may stop printin...

Page 122: ...ull the toner cartridge out of the machine WARNING Never throw a toner cartridge into an open flame Remaining toner in the cartridge may catch fire and cause burn injuries or explosion If you have a u...

Page 123: ...Maintenance WorkCentre 5019 5021 User Guide 10 5 4 Unpack a new toner cartridge and shake it lightly up down and left right 10 times Note Do not touch the shutter...

Page 124: ...r Guide 10 6 5 Orient the toner cartridge with the arrow facing up and insert it as far as it will go 6 Close the front cover Note If the front cover is not completely closed an error code will appear...

Page 125: ...ine diagram Required action When the drum cartridge icon is lit blinks for three seconds the drum cartridge will need to be replaced after about 1 000 pages 1 Have a replacement drum cartridge ready J...

Page 126: ...not expose drum cartridges to direct sunlight or strong light from indoor fluorescent lighting Do not touch or scratch the surface of the drum Doing so may result in unsatisfactory printing J 8 When t...

Page 127: ...aint thinner or other volatile liquids or spray insect repellent on the machine as they might discolor deform or crack the covers Cleaning the machine with an excessive amount of water may cause the m...

Page 128: ...es Do not use cleaning agents other than water or neutral detergent If you cannot remove dirt easily gently wipe the document cover with a soft cloth moistened with a small amount of neutral detergent...

Page 129: ...ith water to remove any dirt and then wipe it with a soft dry cloth Notes Do not press the film with excessive force as it can be easily damaged Do not use cleaning agents other than water or neutral...

Page 130: ...or printing 1 Lift the latch for the document feeder top cover until it is completely open Note When you fully open the cover it comes to a fixed position Open the cover gently 2 While turning the rol...

Page 131: ...Cause action The machine does not work properly Refer to Machine problems on page 11 2 An error code is displayed For information on paper jams refer to Paper jams on page 11 29 For information on do...

Page 132: ...cument Refer to Paper jams on page 11 29 Refer to Document jams on page 11 36 Is the machine front cover or another cover open Follow the instructions in the displayed error code to take the required...

Page 133: ...a few seconds switch on the power When the machine is ready to receive data insert or remove the tray Unable to copy with the specified size Is the document glass or the document cover dirty Clean th...

Page 134: ...machine Open the cover of the machine or pull out the tray to remove any torn pieces or foreign objects Refer to Paper jams on page 11 29 Is non standard paper loaded in the tray Replace with paper t...

Page 135: ...he document on page 5 1 Are you using the irregular shaped documents business cards transparencies or thin documents Are there any sticky tags paper clips or adhesive tape on the document Remove any s...

Page 136: ...move the background paper color before copying Refer to Lighten Darken on page 5 15 Is the document on glossy printing paper Glossy printing paper easily sticks to the document glass and shadows can r...

Page 137: ...it securely all the way into the machine Refer to Loading paper in Trays 1 and 2 optional on page 4 7 Copies have missing parts in them Is the paper damp Damp paper creates missing parts or unclear c...

Page 138: ...artridge with a new one Refer to Replacing the toner cartridge on page 10 3 Black spots appear in copies The drum cartridge has deteriorated or been damaged Replace the drum cartridge with a new one R...

Page 139: ...spots appear in areas of black fill The paper is unsuitable Load the correct type of paper The drum cartridge has deteriorated or been damaged Replace the drum cartridge with a new one Refer to Replac...

Page 140: ...fer to Replacing the toner cartridge on page 10 3 A power failure or high voltage power supply failure may have occurred Contact our Customer Support Center The printout contains white areas or white...

Page 141: ...has deteriorated or been damaged Replace the drum cartridge with a new one Refer to Replacing the drum cartridge on page 10 7 The toner cartridge has run out of toner Replace the toner cartridge with...

Page 142: ...ed on the document feeder is A5 The document is not a supported type The document feeder does not support warped documents business cards transparencies thin documents or documents with attached stick...

Page 143: ...opy density or image quality or specify background suppression before copying The document is printed on glossy printing paper Glossy printing paper easily sticks to the document glass and shadows can...

Page 144: ...appear in copies The document s enlargement factor is too large When making enlarged copies some enlargement factors can create striped patterns Adjust the copy enlargement factor Refer to Reduce enl...

Page 145: ...h the edges of the document Refer to Placing the document on page 5 1 The document is creased Smooth out the document and place it again correctly Refer to Placing the document on page 5 1 The documen...

Page 146: ...An error has occurred in the machine Check the error information and take the required action Data has been sent to the machine No paper has been loaded Load paper There is no paper of the specified...

Page 147: ...in Items under Options in the print driver The computer is not using the print driver supplied with the machine is using another company s print driver Confirm whether the print driver on the compute...

Page 148: ...not support warped documents business cards transparencies thin documents or documents with attached stick on notes paper clips or tape Refer to Paper types on page 4 1 The document guides are misali...

Page 149: ...ument cover shows up in the output Place a sheet of white paper over the document before scanning The document is on colored or rough paper or is a blueprint Adjust the scan density or image quality b...

Page 150: ...cument before scanning The document has shifted out of position Place the document correctly Refer to Placing the document on page 6 1 The document feeder s document guides are misaligned Place the do...

Page 151: ...displayed any print data remaining in the machine and information stored in the machine s memory is not secured If an error code is displayed that is not listed in the following table or if you canno...

Page 152: ...The mixed size documents cannot be loaded at the same time If containing different sizes use the document glass To continue the processing job reload the documents that have not been copied or scanned...

Page 153: ...settings displayed in the paper size display area and reload paper adjusting with the paper guides Refer to Loading paper in Trays 1 and 2 optional on page 4 7 When changing the setting of paper size...

Page 154: ...ratio to fit entirely in the paper place all documents and then press the Start button E 1 Papers jammed in the machine s left cover Open the machine s left cover and remove the jammed paper Refer to...

Page 155: ...be turned off replace the drum cartridge Refer to Replacing the drum cartridge on page 10 7 J 6 The drum cartridge is defective Replace the drum cartridge Refer to Replacing the drum cartridge on page...

Page 156: ...is blank and then switch on the machine power 005 280 An error occurred Switch off the machine power make sure that the display is blank and then switch on the machine power If the same error code is...

Page 157: ...and then switch on the machine power If the same error code is displayed again contact our Customer Support Center 042 325 042 400 042 608 042 614 045 313 061 321 061 325 062 277 062 311 062 360 062 3...

Page 158: ...e on page 10 3 116 321 116 323 116 334 116 377 An error occurred Switch off the machine power make sure that the display is blank and then switch on the machine power If the same message is displayed...

Page 159: ...and scans the documents one sheet at a time if a paper jam occurs on the machine the machine resumes to make a copy of the already scanned document automatically after removing the jammed paper Howev...

Page 160: ...ilm belt inside the left cover Do not touch the Transfer Belt Image quality could be affected or the Transfer Belt could be damaged and need replacement 1 Open the Bypass tray 1 and then while lifting...

Page 161: ...cover a If the paper is jammed in the location shown in the diagram remove the jammed paper pulling upwards b If the paper is jammed in the location shown in the diagram remove the jammed paper pulli...

Page 162: ...odule cover 2 Remove the jammed paper Notes The paper may be jammed in the upper part where it is difficult to see Check thoroughly for jammed paper If the paper tears check to make sure there are no...

Page 163: ...event equipment failure check the location of paper jams on the display before attempting to clear them 3 Remove the jammed paper If the tray is empty load paper Note If the paper tears check to make...

Page 164: ...t equipment failure check the location of paper jams on the display before attempting to clear them 3 Remove the jammed paper If the tray is empty load paper Note If the paper tears check to make sure...

Page 165: ...sheets of paper were loaded remove all the paper while you clear the jam If the paper tears check to make sure there are no remaining shreds in the machine 3 If multiple sheets of paper were loaded al...

Page 166: ...emove the jammed documents in the document feeder Note The document feeder does not come as standard on some machine configurations Follow the steps below to remove the jammed document 1 Pull up the f...

Page 167: ...the document feeder 7 If you cannot find the document in Step 6 lift up the document feeder tray and remove the document 8 Carefully move the document feeder tray back into position 9 Make sure that...

Page 168: ...Problem solving WorkCentre 5019 5021 User Guide 11 38...

Page 169: ...Warm up Time 30 seconds or less 220 V to 240 V Note At room temperature 20 C Original Paper Size The maximum size is 297 432 mm A3 11 17 for both sheets and books Output Paper Size Maximum A3 11 17 M...

Page 170: ...nd 2 Continuous 2 Sided copy same magnification A4 B5 13 1 sheets minute A4 8 7 sheets minute B4 7 9 sheets minute B5 A3 7 2 sheets minute Notes The speed may be reduced due to image quality adjustmen...

Page 171: ...extended Type Built in Output Paper Size Same as the Basic Functions Copy Functions Continuous Print Speed Same as the Basic Functions Copy Functions Note The speed may be reduced due to image quality...

Page 172: ...Windows Server 2008 x64 Edition Microsoft Windows 7 Microsoft Windows 7 x64 Microsoft Windows Server 2008 R2 Note For information about the latest supported OS refer to the www xerox com Type Duplex...

Page 173: ...d printable area is the area of the page within 4 0 mm from the top bottom left and right edges of the paper The actual printable area may vary depending on the printer plotter and control language Un...

Page 174: ...tes The optional components are subject to change without notice For the latest information contact our Customer Support Center Product Name Description One Tray Module A tray that can load 500 sheets...

Page 175: ...s that the machine does not support are included in the file names these characters may not be displayed correctly Only ASCII characters can be used Hard disk You cannot install a hard disk into this...

Page 176: ...icient when copying using the collate feature it outputs only the document data which is being scanned Notes and restrictions on the use of the Print feature Output of long feed documents The output o...

Page 177: ...ing is not correctly specified Refer to the Error Code C 7 and check paper size setting Refer to Error codes on page 11 21 Notes and restrictions on the use of the Scan feature This section describes...

Page 178: ...Appendix WorkCentre 5019 5021 User Guide 12 10...

Page 179: ...ay 3 5 Document glass 3 2 5 3 6 4 Document guides 3 5 5 3 6 3 Document indicator 3 13 6 3 Document jam 3 14 11 36 Document output tray 3 5 Document stopper 3 5 5 3 6 3 Drum cartridge 3 4 3 14 Drum car...

Page 180: ...Paper types 4 1 PDL 12 3 Power Consumption 12 3 Power cord connector 3 3 Power Source 3 6 Power Supply 12 2 Power switch 3 3 Print Driver 2 3 Installing 2 3 Uninstalling 2 4 Print Resolution 12 3 Prin...

Page 181: ...n 3 11 Storing and handling paper 4 6 Supported paper type 4 2 Switching the Power Off 3 7 Switching the Power On 3 6 System Settings Report 9 1 T Toner cartridge 3 4 Toner cartridge icon 3 14 Toner S...

Page 182: ...Index WorkCentre 5019 5021 User Guide iv...

Page 183: ......

Page 184: ......

Reviews: