


Switching On and Off the Power
19
IE
IE
3
Basic Operations
Switching On and Off the
Power
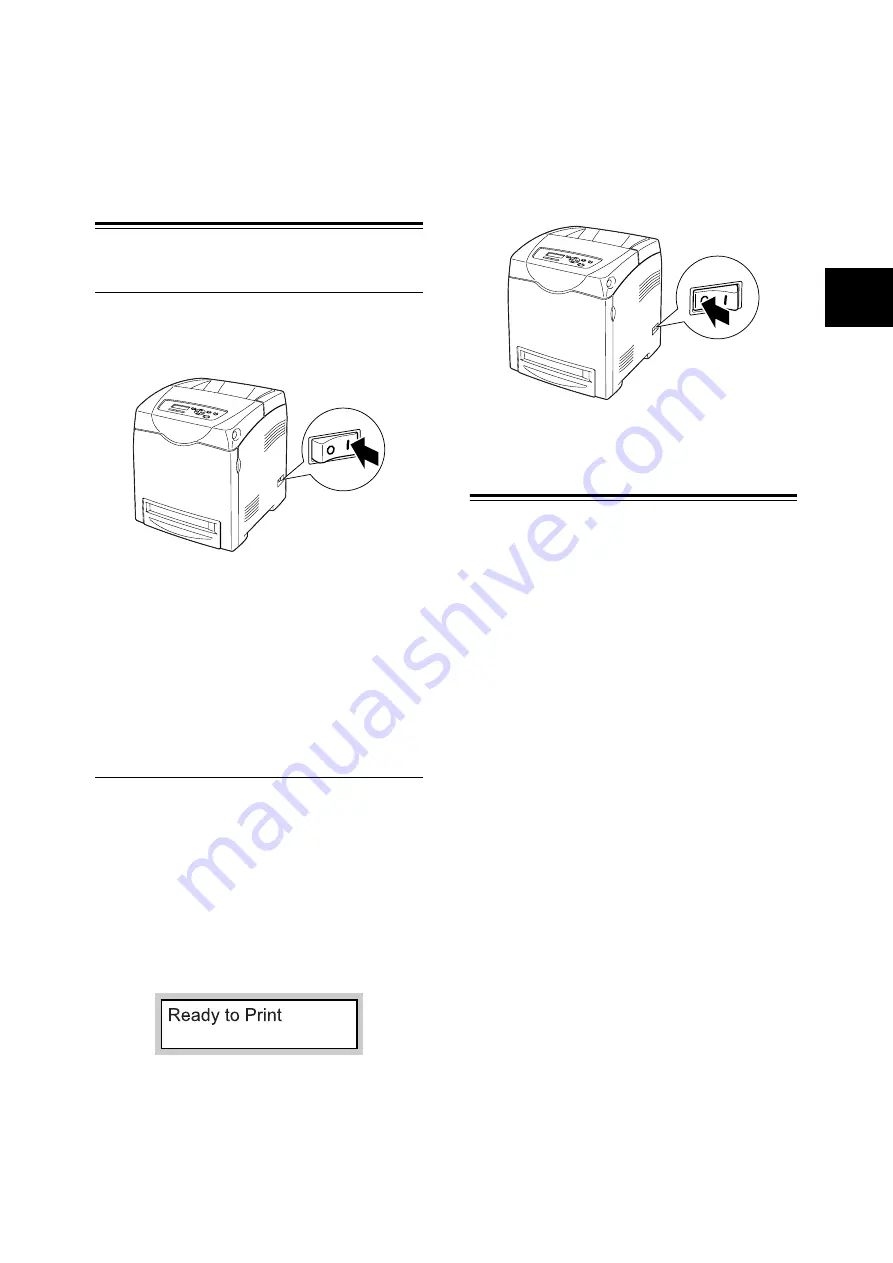
Switching On the Power
1.
Press the power switch of the printer to the
<
I
> position.
2.
When the power is on, “Diagnosing...” is
displayed on the control panel, then it
changes to "Please wait...". When the printer
is ready for printing, “Ready to print” will be
displayed.
Important
• When an error message is displayed, remedy the error
by referring to “Error Messages” (P. 41).
Switching Off the Power
Important
• Do not switch off the power of this printer when printing
is in progress. It may lead to a paper jam.
• Once the power is switched off, print data remaining in
this printer or information saved in the memory of this
printer will be deleted.
1.
By checking the display on the control panel,
confirm that the printer is not processing any
data.
2.
Push the power switch of this printer to the
<
{
> position to switch the power off.
Low Power Mode/Sleep
Mode
This printer has the low power mode and the sleep
mode to reduce power consumption when it is left
idle.
When no print data is received for 3 minutes, the
printer will enter the low power mode. When no
data is received for a further 2 minutes (a total of
5 minutes lapse (default) since the last receiving
data), it will enter the sleep mode by default.
When it enters the low power mode, the display of
the control panel gets dark and “Ready/Standby”
is displayed.
When it enters the sleep mode, only the <Power
Saver> indicator lights and other indicators go out.
Also, the display of the control panel blacks out
and nothing is displayed. The time ranges to
specify for the printer to go into the low power
mode or the sleep mode are 3 to 60 minutes or 2
to 120 minutes, respectively. Consumption of
power during the sleep mode is 9 W or less and
the time required to exit from the sleep mode to a
print-ready status is about 30 seconds.
Note
• You can change the settings so that the printer does not
enter the sleep mode.
• For details on the low power mode/sleep mode and the
procedure to change the settings, refer to “5 List of
Menu Items on the Control Panel” (P. 28) or User Guide
4.2 Description of Menu ltems.
Summary of Contents for DocuPrint C2100
Page 1: ...DocuPrint C2100...
Page 2: ......
Page 3: ...IE IE DocuPrint C2100 Product ID KEB 1 Quick Reference Guide...
Page 6: ...4 Features in Brief Features in Brief...
Page 52: ......
Page 53: ...DocuPrint C2100...
Page 55: ...3 DocuPrint C2100 A Class I 57 B TV TV Fuji Xerox NEMKO IEC60950 1 Edition 1 2001 ISO9001...
Page 56: ...4...
Page 58: ...6 26kg 100mm...
Page 59: ...7 10 110 127Vac 10 50 60 Hz 220 240 V 50 60 Hz 600mm 100mm 100mm 150mm...
Page 60: ...8 IEC60825 1 Class 1 Class 1...
Page 61: ...9 CD ROM CD 30...
Page 65: ...13 5 Enter Adjust Number 6 7 8 6 7 9 10 11 Y M C 0 0...
Page 72: ...20 3 Windows 1 2 Windows OS A B A B PCL...
Page 73: ...21 Windows Delete...
Page 77: ...25 1 2 Letter Legal 8 5 8 5 3 4 5 6 7...
Page 78: ...26 4 OHP 150 15 mm 60 g m2 216 g m2 76 2 mm 220 0 mm 98 0 mm 355 6 mm 355 6 mm P 22 1 2 3 4...
Page 83: ...31 6 550 1 2 P 34 P 31 P 33 P 32 P 35...
Page 84: ...32 6 3 4 5 6 7 8 1 2...
Page 85: ...33 3 4 5 6 7 1 2...
Page 86: ...34 6 3 4 5 1 2 3 4 5 6...
Page 87: ...35 1 2 3 4 5 6...
Page 89: ...37 P 25 4 2 OHP P 25 P 25 P 22 P 25...
Page 90: ...38 6 P 6 P 22 P 22 P 22...
Page 91: ...39 P 22 P 22 P 22 P 22 1 P 12 30 mm...
Page 92: ...40 6 P 22 P 22 P 25 P 22 6 8 6 9...
Page 104: ......
Page 105: ...DocuPrint C2100...
Page 107: ...3 DocuPrint C2100 CNS13438 Class B NEMKO IEC60950 1 Edition 1 2001 ISO9001...
Page 108: ...4...
Page 110: ...6 26 kg 2 100 mm 100 mm...
Page 111: ...7 10 110 127 Vac 10 50 60 Hz 220 240 V 50 60 Hz 110V 15A 600mm 100mm 100mm 150mm...
Page 112: ...8 IEC60825 1 Class 1...
Page 113: ...9 Fuser Safety 30...
Page 117: ...13 5 Enter Adjust Number 6 7 8 6 7 9 10 11 Y M C 0 0...
Page 124: ...20 3 Windows 1 2 Windows A B A B PCL...
Page 125: ...21 Windows Delete...
Page 129: ...25 1 2 8 5 Letter Legal 8 5 3 4 5 6 7...
Page 130: ...26 4 OHP 150 15mm 60 g m2 216 g m2 76 2 mm 220 0 mm 98 0 mm 355 6 mm 355 6 mm P 22 1 2 3 4...
Page 135: ...31 6 550 1 2 P 34 P 31 P 33 P 32 P 35...
Page 136: ...32 6 3 4 5 6 7 8 1 2...
Page 137: ...33 3 4 5 6 7 1 2...
Page 138: ...34 6 3 4 5 1 2 3 4 5 6...
Page 139: ...35 1 2 3 4 5 6...
Page 141: ...37 P 25 4 2 OHP P 25 P 25 P 22 P 25...
Page 142: ...38 6 P 6 P 22 P 22 P 22...
Page 143: ...39 P 22 P 22 P 22 P 22 1 P 12 30 mm...
Page 144: ...40 6 P 22 P 22 P 25 P 22 6 8 6 9...
Page 154: ......
Page 155: ...DocuPrint C2100...
Page 158: ...4...
Page 160: ...6 26 kg 2 100 mm 100 mm 100 mm...
Page 161: ...7 10 110 127Vac 10 50 60 Hz 220 240 V 50 60 Hz 600mm 100mm 100mm 150mm...
Page 162: ...8 IEC60825 1 CLASS 1...
Page 163: ...9 CD ROM CD Fuser Safety 30...
Page 167: ...13 5 Enter Adjust Number 6 7 8 6 7 9 10 11 Y M C 0 0...
Page 174: ...20 3 Windows 1 2 Windows A B A B PCL...
Page 175: ...21 Windows Delete...
Page 179: ...25 1 2 8 5 Letter Legal 8 5 3 4 5 6 7...
Page 180: ...26 4 150 15mm 60 g m2 216 g m2 76 2 mm 220 0 mm 98 0 mm 355 6 mm 355 6 mm P 22 1 2 3 4...
Page 185: ...31 6 550 1 2 P 34 P 31 P 33 P 32 P 35...
Page 186: ...32 6 3 4 5 6 7 8 1 2...
Page 187: ...33 3 4 5 6 7 1 2...
Page 188: ...34 6 3 4 5 1 2 3 4 5 6...
Page 189: ...35 1 2 3 4 5 6...
Page 191: ...37 P 25 4 2 P 25 P 25 P 22 P 25...
Page 192: ...38 6 P 6 P 22 P 22 P 22...
Page 193: ...39 P 22 P 22 P 22 P 22 1 P 12 30mm...
Page 194: ...40 6 P 22 P 22 P 25 P 22 6 8 6 9...
Page 204: ......
Page 206: ...July 2006 604E23141 DE3642Z4 2...


