background image

53

Installing/Configuring the Printer Drivers

4

4.3    Configuring the Printer Drivers

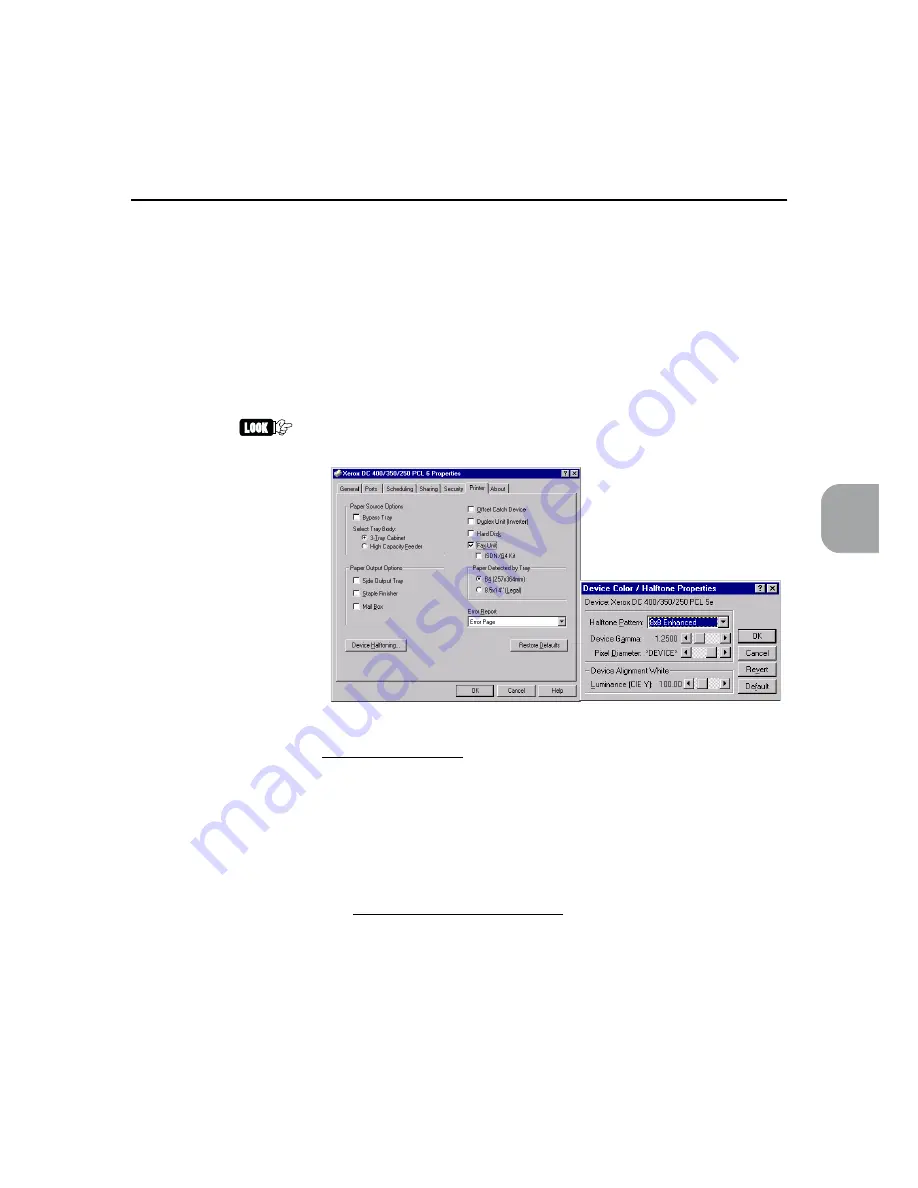
Paper Detected by Tray

Select one of the following two paper sizes which are mutual exclusively detected by the

printer:

• B4 (257 × 364 mm) (default)

• Legal (8.5 × 14")

The selected paper size will be available for selection under Paper Size on the "Paper/

Output" tab while the unselected one will not be available.

If you want to change the paper detection from B4 (257×364 mm) to Legal (8.5×14") or

vice versa, please contact the Xerox Customer Support Centre.

Make sure that the "Paper Detected by Tray" setting is consistent with the physical
cabinet tray setting. Otherwise, trouble with printing may arise.

Error Report (for PCL 6 drivers only)

Specify whether or not errors are to be reported when printing a PCL 6 job. Options

include:

• No Reporting

The printer will not generate any error report.

• Error Page (default)

Error page will be printed when the printer encounters error in printing the job.

Device Halftoning (for Windows NT 4.0 drivers only)

Click this button to display the "Device Color/Halftone Properties" dialog box to define the

colour and halftone properties for the printing device.

Windows NT 4.0

Summary of Contents for Document centre 250 series

Page 1: ...Document Centre 400 350 250 Series User Guide Printer All Contents and Index entries are in hypertext link Click on them to be transported to the corresponding page ...

Page 2: ...ve holders Permission has been obtained from Microsoft Corporation for use of software screen shots This manual is copyrighted with all rights reserved Under the copyright laws this manual may not be copied in whole or part without the written consent of the publisher Parts of this manual are subject to change without prior notice We welcome any comments on ambiguities errors omissions or missing ...

Page 3: ...se with English edition operating system only After reading keep this guide handy for a quick reference should you encounter any difficulties when using the machine In this manual safety instructions are described with the symbol Always read and follow these instructions before performing the required procedure This product is in the Class B category based on the standard of Voluntary Control Coun...

Page 4: ...ide Facsimile Explains the fax functions Quick Reference A simple manual which gives a summary of some of the fax functions which have raised the most queries in the past Manual bundled with the printer kit printer installed unit User Guide Printer i e this manual Explains the printer functions the printer control panel operations as well as the installation configuration of the PCL printer driver...

Page 5: ...putting and the main frame controlpaneloperationsduringprinting transmission Chapter 4 Installing Configuring the Printer Drivers This chapter explains how to install printer drivers set the printer properties print and fax from an application in different OS environments Chapter 5 Mode Menu Common Menu This chapter explains about the two menus Mode menu and Common menu and their menuitems Chapter...

Page 6: ... the Print Utility paper jams at the mail box as well as the PostScript 3 Kit Glossary This section explains the meanings of the terms used in this guide System Charts This section contains the system charts of the menus Refer to these charts to make changes to the settings after you have understood the printer operations ...

Page 7: ...rmation This indicates additional information on procedures of operations and features Indicates sources of references 3 The following conventions are used in this guide Double quotes are used to indicate names of windows menus dialog boxes icons files tabs fields and input contents For example The Select a Printer dialog box appears Bold Face Bold face characters refer to selections made like opt...

Page 8: ...face 21 2 3 Increase Allocation of Memory 23 2 3 1 Uses 23 2 3 2 Suggested values 23 Chapter 3 Useful Operations 3 1 Flow of Printing Fax Transmission 26 3 1 1 For Windows 26 3 1 2 For DOS printing only 27 3 2 Cancelling Printing Fax Transmission 28 3 2 1 Cancelling from host device 28 3 2 2 Cancelling jobs in process 29 3 2 3 Cancelling all jobs in the printer 29 3 2 4 Cancelling fax transmission...

Page 9: ...an application 73 4 4 2 Faxing from an application 73 Chapter 5 Mode Menu Common Menu 5 1 Mode Menu and Common Menu 80 5 1 1 About menu 80 5 1 2 Mode menu 81 5 1 3 Commonmenu 82 5 2 Mode Menu Items 84 5 2 1 List of Mode Menu items 84 5 2 2 Setting a Mode Menu 89 5 3 Common Menu Items 90 5 3 1 List of Common Menu items 90 5 3 2 Setting a Common Menu 103 Chapter 6 Precautions and Limitations 6 1 Pre...

Page 10: ...ry 138 C 5 Print History 140 C 6 Job Template Server Settings 143 C 7 PCL6 Font List 145 C 8 PS Font List 148 D Mail Box Paper Jams 151 E PostScript 3 Kit 152 E 1 Setting Up the Printer 152 E 2 Precautions and Limitations 154 Glossary 156 System Charts Mode Menu Items 158 System Charts Common Menu Items 161 Index 168 ...

Page 11: ...es close attention Read and follow instructions carefully to ensure the task is accomplished safely This symbol is used to alert operators to a specific operating procedure that must not be performed Read and follow instructions carefully This symbol is used to alert operators to a specific operating procedure that should be emphasised for operating safety Read and follow instructions carefully Pr...

Page 12: ...indicator light is lit check if there is any Received document If yes follow the instruction on display and output it Otherwise output the list of stored document and check the contents When the power is switched off print data remaining in the printer kit and information spooled in the memory of the printer kit will be erased Before switching off the power during operation check that the message ...

Page 13: ...1 1 Getting Ready to Print 2 1 2 Special Features of the Printer 4 1 3 Main Components and Their Functions 5 1 4 Precautions on Switching On Off 13 Overview of the Printer ...

Page 14: ...switched off before handling it If not there is a danger of electric shock Connect the cable and allocate memory Chapter 2 Setting Up Carry out the necessary installation and setting to the host device The printer control panel also needs to be set Chapter 4 Installing Configuring the Printer Drivers When connecting to the hostdevicedirectly Parallel Serial ...

Page 15: ...t When the printer is used via a network it is necessary to set the different types of servers and printer control panels Network Print Environment User Guide regarding these settings It is suggested that the memory be increased When connecting to network ...

Page 16: ...es the standard parallel and serial interfaces it can be used in network multi protocol environment through the installation of interface card All the interfaces installed can receive data at the same time Double sidedprintingcanbedonebyinstallingaduplexunit Multiple copies sorting can be achieved through the electronic sorting feature when installing the hard disk Also there is no need to rearran...

Page 17: ...l panel Utilise this when using the copier and fax functions of the machine If necessary it will display the message Printing when the printer function is being used Printer control panel Utilise this when using the printer function of the machine Mail box This output device is an optional item With the mail box attached documents can be output to a specified bin to prevent documents output from m...

Page 18: ...onnector Connects printer to host device by a centronics IEEE 1284 compliant interface cable Slot for expansion interface For attaching optional interface cable Printer control panel The printer control panel is shown below Check the position of the LED Display and the variouskeys 1 3 2 Control panel Ventilation opening Serial interface connector Parallel interface connector Slot for expansion int...

Page 19: ...ght Emitting Diode Data Processing Indicates the state of data processing by green light Light on Ready to receive data Blink Receiving data Light off Unable to receive data When data cannot be received it could be due to instances when you have accessed the Common menu by pressing or the Pause Mode by Chapter 5 Mode Menu Common Menu for details on the menu operations Also for information on the P...

Page 20: ...rly 7 2 Messages for information on the messages displayed when there is an error Display The display shows messages indicating the printer state as well as its setting state Depending on whether the options are installed the state of the setting and the printer model some messages may not be displayed For the Print screen While printing faxing or waiting for data the display will show the Print s...

Page 21: ...lude Tray 1 Tray 2 Tray 3 Tray 4 BPT HCF1 HCF2 and Auto For the Mode Menu screen The screen to fix setting for emulation processing To display the Mode Menu screen press 5 2 2 Setting a Mode Menu For the Common Menu screen The screen to set items common to all print modes To display the Common Menu screen press The Port Setting screen is displayed as follows 5 3 2 Setting a Common Menu Keys There ...

Page 22: ...place at a time Moves cursor when at the top extreme left of the display to the bottom extreme right as well as when at the bottom extreme left to the top extreme right Moves to pause state At this state no data can be received and no printing can be processed 3 2 3 Cancelling all jobs in the printer and 3 3 2 Outputting all jobs in the printer for details on the pause state Eject Remaining data w...

Page 23: ...on the Common Menu Moves to Mode Menu operation Returns from the Mode Menu to the Print Fax Ready print screen When both and are pressed together the printing of jobs in process will be cancelled During the pause state when both and are pressed together jobs which have finished receiving data for all interfaces will be discarded 5 2 Mode Menu Items for details on the Mode Menu Cancels Power Save S...

Page 24: ...DocuWorks patch from 3 0E to 3 02E for Windows 95 98 Windows NT 4 0 ACROBAT Adobe Acrobat Reader for Windows 3 1 Windows 95 98 Windows NT 4 0 Manual Printer User Guide Scanner User Guide Network Print Environment User Guide in pdf format Readme txt CD ROM for the PostScript 3 kit PostScript Driver Library Macintosh Windows AdobePS Adobe PS printer drivers and PPD files for Windows 95 98 Windows NT...

Page 25: ...n After the message Print Fax Ready is displayed wait at least five seconds before turning power off Besides the above occasions the printer hard disk may be in use Note that when you are accessing the printer hard disk and the power is switched off the hard disk may not be usable again For machine without the fax function Print Ready will be displayed ...

Page 26: ...This page is intentionally left blank ...

Page 27: ...2 1 Connecting Cable Parallel Serial Interface 16 2 2 Using the Ethernet Interface 20 2 3 Increase Allocation of Memory 23 Setting Up ...

Page 28: ...rallel interface the optional parallel interface cable provided by our company is needed For details consult the Xerox Customer Support Centre Insert the interface cable connector to the parallel interface connector and secure it by the wire clips on both sides Connect the other end of the interface cable connector to the host device Switch on the printer If necessary set the following items by th...

Page 29: ...serial port is set to inactive when it is shipped out Change it to active after the cable is connected Insert the interface cable connector to the serial interface connector and secure it For the interface cable use the shielded cable EMI product made for your host device Connect the other end of the interface cable connector to the host device Switch on the printer Follow the procedure on the nex...

Page 30: ...n Display of Maintenance Mode 10 Press 1 Press 4 Press or a few times 6 Press or a few times Serial port activated 3 Press 5 Press Display of port status item 7 Press 8 Press or 9 Press Returns to the state when power is on Receiving data possible 2 Press or a few times ...

Page 31: ...offControl default Yes DTRControl default Fix High If necessary set the value for the following items However there is no need to change the default setting for these items for normal usage PDL Mode default PCL 6 PJL Switch default ON Auto Eject Time default 30 sec Serialmemory default 64 KB Chapter 5 Mode Menu Common Menu for details on the setting items of the printer If the optional PostScript ...

Page 32: ... unplug the power cord CAUTION Make sure the power is switched off and the machine unplugged before you begin the installation Otherwise there is a danger of electric shock The printing data left inside the printer or the printer memory will be erased when the power is off Remove the two screws from the slot for the expansion interface card and then take away the shield cover Keep the removed scre...

Page 33: ...Do not connect the interface cable to the two Ethernet interface connectors together as this will cause poor transmission or breakdown For the interface cable use the cable suited to the network Switch on the power of the printer When connecting connector for 10Base 5 follow the procedure on the next page and set the value of Ethernet setting to 10Base 5 When connecting TX T connector also refer t...

Page 34: ...n Display of Maintenance Mode 8 Press 1 Press 4 Press or a few times 6 Press or a few times 3 Press 5 Press Display of Ethernet setting 7 Press Returns to the state when power is on Receiving data possible Setting Ethernet to 10Base 5 2 Press or a few times ...

Page 35: ...ialmemory lpd spool NetWare memory AppleTalk memory Parallelmemory This is a receive buffer for parallel interface use In general the default values are sufficient but if necessary increase the capacity When the capacity is increased the processing might become faster When the parallel interface is not in use inactivate it and allocate the memory for other purposes Serial memory This is a receive ...

Page 36: ...t is recommended that you maintain many areas of this memoryifpossible Page buffer Area for drawing the actual print image It is possible to allocate this area from the remaining area after all the other uses have been allocated To confirm the page buffer capacity print the printer settings list and then check the actual page buffer If the page buffer is too small it will affect the performance an...

Page 37: ...lling Printing Fax Transmission 28 3 3 Outputting 31 3 4 Main Frame Control Panel Operations During Printing Transmission 33 3 5 Removing Documents Output to the Stacker Tray 34 3 6 Outputting Lists Reports 35 3 7 Printer Functions 37 Useful Operations ...

Page 38: ...t device and system configuration used Refer to the manual of the application regarding its operation Before sending print fax data from the host device check the following 1 Port status in Common Menu Maintenance Mode Port Status 2 Print mode of the port in Common Menu Port Setting PDL Mode 5 3 Common Menu Items Refer to the manual of the application regarding its operation 4 4 Printing Faxing fo...

Page 39: ...the host device check the following 1 Port status in Common Menu Maintenance Mode Port Status 2 Print mode of the port in Common Menu Port Setting PDL Mode 5 3 Common Menu Items 3 Printing method e g scale by the PDL Mode 5 2 Mode Menu Items Refer to the manual of the application regarding its operation 3 2 Cancelling Printing Fax Transmission 3 3 Outputting Activate application software to be use...

Page 40: ...ancelling from host device The procedure to cancel printing instructions from the host device is explained here Refer to the following based on the type of OS that you are using Windows 95 Windows 98 Cancelling from Windows 95 Windows 98 Displaythe Printers window Start Settings Printers Double clicktheappropriateprintericon In the displayed window click the appropriate document name and from the ...

Page 41: ...ll still be printed and output 3 2 3 Cancelling all jobs in the printer To cancel printing all jobs received by the printer This operation can stop the receiving of data and empty the buffer All data will be erased when this operation is executed Buffer is the storing location of data sent from the host device There is also a way to execute all the jobs in the printer and print them out See 3 3 2 ...

Page 42: ...cessing is complete Pause will be shown Press Print Fax Ready will be shown 3 2 4 Cancelling fax transmission from touch panel display Jobs that are being faxed and fax transmission jobs that have been arranged are cancelled by using the touch panel display See the User Guide Facsimile for details on thecancellationmethod ...

Page 43: ...resent Auto Eject Time has passed and Data wait will be shown on the display The operation of forcibly printing data in the printer without waiting for the Auto Eject Time to pass in such instance is known as forced outputing The procedure is as follows For parallel and serial interfaces the next job sent when the display shows Data wait might not be printed properly Send the next job after forced...

Page 44: ...will automatically be unable to receive data Press The printing starts When all the jobs have been executed and printed Pause will be shown For parallel and serial interfaces data might be received in the midst of a job depending on the timing when is pressed in Step In this case all data following this will be recognised as a new job after is pressed and then processed as a new job after the paus...

Page 45: ...job that has been stopped will be automatically resumed Print jobs cannot be stopped by the Main Frame Control Panel Printer Printing in progress Close The main frame control panel operations during printing transmission are as follows Main frame control panel operations Printer actions Pressing Interrupt during printing When Interrupt is pressed the printing will be stopped temporarily and the co...

Page 46: ...he Stacker Tray has lowered all the trays completely before removing the documents output to the stacker tray During printing of documents that are to be stapled when Pause Restart or of the main body is pressed the stacker tray will be lowered once the documents that are being printed are output Press Pause Restart again The Staple Finisher will resume operation The temporarily stopped state will...

Page 47: ... known as Print Utility The Print Utility of this machine are as follows PCL 6 Settings Printer Settings Error History Print History Job Template Server Settings PCL 6 Font List PS Font List available when the optional software kit is installed Print Utility is executed at a resolution of 400 dpi Appendix C Print Utility for details on the contents of Print Utility 3 6 2 Printing lists reports The...

Page 48: ...r until you reach the desired item and then press 6 The PCL 6 Settings will be printed and output and then the following screen displayed 5 Press 2 Press or a few times The example here shows the printing of PCL 6 Settings 7 To print other items press to return to Step 4 and the Print Utility PCL 6 Settings display Or press to return to the print screen ...

Page 49: ...rol panel The priority can be chosen from the following Printer Document Fax Receive Document Auto OutputReport User Guide Facsimile for the setting method Copy fax functions and their relation with printer function Operating the main frame control panel No printing can be done when operating the main frame control panel However printing instructions can be received from the host device When a cer...

Page 50: ...eived from the host device Press Interrupt to end the interrupt mode and printing will be processed Even during the interrupt mode the printing process will resume if no operations are carried out after a certain time This time setting is done from the main frame control panel See the User Guide Facsimile for the setting method ...

Page 51: ...Installing Configuring the Printer Drivers 4 1 About the Printer Drivers 40 4 2 Installing Uninstalling the Printer Drivers 41 4 3 Configuring the Printer Drivers 46 4 4 Printing Faxing 73 ...

Page 52: ...98 PCL 5e printer driver for Windows NT 4 0 PCL 6 printer driver for Windows 3 1 PCL 6 printer driver for Windows 95 98 PCL 6 printer driver for Windows NT 4 0 4 1 2 Installation configuration methods The methods of installing configuring the PCL 5e and PCL 6 printer drivers as well as the procedures for printing faxing using these drivers are basically the same Regardless of the operating system ...

Page 53: ...omputer Procedure Start Windows 95 Windows 98 Windows NT 4 0 or Windows 3 1 In this example we will install the PCL 6 printer driver on the Windows 95 OS From the Start menu select Run The Run dialog box appears For the Windows 3 1 OS select Run from the File menu of the Program Manager dialog box Insert in the PCL Driver Network Utility Windows CD ROM and enter E English DC400 Win95_98 PCL6 Setup...

Page 54: ...w appears Click Restart Windows Now Exit to Windows or Printer Setup as needed 4 3 Configuring the Printer Drivers on how to configure the printer driver Restart Windows for the effect to take place You may run the Setup exe program to install the Windows 95 98 printer driver as an alternate driver on the Windows NT server workstation after you have installed the printer driver for Windows NT 4 0 ...

Page 55: ...nterInstallation dialogbox In this example we will install the PCL 6 printer driver on the Windows 95 OS Click Add Network Port The Add Network Printer Port dialog box appears Select the network printer from Network Neighborhood If you do not know the network address of the network printer consult your system administrator Click OK The Printer Installation dialog box showing the network path of th...

Page 56: ...cedure From the Start menu select Run In the Run dialog box displayed click Browse For the Windows 3 1 OS select Run from the File menu of the Program Manager dialog box Insert in the PCL Driver Network Utility CD ROM and select the CD ROM drive in the Browse dialog box Next double click Win95_98 PCL6 Setup and then select Unsetup exe Click Open to close the Browse dialog box For the Windows 3 1 O...

Page 57: ...lowing left dialog box will be displayed instead and clicking Next will display the following right dialox box with the Model name Click Next to continue A Ready to Start Deleting dialog box appears Click Finish to start the uninstalling process When the process is completed click Restart Windows Now to ensure that the driver is completely removed from the system ...

Page 58: ...g on the other tabs Otherwise the other tabs may not show options appropriate to your machine For Windows NT 4 0 drivers You have to define settings on both the Printer and Fonts tabs for the PCL 5e driver or just on the Printer tab for the PCL 6 driver from this Properties dialog box before accessing the Default dialog box to define the other properties For details of all the different properties...

Page 59: ...anager dialog box double click Main followed by Control Panel and then Printers The Printers window appears In this example we will use the PCL 6 driver Ensure that you have selected the appropriate Xerox DC 400 350 250 printer icon in Installed Printers and then click Setup to display the following setup dialog box ...

Page 60: ...ttings on the Printer and Fonts tabs For the PCL 6 driver To define settings on the Printer tab In this example we will use the PCL 5e driver Accessing the document defaults dialog box Follow Step 1 and Step 2 of the procedure for Windows 95 Windows 98 to select the Xerox DC 400 350 250 printer icon Select Document Defaults from the File menu to display the following Default dialog box to define s...

Page 61: ... is printed it will not affect these default settings Changes to these configurations can only be made through these dialog boxes Not all properties are however available for the six different drivers The following table lists out the properties available for each driver as well as the items of each property notcommonlyavailabletoallthedrivers PCL 5e PCL 6 Property Win 3 1 Win 95 98 Win NT 4 0 Win...

Page 62: ...te page overlays for the printer Fonts for PCL 5e drivers only Use this to install soft disk based fonts and scalable typefaces on the printer Layout for PCL 6 drivers only The layout property provides a few job finishing features to modify the printed layout of a document like N Up printing Booklet Printing Fit to Page Scaling Logical On Physical Watermarks for PCL 6 drivers only A Watermark is a...

Page 63: ...Select this if your printer is installed with this manual feeder which is able to handle various paper sizes If this is not checked Bypass Tray Manual will not be available for Paper Source on the Paper Output tab Select Tray Body Provides two options of which either and only one must be installed in the printer 3 Tray Cabinet default Select this if your printer is installed with this input tray c...

Page 64: ...lled with the job offset device which supports both Offset Per Job and Offset Per Set functions Only the standard Centre Tray and the stacker trays can be equipped with the job offset device Default is off If this is not checked the job offset settings will not be available for Job Offset on the Output Options tab Duplex Unit Inverter Select this if your printer is installed with a duplex unit to ...

Page 65: ...ontact the Xerox Customer Support Centre Make sure that the Paper Detected by Tray setting is consistent with the physical cabinet tray setting Otherwise trouble with printing may arise Error Report for PCL 6 drivers only Specify whether or not errors are to be reported when printing a PCL 6 job Options include No Reporting The printer will not generate any error report Error Page default Error pa...

Page 66: ...boxes to make selections Job Type Specify the type of job you are handling Print Fax available only if Fax Unit is selected on the Printer tab Copies Specify the number of copies to print The valid range is 1 999 copies Default is 1 Paper Size Specify the paper size to use for the print data Options include A4 210 297 mm default 8 5 11 Letter B5 182 257 mm B4 257 364 mm when Fax is selected for Jo...

Page 67: ...ble at the same conditions as Booklet on A4 Booklet on A3 for PCL 6 drivers only available at the same conditions as Booklet on A4 Booklet on Ledger for PCL 6 drivers only available at the same conditions as Booklet on A4 Custom Paper Size A user defined size ranging from 100 148 mm min to 297 431 mm max when Fax is selected for Job Type on Printer tab available at all times when Print is selected...

Page 68: ...g down Side Output Tray Printouts are sent to the side output tray with the printed side facing up Available only if Side Output Tray is selected for Paper Output Options on the Printer tab Mail Box Bin 1 Mail Box Bin 10 Printouts are sent to the specified bin s with the printed side facing down Useful for preventing a mixed up of documents sent by different users Available only if Mail Box is sel...

Page 69: ...one page Long Edge Binding Two sided printing aligned to the long edge of the paper Short Edge Binding Two sided printing aligned to the short edge of the paper All duplex printing options except Duplex Off are available only if Duplex Unit Inverter is selected on the Printer tab Custom Paper Size Click this button to display the Custom Paper Size dialog box to define the non standard size of the ...

Page 70: ...set Per Set Apply printer offset mechanism at the beginning of each set or copy of job This option is meant for printing two or more copies of a print job When this option is selected for printing only one copy of a job it has the same output effect as Offset Per Job If Collate is selected for Collate Settings each set printed will be output to the Centre Tray or any of the stacker tray in an in o...

Page 71: ...at the top edge of paper Top Right Corner Apply one staple at the top right corner of paper Left Double Apply two staples at the left edge of paper Right Double Apply two staples at the right edge of paper Bottom Left Corner Apply one staple at the bottom left corner of paper Bottom Double Apply two staples at the bottom edge of paper Bottom Right Corner Apply one staple at the bottom right corner...

Page 72: ...rts for all except Windows 3 1 drivers The Document Monitor tool must be installed on the computer in order for the following check boxes to be enabled Use Document Monitor The Document Monitor is a CentreWare software tool that enables network users to monitor and track the status of documents print fax jobs being processed by the Xerox Document Centre System Enabled if CentreWare is installed De...

Page 73: ...ay appear to be a closer match to the screen image than the other mode but printing is slower Vector default This mode enables images to be printed faster but not all graphic images can be printed under this mode If the printed graphic images do not appear the same way as they did on your screen select Raster and reprint your graphic Note that however this is not a What You See Is What You Get rep...

Page 74: ...rance of grey scales by randomly placing individual dots of ink Best for photographic images but requires more processing time Available only if Raster is selected for Graphics Mode For the Windows NT 4 0 PCL 6 driver Device default Image objects will be rendered by default halftoning attributes Available only if Vector is selected for Graphics Mode System Enables the System Halftoning Click Halft...

Page 75: ...de Use Printer TrueType fonts When this is on the printer prints by using the printer resident fonts instead of by downloading fonts to the printer unless the required fonts are not present in the printer This will speed up the printing process and give the printer its best performance Default is on Disabled if Print as Graphics is selected for True Type Mode Halftone Colour Adjustment for Windows...

Page 76: ...er of the file and its location If you source an external file from a floppy disk and then remove the disk from the disk drive the file will no longer be available as an overlay If you intend to use this file regularly it is recommended that you copy the file to your system local disk before using this button Create Overlay Creates and stores a Page Overlay from a file containing the overlay that ...

Page 77: ...ected a message box requesting for confirmation will appear whenever a page overlay command is sent to the printer If this option is off the selected page overlay file will be sent directly to the printer This option is not active if No Overlay is selected or if the currently selected overlay has been permanently downloaded to the printer Selected Overlay status Displays information on the selecte...

Page 78: ...from your Windows applications or and your hard disk Edit If you have purchased a disk based font which has the same name as a font you are already using you should change the name of either font by clicking this button after you have selected that font Permanent Downloading a font permanently ensures a font stays in your printer memory until the printer is turned off This is especially useful for...

Page 79: ...lt Booklet Printing Fit To Page Scaling Logical On Physical Selecting each of the features will display one of the following corresponding options N Up Printing available when N Ups is selected for Layout Mode The N Up function allows more than one document page to be printed on a same physical page by dividing the physical page into N smaller physical pages Each document page is then reduced and ...

Page 80: ...abled when more than 1 Up is selected for Pages Per Sheet Default is off Booklet Printing available when Booklet Printing is selected for Layout Mode This function allows the document to be printed as a booklet It ensures that the document pages will be re ordered and printed 2 Up and that the output sheets when folded and stacked will have the correct page order When this feature is chosen in Lay...

Page 81: ... Paper Output tab The Fit to Page function can output to all paper sizes Default is A4 210 297 mm Scaling available when Scaling is selected for Layout Mode This function allows enlargement or reduction of each document page to be printed Scale Factor Define a scale factor of between 50 to 400 for enlargement 100 or reduction 100 of your page Default is 100 Page Position Specify the position where...

Page 82: ...e document page is to be printed on the output Top Left Top Right Center default Bottom Left Bottom Right Page Border To provide options of printing each document page with a page border on the physical page None default No page border is drawn Shadow A rectangle with drop shadow effect is drawn around each document page Watermarks for PCL 6 drivers only This property dialog allows you to create e...

Page 83: ...atermark to the Watermark list The procedure to edit a watermark is as follows Select an existing watermark from the Watermark drop down list Make changes to it as required Click Update to replace the previous version or Add to save a modified version of the watermark The procedure to delete a watermark is as follows Select an existing watermark from the Watermark drop down list Click Delete to re...

Page 84: ... items that relate to document property It presents a summary of the document default settings of the driver and allows user to change setting of each item by selecting them here A control corresponding to the selected item will be available for user input The settings include only items from the Paper Output OutputOptions and Graphic tabs ...

Page 85: ...File menu e g Document setup Close the properties dialog box Click OK in the Print dialog box to start printing This Xerox DC 400 350 250 printer allows you to print the PostScript language by using the PostScript 3 Kit For details see Appendix E PostScript 3 Kit 4 4 2 Faxing from an application To be able to fax from your Xerox DC 400 350 250 printer you must attach a fax unit to it and then on t...

Page 86: ...x appears Input the information for Name and Fax Number and then click Add to List Or if you have previously saved the list of recipients select it from Recipient List to display the recipients information You can also access the list of recipients from files other than the one specified in the Recipient List box by clicking Open File Click OK to send the fax The Fax Job Confirmation dialog box ap...

Page 87: ...è9 Recipient s fax number must be specified before the fax job from an application can be sent Add to List To send a fax you have to enter the fax number and optional name in the respective fields and then click Add To List The fax address is only confirmed when it is entered in the list You can add a maximum of 50 recipients to the list If you did not click Add To List after entering the name and...

Page 88: ... box and click Save List As Recipient Info Select a recipient in the list box then click this button A dialog box displaying information of the selected recipient appears You may enter or edit information regarding this recipient such as his name company fax number voice number and e mail address here Comm Settings Click this to specify the communication settings of the selected recipient in the d...

Page 89: ... job via the specified relay station After specifying the recipient s destination ID press Add To to add it to Destination List The default destination ID is 1 99 but when Group Sending is selected it becomes 1 9 Destination List It shows the confirmed destinations that will receive the relay fax job You may specify up to 20 destinations here A group ID is prefixed with a AddTo This button is used...

Page 90: ...options to specify a resolution for fax transmission Normal 100 200 dpi Fine 200 200 dpi default Super Fine 400 400 dpi Fax transmitted at a higher resolution takes a longer transmission time Transmission Report Select whether or not to generate a report for fax transmission Report Always A transmission report is always generated after fax transmission is completed Report On Error default A transm...

Page 91: ...Mode Menu Common Menu 5 1 Mode Menu and Common Menu 80 5 2 Mode Menu Items 84 5 3 CommonMenuItems 90 ...

Page 92: ...on explains about the types and levels of menu 5 1 1 Aboutmenu There are two types of menus Mode menu and Common menu During the Power Save mode nothing will be shown in Display Switch off the Power Save mode before carrying on CommonMenu ModeMenu ...

Page 93: ...em Candidate value There are menu items without item PCL 6 Settings Font Source Built In Download Font Number 23 Courier Symbol Set ROMAN 8 ISO L1 ISO L2 WIN 3 0 Point Size The above diagram shows only a portion of the PCL 6 Mode menu levels PCL 6 Settings PCL 6 Settings feature is used to set the default values for both PCL 5e and PCL 6 Mode menu Menu item Candidate value ...

Page 94: ...modes Common menu is made up of the following levels Common menu Menu item Item Candidate value The above diagram shows only a portion of the Maintenance Mode from the Common menu Printer Settings Jam Recovery OFF ON Alarm OFF Echo Back Mode Memory Change Receive Parallel 64KB BufferMem Serial 64KB PS Memory Common menu Menu item Item Candidate value Maintenance Mode ...

Page 95: ...ons that can be set by the Port Setting menu PrintUtility The Print Utility menu is used to print and check internal information of the printer such as printer setting information error log table print log table and fonts related information 3 6 Outputting List Report for items and operations that can be set by the Print Utility Maintenance Mode The Maintenance Mode menu is used to set printer set...

Page 96: ...ownloaded fonts are deleted from the printer the selection will be ignored and the default will be used Font Number Sets the font to be the default The range of setting is between 0 45 for Built In Each unit is 1 Default is 23 Courier The setting takes on default value when the NVRam is initialised For Built In default is 23 For Download default is 1 If the number selected is not in the range of a...

Page 97: ...ilable when fixed spaced font is selected Copies Sets the number of output copy The range of setting is between 1 999 copies Default is 1 and each unit is 1 When there is a specific number of output from the host device this value can be displayed and printed out Also it can be changed on the setting of the operator panel However number of specified output from Netware lpd and AppleTalk cannot be ...

Page 98: ...is displayed when the 1 tray module is installed Tray 3 HCF 1 Supplies paper from tray 3 This value is displayed when the 3 tray cabinet is installed Tray 4 HCF 2 Supplies paper from tray 4 This value is displayed when the 3 tray cabinet is installed Bypass Tray Supplies paper from bypass tray BPT In this case the paper size specified in Paper size selection must be loaded in the BPT This value is...

Page 99: ...tation for printing for PCL 6 only The candidate values are Portrait and Landscape Default is Portrait The values set are changeable by commands The setting takes on default value when the NVRam is initialized Form Lines Sets the page length printing area of one page The range of setting is between 5 128 lines with 1 line per unit Default is 64 The values set are changeable by commands The setting...

Page 100: ...rrideSize Turns the Override Size on and off The candidate values are OFF and ON Default is OFF The Override Size feature allows paper size switching if there is a paper size mismatch when the requested paper size is not available in the printer Enabling this feature will allow the job to be printed on a best fit paper size However there might be an image loss while using this feature To ensure mi...

Page 101: ...es in PCL 6 Settings 5 Press or to display the required candidate value For this example we choose ISO 69 7 Press to move back to the Mode Menu PCL 6 Settings Then press again to move back to the print screen Print Fax Ready In general Press to display the next level Press or to display the items within the same level The menu items Tray and Duplex have one more level i e an item level after the m...

Page 102: ...ommands sent from the host device to valid or invalid The candidate values are as follows ON Default Accepts PJL commands OFF Ignores PJL commands Auto Eject Time Sets the time to automatically print and output any remaining data in the printer when it is in a continuous state of not receiving data The range of setting is between 5 1275 seconds with 5 seconds per unit Default is 30 seconds Adobe P...

Page 103: ...follows ON Default Accepts PJL commands OFF Ignores PJL commands Auto Eject Time Sets the time to automatically print and output any remaining data in the printer when it is in a continuous state of not receiving data The range of setting is between 5 1275 seconds with 5 seconds per unit Default is 30 seconds Adobe Protocol Sets the Adobe protocol which is the PostScript protocol connection for pa...

Page 104: ...bit 7Bit Sets the data length to 7 bit Stop Bit Sets the length of stop bit for serial interface The candidate values are as follows 1 Bit Default Sets the length of the stop bit to 1 bit 2Bit Sets the length of the stop bit to 2 bit Parity Sets the parity check method for serial interface Parity check is a checking process that determines whether the data has been sent correctly from the sending ...

Page 105: ...rol of DTR signal for serial interface DTR Data Terminal Ready is a hardware signal that determines whether the printer is able to receive data from the host device The candidate values are as follows Fix High Default Always sets DTR signal to high regardless of whether or not it is able to receive data Fix Low Always sets DTR signal to low regardless of whether or not it is able to receive data A...

Page 106: ...ct Print Utility or PrintDirect The candidate values are as follows TCP IP Sets TCP IP which is to be used as a protocol of the transport layer to valid ON or invalid OFF in lpd or Direct Print Utility IPX SPX Sets IPX SPX which is to be used as a protocol of the transport layer to valid ON or invalid OFF in PrintDirect When Menu is presssed after setting a system reset will be executed During the...

Page 107: ...eceived from the host device as PostScript language PJL Switch Look 2 Sets the PJL commands sent from the host device to valid or invalid The candidate values are as follows ON Accepts PJL commands OFF Default Ignores PJL commands Optional Note 1 PostScript and Auto will be displayed only if the PostScript option is installed Look 1 When set to Auto and the automatic determination of print languag...

Page 108: ...server Note 1 Look 1 Appendix C 6 Job Template Server Settings PCL 6 Font List Prints the list of PCL 6 fonts that can be used by printer Note 1 Look 1 Appendix C 7 PCL6 Font List PS Font List Prints a list of PostScript fonts that can be used by printer Note 1 Look 1 Appendix C 8 PS Font List Optional Note 1 The paper sizes that can be used for printing are A4 B4 A3 and they are selected automati...

Page 109: ...when printing date time of Print Utility The setting is YY MM DD hh mm where YY is the setting for the year last 2 digits between 00 99 MM is the month between 01 12 DD is the day between 01 31 hh is the hour between 00 23 and mm is the minute between 00 59 AutoPrintHistory Sets whether or not to automatically eject the print history Print history is the printed information regarding the print job...

Page 110: ... memory capacity that can be set changes according to the free memory capacity Receive Buffer Memory Sets the memory capacity of the receive buffer for the respective interfaces Receive buffer is the temporary storage location of the data sent from the host device The memory capacity of the buffer can be changed according to the status and objective of the usage Also the increase of memory capacit...

Page 111: ...is on Disabled Inactivates the parallel port when the power is on Serial Sets to activate inactivate the serial port when the power is on The candidate values are as follows Enabled Activates the serial port when the power is on Disabled Default Inactivates the serial port when the power is on lpd PD Sets to activate inactivate the lpd PD port when the power is on The candidate values are as follo...

Page 112: ...e as follows Enabled Activates the port in use by EtherTalk when the power is on Disabled Default Inactivates the port in use by EtherTalk when the power is on This item is displayed when the interface card for Ethernet 100BASE TX 5 is installed Initialisation Executes the initialisation of NV memory and hard disk It can also execute system reset NV memory is the nonvolatile memory that maintains ...

Page 113: ...idate values are as follows ON Activates the agent which uses the IPX protocol OFF Default Inactivates the agent which uses the IPX protocol Start UDP Activates or inactivates the agent which uses UDP as a protocol of the transport layer When you use the CentreWare software in the Windows NT environment activate the agent from this menu The candidate values are as follows ON Activates the agent wh...

Page 114: ...of 000 255 with 001 per unit If the values are not entered correctly when setting the subnet mask like entering 0 as a value the setting will return to the previously set figure even though you press and it will not be possible to move on to other settings until the correct values have been set IPX SPX Setting Sets the operation frame type of IPX SPX The candidate values are as follows with the in...

Page 115: ...xample we chooseSerial 5 Press or to display the required item For this example we choose Auto Eject Time 6 Press to display the candidate values in Auto Eject Time 7 Press or to display the required candidate value For this example we choose to change the time to 20 sec 9 Press to move back to the print screen Print Fax Ready In general Press to display the next level Press or to display the item...

Page 116: ...This page is intentionally left blank ...

Page 117: ...Precautions and Limitations 6 1 Precautions and Limitations 106 ...

Page 118: ...dditional memory capacity When the hard disk and the additional RAM module are installed with a large number of files registered in the hard disk the printer might not be able to start up if the additional RAM module is removed In this situation either switch off the power and remove the hard disk or install the additional RAM module When the printing result is different from the setting Due to in...

Page 119: ...f the advance fax instructions made by dialing from the touch panel display plus the fax instructions from the host device are limited to 100 recipients In this case multiple transmissions of different documents to an identical recipient is treated as one recipient but different transmission modes e g G3 Auto International transmission G4 Auto using a similar telephone number will be treated as di...

Page 120: ...This page is intentionally left blank ...

Page 121: ...Troubleshooting 7 1 When Problems Occur 110 7 2 Messages 114 7 3 When the Print Quality is Poor 123 ...

Page 122: ... of high voltage If you have to carrry out any disassembling operation of panels and covers make sure you follow the instructions in the relevant user guides Never try to alter the printer configuration or modify any parts as it may cause fire or smoke Turn on the printer breaker switch and power switch Turn off the power switch and check that the power cord is plugged in properly Then turn on the...

Page 123: ...accordinglyasfollows Pause Press to release the pause state Others Press to release the menu setting state 1 3 2 Control panel Treat according to the message displayed 7 2 Messages By default the birectional communication setting of the printer is set to ON If the host device is not responding to bidirectional communication printing cannot be done In this case turn the bidirectional communications...

Page 124: ...tall the additional RAM module to increase the memory Insert in the correct size paper and send printing again User Guide Copier Just wait for five minutes or press and together to stop printing Condition Cause Treatment If the memory is insufficient the printer will automatically inactivate the interface and then activate itself again When switching on the power of the printer check whether the h...

Page 125: ...he Print History Refer to 7 3 When the Print Quality is Poor and treat accordingly 1 Check the printer resident fonts by the PCL Font List and the font indicationofthedriver 2 Try to use the font downloaded from the driver Stop printing or force the remaining data to be output 3 2 Cancelling Printing Fax Transmission 3 3 Outputting Switch off the power without forcefully moving the paper tray Afte...

Page 126: ...ormal The main frame is in operation or the main frame control panel is being used Wait awhile When the main frame operation has ended press Clear All on the main frame control panel Normal The printer is being warmed up to print fax the data received Print fax data can be received from the host device Normal Printinginprogress Print fax data can be received from the host device Normal The printer...

Page 127: ...aining print fax data in the printer is beingoutput Print fax data can be received from the host device Normal All the remaining print fax data in the printer is beingcancelled Print fax data can be received from the host device Normal The PCL6 settings information is being printed Print fax data can be received from the host device Notice The toner of drum toner cartridge is about to be used up G...

Page 128: ...oad the paper tray correctly User Guide Copier Cause No paper is loaded in tray Or the paper tray is not correctly loaded Treatment Press and together to stop printing and then load paper in tray correctly User Guide Copier Cause Paper of xxxx size is not found in BPT Treatment Load paper of xxxx size in the BPT Cause A4 B4 or A3 paper is not loaded Treatment Load A4 B4 or A3 paper This message ma...

Page 129: ...m toner cartridge is used up Treatment Replace it with a new drum toner cartridge User Guide Copier Cause The drum toner cartridge is not properly loaded Treatment Load the drum toner cartridge properly User Guide Copier Cause Paper jams Treatment Follow the instruction displayed by the main set control panel and the printer to remove the paper Cause The cover of the mail box is open Treatment Clo...

Page 130: ... mail box bin Cause The maximum capacity of each of the mail box has been exceeded or paper is left in each bin Treatment Remove copies from each of the mail box bins Cause When the battery voltage of the NV memory is lowered the system setting memory will be erased from the memory Treatment Press Eject Set to initialize the system 5 3 Common Menu Items Cause The setting of the system clock is inc...

Page 131: ...dule is not set correctly The ROM module must be removed Treatment Switchoffthepower unplugthepowercordand contact the Xerox Customer Support Centre Cause The optional RAM module is not set in the order of size from bigger to smaller or not set correctly Treatment Switchoffthepower unplugthepowercordand contact the Xerox Customer Support Centre Cause Insufficientmemory Treatment Switch off the pow...

Page 132: ...wer cord and contact the Xerox Customer Support Centre Cause An error has occurred The interface cable is not connected Treatment Switch off the power and connect the interface cable Switch on the power and if the message appears again switch off the power unplug the power cord and contact the Xerox Customer Support Centre Cause An error has occurred Treatment Switch off and then on the power If t...

Page 133: ...per is jammed in stacker tray 1 2 or 3 Treatment Remove paper from the stacker tray Cause Thefinisherfailed Treatment Press and together Cause The stacker tray 1 2 or 3 failed Treatment Press and together Cause This message appears if you press the Pause Restart button when the stacker trays are being moved up or down Treatment Wait for the trays to stop moving Cause This message appears if you pr...

Page 134: ...cover and close the cover Cause Staple has run out Treatment Add staple Cause The staple cartridge is not in the finisher Treatment Set up the staple cartridge Cause There is a foreign object under the finisher Treatment Remove the foreign object Cause There is a foreign object in the stacker tray Treatment Remove the foreign object Cause Stapleisjammed Treatment Open front cover Cause This messag...

Page 135: ...er User Guide Copier Replace with a new drum toner cartridge User Guide Copier Replace with a new drum toner cartridge User Guide Copier Load the suitable paper User Guide Copier Replace with a new drum toner cartridge User Guide Copier Replace with a new drum toner cartridge User Guide Copier 7 3 When the Print Quality is Poor When the print quality is poor carry out the necessary treatment accor...

Page 136: ...sture The paper used is not suitable The front cover is not completely closed The drum toner cartridge is defective or damaged May be due to high voltage problem Print a few pages Replace with a new drum toner cartridge User Guide Copier Load the suitable paper User Guide Copier Replace with a new drum toner cartridge User Guide Copier Replace with new paper User Guide Copier Replace with suitable...

Page 137: ...paper has moisture The paper used is not suitable The toner seal is not pulled out completely Remove the seal from the drum toner cartridge User Guide Copier Fan the paper and load them again User Guide Copier Replace with a new drum toner cartridge User Guide Copier Replace with a new drum toner cartridge User Guide Copier Contact the Xerox Customer Support Centre Replace with new paper User Guid...

Page 138: ...f the paper tray are not set in the correct positions Paper has wrinkles Printingsmeared Vertical white strips Printingisslanted Replace with suitable paper User Guide Copier Replace with suitable paper User Guide Copier Replace with new paper User Guide Copier Adjust and set it correctly User Guide Copier Replace with a new drum toner cartridge User Guide Copier Replace with a new drum toner cart...

Page 139: ...Appendix Appendix A Printing Area 128 Appendix B Connector and Allocation Signals 129 Appendix C Print Utility 133 Appendix D Mail Box Paper Jams 151 Appendix E PostScript 3 Kit 152 ...

Page 140: ...76 6828 4768 4552 3176 6828 4768 B5LEF 3928 3736 5892 4108 3928 3736 5892 4108 A5LEF 3184 2200 4776 3304 3184 2200 4776 3304 Ledger 11 17 SEF 4280 6672 6420 10012 4280 6672 6420 10012 Legal14 8 5 14 SEF 3280 5472 4920 8212 3280 5472 4920 8212 Legal13 8 5 13 SEF 3280 5072 4920 7612 3280 5072 4920 7612 Letter 8 5 11 SEF 3280 4272 4920 6412 3280 4272 4920 6412 Letter 8 5 11 LEF 4280 3264 6420 4912 42...

Page 141: ...d 3 Data2 I 21 Signal Ground 4 Data3 I 22 Signal Ground 5 Data4 I 23 Signal Ground 6 Data5 I 24 Signal Ground 7 Data6 I 25 Signal Ground 8 Data7 I 26 Signal Ground 9 Data8 I 27 Signal Ground 10 nAck O 28 Signal Ground 11 Busy O 29 Signal Ground 12 PError O 30 Signal Ground 13 Select O 31 nInit I 14 nAutoFd I 32 nFault O 15 RESERVED 33 RESERVED 16 Logic GND 34 RESERVED 17 Chassis Gnd 35 RESERVED 18...

Page 142: ...signal which indicates that there is no more paper Select PinNo 13 A HIGH active signal which indicates that it is possible to receive data nAutoFd Pin No 14 The signal when the bidirectional is ON Chassic Gnd Pin No 17 Connected to frame ground Peripheral Logic High Pin No 18 5V voltage on the host side SignalGround PinNo 19 30 Connected to the various signal ground nInit PinNo 31 The LOW active ...

Page 143: ...llows Pin arrangement The pin arrangement of the various signals is as follows Pin No Signal Name I O 1 Frame GND FG 2 Transmitted data TXD O 3 Received data RXD I 4 Request to send RTS O 5 Clear to send CTS I 6 Data set ready DSR I 7 Signal GND SG 8 10 Reserved 11 17 Not Connected NC 18 Reserved 19 Not Connected NC 20 Data terminal ready DTR O 21 25 Not Connected NC Looking fom the printer I is t...

Page 144: ...at the host device can receive data Printer will ignore this signal DSR In Pin No 6 A signal which indicates that the host device can receive data The purpose of DSR changes according to the settings SG Pin No 7 Connected to signal ground Reserved Pin No 8 10 18 Not in use NC Pin No 11 17 19 21 25 Not connected DTR Out PinNo 20 A signal which indicates that the printer can operate The operation of...

Page 145: ...istory Print History Job Template Server Settings PCL6 Font List PS Font List The Print Utility is printed by a resolution of 400 dpi Paper sizes To print the Print Utility the following paper sizes must be set in the paper tray A3 B4 A4 When multiple paper sizes are used in multiple paper trays the paper will be selected in the order of A4 B4 and then A3 When all the paper trays are not loaded wi...

Page 146: ...ent of PCL 6 mode printer Printingresult Thefollowingitemswillbeprinted Font Source Font Number Symbol Set Point Size Pitch No of Copies HexDump Resolution Tray Duplex Orientation Form Lines Image Enhance Economode Output Tray OverrideSize The result of the printing is shown on the next page ...

Page 147: ...135 Appendix Appendix C Print Utility ...

Page 148: ...ttings Prints the information in the system menu Printingresult Thefollowingitemswillbeprinted Printer Internal Data Maintenance Mode Settings Printer Options Memory Distribution Host Interface Setup Multi Function The result of the printing is shown on the next page ...

Page 149: ...137 Appendix Appendix C Print Utility ...

Page 150: ...t Utility C 4 Error History AboutErrorHistory Prints information related to printer errors Printingresult Thefollowingitemswillbeprinted Date Time Error Code Error Type The result of the printing is shown on the next page ...

Page 151: ...139 Appendix Appendix C Print Utility ...

Page 152: ...x x x x Automatic Judgement Error Printed when printer language cannot be judged automatically while Common Menu Port Setting Emulation Mode is set to AUTO Treatment Set the print language to match data by the print mode setting Numeric Operation Error Printed when values exceeding the printer limit are used in the print data Treatment Remove the above mentioned data Normal Ending 0 Page Printed i...

Page 153: ... IllegalAttribute IllegalAttributeCombination If there are more than one PCL XL syntax errors in the same job only the first error encountered will be logged in The maximum length of the PCL XL error code is 31 bytes Printed when there is a PJL command with syntax error For example if the invalid command PJL JOBINFOX JOBNAME ABCDEFGHIJKLMN is ordered to printer the printing status should display t...

Page 154: ...142 Appendix C Print Utility ...

Page 155: ... the storing server Printingresult Thefollowingitemswillbeprinted Total Printed Pages System ROM Version Server Name of the template storing server Directory of the template storing server Login User of the template storing server Polling Interval of the template storing server The result of the printing is shown on the next page ...

Page 156: ...144 Appendix C Print Utility ...

Page 157: ...45 Appendix Appendix C Print Utility C 7 PCL6 Font List About PCL6 Font List Prints the list of PCL 6 fonts that can be used by printer Printingresult The result of the printing is shown on the next page ...

Page 158: ...146 Appendix C Print Utility ...

Page 159: ...147 Appendix Appendix C Print Utility ...

Page 160: ...y C 8 PS Font List About PS Font List Prints a list of PostScript fonts that can be used in printer It can be printed if the optional PostScript kit is installed Printingresult The result of the printing is shown on the next page ...

Page 161: ...149 Appendix Appendix C Print Utility ...

Page 162: ...150 Appendix C Print Utility ...

Page 163: ...ith the power on If the power is off print data remaining inside the printer and informa tion stored in the printer memory will be erased This message is displayed when the optional mail box is installed Pull the release lever to open the cover of the mail box slowly Pull out jammed paper in the direction of the arrow Close the cover of the mail box Release lever ...

Page 164: ...00 350 250 printer E 1 Setting Up the Printer To carry out a print job using the the PostScript language you have to install the PostScript programme ROM and then make settings from the printer control panel according to the operating system that you are in Usable Common Menus The following common menus become available when the PostScript ROM is installed on theprinter ...

Page 165: ...in the ASCII format default Binary Selected when the protocol is in the binary format Depending on the data the printing speed might be faster than when selectingStandard TBCP Selected when the protocol exists in both ASCII and binary formats and to switch between them by the specific control code Set according to the data format output from the host device driver For general use select the defaul...

Page 166: ...n a two sided page in 600 dpi resolution Is the page buffer secured for one sided page of the data Does the compressed size of the two sided page data exceed the limitation of the buffer size Lower the resolution to 400 dpi Is the page buffer secured for one sided page of the data Print the data on one side in 400 dpi Does the compressed size of the two sided page data exceed the limitation of the...

Page 167: ...en page buffer for one page is not sufficient in 600 dpi it will be lowered to 400 dpi A3 portrait B4 portrait A4 portrait Without hard disk 4641 3446 2273 With hard disk 5569 4135 2727 Unit KB The above values are the minimum required It is recommended to set the value of the page buffer more than the minimum required 2 3 Increase Allocation of Memory 2 Increase the memory as required An optional...

Page 168: ...Return which is the change of line Cut paper Standard types of paper like A4 B5 etc DPI Stands for Dot Per Inch which is the number of dots that can be printed within a width of 1 inch Used as the unit for resolution DL Stands for Double Letter Also known as Ledger 17 11 432 279 mm paper size DTR Control Stands for Data Terminal Ready which is the hardware signal that indicates whether the printer...

Page 169: ...rity check The checking of whether the data sent is being received Plotter coordinates The coordinates of the plotter PostScript Page description language of Adobe Systems Incorporated Power Saver The feature which saves the power consumption by lowering the temperature of the printer s fuser The power saver mode is automatically activated when the time set has elapsed after the previous print job...

Page 170: ...fault 00 45fonts Range 4 50 Unit 0 25 Range 6 24 Unit 0 01 1 00 Range 1 999 Unit 1 FontNumber SymbolSet PointSize Pitch Copies Hex Dump Resolution Built in Download 23Courier ISO L1 ISO L2 ROMAN 8 WIN 3 0 12 00 10 00 1 ON OFF 400 600 see next page Font Source ...

Page 171: ... and Bypass Tray 3 HCF supports only A4 LT and B5 Range 5 128 Unit 1 Tray FormsLines Image Enhance Tray 1 Tray 2 Tray 3 HCF 1 Tray 4 HCF 2 Bypass Tray Auto Tray LG LT B5 B4 A4 Folio 267 388mm 11 17 A5 Postcard A3 OFF Long Edge Duplex ON Short Edge Orientation 64 Landscape Portrait OFF ON OFF from previous page see next page ...

Page 172: ...arts ModeMenuItems Option Default Economode OverrideSize ON OFF OFF ON OFF Output Tray Centre Tray Side Tray Stacker Auto Stacker Tray 1 Stacker Tray 2 Stacker Tray 3 MailBox Bin 1 MailBox Bin 10 from previous page ...

Page 173: ... Unit 5 Auto PCL 6 PostScript 3 PDL Mode 30 sec Option PJL Switch Auto Eject Time ON OFF Auto PCL 6 PostScript 3 ON OFF Range 5 1275 Unit 5 30 sec Parallel Serial TBCP ON OFF PDL Mode PJL Switch Auto Eject Time Bidirectional AdobeProtocol Standard Binary Default see next page ...

Page 174: ...t TBCP 9600 19200 1200 2400 4800 8 Bits 7 Bits 1Bit 2 Bits None Odd Even Yes No Fix High Fix Low Active High Active Low Serial DTRControl Xon XoffControl Parity StopBit Data Length AdobeProtocol Standard Binary from previous page see next page Baud Rate ...

Page 175: ...nuItems Option Default PDL Mode PJL Switch Transport OFF ON Auto PCL 6 PostScript 3 OFF ON TCP IP IPX SPX NetWare lpd PD EtherTalk from previous page PJL Switch OFF ON PDL Mode Auto PCL 6 PostScript 3 PJL Switch ON PDL Mode PostScript 3 OFF ...

Page 176: ...164 SystemCharts CommonMenuItems Print Utility Ready Ready Ready Ready Ready Ready Ready PS Font List PCL 6 Font List JTSvrSettings PrintHistory ErrorHistory PrinterSettings PCL 6 Settings Option ...

Page 177: ...ry ReceiveBufferMem Parallel 4 50 MB 4 50 MB AppleTalkmemory 64 KB Jam Recovery OFF Continuous AutoPrintHistory SystemClock OFF ON 2 sec 90 sec YY MM DDhh mm OFF Alarm PrinterSettings Echo Back Mode MemoryChanges Option Default Unit 2sec Range 2 00 16 00MB Unit 0 25MB Range 2 00 16 00MB Unit 0 25MB Range 64 1024 KB Unit 32 KB see next page ...

Page 178: ...tation NetWare InitaliseNVRam System Reset Ready to Init Init Hard Disk Start IPX CommunitySignup OFF ON Start UDP 100BASE TX 10BASE 5 10BASE T Option Default Port Status Initialisation Agent Ethernet Setup Range 64 1024KB Unit 32 KB Range 64 1024 KB Unit 32 KB Range 0 50 32 00MB Unit 0 25MB OFF Enabled Disabled AUTO T TX 1 MB see next page from previous page Ready to Init Ready to Init ...

Page 179: ...tting Ether II 802 2 802 3 IPX SPXSetting SNAP IP Address XXX XXX XXX XXX XXX XXX XXX XXX SubNet Mask Gateway Address XXX XXX XXX XXX Option Default AUTO Range 000 255 Unit 001 Range 000 255 Unit 001 Range 000 255 Value 000 128 192 224 240 248 252 254 255 from previous page ...

Page 180: ... 33 Copies 54 Copying 37 Custom Paper Size 57 D Data length 19 Device Halftoning 53 Document defaults dialog box 48 Document Monitor 60 DTR control 19 DuplexPrint 57 Duplex Unit Inverter 52 E EconoMode 62 Enable Raster EMF Spooled Jobs 60 Error Report 53 Ethernet Interface 20 Ethernet interface Connecting 21 Ethernet interface card 20 F Fax Option tab 78 Fonts tab 65 Fax Recipient 75 FaxUnit 52 Fa...

Page 181: ...ptions 51 Paper Tray Priority 37 Parallelinterface Connection 16 Parallelmemory 23 Parity 19 PCL6memory 24 PJL switch 19 90 91 94 95 Print mode specification 19 Printer driver configuring 46 Installing for a local printer 41 Installing for a network printer 43 Uninstalling 44 Printer drivers 40 Printer properties dialog box Accessing in Windows 3 1 47 Accessing in Windows 95 Windows 98 46 Accessin...

Page 182: ...dex Staple Finisher 52 56 Staple Position Settings 59 Stop bit 19 System 23 T Transmitting 37 TrueType Mode 63 U Use Document Monitor 60 Use Printer TrueType fonts 63 W Watermarks tab 70 X Xon Xoff control 19 ...

Page 183: ... the Manual Strongly Neutral Strongly Agree Disagree 1 It is handy 1 2 3 4 5 2 It is easy to read 1 2 3 4 5 3 Titles of chapters and sections make sense 1 2 3 4 5 4 Information is logically placed 1 2 3 4 5 5 Referencing is easy 1 2 3 4 5 6 Content is easy to understand 1 2 3 4 5 7 The step by step instructions are easy to follow 1 2 3 4 5 8 All necessary information is included 1 2 3 4 5 9 Illust...

Page 184: ...This page is intentionally left blank ...

Page 185: ...Document Centre 400 350 250 User Guide Printer Fuji Xerox Co Ltd 2 17 22 Akasaka Minato ku Tokyo 107 0052 Japan DE 0471E2 Edition 3 Copyright 1999 by Fuji Xerox Co Ltd Printed in Japan ...

Reviews: