background image

12

Xerox CopyCentre, WorkCentre, WorkCentre Pro 232/238/245/255/265/275 Tab Supplement

4    

Copying using Build Job

Build Job

 allows the document to be broken into several segments and copied 

segment by segment with different settings applied to each segment. This section 
describes how to copy an original document containing printed tab dividers. 

Load the tab stock into the paper trays

Load the tab stock into either the Bypass Tray, Tray 1 or Tray 2 as described in Section 
2, 

Setup on page 3

.

Program Build Job

The job must be divided into segments. Each divider will be a segment and each part 
of the body of the document between the dividers will be a segment.

1

Input the number of sets you require.
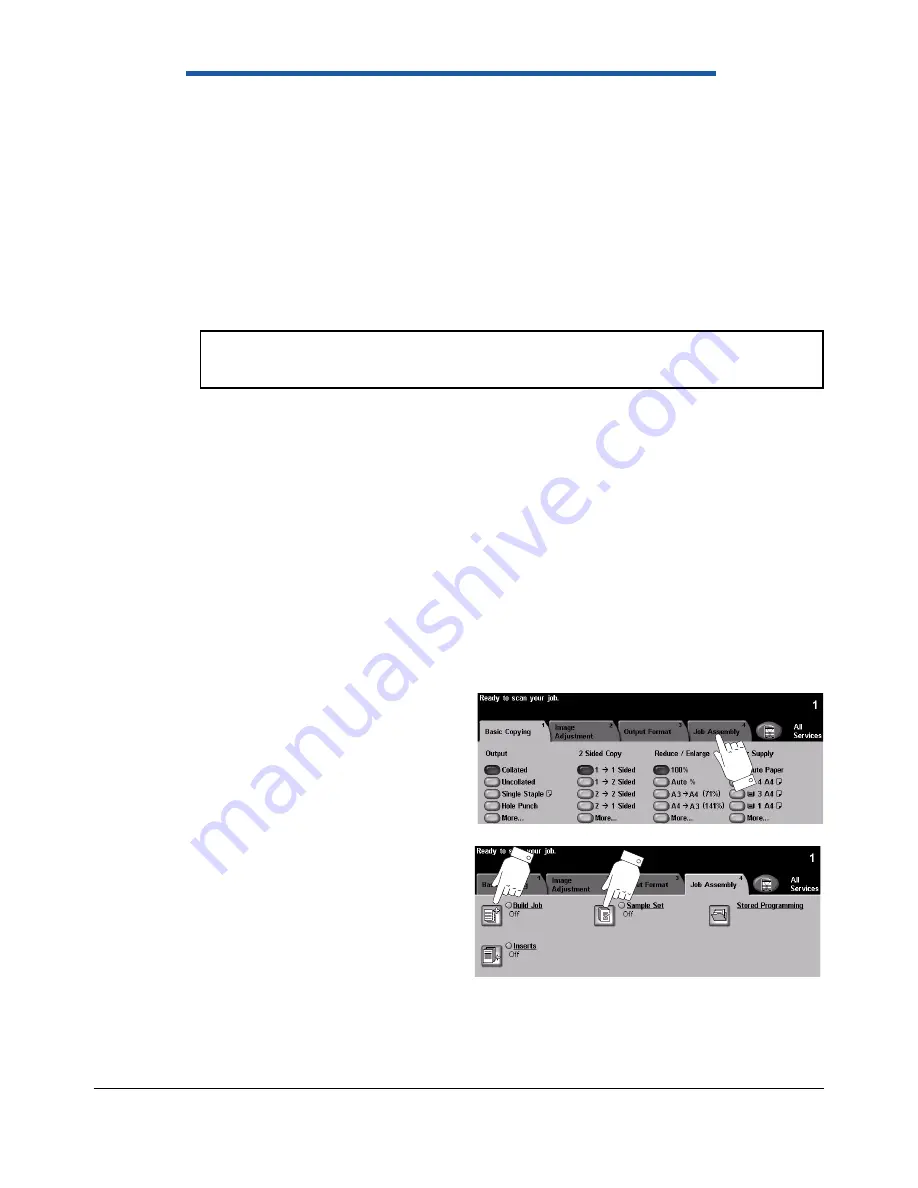
2

Select the 

Job Assembly

 tab.   

3

Select 

Sample Set,

 select 

On


and 

Save

. This will enable you 

to print one sample set to 
ensure that you have 
programmed the job correctly. 

4

From the 

Job Assembly

 screen 

select 

Build Job

.

Note: 

The original printed tab dividers MUST be copied from the document glass 

while the body of the original can be copied using the document handler. 

Summary of Contents for CopyCentre 232

Page 1: ...Version 3 0 November 2005 CopyCentre WorkCentre WorkCentre Pro 232 238 245 255 265 275 Tab Creation Supplement...

Page 2: ...y statutory or judicial law or hereinafter granted including without limitations material generated from the software programs which are displayed on the screen such as icons screen displays looks etc...

Page 3: ...inted tabs so that subsequent manual sorting is not required Printed jobs For printed jobs tabs are enabled from the Special Pages tab in the print driver To add blank or pre printed tab stock use the...

Page 4: ...document that has tab dividers Using this supplement The instructions in this booklet will help you print and copy tab dividers Specifications Type of Job Go to section Copy onto tabs only Copying on...

Page 5: ...in standard order If more than one set of tabs is required the number and sequence of the tabs loaded must match the number and sequence of tabs to be printed Any surplus tabs should be removed from e...

Page 6: ...y surplus tabs should be removed from each set prior to starting the job 2 Adjust the paper guides to touch the side and back of the stack of tabs 3 When the Tray Information screen appears select Cha...

Page 7: ...n Tab Template 2 Open the template you require save it as another file and change the text on the tabs as required 3 If you are making the tab masters for a copy job print the tab master pages onto pl...

Page 8: ...tab You may need to adjust the vertical position of the text boxes on your master to make the text align correctly with the respective tabs 5 If you are making the tab masters for a copy job print the...

Page 9: ...aper tray that contains the stock you want to use for the body of the document which should be in either Trays 3 or 4 3 Select the Job Assembly tab Note If your original document contains printed tab...

Page 10: ...ed 8 The Inserts screen displays the controls for adding the insert pages Use the scroll buttons to display the page number of the first insert and then select Add Insert The page number will appear i...

Page 11: ...ce up with page one on top Select the number of sets you require and any image quality adjustments or output selections you may wish to make that are appropriate to your original document 15 Press Sta...

Page 12: ...re is used to review the output to ensure that it is exactly what is required prior to printing a large quantity Options Off The feature is switched off On Use to enable the Sample Set feature One com...

Page 13: ...location then select a function button Store or Recall Programming Options Job Number Use to scroll to a job number between 1 and 10 Store Programming Use this option to store the current programming...

Page 14: ...ray 1 or Tray 2 as described in Section 2 Setup on page 3 Program Build Job The job must be divided into segments Each divider will be a segment and each part of the body of the document between the d...

Page 15: ...1 sided copies 14 Press Start The divider will be scanned 15 Repeat this process until all the segments of the document have been scanned Don t forget to make the appropriate selections for each segm...

Page 16: ...and 1 Load the tab stock into the Bypass Tray Tray 1 or Tray 2 2 Create your tab master pages Printing a document with printed tab dividers 1 With your document open select File Print 2 Select your Wo...

Page 17: ...input 10 20 30 7 Select the Select Paper drop down menu and select Type Tab Stock Note Add Covers enables printed plain or pre printed covers to be added to the front or back of the document Add Inse...

Page 18: ...u have used the 8 5x11 inch template 12 7 mm if you have used the A4 template Custom if you have created your own tab master You can shift the image from 0 50 mm or 2 inches as required 9 Select OK to...

Page 19: ...ed Print body of document Stapling or 3 Hole Punch Select OK 14 At the Print window select the number of copies you require Ignore all print margin warnings and select OK 15 The job will print Note In...

Reviews: