background image

PHASER 8550, 8500, & 8400 CARE SECTION

Version 1.0

page 53

Reporting Maintenance Kit Status

The printers track their Maintenance Kit status including the life remaining and installation date of the 
current kit, as well as the total number of kits installed. Kit status can be reported accurately after used kits 
are installed, because each kit includes a counter to track usage. The printers have several ways to inform 
users of the Maintenance Kit status:

The Control Panel displays status messages for low and replace

Windows printer driver Paper/Quality properties page (status window)

The CentreWare IS Status page provides status information

If connected via TCP/IP, PrintingScout reports when the Maintenance Kit is low or expired

Determining Actual Usage

Customers can use the Control Panel to view information about the Maintenance Kit. The installation date, 
estimated life remaining, and type of kit installed can be determined by selecting the 

Information

 menu and 

then the 

Supplies Info

 menu. Similar information is available by printing the 

Usage Profile

 or the 

Printer 

Status Page

.

The Maintenance Kit is “low” when less than 1000 pages remain.

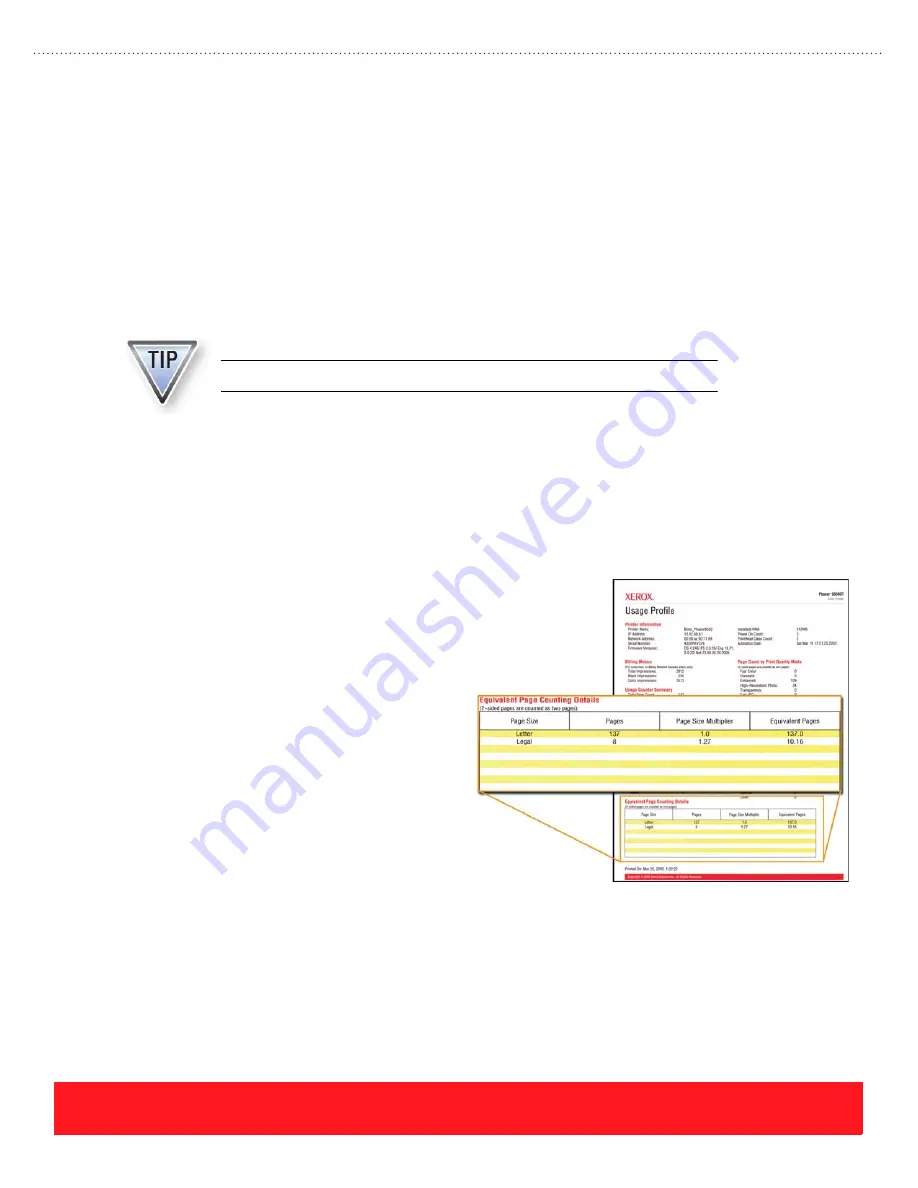
A feature of the Phaser 8500 and 8550 

Usage 

Profile

 is the “Equivalent Page Counting 

Details” field. It provides the multiplication 
factors used by the printer to determine how 
much oil is consumed for different types of 
jobs. This information can be used to help 
customers understand why their Maintenance 
Kit produced fewer pages than expected.

In the example to the right, the printer used a 
page size multiplier of 1.27 for Legal-size 
pages. Generating prints on Legal-size paper 
will consume the Maintenance Kit 1.27 times 
faster than using Letter-size paper. 

Phaser 8500 and 8550 

Usage Profile

Summary of Contents for 8550YDP - Phaser Color Solid Ink Printer

Page 1: ...Version 1 0 Technical Product Training Phaser S o l i d I n k P r i n t e r s 8550 8500 8400...

Page 2: ...rox com office testing Continuing Support The Resources section of the training CD ROM contains useful printer documentation and supplemental training materials To obtain the most current updates tips...

Page 3: ...quirements Adobe Reader Included on training CD ROM Web Browser Internet Explorer 5 X or later recommended To start your training Product Training CD ROM 1 Refer to the Introduction section of the Sel...

Page 4: ......

Page 5: ...ter 5 If You Need Help 6 How to Contact Xerox Product Training Information 6 OVERVIEW SECTION Overview Objectives 7 Configurations 7 Phaser 8500 and 8550 Printers 7 Phaser 8400 Printers 9 Primary Diff...

Page 6: ...aper 28 Guidelines 29 Loading Tray 1 MPT 29 Loading Trays 2 3 4 31 Loading Paper Review Exercise 31 Configure Control Panel 32 Menus 32 Shortcuts 32 Control Panel Defaults 33 Control Panel Lab 33 Test...

Page 7: ...Remove Print Smears 61 Clean Components Manually 62 Cleaning Review Exercise 63 Replace Parts 64 Feed Roller Kit 64 Front Door and Tray Kit 65 Replace Parts Lab 65 Moving The Printer 66 Moving and Shi...

Page 8: ...Answers to Overview Exercises 89 Speed Quality Review Exercise 89 Media Support Review Exercise 89 Answers to Setup Exercises 90 Setup Review Exercise 90 Loading Paper Review Exercise 90 Answers to C...

Page 9: ...urces section Prerequisite Courses The Printing Basics and Solid ink Basics prerequisite courses must be completed before you begin the Phaser 8550 8500 and 8400 training program The prerequisites are...

Page 10: ...stall the latest version of the Macromedia Flash Player Use www macromedia com downloads to access the player Adobe Reader Adobe Reader is required to view the PDF documents contained in the Resources...

Page 11: ...ocated on the training CD ROM b Turn to Care Objectives on page 45 and complete the Care section of the SSG c Return to the training CD ROM and complete the Care Self Check 7 Complete the Service sect...

Page 12: ...s Media Support Documentation Software Setup Care Service Online Test Printer Installation Power On Process Test Ports Custom Size Jobs Advanced Setup Procedures Setup Self Check Setup the Printer Loa...

Page 13: ...550 Service Manual available from the Resources section of the training CD ROM Xerox P N 721P58550 Software Internet Explorer 5 5 Macromedia Flash 6 0 ActiveX Control Plug in Adobe Reader Phaser 8500...

Page 14: ...xerox com office partners or the training update site at one of these locations Internet Access www xerox com office training Requires login user name and password Intranet Access cpidserv opbu xerox...

Page 15: ...e Phaser 8550 8500 and 8400 printers A summary of the primary differences between the printer models is also included Phaser 8500 and 8550 Printers The Phaser 8500 and 8550 printers are the next gener...

Page 16: ...600 MHz 600 MHz Standard Memory Maximum 128 MB 1 GB 128 MB 1 GB 256 MB 1 GB 256 MB 1 GB 512 MB 1 GB Fast Color Enhanced Print Quality Modes 3 3 3 3 3 Standard High Res Photo Print Quality Modes No No...

Page 17: ...pm 24 ppm Standard Memory Maximum 128 MB 512 MB 256 MB 512 MB 128 MB 512 MB 256 MB 512 MB 256 MB 512 MB Fast Color Standard Enhanced High Res Photo Print Quality Modes 3 3 3 3 3 PCL Print Quality Mode...

Page 18: ...g supplies Printer Supplies Phaser 8500 8550 supplies are similar to Phaser 8400 supplies but are not interchangeable Refer to Supplies on page 49 for more information on the ink sticks and Maintenanc...

Page 19: ...following table Network Connectivity 8400N DP DX 8500N DN 8550DP DT DX Network Protocols TCP IP IPX SPX EtherTalk TCP IP EtherTalk TCP IP EtherTalk CentreWare Web IS DP MC Web IS MC Web IS MC Although...

Page 20: ...B of RAM and no hard drive additional memory increases the job accounting record capacity from 50 to 500 At least 256 MB of memory is required for automatic two sided printing The printer supports PC1...

Page 21: ...r 8550 printers However customers can purchase the components needed to upgrade their Phaser 8550 printer Use the following table as a guide Five upgrade kits are available to change the feature set a...

Page 22: ...ipt Print Quality Modes are provided below Fast Color Fastest full color mode useful for many images rapidly producing review documents previewing work and rush jobs Standard General purpose mode for...

Page 23: ...e the same for all Phaser 8400 printers as shown in the following chart The High Resolution Photo mode uses image enhancement technology to produce photo quality images Printer Fast Color 225 x 400 dp...

Page 24: ...When Phaser 8500 and 8550 printers run out of cyan magenta or yellow ink the user is given the choice to continue printing using black ink only This capability is known as run black mode Although man...

Page 25: ...k Up features This topic provides an overview of the Walk Up Printing technology followed by descriptions of the Walk Up installation process Walk Up features and the special Walk Up printer driver Wa...

Page 26: ...menu shown to the right Phaser 8550 printers offer an additional feature called Personal Print It provides a virtual mailbox feature allowing users to send a job and then print at their convenience u...

Page 27: ...t sizes A6 and 3 x 5 inch Index Cards Plain paper up to 220 g m2 Card stock up to 163 g m2 Phaser Professional Solid Ink Business Cards 10 sizes of envelopes Custom size paper Minimum dimensions 75 mm...

Page 28: ...f Paper Phaser Trifold Brochures 10 Commercial DL and C5 envelopes Media Support Review Exercise Use the chart from the Phaser 8400 Paper Tips Page to determine which of the following media must be pr...

Page 29: ...on CD ROM and Printer Installer Utilities CD ROM The Phaser 8500 and 8550 printer drivers and user documentation are delivered on a single Software and Documentation CD ROM This section provides a qui...

Page 30: ...c network installation and procedures for printing Additional topics include print quality printer maintenance and troubleshooting When loading the Phaser 8500 8550 printer software a pdf version of t...

Page 31: ...enu Provides hints and tips for solving printing problems by directing users to sources of information on a variety of topics Moving Guide Phaser 8400 only Information Pages Menu Provides cautions tha...

Page 32: ...advanced users to customize the TekColor Color Corrections See Color Adjustment Sliders on page 25 for details Utilities The printer utilities listed below are available from the Xerox website to supp...

Page 33: ...he Color Adjustments all sliders set to 0 000 They must also be aware that the adjustments always apply to the active Color Correction setting For example a customer may select the Color Correction No...

Page 34: ...reWare IS support websites the knowledge base and PhaserSMART During the software installation the Installer creates a shortcut to the Xerox Support Centre and saves it on the computer desktop After t...

Page 35: ...er if available It also presents information on loading paper and specialty media changing Control Panel settings testing the communication ports printing documents and installing hardware upgrades Re...

Page 36: ...n be within 10 cm 4 in of the wall ________________________ 4 The surface on which the printer is placed must be level from side to side within how many inches ________________________________________...

Page 37: ...ripes add thickness to one side of the media so the stack is higher on one side of the tray If the stack is too high mispicks jams or skewing can occur Paper with pre punched holes Print quality probl...

Page 38: ...printers remember the previous setting In contrast Phaser 8400 printers default to the highest priority tray regardless of the previous settings Phaser 8500 and 8550 printers use the following sequen...

Page 39: ...fill the tray above the fill line located on the left width guide Refer to labels on the tray for the correct orientation for envelopes and letterhead Always load media short edge feed Print custom si...

Page 40: ...Walk Up driver When Walk Up Printing is selected the printer searches the network for jobs that use Walk Up Technology Information Menu The Information Menu provides access to the Menu Map printer id...

Page 41: ...ltimedia training explains how to test the printer s Ethernet and USB ports from a Windows 2000 PC This lesson provides additional procedures for testing the communication ports Refer to the Phaser 84...

Page 42: ...range 169 254 xxx xxx an alternate procedure is required to test the printer see below PCs that have not been configured for a specific network default to a LOCAL LINK value that begins with 169 254 U...

Page 43: ...ent cable and retest Test Parallel Port To test the parallel port on Phaser 8400 printers install the printer driver and print a test page This procedure demonstrates how to test the port by installin...

Page 44: ...hown to the right 6 If prompted specify the drive where the driver files are located CD ROM 7 Click Print Test Page at the end of the installation to test the connection 8 If the test page fails to pr...

Page 45: ...d drive Select Applications Utilities Print Center 6 To select the PPD On Print Center click the ADD icon Use the pull down menu to select USB Select the printer from the Product section there may onl...

Page 46: ...net type If the Ethernet type is not connected either the cable or port is broken Use the printer s Control Panel to change its IP address to a static IP address that matches the Macintosh computer ex...

Page 47: ...er onto your computer If you support multiple operating systems use the Knowledge Base to locate and install drivers for each computer and operating system The printer s software CD ROM includes an in...

Page 48: ...enerate jobs using the following printer features if available Select paper from Tray 1 and Tray 2 Two sided printing multi page document Booklet printing multi page document Fast Color print quality...

Page 49: ...is packaged with each option and upgrade kit Most installations require access to the printer s main board which is located inside the electronics module The printer s option plate must be removed to...

Page 50: ...ty service agreement or Total Satisfaction guarantee only when purchased from Xerox The hard drive Productivity Kit includes two cables that must be installed on the Main Board If the lower RAM slot c...

Page 51: ...p You have completed the Setup Section of the Self Study Guide Configuration upgrade kits are available for many Phaser 8400 printers but not for Phaser 8500 or 8550 printers See Configuration Upgrade...

Page 52: ...PHASER 8550 8500 8400 SETUP SECTION Version 1 0 page 44...

Page 53: ...cedures for cleaning replacing customer parts and moving the printer Refer to the Phaser 8400 Reference Guide or the Phaser 8500 8550 User Guide to complete the exercises in this section Electronic ve...

Page 54: ...checking the functionality of each tray Service Tools menu The menu Troubleshooting Service Tools provides access to the embedded Printer Status Page Jam History and the Customer Diagnostics Mode Prin...

Page 55: ...prove clearance lift the paper guide until it snaps into place as shown to the right If paper scraps are located inside the Preheater use the following procedure to remove them 1 Open the Front Cover...

Page 56: ...Roller For jams at the Tray 1 MPT Clean the Pick Roller and Pick Pad Replace the Front Door and Tray kit To clear and resolve jams under the Exit Cover Check for paper below both the Exit Guide and t...

Page 57: ...olor or Standard Print Quality modes Print low coverage text only documents Avoid unnecessary Printhead cleaning cycles Leave the power turned on Keep the covers and doors closed This lesson describes...

Page 58: ...e IS Status page If connected via TCP IP PrintingScout reports when ink is out Phaser 8400 printers indicate ink is low when any color reaches the center of the last oval hole in the ink load bin wher...

Page 59: ...g the number of inks sticks used In contrast Phaser 8400 printers have one ink out sensor that monitors all four colors of ink A notch on each Phaser 8500 8550 ink stick triggers an ink out sensor fla...

Page 60: ...ude the Standard Capacity Maintenance Kit but Standard and Extended Capacity kits are available for Phaser 8400 and 8550 printers Although the Phaser 8400 and 8500 8550 Maintenance Kits look the same...

Page 61: ...se the Control Panel to view information about the Maintenance Kit The installation date estimated life remaining and type of kit installed can be determined by selecting the Information menu and then...

Page 62: ...ues Use the example Phaser 8400 Printer Status Page on the next page to diagnose the following customer examples The answers for this exercise are located in the Appendix on page 90 1 On November 11 2...

Page 63: ...Before authorizing onsite service the knowledge base indicates the Maintenance Kit should be replaced to correct a specific print quality problem The customer has FAXED a copy of their Printer Status...

Page 64: ...Quality Problems and press OK 3 Locate the Eliminate Light Stripes selection in the menu Do not select Eliminate Light Stripes unless you want to clean the Printhead Cleaning instructions are located...

Page 65: ...cts the brightness of the color bars on the Light Stripes Test Page When the Print Quality Mode is Enhanced factory default or High Res Photo the colors are highly saturated Test prints generated usin...

Page 66: ...issing jets they should select the menu path Troubleshooting Print Quality Problems and print the Troubleshooting Print Quality Page menu choice shown to the right The step by step instructions on thi...

Page 67: ...st Page In the print quality example to the right the user should select magenta jet number 85 After selections are made the printer temporarily increases the drive voltage to the selected jet prints...

Page 68: ...t the tray into the printer 5 Close the Side Door The printer moves the Printhead Wiper Assembly up from its home position to lock the Waste Tray in place Occasionally it may be necessary to remove th...

Page 69: ...e Paper Feed Rollers Approximately 15 sheets of clean paper are used when running this procedure which takes about 5 minutes On Phaser 8500 and 8550 printers a special paper type option called 2nd Sid...

Page 70: ...0 isopropyl alcohol when cleaning printer components The Paper Release Blade may accumulate ink or other debris leaving smears or vertical streaks on the page To clean the blade 1 Open the Exit Cover...

Page 71: ...ate Light Stripes menu a 1 b 2 c 3 d 4 2 Which troubleshooting step should not be used even though it appears on the embedded Phaser 8500 8550 Troubleshooting Print Quality Page a Step 1 b Step 2 c St...

Page 72: ...ovides a new Pick Roller and Retard Roller for the 525 Sheet Tray A new roller may be required if paper jams occur frequently when printing from Trays 2 3 or 4 When installing the kit observe the foll...

Page 73: ...Always turn the printer off before replacing the assembly Replacing parts when power is on can damage the assembly and the printer When installing the kit observe the following practices After releasi...

Page 74: ...__ Your Next Step This lesson reviews special precautions that must be observed to avoid damage when moving the printer or preparing it for shipment The printer contains several features that help to...

Page 75: ...generating pressure to purge ink out the faceplate Wiper Assembly cleans the Printhead faceplate Vacuum Pump Module generates vacuum that sucks ink out of faceplate Cap Wipe Purge Assembly holds vacuu...

Page 76: ...e base Service Flashes and Service Bulletins Error Codes The printers report error codes using the Control Panel display the status LED and the PS PE LEDs located just above the Power Switch Troublesh...

Page 77: ...ST Blinks the PS PE LEDs just above the Power Switch BIST Rear Panel LED Codes Table POST Error code is displayed on the Control Panel POST Power On Self Test Error Messages Table Blinks the Control P...

Page 78: ...Usage Profile Report Print process that was active when the jam occurred The reason or basis for reporting the jam Page count when the jam occurred Tray from which jammed paper was picked 1 4 or when...

Page 79: ...________________________________________________________________________ Print Quality Most print quality problems can be resolved by the end user The most common print quality defects are caused by o...

Page 80: ...olate the problem to the printer Problems that appear on embedded pages such as the Light Stripes Test Page cannot be caused by the customer s computer network or software application Each procedure b...

Page 81: ...Zabcdefghijklmnopqrstuvwxyz1234567890 6 point Times Roman ABCDEFGHIJKLMNOPQRSTUVWXYZabcdefghijklmnopqrstuvwxyz1234567890 5 point Times Roman ABCDEFGHIJKLMNOPQRSTUVWXYZabcdefghijklmnopqrstuvwxyz1234567...

Page 82: ...rmation are you checking for in Step 1 of the checklist ________________________ 2 If the printer has error code 13 197 4x name two troubleshooting steps to complete before replacing the Printhead ___...

Page 83: ...oltage may be present at any of these assemblies The printer s Power Switch does not physically disconnect the AC line from internal components Disconnecting the power cord is the only way to isolate...

Page 84: ...d Ink Loader Assemblies while they are still warm observe the following precautions Never place the assemblies directly onto carpeting upholstery or finished surfaces Place the assemblies on several s...

Page 85: ...area with your hands or tools to avoid scratches If the Printhead is hot hold it using the rounded lift points to avoid burns as shown to the right Finally never position the Printhead on its facepla...

Page 86: ...ages the drive train Printhead Printhead tilted forward against Drum print position Tilt Gear disengaged from drive gear train When the Tilt Gear is disengaged the two arrows on the left printer frame...

Page 87: ...endix on page 93 Parts Replacement Tips This lesson provides hints and tips that will help you avoid problems when replacing service parts including the exterior covers as well as assemblies within th...

Page 88: ...shown to the right Release them by pulling up on the rounded area near the back of the printer and near the front cover The right side cover has one more latch located next to the power cord receptacl...

Page 89: ...example you may need to watch the Printhead or Wiper Assembly to visually determine the cause of failure Hang the Ink Loader Assembly by attaching its plastic hooks over the Electronics Module as show...

Page 90: ...Assembly be sure to hold the Transfix Roller firmly when lifting the assembly out of the printer After removing the Transfix Roller Shaft to free the assembly from the printer frame the Transfix Roll...

Page 91: ...code Phaser 8500 8550 printers display error 19 004 40 if the Printhead and Electronics Module codes do not match Technicians should also be aware of the following differences between the Phaser 8400...

Page 92: ...the Nose Cone Gear so the X Axis Shaft can thread in and out Do not apply grease to the rail unless it is completely dry A thin coating of grease is adequate to lubricate for smooth motion of the Nose...

Page 93: ...se the following tips when replacing the Exit Assembly Carefully observe how the Drum Temperature Sensor wiring harness yellow wires shown to the right passes through the Exit Assembly frame The wires...

Page 94: ...f the Media Drive Gearbox and Motor gears are noisy after reinstalling the assembly rotate the Duplex Roller back and forth to seat the gears Procedure Differences The Drum Assembly replacement proced...

Page 95: ...___________________ _____________________________________________________________________________ 4 Which part has screws that should be tightened using 6 in lbs __________________________ Plastic par...

Page 96: ...and then reinstall the Drum Assembly 3 Power on the printer and verify normal operation Your Next Step You have completed the Phaser 8550 8500 8400 Self Study Guide To avoid damage to the printer refe...

Page 97: ...ity Mode What are two suggestions you can her them to increase the print speed Increase the print speed by using Tray 2 instead of Tray 1 and by selecting a different Print Quality Mode 3 What advice...

Page 98: ...The supported envelope styles are A B and D Answers to Care Exercises Troubleshooting Exercise 1 On November 11 2003 a customer explains that their printer is using too much ink The printer s warrant...

Page 99: ...he printer for 4 hours is no longer a recommended troubleshooting step 3 A hidden push button sequence is used to select Jet Substitution mode on Phaser 8500 8550 printers False Jet Substitution is lo...

Page 100: ...se wrinkling 4 Dirty Drum Temperature Sensor Dirt or debris located beneath the Drum Temperature Sensor can cause loss of detail such as the missing thin line Printhead Troubleshooting Checklist Exerc...

Page 101: ...intenance Camshaft is home dot lines up with arrow Tightening Screws Review Exercise 1 How should you start screws when using a power driver for installation Start the screw by hand to avoid cross thr...

Page 102: ...nd Service Agreements www xerox com office support Xerox Worldwide Service Partners Login Site www office xerox com partners Resource How to contact Product Training Information 503 685 4400 North Ame...

Page 103: ......

Page 104: ...Computer Inc Windows is a registered trademark of Microsoft Corporation Macromedia and Flash are registered trademarks of Macromedia Inc Adobe the Adobe logo and Reader are either registered trademar...

Reviews: