background image

Troubleshooting 


210 

Xerox

®

 VersaLink

®

 C405 Color Multifunction Printer 


User Guide 


Symptom 

Probable Causes 

Solutions 

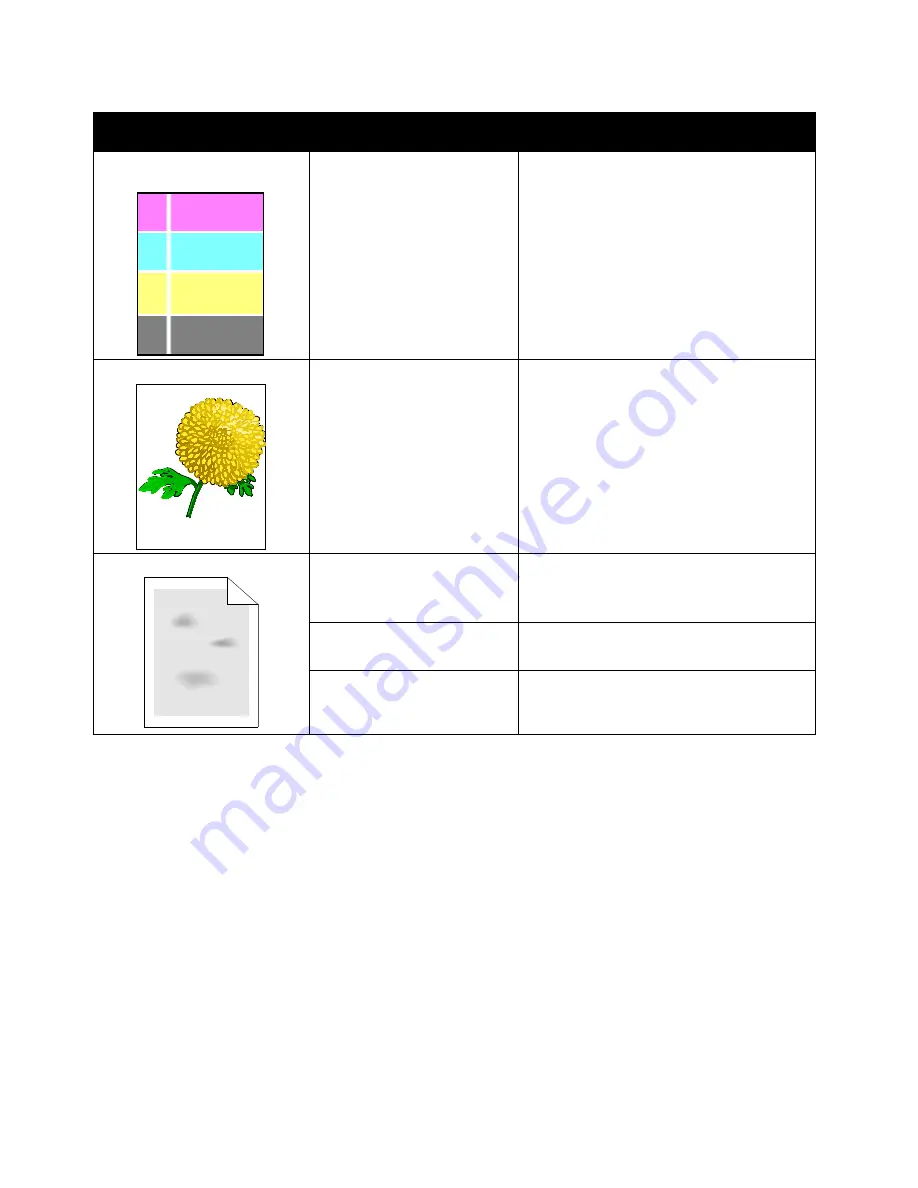
White line or lines running 

through all colors. 


Paper or debris is dragging the 

bottom of the transfer belt. 


Remove the paper or debris from the 

printer. 


For assistance, go to the Xerox

®

 Support 

website at 

www.xerox.com/office/VLC405support

Slanted printing. 


The paper guides in the trays 

are not set correctly. 

Reset the paper tray guides. For details, refer 

to 

Loading Paper

 on page 144. 

Blotchy or mottled images. 


The paper is too light or too 

thin. 

Choose a different paper type at the control 

panel, in the application, and in the print 

driver. 

The paper is damp. 

Replace the paper. 

The humidity is too high. 

Reduce the humidity in the room or move the 

printer to a new location. 

Summary of Contents for 095205841718

Page 1: ...Xerox VersaLink C405 Color Multifunction Printer User Guide...

Page 2: ...e trademarks of Apple Inc registered in the U S and other countries AirPrint and the AirPrint Logo are trademarks of Apple Inc Google Cloud Print web printing service Gmail webmail service and Android...

Page 3: ...Single Pass Duplex Automatic Document Feeder 23 Internal Parts 24 Rear View 25 Control Panel 26 Power Options 28 Powering On the Printer or Exiting Low Power or Sleep Mode 28 Restarting Placing in Sl...

Page 4: ...ount 60 Logging in to your Xerox App Gallery Account 61 Installing or Updating an App from the Xerox App Gallery 62 Device 63 Device Overview 63 About 65 Supply Status 66 Billing and Usage Counters 67...

Page 5: ...rinting Options 116 Macintosh Printing Options 117 UNIX and Linux Printing 118 Mobile Printing Options 121 Printing From a USB Flash Drive 122 Printing Features 123 Managing Jobs 123 Printing Special...

Page 6: ...tings 144 Loading Paper in Trays 1 and 2 144 Loading Paper in the Bypass Tray 147 Configuring Trays 1 or 2 for the Paper Length 150 Printing on Special Paper 151 Envelopes 151 Labels 155 7 Maintenance...

Page 7: ...lling Print Quality 205 Paper and Media 206 Solving Print Quality Problems 206 Copy and Scan Problems 212 Fax Problems 213 Problems Sending Faxes 213 Problems Receiving Faxes 214 Getting Help 215 View...

Page 8: ...Information 227 Basic Regulations 228 United States FCC Regulations 228 Canada 228 Certifications in Europe 229 European Union Lot 4 Imaging Equipment Agreement Environmental Information 229 Germany...

Page 9: ...and Disposal 245 All Countries 246 North America 247 European Union 248 Domestic Household Environment 248 Professional Business Environment 248 Collection and Disposal of Equipment and Batteries 249...

Page 10: ......

Page 11: ...erational Safety 15 Maintenance Safety 17 Printer Symbols 18 Environmental Health and Safety Contact Information 20 Your printer and the recommended supplies have been designed and tested to meet stri...

Page 12: ...d to meet strict safety requirements These include safety agency evaluation and certification and compliance with electromagnetic regulations and established environmental standards The safety and env...

Page 13: ...rforming these installations Disconnect the power cord when removing covers and guards for installing optional equipment Except for user installable options there are no parts that you can maintain or...

Page 14: ...r Review the electrical specification of the printer with an electrician if necessary Do not place the printer in an area where people can step on the power cord Do not place objects on the power cord...

Page 15: ...e hazard areas within the printer Do not remove the protective covers Do not override any electrical or mechanical interlock devices Do not attempt to remove paper that is jammed deeply inside the pro...

Page 16: ...ons specified in Elevation on page 223 Printer Supplies Use the supplies designed for your printer The use of unsuitable materials can cause poor performance and a possible safety hazard Follow all wa...

Page 17: ...ot burn any consumables or routine maintenance items For information on Xerox supplies recycling programs go to www xerox com gwa WARNING Do not use aerosol cleaners Aerosol cleaners can be explosive...

Page 18: ...id personal injury Warning Moving parts To avoid personal injury use caution Caution Indicates a mandatory action to take in order to avoid damage to the property Caution To avoid damage to the proper...

Page 19: ...use folded creased curled or wrinkled paper Do not use inkjet paper Do not use transparencies or overhead projector sheets Do not reload paper previously printed on or used Do not copy money revenue s...

Page 20: ...ealth and Safety in relation to this Xerox product and supplies contact the following customer help lines United States and Canada 1 800 ASK XEROX 1 800 275 9376 Europe 44 1707 353 434 For product saf...

Page 21: ...r Guide This chapter includes Parts of the Printer 22 Power Options 28 Accessing the Printer 30 Introduction to Apps 31 Information Pages 32 Configuration Report 33 The Embedded Web Server 34 Installa...

Page 22: ...22 Single Pass Duplex Automatic Document Feeder 23 Internal Parts 24 Rear View 25 Control Panel 26 Front View 7 8 9 10 1 3 6 5 4 2 1 Tray 1 2 Bypass Tray 3 Front Door 4 USB Memory Port 5 Card Reader B...

Page 23: ...ments face up so that the top of the document enters the feeder first Place only loose sheets of undamaged paper in the duplex automatic document feeder Adjust the paper guides so that they fit agains...

Page 24: ...k C405 Color Multifunction Printer User Guide Internal Parts 1 Front Door 2 Toner Cartridges 3 Document Glass 4 Document Cover 5 Single Pass Duplex Automatic Document Feeder 6 Waste Cartridge Lock 7 D...

Page 25: ...ser Guide Rear View 6 8 7 9 10 11 12 1 2 3 4 5 1 Duplex Unit 2 Transfer Roller 3 Fuser 4 Power Connector 5 Rear Door 6 Left Side Cover 7 Phone Line Connector 8 Fax Line Connector 9 Wireless Network Ad...

Page 26: ...s the current operating status of the printer Provides access to print copy and scan features Provides access to reference materials Provides access to Tools and Setup menus Prompts you to load paper...

Page 27: ...e the power status of the printer When the light blinks slowly the printer is in low power mode or Sleep mode When the light blinks rapidly the printer is powering down or exiting a low power mode 5 S...

Page 28: ...On the Printer or Exiting Low Power or Sleep Mode To power on the printer or to exit Low Power mode or Sleep mode press the Power Wake button Notes The Power Wake button is the only power button on t...

Page 29: ...h Restart To place the printer in Sleep Mode touch Sleep In Sleep Mode the touch screen goes dark and the Power Wake button flashes To power off the printer touch Power Off If the printer does not res...

Page 30: ...entication If authentication is set to access printer features you log in with your user credentials Logging In at the Control Panel 1 At the printer control panel press the Home button 2 Touch Log In...

Page 31: ...lready installed on the device and that appear on the Home screen There are also Apps that are installed as standard but are hidden when your device is used for the first time When you log in the apps...

Page 32: ...rs for reordering supplies PostScript Font List The PostScript Font List provides a printout of all PostScript fonts that are available on the printer PCL Font List The PCL Font List provides a printo...

Page 33: ...rt provides product information including installed options network settings port setup tray information and more Printing the Configuration Report 1 At the printer control panel press the Home button...

Page 34: ...rinter you need the IP address of your printer You also need the IP address to access the settings of your printer through the Embedded Web Server You can view the IP address of your printer on the co...

Page 35: ...typically faster than a USB connection and it provides access to the Embedded Web Server For more information refer to the System Administrator Guide at www xerox com office VLC405docs Selecting a Lo...

Page 36: ...ately USB If you connect the printer to one computer and do not have a network use a USB connection A USB connection offers fast data speeds but typically not as fast as a network connection Note To a...

Page 37: ...e switch or router with one cable then connect the printer to the switch or router with the second cable Connect to any port on the switch or router except the uplink port 3 Attach the power cord then...

Page 38: ...y from the printer 3 Remove the packaging from the Wireless Network Adapter 4 To install the Wireless Network Adapter follow the procedure defined on the instruction sheet provided with the Wireless N...

Page 39: ...r on the printer 6 Configure the Wi Fi Settings For details about configuring the Wi Fi settings refer to the System Administrator Guide at www xerox com office VLC405docs Removing the Wireless Networ...

Page 40: ...Network Adapter with your other hand and carefully pull it away from the printer CAUTION Do not use force to pull on the Wireless Network Adapter If the latch is released properly the adapter pulls ou...

Page 41: ...nter 41 User Guide 6 Place the left side cover into position then slide it toward the front of the printer 7 To tighten the cover turn the bolt to the right 8 Connect the printer to your computer with...

Page 42: ...i Fi Direct is disabled by default Note Wireless networking is available only on printers with the optional Wireless Network Adapter installed To connect with Wi Fi Direct follow the directions provid...

Page 43: ...nstall a print driver AirPrint enabled printers allow you to print or fax directly from a Mac an iPhone iPad or iPod touch You can use AirPrint to print from a wired device or a wireless device withou...

Page 44: ...up a Google email account Configure the printer to use IPv4 Configure Proxy Server settings as needed To configure Google Cloud Print 1 At your computer open a Web browser In the address field type t...

Page 45: ...software verify that the printer is plugged in turned on connected correctly and has a valid IP address The IP address usually appears in the upper right corner of the control panel If you cannot find...

Page 46: ...P address of the printer refer to Finding the IP Address of Your Printer on page 34 7 Click Next 8 If desired you can name your printer by typing a name in the Queue Name field 9 If installing a print...

Page 47: ...that the Ethernet or USB cable is connected properly 11 To accept the print queue message click OK 12 Select or clear the Set Printer as Default and Print a Test Page check boxes 13 Click Continue th...

Page 48: ...ation location click Install or select another location for the installation files then click Install 8 Enter your password then click OK 9 Select your printer in the list of discovered printers then...

Page 49: ...e cable is connected properly 6 In the Print Using drop down list choose Select Printer Software 7 In the printer software list select the appropriate Xerox LAN fax driver model then click OK 8 Click...

Page 50: ...u want to use does not appear in the list click the Cancel button Add the WSD printer manually using the Add Printer Wizard 4 Click Close To install a WSD printer using the Add Printer Wizard 1 At you...

Page 51: ...line technical support Online Support Assistant and print driver downloads www xerox com office VLC405support Information Pages Print from the control panel For details refer to Information Pages on p...

Page 52: ......

Page 53: ...Color Multifunction Printer 53 User Guide This chapter includes Customize and Personalize Overview 54 Customizing or Personalizing the Home Screen 55 Customizing or Personalizing the Apps 56 3 Custom...

Page 54: ...default settings to meet the needs of your workgroup You can save job settings for repeated use Customization enables users to work more productively When individual user accounts are configured on th...

Page 55: ...b Touch the App that you want to appear on the control panel c Touch Done 4 To hide an installed App a For the desired App touch X b Touch Done 5 Verify that only the desired Apps are displayed on th...

Page 56: ...rs with a line across To show a feature for the required feature touch the Eye icon To signify a feature is visible the Eye icon appears with no line across 6 To reorder the menu features touch and dr...

Page 57: ...se the keypad 7 Touch Next 8 Select an icon that best suits the preset that you are creating 9 Touch Done Note The preset is stored within the Preset feature Deleting a Saved Preset To delete a saved...

Page 58: ...r Guide Customizing App Default Settings To customize the App default settings 1 At the control panel press the Home button 2 Touch the App required 3 Configure the required default settings 4 Touch S...

Page 59: ...o Apps that are installed as standard but are hidden when your device is used for the first time For details about Customizing the Home screen and the Apps features refer to Customize and Personalize...

Page 60: ...or the wired network connection Note If your device is hosted by a local server inside a firewall and a proxy is enabled set a proxy exception at the device For further information and instructions on...

Page 61: ...9 Review and accept the Terms of Use To continue creating an account click the Agree button 10 Enter the information required into the appropriate fields User ID Password Confirm Password First and L...

Page 62: ...License Agreement screen appears Note If the App was installed previously and a new version is available the button is labeled as Update 7 Touch Agree The installation process begins If the App does...

Page 63: ...Device Overview The Device App gives you access to information about your printer including the serial number and model You can view the status of the paper trays billing and supplies information and...

Page 64: ...to monitor the status of the components you can replace The supply level and estimated number of impressions or days left for each unit is displayed Billing Usage Use the Billing Usage option to view...

Page 65: ...ovides information about the device and a detailed listing of the billing meters and sheet counts Supplies Usage Report The Supplies Usage Report provides coverage information and part numbers for reo...

Page 66: ...2 To enable supplies alerts touch the Enable Alerts toggle button 3 To configure the printer to display an alert when an item reaches a specific usage percentage level touch the item then select the...

Page 67: ...provides the number of images sent using the Fax Email or Scan features Fax Impressions Counters This option provides the number of images sent using the Fax features Each fax feature is identified o...

Page 68: ...save contact information for individual contacts or groups You can manage address book contacts at the control panel or in the Embedded Web Server Adding or Editing Contacts in the Address Book at th...

Page 69: ...l panel press the Home button then touch Address Book 2 Touch the Plus icon then select Add Group 3 Select the group type enter a name for the group then touch Enter 4 To add group members touch Add M...

Page 70: ...MB scan location click the Network SMB Plus icon then enter the SMB details Click OK To add an FTP scan location click the FTP Plus icon then enter the FTP details Click OK 6 To mark the email address...

Page 71: ...In the address field type the IP address of the printer then press Enter or Return 2 In the Embedded Web Server click Address Book 3 Within the address book select a group 4 To add group members a For...

Page 72: ...nges touch OK 5 To clear a contact marked as a Favorite a To remove the contact as a Global Favorite for the contact name touch the Star icon b To remove the contact from the Favorite list for a selec...

Page 73: ...details refer to Managing Jobs using the Embedded Web Server on page 78 A print job can be held by the printer when it is unable to complete a print job For example it needs attention paper or suppli...

Page 74: ...obs in the folder touch Print All or Delete All 4 To view details about a job touch the job 5 To return to the Home screen press the Home button Notes The system administrator can restrict users from...

Page 75: ...Print window click Preview then select Xerox Features 3 For Job Type select Saved Job 4 Type a job name or select a name from the list then click OK 5 Select any other required printing options For Wi...

Page 76: ...int job touch the job To print all the jobs in the folder touch Print All To delete a Secure Print job touch the Trash icon then at the prompt touch Delete To delete all the jobs in the folder touch D...

Page 77: ...ins Secure Print jobs and Personal Print jobs the passcode prompt appears 6 Select an option To print a Personal Print job touch the job To print all the jobs in the folder touch Print All To delete a...

Page 78: ...es of the job 4 Select an option To print the remaining copies of the job touch Release To delete the remaining copies of the job touch Delete 5 To return to the Home screen press the Home button Mana...

Page 79: ...Embedded Web Server 1 At your computer open a Web browser In the address field type the IP address of the printer then press Enter or Return 2 In the Embedded Web Server click Home 3 In the Quick Lin...

Page 80: ...list of features can be customized and some features could be hidden from view when the App is installed To view all available features and to find out more about customizing the Copy App refer to Cu...

Page 81: ...5 If scanning from 2 sided original documents touch 2 Sided then select an option 6 Adjust copy settings as needed For details about available features refer to Apps Features on page 251 7 Touch Star...

Page 82: ...balance of the printing colors between cyan magenta yellow and black before printing your copy To adjust the Color Balance 1 At the printer control panel press the Home button 2 Touch Copy 3 Touch Col...

Page 83: ...n move the slider to increase or decrease the contrast 7 Touch OK Changing the Page Layout You can use Page Layout to place a defined number of pages on one or both sides of the paper To change the pa...

Page 84: ...ook onto a single sheet of paper 5 If Binding Edge Erase is required touch Binding Edge Erase then move the slider to the right to erase up to 50 mm 1 97 in 6 Touch OK Shifting the Image You can chang...

Page 85: ...ges to fit two images on each side of the printed page You can print copies in booklet format Notes This function is available on printers with an optional Productivity Kit installed only In Booklet m...

Page 86: ...sides of the cover 5 Touch Paper Supply then select the required paper source 6 Touch OK Erasing the Edges of Copies You can erase content from the edges of your copies using the Edge Erase feature Y...

Page 87: ...pies are printed 8 To return to the home screen press the Home button Adding Annotations You can use the Annotations feature to add a page number comment date or Bates Stamp to your copies Notes This...

Page 88: ...efix then select the required entry Touch OK Note To create a prefix touch the edit icon for Not in Use Enter the required text then touch OK c Touch Starting Number Enter the required starting number...

Page 89: ...For more information about adding and customizing Apps refer to Customize and Personalize on page 53 For information about all the App features and available settings refer to Apps Features on page 25...

Page 90: ...hidden from view when the App is installed To view all available features and to find out more about customizing the Email App refer to Customize and Personalize on page 53 For information about all...

Page 91: ...e email settings as needed To save the scanned document with a specific file name touch the attachment file name enter a new name using the touch screen keypad then touch Enter To save the scanned doc...

Page 92: ...a single computer so you select a destination for the scanned image at the printer The printer supports the following scanning functions Scan original documents to an email address Scan original docum...

Page 93: ...pecific file name touch the attachment file name then enter a new name using the touch screen keypad Touch Enter 6 To save the scanned document as a specific file format touch the attachment file form...

Page 94: ...administrator 5 To save the scanned file to a specific folder on the USB Flash drive navigate to the directory where you want to save your file then touch OK 6 To save the scanned document as a speci...

Page 95: ...document on the document glass or into the duplex automatic document feeder 2 At the printer control panel press the Home button 3 To log in to the printer touch Log In 4 Enter your user name then to...

Page 96: ...r the System Administrator Guide at www xerox com office VLC405docs To Scan to Desktop 1 Load the original document on the document glass or into the duplex automatic document feeder 2 At the printer...

Page 97: ...he Share name for later use 8 Click OK again 9 Click Close Sharing a Folder in Macintosh OS X Version 10 7 and Later 1 From the Apple menu select System Preferences 2 From the Internet Wireless menu s...

Page 98: ...rt number Share Enter a name for the directory or folder For example to save scanned files to a shared folder named scans type scans Document Path Enter the path of the folder on the SMB server For ex...

Page 99: ...feeder a prompt does not appear 11 To return to the Home screen press the Home button Scanning Images into an Application on a Connected Computer You can import images directly from the scanner into a...

Page 100: ...click the printer icon then select Start Scan 4 Select the paper source for your original document from the menu 5 Adjust scanning options as needed 6 To preview the document or select a portion of th...

Page 101: ...and DSL are not supported Before you use the fax configure the Fax Settings to ensure they are compatible with your local connection and regulations The Fax Settings include optional features you can...

Page 102: ...cument feeder Remove any staples and paper clips from the pages Insert the original documents face up in the document feeder with the top of the page entering the feeder first Adjust the paper guides...

Page 103: ...ete the job and return to the Fax app touch Done To scan another page load a new original document on the document glass then touch Add Page To delete the scan and return to the Fax app touch Cancel t...

Page 104: ...ol panel press the Home button 2 Touch Fax 3 To add a recipient fax number use the touch screen keypad or to add a contact from the Address Book touch the Address Book icon 4 Load original documents i...

Page 105: ...r to Sending a Fax on page 102 3 Touch Cover Sheet 4 Touch Add Cover Sheet 5 To add predefined comments in the From or To fields touch Blank Comment then select from the list of predefined comments No...

Page 106: ...ext then touch OK 7 To add a filename for attachments touch Attachment then enter a filename 8 To change the file format for attachments touch the current format extension then select a new format Not...

Page 107: ...on the document glass then touch Add Page To delete the scan and return to the Fax app touch Cancel then touch Delete Note If you are scanning a document from the automatic document feeder a prompt d...

Page 108: ...iver dialog box click Printer Properties 3 On the Printing Options tab from the Job Type list select Fax 4 In the Fax window click the Recipients tab 5 To add recipients manually a Click the Add Recip...

Page 109: ...ect the required printer 3 To access the fax driver settings click Preview select Xerox Features then from Job Type list select Fax 4 To add a recipient in the Fax window click the Recipients tab then...

Page 110: ...n Power Saver mode before proceeding with the USB scan to wake the device press the Power Wake button Only USB Flash drives formatted to the typical FAT32 file system are supported To scan to a USB Fl...

Page 111: ...re proceeding with the Print job to wake the device press the Power Saver button Only USB Flash drives formatted to the typical FAT32 file system are supported To print from a USB Flash drive 1 Insert...

Page 112: ...stem Administrator Guide at www xerox com office VLC405docs 4 Add files to the Document Source Table To print a group of print ready files for the USB drive or folder touch the Select All icon Verify...

Page 113: ...05 Color Multifunction Printer 113 User Guide This chapter includes Printing Overview 114 Selecting Printing Options 115 Printing From a USB Flash Drive 122 Printing Features 123 Using Custom Paper Si...

Page 114: ...er 2 Load paper in the appropriate tray On the printer control panel specify the size color and type 3 Access the print settings in your software application For most software applications press CTRL...

Page 115: ...d print quality Printing options that are set from Printing Preferences become the default setting Printing options that are set from within the software application are temporary The application and...

Page 116: ...settings specified in the Printing Preferences window You can specify your most common printing options and save them so that you do not have to change them every time you print For example if you wan...

Page 117: ...ded then click Apply 6 To save the settings click OK Saving a Set of Commonly Used Printing Options for Windows You can define and save a set of options so that you can apply them to future print jobs...

Page 118: ...ng these options select the name from the Presets list UNIX and Linux Printing The Xerox Print Driver package provides tools for you to manage printers connected in UNIX and Linux environments The Xer...

Page 119: ...the End User License Agreement then click accept The file automatically downloads to the default location for your computer file downloads 8 To install the Xerox Print Driver package a Open the packa...

Page 120: ...fer to the CUPS Software Users Manual available from www cups org documentation php Installing the PPD on the Workstation 1 If available download the Xerox PPD for CUPS from the Drivers and Downloads...

Page 121: ...nnected to the same wireless network as the printer To print with AirPrint 1 Open the email photograph website page or document that you want to print 2 Tap the Action icon 3 Tap Print 4 Select your p...

Page 122: ...K 5 Confirm that the required files are listed To select more files touch Add Document then touch OK To remove a file name from the list touch the file name then touch Remove 6 Select the paper supply...

Page 123: ...a list of active and completed print jobs From the control panel Jobs menu you can view lists of active jobs secure jobs or completed jobs You can pause delete print or view job progress or job detai...

Page 124: ...tem administrator has restricted job deletion you can view the jobs but not delete them Only the user that sent the job or the system administrator can delete a Secure Print job Printing Special Job T...

Page 125: ...ur printer then open the print driver For Windows click Printer Properties Depending on your application the title of the button varies For Macintosh in the Print window click Preview then select Xero...

Page 126: ...your software application access the print settings For most software applications click File Print or for Windows press CTRL P 2 Select your printer then click Printer Properties Depending on your a...

Page 127: ...r software application access the print settings For most software applications press CTRL P for Windows or CMD P for Macintosh 2 Select your printer then open the print driver For Windows click Print...

Page 128: ...ted output paper size For Windows the scale options are on the Printing Options tab in the Paper field For Macintosh the scale options are in the Print window for Preview To view more printing options...

Page 129: ...This option prints on one side of the media Use this option when printing on envelopes labels or other media that cannot be printed on both sides 2 Sided Print This option prints the job on both sides...

Page 130: ...g produces brighter and more saturated colors using red green and blue color Commercial This option applies color for printing on a commercial printing press Image Shift Image Shift allows you to modi...

Page 131: ...rease the magenta levels the green levels decrease The Yellow to Blue option allows you to adjust the color balance between yellow and blue For example when you increase the yellow levels the blue lev...

Page 132: ...the booklet For Windows Booklet Layout is on the Page Layout tab Page Layout is on the Document Options tab For Macintosh in the Print window in Xerox Features Booklet Layout is on the Paper Output l...

Page 133: ...front and back cover pages from the same tray Front and Back Different prints the front and back cover pages from different trays After making a selection for printing the cover pages you can select t...

Page 134: ...Print prints the exception pages on both sides of the paper and flips the pages on the long edge The job then can be bound on the long edge of the pages 2 Sided Print Flip on Short Edge prints the ex...

Page 135: ...e text and graphics in the document 7 Click Pages then select the pages to print the watermark Print on All Pages prints the watermark on all pages of your document Print on Page 1 Only prints the wat...

Page 136: ...ect to be notified when your job finishes printing A message appears on your computer screen with the name of the job and the name of the printer where it was printed Note This feature is only availab...

Page 137: ...efining Custom Paper Sizes on page 138 Printing on Custom Paper Size from Windows Note Before printing on custom size paper define the custom size in the printer properties 1 Load the custom size pape...

Page 138: ...4 To specify the units of measurement at the bottom of the window click the Measurements button then select Inches or Millimeters 5 To save in the Name field type a title for the new size then click...

Page 139: ...Xerox VersaLink C405 Color Multifunction Printer 139 User Guide This chapter includes Supported Paper 140 Loading Paper 144 Printing on Special Paper 151 6 Paper and Media...

Page 140: ...ollow the guidelines in this section For best results use Xerox paper and media recommended for your printer Recommended Media A list of paper and media recommended for your printer is available at ww...

Page 141: ...ntative for details Paper Storage Guidelines Storing your paper and other media properly contributes to optimum print quality Store paper in dark cool relatively dry locations Most paper is susceptibl...

Page 142: ...79 mm 8 5 x 11 in Executive 184 x 267 mm 7 25 x 10 5 in 203 x 254 mm 8 x 10 in Bypass Tray C5 envelope 162 x 229 mm 6 4 x 9 in C6 envelope 114 x 162 mm 4 5 x 6 38 in DL envelope 110 x 220 mm 4 33 x 8...

Page 143: ...rdstock for 1 Sided printing refer to Supported Paper Types and Weights on page 142 For types and weights of supported Cardstock for 2 Sided printing refer to Supported Paper Types and Weights for Aut...

Page 144: ...cannot change the paper size type and color when you load paper into the tray Bypass When paper is present in this tray it is used for print jobs where you did not specify a particular tray For detai...

Page 145: ...is procedure separates any sheets that are stuck together and reduces the possibility of jams 5 Load paper into the tray with the print side face up Load hole punched paper with the holes to the left...

Page 146: ...ouch OK To select a new paper size type or color touch the current setting then select a new setting When you are finished touch OK 8 To change a paper tray to Dedicated mode a At the printer control...

Page 147: ...t variety of media types It is intended primarily for small quantity jobs that use special media To load paper in the bypass tray 1 Open the bypass tray If the bypass tray is loaded with paper already...

Page 148: ...er and reduces the possibility of jams Note To avoid jams and misfeeds do not remove paper from its packaging until you are ready to use it 5 Load the paper in the tray Load hole punched paper with th...

Page 149: ...e screen If you are not prompted change the paper settings a At the printer control panel press the Home button b Touch Device Paper Trays c In the Paper Trays menu touch the bypass tray icon To selec...

Page 150: ...the tray until it stops lift the front of the tray slightly then pull it out 3 Configure the tray To compress the tray for shorter paper hold the back of the tray with one hand With the other hand pr...

Page 151: ...clasps Print quality depends on the quality and construction of the envelopes If you do not get the desired results try another envelope brand Maintain constant temperatures and relative humidity Stor...

Page 152: ...User Guide Loading Envelopes in the Bypass Tray 1 Open the bypass tray 2 Move the width guides to the edges of the tray Note If you do not load envelopes in the bypass tray right after they have been...

Page 153: ...hort edge going into the printer flaps down and flaps to the right For Monarch or DL envelopes do one of the following If the envelopes wrinkle try another option Insert envelopes with the short edge...

Page 154: ...ry the other option Insert envelopes with the print side up flaps open and down and the bottom of the envelope going into the printer Insert envelopes with the print side up flaps closed and down and...

Page 155: ...gned for laser printing Do not use vinyl labels Do not feed a sheet of labels through the printer more than once Do not use dry gum labels Print only on one side of the sheet of labels Use full sheet...

Page 156: ...ompts you verify the size type and color on the screen If you are not prompted change the paper settings a At the printer control panel press the Home button b Touch Device Paper Trays c In the Paper...

Page 157: ...Multifunction Printer 157 User Guide This chapter includes General Precautions 158 Cleaning the Printer 159 Adjustments and Maintenance Procedures 172 Supplies 176 Managing the Printer 180 Moving the...

Page 158: ...NING Do not remove the covers or guards that are fastened with screws You cannot maintain or service any parts that are behind these covers and guards Do not attempt any maintenance procedure that is...

Page 159: ...ts with a damp soft cloth After cleaning wipe with a dry soft cloth For stubborn stains apply a small amount of mild detergent to the cloth and gently wipe the stain off Cleaning the Scanner To ensure...

Page 160: ...e 3 Open the document cover 4 Wipe the surfaces of the document glass until they are clean and dry Note For best results use Xerox Glass Cleaner to remove marks and streaks 5 Wipe the white underside...

Page 161: ...te print quality Clean the printer interior whenever you replace a drum cartridge After clearing paper jams or replacing a toner cartridge inspect inside the printer before closing the printer covers...

Page 162: ...ner on your clothes lightly dust them off as best as you can If some toner remains on your clothes use cool water not hot to rinse off the toner If toner gets on your skin wash it off with cool water...

Page 163: ...cartridge lever 90 degrees counterclockwise c Grasp the handle of the waste cartridge then pull it out To prevent toner spills keep the openings of the cartridge facing up Notes Be careful not to spil...

Page 164: ...evel surface CAUTION To avoid toner spills or malfunction do not lay the waste cartridge on its side 3 Clean the laser lenses a Remove the cleaning rod from inside of the printer b Insert the cleaning...

Page 165: ...holes in the other three slots d Return the cleaning rod to its original location 4 Insert the waste cartridge Note If the waste cartridge does not fit into place properly ensure that the cleaning rod...

Page 166: ...he right side door Cleaning the Color Toner Density Sensor If the print or color density is too light missing or the background is foggy clean the density sensor To clean the color toner density senso...

Page 167: ...3 Remove the waste cartridge a Open the right side door b To unlock the waste cartridge rotate the waste cartridge lever 90 degrees counterclockwise c Grasp the handle of the waste cartridge then pull...

Page 168: ...handling the waste cartridge After removing the waste cartridge do not touch the area shown in the illustration d Place the removed waste cartridge on a level surface CAUTION To avoid toner spills or...

Page 169: ...Grasp the handles on the top of the transfer belt then pull to remove it from the printer c At the rear of the printer use a dry cotton swab to clean the color toner density sensor d At the front of...

Page 170: ...User Guide 5 Insert the waste cartridge Note If the waste cartridge does not fit into place properly ensure that the cleaning rod is inserted fully a To lock the waste cartridge rotate the waste cartr...

Page 171: ...Maintenance Xerox VersaLink C405 Color Multifunction Printer 171 User Guide 6 Close the rear door...

Page 172: ...tment occurs every time a new toner cartridge is installed You can run this adjustment at other times as needed To perform a color registration adjustment 1 At the printer control panel press the Home...

Page 173: ...lose 8 To exit the menu touch X 9 To return to the Home screen press the Home button Performing the Scan Color Consistency Procedure 1 At the printer control panel press the Home button 2 Touch Device...

Page 174: ...rce paper tray for the registration print a Touch Paper Supply b Touch the desired tray 5 If your printer has automatic 2 sided printing select the sides that you want to optimize To select a sample r...

Page 175: ...rinted in Verifying Paper Registration select the side for registration a For adjusting Side 1 touch Adjusted Side then touch Side 1 b For adjusting Side 2 touch Adjusted Side then touch Side 2 6 To a...

Page 176: ...urate To ensure print quality the toner cartridge has been designed to cease functioning at a predetermined point CAUTION Use of toner other than genuine Xerox Toner can affect print quality and print...

Page 177: ...ck the status and percentage of life remaining for your printer supplies at the control panel or from the Embedded Web Server When printer supplies near their replacement time warning alerts appear on...

Page 178: ...disable an alert touch the toggle button 6 To exit the menu touch OK 7 To return to the Device screen touch the back arrow To check the supplies status and set up alerts using the Embedded Web Server...

Page 179: ...Never use a vacuum cleaner to remove spills Electric sparks inside the vacuum cleaner can cause a fire or explosion If you spill a large volume of toner contact your local Xerox representative WARNIN...

Page 180: ...e Remote Services to send billing meter readings to Xerox automatically so that you do not have to collect the readings manually Refer to the System Administrator Guide for further information To view...

Page 181: ...the optional 550 Sheet Feeder is not fixed to the printer securely it can fall to the ground and cause injury Follow these instructions when moving the printer 1 Power off the printer then disconnect...

Page 182: ...remove the drum cartridge and toner cartridges to prevent toner from spilling CAUTION Failure to repackage the printer properly for shipment can result in damage not covered by the Xerox Warranty Serv...

Page 183: ...405 Color Multifunction Printer 183 User Guide This chapter includes General Troubleshooting 184 Paper Jams 189 Print Quality Problems 205 Copy and Scan Problems 212 Fax Problems 213 Getting Help 215...

Page 184: ...ntrol panel press the Power Wake button For details refer to Powering On and Off the Printer on page 28 The power cord is not plugged into the outlet correctly Power off the printer and plug the power...

Page 185: ...ror If the Status LED is blinking amber follow the instructions on the control panel to clear the error If the error persists contact your Xerox representative The printer is out of paper Load paper i...

Page 186: ...ireless Network on page 37 Printing Takes Too Long Probable Causes Solutions The printer is set to a slower printing mode For example the printer could be set to print on Heavyweight paper It takes mo...

Page 187: ...on page 143 Your printer model is not configured with automatic 2 sided printing Ensure that your printer supports automatic 2 sided printing For details refer to Printer Configurations and Options o...

Page 188: ...m room Condensation can form in a printer after it has been sitting in a cold room that is heated quickly Probable Causes Solutions The printer has been sitting in a cold room Allow the printer to ope...

Page 189: ...paper is wrapped around the heat roller do not try to remove it immediately Power off the printer immediately and wait 40 minutes for the fuser to cool Try to remove the jam after the printer has cool...

Page 190: ...ues Always use clean undamaged paper Avoid paper that is curled torn moist creased or folded To separate the sheets before loading into the tray fan the paper Observe the paper tray fill line never ov...

Page 191: ...ay 1 Area 195 Clearing Paper Jams from the Tray 2 Area 198 Clearing Paper Jams from the Fuser Area 199 Clearing Document Feeder Jams To resolve the error that appears on the control panel clear all pa...

Page 192: ...above the MAX fill line Adjust the paper guides so that they fit against the paper Use supported paper only For details refer to Duplex Automatic Document Feeder Guidelines on page 23 Clearing Paper...

Page 193: ...ting Xerox VersaLink C405 Color Multifunction Printer 193 User Guide 3 Pull out Tray 1 until it stops 4 To remove the tray lift the front of it slightly then pull it out of the printer 5 Remove the ja...

Page 194: ...n it is inserted into the printer 7 Insert the Bypass Tray completely into the printer 8 When paper trays are set to Fully Adjustable you are prompted to verify or change the paper settings To confirm...

Page 195: ...earing Paper Jams from the Tray 1 Area To resolve the error that appears on the control panel clear all paper from the paper path 1 Remove any paper from the Bypass Tray 2 Grasp both sides of the Bypa...

Page 196: ...05 Color Multifunction Printer User Guide 4 To remove the tray lift the front of it slightly then pull it out of the printer 5 Remove the jammed paper 6 Remove any crumpled paper from the tray and any...

Page 197: ...n it is inserted into the printer 8 Insert the Bypass Tray completely into the printer 9 When paper trays are set to Fully Adjustable you are prompted to verify or change the paper settings To confirm...

Page 198: ...2 Area To resolve the error that appears on the control panel clear all paper from the paper path 1 Pull out Tray 2 until it stops 2 To remove the tray lift the front of it slightly then pull it out o...

Page 199: ...o Fully Adjustable you are prompted to verify or change the paper settings To confirm the same paper size type or color touch OK To select a new paper size type or color touch the current setting sele...

Page 200: ...ultifunction Printer User Guide 2 If paper is jammed in the Fuser raise both green levers to open the Fuser 3 To open the paper guide raise the green handle 4 Remove any jammed paper from the back of...

Page 201: ...Troubleshooting Xerox VersaLink C405 Color Multifunction Printer 201 User Guide 6 Lower the green levers to their original position 7 Close the rear door...

Page 202: ...The edges of the paper are not even Remove the paper align the edges and then reload it The paper is moist from humidity Remove the paper from the tray and replace it with new dry paper Too much stat...

Page 203: ...to Supported Paper on page 140 The feed rollers are dirty With a clean lint free cloth moistened with water wipe the feed rollers until they are clean For details refer to Cleaning the Printer on page...

Page 204: ...at is open Note Check for and remove torn pieces of paper in the paper path Jams During Automatic 2 Sided Printing Probable Causes Solutions Using paper of the wrong size thickness or type Use paper o...

Page 205: ...Xerox representative for details Notes To ensure consistent print quality the toner print drum cartridges for many devices are designed to cease functioning at a predetermined point Grayscale images...

Page 206: ...windows metal clasps side seams or adhesives with release strips Padded envelopes Plastic media Transparencies Ensure the paper type selected in your print driver matches the paper type on which you...

Page 207: ...used is outside the recommended specification range Replace the paper with a recommended size and type and confirm that your control panel and print driver settings are correct For details refer to Su...

Page 208: ...oth to remove debris from the rollers Note Do not touch the transfer roller or the exposed end of the transfer belt Fingerprints can cause print quality issues The toner cartridges are not Xerox toner...

Page 209: ...from the paper path Ensure that the trays are pushed in all the way Ensure that the rear cover is closed and locked Condensation inside the printer causes partial blanks or creased paper Power on the...

Page 210: ...Xerox Support website at www xerox com office VLC405support Slanted printing The paper guides in the trays are not set correctly Reset the paper tray guides For details refer to Loading Paper on page...

Page 211: ...upport Pages Repeating Defects 2 To determine the cause measure the distance between the print defects 28 mm 1 1 in Drum Cartridge 53 mm 2 1 in Drum Cartridge 75 mm 3 0 in Drum Cartridge 82 mm 3 2 in...

Page 212: ...eaks Clean all glass surfaces with a lint free cloth For details refer to Cleaning the Scanner on page 159 Spots present in copies taken from the document glass There is debris on the document glass W...

Page 213: ...ocument correctly The document glass is dirty Clean the document glass The text in the document is too light Adjust the resolution There is a problem with the telephone connection Verify that the tele...

Page 214: ...reases available memory The received fax size is reduced The paper supply in the printer does not match the document size sent Confirm the original size of the documents Documents could be reduced bas...

Page 215: ...control panel at a time Viewing Current Errors on the Control Panel When an error condition occurs a message appears on the control panel to inform you of the problem Error messages warn you about pr...

Page 216: ...tion Pages on page 32 More Information You can obtain more information about your printer from these sources Resource Location Installation Guide Packaged with the printer Other documentation for your...

Page 217: ...function Printer 217 User Guide This appendix includes Printer Configurations and Options 218 Physical Specifications 220 Environmental Specifications 223 Electrical Specifications 224 Performance Spe...

Page 218: ...pi Enhanced mode 600 x 600 x 8 bit dpi Paper Capacity Bypass Tray Tray 1 Optional 550 Sheet Feeder Output Tray 150 sheets 550 sheets 550 sheets 250 sheets Maximum print size Legal 216 x 356 mm 8 5 x 1...

Page 219: ...addresses per email group Control Panel 5 inch LCD touch screen with home and power wake buttons Connectivity 2 x USB 2 0 Type A USB 3 0 Type B Ethernet 10BASE T 100BASE TX 1000BASE T Wireless networ...

Page 220: ...Weights and Dimensions Standard Configuration Configuration with Optional 550 Sheet Feeder Width 432 mm 17 in 432 mm 17 in Depth 540 mm 21 3 in 540 mm 21 3 in Height 599 mm 23 6 in 737 mm 29 in Weigh...

Page 221: ...on Printer 221 User Guide Total Space Requirements Standard Configuration Configuration with Optional 550 Sheet Feeder Width 932 mm 36 7 in 932 mm 36 7 in Depth 1540 mm 60 6 in 1540 mm 60 6 in Height...

Page 222: ...Specifications 222 Xerox VersaLink C405 Color Multifunction Printer User Guide Clearance Requirements with Optional 550 Sheet Feeder...

Page 223: ...perature Range 15 28 C 59 82 F Relative Humidity Operating Humidity Range 10 85 Optimal Humidity Range 20 70 relative humidity at 28 C 82 F Note Under extreme environmental conditions such as 10 C and...

Page 224: ...ith copy automatic 2 sided printing scan functions fax functions and USB or network connectivity The ENERGY STAR and ENERGY STAR mark are registered United States trademarks The ENERGY STAR Imaging Eq...

Page 225: ...unctions fax functions and USB or network connectivity This label distinguishes it as a device that satisfies Blue Angel criteria for environmental acceptability in terms of device design manufacture...

Page 226: ...s printing are up to 36 ppm Print speeds are the same for color or black and white printing Several factors affect print speed Print mode The fastest print mode is Standard Paper size Letter 8 5 x 11...

Page 227: ...C405 Color Multifunction Printer 227 User Guide This appendix includes Basic Regulations 228 Copy Regulations 234 Fax Regulations 237 Safety Certification 242 Material Safety Data Sheets 243 B Regulat...

Page 228: ...tion of this equipment in a residential area is likely to cause harmful interference Users are required to correct the interference at their own expense If this equipment does cause harmful interferen...

Page 229: ...tion of this Xerox device If external radiation from ISM equipment interferes with this device contact your Xerox representative for assistance This is a class A product In a domestic environment this...

Page 230: ...d purchase of energy efficient models which help to reduce environmental impact Details on the ENERGY STAR program and models qualified to ENERGY STAR can be found at the following website www energys...

Page 231: ...ettings This device is ENERGY STAR qualified under the ENERGY STAR Program Requirements for Imaging Equipment The transition time from Ready mode to Low Power mode can be set up to 60 minutes The defa...

Page 232: ...Reflexionen am Bildschirmarbeitsplatz zu vermeiden darf dieses Produkt nicht im unmittelbaren Gesichtsfeld platziert werden L rmemission Maschinenl rminformations Verordnung 3 GPSGV Der h chste Schal...

Page 233: ...accept any interference received including interference that may cause undesired operation Changes or modifications to this device not specifically approved by the Xerox Corporation may void the user...

Page 234: ...o reproduce a legal document on which there is a canceled revenue stamp this may be done provided the reproduction of the document is performed for lawful purposes Postage Stamps canceled or uncancele...

Page 235: ...ted States military discharge certificates may be photographed 9 Badges Identification Cards Passes or Insignia carried by military personnel or by members of the various Federal Departments such as F...

Page 236: ...nt of a state other than Canada Impressed or adhesive stamps used for the purpose of revenue by the Government of Canada or of a province or by the government of a state other than Canada Documents re...

Page 237: ...ded to the Telephone Company A plug and jack used to connect this equipment to the premises wiring and telephone network must comply with the applicable FCC Part 68 rules and requirements adopted by t...

Page 238: ...you to make necessary modifications to maintain uninterrupted service If you experience trouble with this Xerox equipment please contact the appropriate service center for repair or warranty informat...

Page 239: ...rnal metallic water pipe systems if present must be connected together This precaution could be vital in rural areas WARNING Do not attempt to make such connections yourself Contact the appropriate el...

Page 240: ...ovakia Estonia Liechtenstein Slovenia Finland Lithuania Spain France Luxembourg Sweden Germany Malta United Kingdom If you have problems with your product contact your local Xerox representative This...

Page 241: ...onnected to the same line as other equipment may give rise to bell tinkle or noise and cause a false answer condition If you encounter such problems do not contact the Telecom Faults Service 6 DTMF to...

Page 242: ...ified by the following Agencies using the following safety standards Agency Standard Underwriters Laboratories Inc US Canada UL 60950 1 2nd Edition 2014 10 14 CAN CSA C22 2 No 60950 1 07 2nd Edition 2...

Page 243: ...3 User Guide Material Safety Data Sheets For Material Safety Data information regarding your printer go to North America www xerox com msds European Union www xerox com environment_europe For the Cust...

Page 244: ......

Page 245: ...Xerox VersaLink C405 Color Multifunction Printer 245 User Guide This appendix includes All Countries 246 North America 247 European Union 248 Other Countries 250 C Recycling and Disposal...

Page 246: ...e regulated due to environmental considerations The presence of these materials is fully consistent with global regulations applicable at the time that the product was placed on the market For recycli...

Page 247: ...n equipment take back and reuse recycle program Contact your Xerox representative 1 800 ASK XEROX to determine if this Xerox product is part of the program For more information about Xerox environment...

Page 248: ...sed electrical and electronic equipment to designated collection facilities free of charge Please contact your local disposal authority for information In some member states when you purchase new equi...

Page 249: ...handling For more information about collection and recycling of old products and batteries please contact your local municipality your waste disposal service or the point of sale where you purchased...

Page 250: ...Recycling and Disposal 250 Xerox VersaLink C405 Color Multifunction Printer User Guide Other Countries Please contact your local waste management authority to request disposal guidance...

Page 251: ...ts If you have a color original document you can adjust the color of the copy using preset color effects For example you can adjust colors to be brighter or cooler Saturation Saturation allows you to...

Page 252: ...al was created Lighten Darken Use the Lighten Darken slider to make the output image or print lighter or darker Sharpness Use this option to sharpen the output image or print For best results sharpen...

Page 253: ...ok Copying feature to copy books magazines or other bound documents Front Cover You can print the first page of your copy job on different paper such as colored or heavyweight paper The printer select...

Page 254: ...y you can choose to print or cancel the remaining copies Quantity Use this option to enter the number of required ID card copies Preview Use this option to view a sample image Resolution Resolution de...

Page 255: ...You can add a password to protect the image or choose to combine multiple images into a single file File Already Exists Use the File Already Exists option to define what action the device takes when...

Page 256: ...on are included on all faxes Delay Send You can set a time in the future for the printer to send your fax job You can delay the send of your fax job for up to 24 hours Priority Send Use Priority Send...

Reviews: