background image

14

INSTRUCTIONS

The combi ladde

r is a telescopic ladder with 

dual functionality as a freestanding step ladder 

with or without knee support/handle and as a 

leaning ladder. Due to its unique design, it can be 

expanded from a compact format to full height. 

In order to retain the properties and function of 

the ladder, you must use, look after and main-

tain your combi ladder as described in these 

instructions. 

WARNING! The combi ladder must 

always be properly locked when in 

use. Always check that all opened 

rung sections are locked before clim-

bing the ladder. Don’t forget to check 

the locking catches at the bottom, 

which are not visible from above. 

The combi ladder locks automatically when 

you open it up. 

The combi ladder must always be ful-

ly opened, to full height with or wi-

thout the knee support/handle. You 

must not sit, stand or step on the com-

bi ladder unless it is fully opened, 

and as a freestanding stepladder 

also fully unfolded and locked with 

the fold up locking latch. 

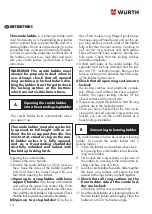
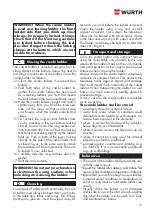
Opening the combi ladder: 

1 Remove the carry handle. 

2 Position the combi ladder on a firm, level sur-

face. Keep the sides of the ladder together 

and hold down the lowest rungs with your 

foot when opening the ladder. 

a) 

Open up to a step ladder with knee 

support/ handle:

 Grip the top of the ladder 

and pull out the upper rung section fully. Conti-

nue to pull out the rung sections one after ano-

ther, until the combi ladder is fully opened. Check 

that the locking catches protrude completely. 

b)Open up to a step ladder:

 Grip the si-

des of the double rung (hinged joint) below 

the knee support/handle and pull out the up-

per rung sections on both sides of the ladder 

fully. After that the next section. Continue to 

pull out the rung sections until both ladder 

sides without the knee support/ handle are 

fully open. Check that the locking catches 

protrude completely.

3 Unfold both sides of the combi ladder. The 

spreader must be fully stretched and the lad-

der at a 70° inclination angle. Bring out the 

fold up locking latch between the both sides 

of the ladder and secure it. 

4 Check that all open rung sections are 

locked: 


the locking catches must prodtrude comple-

tely. When used without the knee support/

handle, the upper locking catches of the 

closed sections will not protrude.


5 If necessary, adjust the ladder so that all rung 

sections are in the locked position. 

6 Once you have checked that the fold up lo-

cking latch and all opened rung sections are 

locked, you can use the combi ladder as a 

freestanding stepladder. 

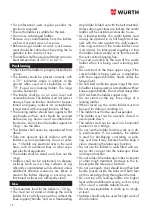
The combi ladder can also be used as a leaning 

ladder. To convert the combi ladder into a 

leaning ladder: 

7  Open the ladder as described above (see 

A Opening the combi ladder into a freestan-

ding step ladder). 

8  First unlock the rung sections on the rear of 

the ladder by pressing in the two bottom lo-

cking catches, one at a time. 

9  Lean the combi ladder forwards. Slide together 

the lower rung sections and secure the belt 

around both rungs so they are held together. 

10 

Check that all rung sections on the 

front ladder side of the combi lad-

der are locked: 


all locking catches must protrude fully. 

11 Use the combi ladder as a leaning ladder with 

the rear folded ladder side hanging. Place the 

ladder at a 65-70°inclination angle. 

Opening the combi ladder  

into a freestanding stepladder 

A

Converting to leaning ladder 

B

Summary of Contents for 0962 975 23

Page 1: ...1 ISTRUZIONI D USO E MANUTENZIONE Art 0962 975 23 Istruzioni per l uso Gebrauchsanweisung Instructions...

Page 2: ...BERGAMO 2009 603499 eco Estensione della scala oltre il punto di arrivo min 1 metro UNI Pagina22 UNI EN 131 3 2007 figura A 7 Montare su una base solida figura A 8 Estensione della scala oltre il pun...

Page 3: ...ante il trasporto della scala figura A 16 Rivolgersi verso la scala per la salita e la discesa figura A 17 Accertarsi che la scala doppia sia completamente aperta prima dell uso ACAL C O API BERGAMO 2...

Page 4: ...nticare di con trollare di bloccaggio inferiori che non sono visibili dall alto La scala combi si blocca automaticamente all apertura Aprire sempre interamente la scala com bi alla lunghezza massima c...

Page 5: ...feriore della scala e fissare la cinghia ai due gradini in modo da tenerli uniti 10 Accertarsi che tutte le sezioni della parte anteriore della scala siano bloccate i bloccaggi devono essere interamen...

Page 6: ...l uso Prima del primo utilizzo dopo la consegna controllare che la scala sia in buono stato e che tutte le sue parti funzionino correttamente La condizione fisica dell utente deve consentire un utili...

Page 7: ...ppoggiata alla parete Non usare la scala combi chiusa come sedile o sgabello Non utilizzare la scala appesa Non aprire chiudere o utilizzare la scala in posizione ribaltata Non utilizzare la scala in...

Page 8: ...torte battute spaccate o corrose le aste telescopiche siano integre nei punti di raccordo la viteria rivetti viti ecc non manchino non siano allentati e non siano corrosi i pioli non manchino non sian...

Page 9: ...nklappen gesichert ist Kombileiter wie folgt ausziehen 1 Tragegriff abnehmen 2 Kombileiter auf einen waagerechten und harten Untergrund stellen Leiterseiten zu sammenhalten und die beiden untersten Le...

Page 10: ...den dass Sie sich beim Entriegeln und Zusammenschieben der Lei ter klemmen 15 Zuerst die Sprossensegmente am hinteren Leiterschenkel entriegeln indem Sie die bei den untersten Sperrriegel nacheinander...

Page 11: ...m ssen be achtet werden Die Leiter darf in einer Umgebungstempera tur von 20 C bis 60 C eingesetzt und gelagert werden Vor der Nutzung berpr fen ob die Leiter ordnungsgem eingerastet ist Die Leiter m...

Page 12: ...h den an den Stangen die Teleskopfunktion beeintr ch tigen Nicht zu weit zur Seite hinausrecken W h rend der gesamten Arbeitszeit muss sich die G rtelschnalle bzw der Nabel des Benut zers innerhalb de...

Page 13: ...h auf Reparatur oder Austausch des Produkts gem den im Einkaufsland geltenden Gesetzen ber den Ver kauf von Verbrauchsg tern Erweiterte Garantie Der Hersteller bernimmt die Verantwortung f r Produktfe...

Page 14: ...knee support handle and pull out the up per rung sections on both sides of the ladder fully After that the next section Continue to pull out the rung sections until both ladder sides without the knee...

Page 15: ...and before the ladder is closed Clean the ladder using a rag and a small amount of solvent Once clean the telescopic tubes can be treated with silicon spray Spray in the tube and wipe dry with paper...

Page 16: ...a freestanding step ladder folded out with the belt stretched Unless all rung sections are locked the combi ladder will be unstable and unsafe to use As a leaning ladder the combi ladder must always b...

Page 17: ...u should order a new one See the address at the back of the ins tructions or contact your local retailer Before use check that the stiles uprights are not bent bowed twis ted dented cracked or corrode...

Page 18: ...he fault has been discovered or within the time period regulated by the country of purchase Service and repair Any service or repair work must always be car ried out by an authorised service workshop...

Page 19: ...19...

Page 20: ...alle norme antinfortunistiche in vigore Egna 02 02 2017 Legale Rappresentante Markus Oberprantacher W rth Srl Via Stazione 51 39044 Egna BZ Tel 0471 828 111 Fax 0471 828 600 clienti wuerth it www wuer...

Reviews: