background image

Bild 8

Bild von der XPress mit ausgeklapptem 
Verriegelungshebel.

© Wieländer+Schill 

10

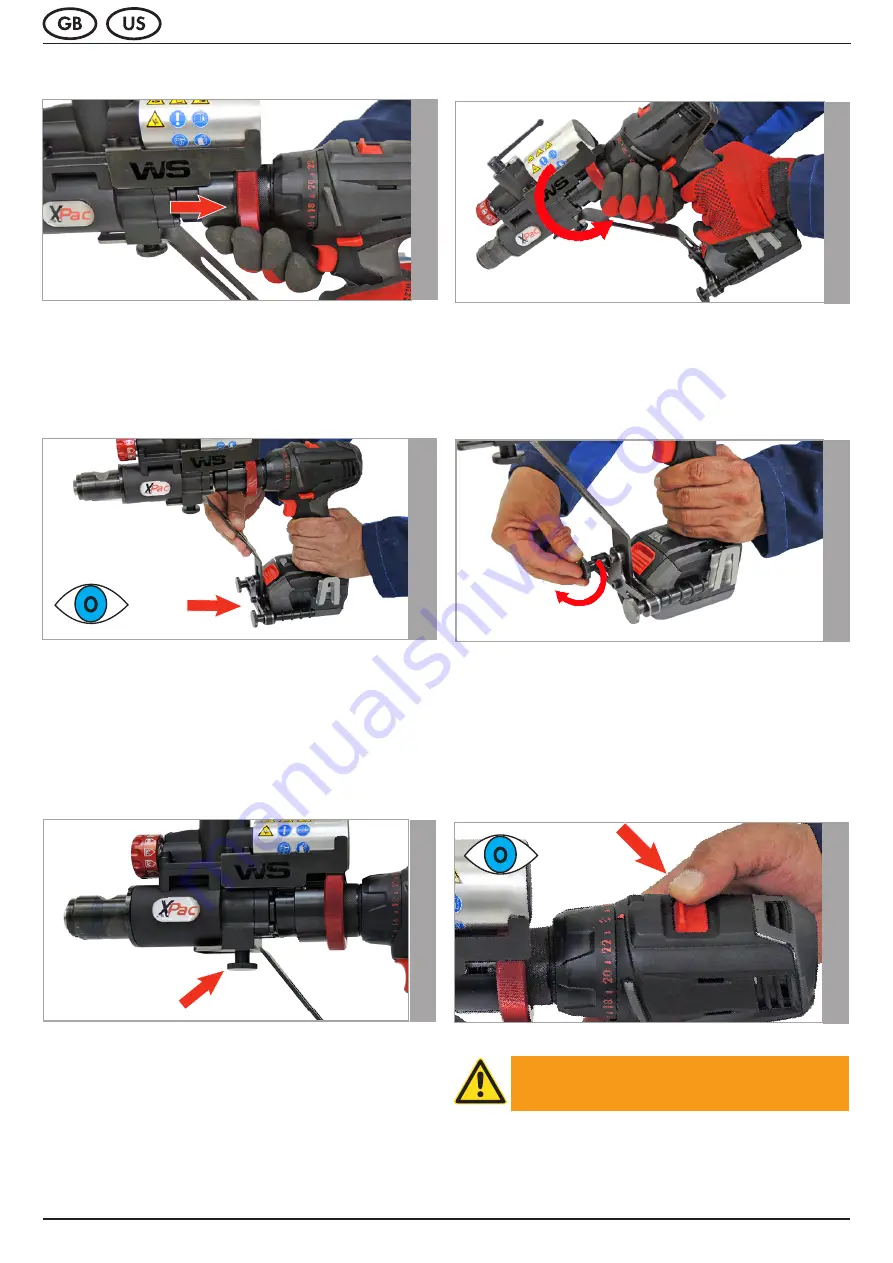
Position the torque arm of the 

XPac

 on the cordless 

screwdriver.

Position the support elements on the battery wit-

hout play and tighten the knurled screws.

Setting on the cordless screwdriver.

ATTENTION! 

No impact function

Select second gear for all applications. 

(fast forward)

Torque adjustment to maximum.

Push the locking ring backwards over the drill 

chuck.

Tighten the locking ring with 

left thread

 firmly.

Also tighten the knurled screw of the torque arm at 

the top of the 

XPac

.

Abb. 3.1.h

Abb. 3.1.g

Abb. 3.1.j

Abb. 3.1.e

Abb. 3.1.f

Abb. 3.1.i

Summary of Contents for 703510

Page 1: ...Hydraulic Pressing Tool for cordless screwdrivers Assembly Operating Instruction ...

Page 2: ...3 Technical data XPac 6 2 4 Safety advice and basic principles on how to use the XPac 7 2 5 Maintenance 8 2 6 Warranty 8 3 1 Connecting and adjusting the XPac 9 3 2 Assembling the C arm 12 3 3 Example Mounting the mandrel and die 13 4 1 Put out of operation and storage 14 4 2 Cleaning and maintenance 16 5 1 International service and repair partners 17 1 2 3 4 5 ...

Page 3: ...he event of a fault the user may only carry out repair work for the faults for which the relevant maintenance process is described in this manual 1 2 Explanation of symbols There are some sections of this manual that use internationally known warning symbols warning notes and general instructional symbols The individual symbols are explained below Follow all instructions and safety advice Observe ...

Page 4: ...gh pressing force of up to 80 kN or 8t A commercially available cordless screwdriver of medium power class serves as drive unit The rotation energy of the cordless screwdriver activates a high pressure pump which activates a high pressure cylinder via a pressure control valve A full stroke pressure control valve switches off the tool at a preset pressure when the preset end force is reached A manu...

Page 5: ...control knob Torque arm Locking bolt The pressure control knob of the XPac allows for the setting of the operating pressure and therefore the working pres sure Before each working operation please check the pressure setting at the XPac to 80 kN 8 0 t Maximum force from 25 kN 2 5 t Minimum force Tamper protection Abb 2 1 a Abb 2 1 b Abb 2 1 c Abb 2 1 d ...

Page 6: ...250 1500 rpm Required torque 12 5 Nm Permissible hydraulic OIL Hydraulic OIL according to DIN 51524 AFT OIL according to DIN 51562 2 Type HLP 22 HLP 36 Viscosity of the OIL ca 22 36 mm2 s bei 40 C OIL filling capacity 60 ccm Ambient temperature 5 50 C 41 122 F Prescribed safety clothing Protective gloves face mask 2 2 Technical Specifications 2 3 Technical data XPac riveting system ...

Page 7: ...allic parts can break up and fly off with high energy if the tool is faulty or operated incorrectly protective gloves and face mask must strictly be worn for all applications of the equipment As a result there is a risk of severe physical injury Never throw the tool or allow it to fall Ne ver misuse the tool or let untrained per sonnel use it The tool must only be used in ambient temperature of ab...

Page 8: ...the user buyer provided that the tool is obtained from an authorized sales outlet and is used as described in the instruction manual and for the purpose for which it was designed The warranty becomes invalid if the tool is used for purposes other than those for which it was designed In addition the warranty becomes invalid if the tool is not used as described in the instruction manual In the event...

Page 9: ...laced on a non slip surface stored safely and cannot fall down Make sure that the Power Pack XPac is set up in a work area that is free from heat sources max 50 C 120 F and free from corrosive liquids greases and oils ATTENTION The drill chuck must never be opened or closed with the driven cordless screwdriver 3 1 Connecting and adjusting the XPac The XPac is delivered as standard without a cordle...

Page 10: ...nd tighten the knurled screws Setting on the cordless screwdriver ATTENTION No impact function Select second gear for all applications fast forward Torque adjustment to maximum Push the locking ring backwards over the drill chuck Tighten the locking ring with left thread firmly Also tighten the knurled screw of the torque arm at the top of the XPac Abb 3 1 h Abb 3 1 g Abb 3 1 j Abb 3 1 e Abb 3 1 f...

Page 11: ...both direc tions To release the XPac push the release lever up Not more than 60 After mounting the C arm chapter 3 2 and the inserts loosen the lock on the cordless screwdriver The XPac is now ready for operation Or press down Not more than 60 Abb 3 1 k Abb 3 1 l Abb 3 1 m 60 60 Abb 3 1 n Abb 3 1 o ...

Page 12: ...e intake of the XPac 5 Close the locking lever clockwise to close 6 The C arm is correctly mounted when the safety button jumps out completely and a green mark is visible This action is accompanied by an audible click Attention The mounting hole of the C arm must be free from contamination and damage The locking mechanism must engage smoothly It should not be possible to move the locking lever onc...

Page 13: ...ivet must be taken from the repair instructions Check that the riveting heads are firmly seated after each riveting process Rivet inserts that have become loose present a hazard and can lead to equipment da mage or injuries Hand tighten the riveting head provided Apply no excessive force Screw the corresponding counterpart into the insert on the opposite side of the C arm plunger rod with the incl...

Page 14: ...fety button pressed down clockwise Loosen knurled screws on the support elements 4 1 Put out of operation and storage ATTENTION To avoid injury lock the cordless screwdri ver before disconnecting the XPac Open the support elements on the torque arm Abb 4 1 a Abb 4 1 b Abb 4 1 c Abb 4 1 d 4 Abb 4 1 e ...

Page 15: ...rewdriver Un screw the locking ring ATTENTION The drill chuck must never be opened or closed with the driven cordless screwdriver Disconnect the cordless screwdriver from the XPac Push the locking ring forward Abb 4 1 h Abb 4 1 f Abb 4 1 g Abb 4 1 i ...

Page 16: ... return the unit to an authorized dealer for repair Foreign objects or contamination in the area of the locking ring can cause the equipment to malfunction Remove foreign objects or contaminati on in this area with a clean cloth To protect the metallic surface from cor rosion you can use a standard corrosion protection product such as Caramba Ballistol or WD40 Abb 4 2 a Abb 4 2 b Abb 4 2 c ...

Page 17: ...17 XPac 5 1 International service and repair partners https www wielanderschill com service vertretungen weltweit https www wielanderschill com en service distributors worldwide 5 ...

Page 18: ... Wieländer Schill 18 ...

Page 19: ...19 XPac ...

Page 20: ...isions to be reserved Wieländer Schill sh 11 2020 Professionelle Karosserie Spezialwerkzeuge Tel 49 0 7464 9898 0 Fax 49 0 7464 9898 289 info wielanderschill com www wielanderschill com Adresse Neue Wiesen 8 D 78609 Tuningen ...

Reviews: