Worth Data 5000 TriCoder s Owner'S Manual Download Page 30


29 


Chapter 8: 

TriCoder Setup 

All  of  the  Setup  Parameters  are  changed  via  the  TriCoder  keypad  using  the 

Setup  Mode. 

You  can  also  send  your  setup  from  the 

Hardware Utilities

 via USB using the Full Speed USB setup or by a Clone file also sent from the 

Hardware Utilities

.  


Using the keypad to setup the TriCoder 

You can change the Setup Parameters on the TriCoder by going into SETUP MODE from the Main Menu (opening screen option 5).  
When you enter setup you will see the following screen:


TRICODER SETUP 

BAR CODE OPTIONS ---------------- 1 
I/O SETTINGS --------------------------  2 
DATE & TIME SETTINGS -----------  3 
SPEAKER SETTINGS ---------------- 4 
LASER SETTINGS --------------------  5 
LCD SETTINGS ------------------------  6 
LCD SETTINGS ------------------------  7 
OTHER SETTINGS -------------------- 8 
SYSTEM TOOLS ----------------------- 9 
DONE/EXIT ------------------------------ 0 
PLEASE SELECT OPTION:  _ 


At this screen press the 

NUMBER 

key on the TriCoder keypad that corresponds to the 

Setup Parameter

 you want to change. 

 
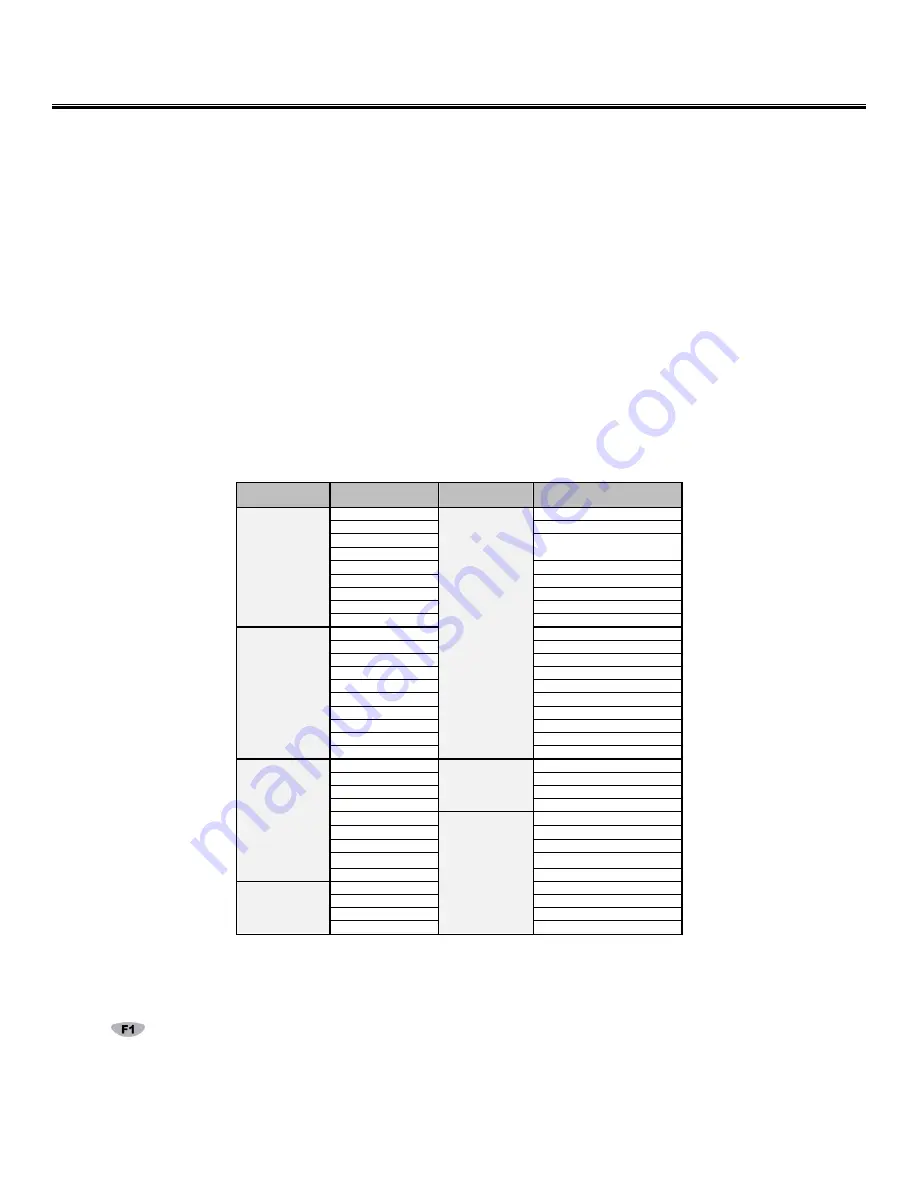
The setup parameters are distributed in the groups as follows: 

Menu 

Selection 

Setup 

Parameters 

Menu  

Selection 

Setup 

Parameters 

BAR CODE 

OPTIONS  

1

” 

CODE 3 OF 9 

LASER OPTIONS 

5

” 

DOUBLE DECODE 

UPC-A  EAN13 

4.5 SECOND LASER BEAM 

UPC-E  EAN8 

AIMING DOT DURATION 

CODE 128 
2 OF 5 CODES 

LCD OPTIONS 

6

” 

MASTER BACKGROUND 

CODABAR 

PROMPT BACKGROUND 

MSI/PLESSEY 

PROMT TEXT COLOR 

CODE93/CODE11 

DATA BACKGD COLOR 

DataBar/RSS/Others 

DATA TEXT COLOR 

I/O SETTINGS 

2

” 

HOST (I/O Interface) 

BRIGHTNESS 

TERMINATOR CHAR 

BRIGHTNESS TIMEOUT 

SINGLE CYCLE 


BAUD RATE 


PARITY 


DATA BITS 


RS-232 PROTOCOL 


USB ENUM DELAY 


USB HID SPEED 


USB HID ALT OUTPUT 


DATE & TIME 

SETTINGS 

3

” 

TIME 

OTHER SETTINGS PREAMBLE 

DATE 

7

” 

POSTAMBLE 

DATE FORMAT 


CHARACTERS 

YEAR OUTPUT 


SHUT DOWN TIME 

SYSTEM TOOLS 

8

” 

CHARGING FROM USB 

DATE/TIME FORMAT 

PLAY VOICE PROMPT 


LANGUAGE 


RESET SETUP TO DEFAULT 


RESET PROGS & DATA 

SPEAKER 

SETTINGS 

4

” 

BEEP VOLUME 

CLEAR DATA FILE(S) 

BEEP TONE 

DATA SECURITY 

VOICE VOLUME 

FIXED PROGRAM 

KEYPAD TONE 

TABLE ALLOWED 


To select a particular category, press the corresponding number key on the TriCoder keypad.  Once you are in a category it will have a 
new  screen  with  options  for  that  particular  setup  for  you  to  change.  Some  changes  must  be  made  by  scanning  bar  codes  from  the 
FULL ASCII MENU. You can set a parameter back to the default settings by pressing the CLEAR key. 


Press the


 key to go back to the category selection screen. 

Summary of Contents for 5000 TriCoder s

Page 1: ...Owner s Manual A battery operated Portable Batch Reader with Voice Messages for PC Mac etc Portable Data Collector 5000 TriCoder www worthdata com...

Page 2: ...rce Warning labels to AVOID DIRECT EYE EXPOSURE DANGER are located according to the diagram below There are no user adjustments or maintenance operations to be performed on the integrated laser scanne...

Page 3: ...File Formats 19 Carriage Return Separated Files 19 Comma Separated Files 20 Flat File Formats 21 Uploading the data 22 USB HID Keyboard Upload 22 Serial Upload 23 Chapter 6 TriCoder Connection 24 USB...

Page 4: ...ng programs 74 Chapter 11 Creating TriCoder Programs on your Windows PC 75 Chapter 12 Voice Messages 78 Why Use Voice Messages and Prompts 78 Tips for Using Voice Prompts 78 TriCoder s Voice Message M...

Page 5: ...dows 7 Vista XP 106 Win98 ME 106 Win2000 106 Appendix F Specifications for Code 39 107 Code 39 Advanced Features and Functions 108 Special key sequences for USB 111 Appendix G Code 128 Specifications...

Page 6: ...default prompts the operator for an item number then a quantity To get started quickly we suggest using one of the Quickstart Tutorials then move on to the PROGRAMMING section if you find that neithe...

Page 7: ...except that you have trouble with the upload you need delays see Program 2 It is identical to program 0 but allows editing of the Upload Prefix and Suffix See Chapter 10 Creating a custom program for...

Page 8: ...our own programs and learning the basics of data collection Getting into Data Collection Mode The first step involves turning on the TriCoder make sure your unit is fully charged getting into DATA COL...

Page 9: ...the TriCoder will beep once and display the following ENTER DATA original prompt 00001 bar code 1 ENTER DATA new data entry prompt After scanning the TriCoder displays the original prompt then the dat...

Page 10: ...final step For the tutorial we assume that you have successfully established communication between the computer and the TriCoder If you have not go to Chapter 3 Non Portable Mode and establish communi...

Page 11: ...ayed The TriCoder can be programmed to play the voice message every time the visual prompt is displayed if desired See Chapter 10 Creating a custom program or Chapter 12 Voice Messaging for details Us...

Page 12: ...der displays ENTER QUANTITY XXX last quantity data entered BEGIN OF FILE HIT ANY KEY_ Press any key on the TriCoder keypad The TriCoder displays the first record of data To scroll through the data rec...

Page 13: ...is a good time to go and upload your data You can continue to collect data but you will eventually get this message OUT OF MEMORY HIT ANY KEY_ Pressing a key will take you out of Data Collection mode...

Page 14: ...d into any mode other than DATA COLLECTION mode In addition to using Data Security to restrict the user to DATA COLLECTION mode you can use the second security feature Program Restriction to confine t...

Page 15: ...ON PORTABLE mode and turn the TriCoder off when you turn the TriCoder back on you will return to the Main Menu If you want to leave NON PORTABLE mode simply press the key to return to the beginning of...

Page 16: ...iate the installation of the correct USB driver or you will have to go into your control panel and update the USB Driver manually If you are using Windows and you wish to use the Integrated Hardware U...

Page 17: ...e Utilities program make sure your TriCoder is connected and turned on then run the program by clicking on the Hardware Utilities icon in your Windows Start Menu 3 If you are connected to the USB port...

Page 18: ...s CD ROM shipped with every TriCoder Windows Users Install the Integrated Hardware Utilities program by inserting the Worth Data Hardware Utilities CD ROM in your computer and clicking on Start when t...

Page 19: ...der ENTER key Hardware Utilities Serial Port Test Screen You should see the data displayed both on the TriCoder display and in the test window on the PC If you do not see the data displayed on your PC...

Page 20: ...Utilities CD ROM that came with your TriCoder You can also find more information on KwikCount EX at http www barcodehq com kwikcountex html File Formats The program you are using to process your data...

Page 21: ...ed format 1 Set the Terminator Character to NONE To Change the Terminator Character in SETUP MODE Turn the TriCoder On Select 5 for SETUP MODE From the TRICODER SETUP screen choose 2 for I O SETTINGS...

Page 22: ...to demonstrate how Refer backs work Lets say that the data for the first field in every record must be the operators initials 3 characters The second field in each record must be an item number and t...

Page 23: ...will use Windows Notepad If you want to use another Windows text editor or Word Processor the specifics may vary but the basic upload will be the same In Windows open Notepad or program of your choic...

Page 24: ...on the START button to start the program You must start the upload program before you press 2 on the Main Menu of the TriCoder for Data Upload Press the 2 key at the TriCoder Main Menu opening screen...

Page 25: ...download new firmware releases upload download programs and download tables using the Full Speed USB mode With the Full Speed USB interface data uploads and program transfers are up to 40 times faster...

Page 26: ...at your computer store The easy part is the connection simply plug the C24 end of your cable into the open serial port in the back of your computer Plug the I O end of the cable into the port on the b...

Page 27: ...up Pressing while in a Setup Parameter will take you back one step in the Setup Mode from there choose a new group of settings Pressing again at the TriCoder Setup Screen will exit SETUP MODE PC Seria...

Page 28: ...erent Host Interfaces Using Setup Mode to change the TriCoder Setup You can change the Setup Parameters on the TriCoder by going into SETUP MODE from the Main Menu opening screen option 5 When you ent...

Page 29: ...load that will work with most modern PC s including any computer that runs Windows 7 Vista or XP The other option is to set it to SLOW for slower Windows machines that run older Windows versions like...

Page 30: ...A EAN13 4 5 SECOND LASER BEAM UPC E EAN8 AIMING DOT DURATION CODE 128 2 OF 5 CODES LCD OPTIONS 6 MASTER BACKGROUND CODABAR PROMPT BACKGROUND MSI PLESSEY PROMT TEXT COLOR CODE93 CODE11 DATA BACKGD COL...

Page 31: ...on plugged into the computer with a C22 USB cable and it is set for Full Speed USB interface In the Hardware Utilities program choose TriCoder Manager from the left menu and then click on the Setup bu...

Page 32: ...with various options to change Choose the option you would like to change by keying in the number that corresponds to the Setup parameters you would like to change in that mode the Default settings ar...

Page 33: ...be transmitted as 1234 Transmitting the start and stop characters can be useful if you need to differentiate between data that comes from a bar code versus data coming from the keypad o Enabling use o...

Page 34: ...OFF For details on ISBN see Appendix I UPC EAN o UPC A can be transmitted in EAN 13 format by adding a leading 0 USA county code to the UPC A data To transmit in EAN 13 format set option 8 to ON UPC...

Page 35: ...h setting must always be an even number o Reading variable length I 2of5 or 2 of 5 codes is to be avoided if at all possible The 00 setting is supplied for the purposes of reading codes of unknown len...

Page 36: ...ted above We support the standard and stacked version of GS1 DataBar For more information on GS1 DataBar see the GS1 org website at http www gs1 org barcodes databar Bar Code ID s are characters assig...

Page 37: ...Mode and Data Upload as a HID USB Keyboard to a Mac There isn t support for full speed USB on a Mac If you are using Windows 98SE or later Windows 7 Vista XP 2000 ME and you wish to upload your files...

Page 38: ...e asked by the operating system to install the USB Keyboard HID driver which is probably on your hard disk but if not is on your original Windows CD ROM While the TriCoder is set for FULL SPEED USB it...

Page 39: ...HID SPEED FAST 8 USB HID ALT OUTPUT OFF 9 DONE EXIT 0 CHANGE SETTING _ o Single Cycle Upload allows the TriCoder to upload one field at a time to the host controlled by the pressing of any key except...

Page 40: ...S HOST SERIAL 1 TERMINATOR CHARACTER CR 2 SINGLE CYCLE UPLOAD OFF 3 BAUD RATE 9600 4 PARITY NONE 5 DATA BITS 8 BITS 6 PROTOCOL NONE 7 DONE EXIT 0 CHANGE SETTING _ o Set the Data Bits to match the sett...

Page 41: ...USB ENUMERATION DELAY 0 7 USB HID SPEED FAST 8 USB HID ALT OUTPUT OFF 9 DONE EXIT 0 CHANGE SETTING _ o The USB HID SPEED setting by default is set to FAST and offers our fastest upload The FAST setti...

Page 42: ...oming across correctly from the TriCoder in HID Keyboard data upload or Non Portable mode o An example of this is if you scan a bar code or key in A on the TriCoder and upload it with your computer ke...

Page 43: ...nner do 2 identical decodes of the same bar code before accepting the result and entering the data This is useful when there are very poorly printed codes and for codes that are out of spec and are gi...

Page 44: ...ional date format of ddmmyy Year Output Press the 4 key on the TriCoder keypad to change the Year Output This option allows you to output the date with a 2 Digit year or as a 4 Digit year The default...

Page 45: ...8 9 A B C D E F See the Color Chart below for color options Data Background Color Keying 4 allows you to change the Data Background Color of the TriCoder The default is 1 which is BLACK background fo...

Page 46: ...Enter keys from the keypad or Scan any other desired characters up to 15 from the FULL ASCII Menu available on the Utilities CD ROM or from our website www barcodehq com downloads html 5 Press the ENT...

Page 47: ...e if you scanned the number 1 hex 31 and wanted the TriCoder to output hex 92 instead you would enter 3192 for the Characters parameter This would re assign the output characters with the TriCoder out...

Page 48: ...tup changes you may have made so do this with caution You will be prompted with the message ARE YOU SURE YES NO Press YES if you want to reset press NO if you don t Reset Programs Data Selecting 5 wil...

Page 49: ...ystem To install the Hardware Utilities for Windows insert the Utilities CD ROM into your CD drive If you have autoplay enabled the installation should begin automatically If it does not or you have a...

Page 50: ...49 If you are connected via USB you should see TriCoder HCVxxxx in the Far Left Pane as shown below...

Page 51: ...you to o Load and edit existing tables that are on your computer and download them into your TriCoder and o Create new tables and download them to your TriCoder Once you have the table open in the Tab...

Page 52: ...s and cln for clone files Data Files 1 Select Data File as the file type then enter the name of the file we recommend the extension dat for data files 2 Click the Start button in the TriCoder Manager...

Page 53: ...ities choose Clone TriCoder as the File type then specify the name of the file we recommend using the extension cln for clone files 3 Click the START button in the Hardware Utilities 4 The Hardware Ut...

Page 54: ...2 Start the Hardware Utilities program from your Windows Start Menu 3 Click the TriCoder Manager Tab In the Right Panel you will see what is currently in your TriCoder The middle panel will determine...

Page 55: ...to in the right panel 6 Click on the arrow between the panels or alt click and select Save As Type in the file name you would like or accep the default file name and press the Save button That s it Cl...

Page 56: ...ing Select the type of file you will be downloading a Program for collecting data a TriCoder Clone file complete setup information including setup parameters and programs or a Table for reference whil...

Page 57: ...u want to download in the middle panel and click to highlight it 5 Choose the program file in the right panel these are the programs already in your TriCoder that you want to replace 6 Click on the le...

Page 58: ...form to help you chart out programs before they are entered into the TriCoder TriCoder Coding Forms can be found at the very back of the manual We will also use sections of the TriCoder Coding Form t...

Page 59: ...esuming collection in an existing one This is done using the first 3 characters in the PROGRAM NAME prompt The first character must be followed by the two digit statement number you want to start with...

Page 60: ...IT PREV NEXT _ Parts of the TriCoder programming screen Before you start programming the TriCoder it helps to know what the TriCoder is asking you at each step Prompt PROGRAM 1 PROMPT 01 The word PROM...

Page 61: ...depending on the character entered at the branch prompt The data entered at a branch statement is not saved to memory it simply acts as a pointer directing the program to the appropriate statement Whe...

Page 62: ...ield prompt the YES NEXT STMT prompt determines which statement the YES key takes the program to For example if we wanted the program to jump to statement 05 if we answer YES to statement 01 the promp...

Page 63: ...he ENTER QUANTITY prompt is less than the minimum data length of the ENTER ITEM NO prompt then the data entered is stored as the quantity If the number of characters entered at the ENTER QUANTITY prom...

Page 64: ...statement and take you to a new statement dependent upon whether the data in the two compared statements matched The statement to compare to is referenced in the Data ID field For example you could en...

Page 65: ...negative number i e you cannot enter 100 You can use whole numbers only no decimals or fractions Only 1 calculation is allowed per sum for example you can enter 10 5 and press ENTER but you cannot typ...

Page 66: ...fied This is just one example of how to use Copy Table Data to Prompt to modify data in a stored Table you can also use it to modify things like locations conditions asset value items to be returned e...

Page 67: ...is the FREQUENCY field This field determines how often the voice messages for this statement are played VOICE FREQ E There are two choices for the FREQUENCY field E Exception the voice message is pla...

Page 68: ...ata and compare it to the check digit that was keyed in If the two digits do not match the TriCoder generates the following error message INVALID INPUT HIT ANY KEY_ To use this feature enter the follo...

Page 69: ...the data you scanned in statement 2 to the data you scanned in statement 1 you would choose the statement type C for statement 2 and enter 01 for the Data ID See the example under the Compare statemen...

Page 70: ...keypad and or scanner input Yes Next Statement The YES NEXT STMT field allows you to tell the TriCoder which statement to go to next or in the case of a Question statement where to go if the question...

Page 71: ...r example if you are uploading into a program that requires that you press the F1 key before you enter a particular field of a data you would program an F1 into the Upload Prefix for that statement by...

Page 72: ...would occur and the data would be transmitted in its entirety x where x is a single hex digit corresponding to the number of characters you want to remove from the data As above valid entries are 1 F...

Page 73: ...he CR as 013 the ASCII for CR See Appendix M ASCII Code Equivalent Table for a chart of all ASCII characters Upload Prefixes and Upload Suffixes are the only program statement fields that can be edite...

Page 74: ...gram and the TriCoder shuts off goes to sleep in the middle of programming maybe you were interrupted and left to do something else when you turn the TriCoder back on you may get the following message...

Page 75: ...ENTER Press the SEARCH key and enter the data you want to search for at the SEARCH PATTERN prompt The search begins at the beginning of the file and moves forward until a match is found Once you press...

Page 76: ...oder includes an interface that looks like the TriCoder Coding Form Simply use the TriCoder Coding Form to enter the correct data into the Virtual TriCoder The TriCoder does not know the difference be...

Page 77: ...76 3 Select the TriCoder Tab on the left of the Screen 4 Select Virtual TriCoder on the TriCoder Manager Menu 5 Press the Start Virtual TriCoder button and follow the prompts...

Page 78: ...een you can start to create a new TriCoder Program By default the View Table Program Grid is activated and will also appear with the Virtual TriCoder screen For help getting started simply press the H...

Page 79: ...will understand Vary the tone of your voice for different prompts For example the pre programmed prompts for Program 1 Item and Quantity are recorded in a female voice while all error messages are rec...

Page 80: ...sages you have recorded they must be designated for use when creating a data collection program in the TriCoder Once the programming is complete the operator has the following options available from t...

Page 81: ...lt messages and the message numbers they are recorded under Message Recorded Message Prompts ITEM 01 QUANTITY 02 Error messages CHANGE BATTERIES 20 DATA FILE EXISTS 21 DATA TOO LONG 22 DATA TOO SHORT...

Page 82: ...that statement When the operator enters an item found in the table the TriCoder writes the item to the data file and goes to the next statement in the program If the item is not found in the table th...

Page 83: ...gth but the next 3 characters are F01 specifies duplicate entry and each data record has an additional 0 added to the low order position 06F01000000EXAMPLE1 1111110 2222220 3333330 3242110 3656670 Ctr...

Page 84: ...ND HIT ANY KEY_ You either hit BEGIN to review data and no data was found or you attempted to upload and no data was found HIT ANY KEY to resume Data Review Request Press BEGIN key to Start or F1 for...

Page 85: ...he correct password WDTRI INVALID PROGRAM HIT ANY KEY_ You have entered something other than 0 1 2 or 3 in Programming Mode or 1 2 or 3 for Data Collection Mode HIT ANY KEY Enter the correct number IT...

Page 86: ...r If you want to see the data on the computer connect to the USB port then press any key Press F1 to exit Non Portable Mode or press F2 to simply display the data on the TriCoder screen without transm...

Page 87: ...t upload o Make sure the Serial Cable is fully plugged in and check your Serial Setup to make sure it is correct Strange Behavior o Low batteries that are not detected can exhibit some bizarre TriCode...

Page 88: ...of the bar code in the quiet zone moving the scanner quickly and smoothly as if drawing a line through the bar code If using a laser scanner or CCD scanner make sure the beam covers the bar code comp...

Page 89: ...n proceed to click on Update Driver this time furnishing the original Windows CD ROM for HID or the Worth Data Utilities CD ROM for the Full Speed driver See Appendix E USB Driver Installation Recover...

Page 90: ...computer stores 3 What I O Interface Computer Interface is the TriCoder set for 3 is the correct setting for RS 232 4 What Baud Rate Parity and Start and Stop bits are you using Make sure the settings...

Page 91: ...are going to do this you must check the length in DATA COLLECTION to minimize the possibility of partial reads I 2 of 5 is very susceptible to misreads so using 00 to read all lengths is risky and no...

Page 92: ...anning voice prompts and error messages can reduce the amount of time the operator has to look at the display making data collection faster and more efficient Use outside help when you need it You don...

Page 93: ...s no longer needed o After turning on the TriCoder answer 5 at the Main Menu opening screen o Press the 8 key for System Setup o You will be prompted for a password Key in WDTRI then press ENTER o Pre...

Page 94: ...he I O Interface is set for L is for a TriCoder with a Laser Built In S Is for Serial Interface K Is for USB Keyboard upload or U for USB High Speed upload HW7 Refers to the hardware revision of the m...

Page 95: ...ess the STATUS key again resume processing To change the Li ion battery 1 Turn OFF the TriCoder and unplug the 5 volt power adapter 2 Remove the battery door on the back of the T5000 TriCoder or the H...

Page 96: ...should first upload all data files and clone the TriCoder to a computer file before starting a firmware download Data files and tables can be lost in firmware updates Sometimes the Setup and the Prog...

Page 97: ...96 Select TriCoder and then Press Next Select the COM port you are using if you are connecting by Serial Cable or Select USB is you are connecting by USB...

Page 98: ...computer using a serial cable or USB cable and press the Next button Then turn the TriCoder on and leave it at the Main Menu opening screen and Press the Next button again and follow the prompts and...

Page 99: ...er 3 Locate the small switch in the right hand corner and slide the switch down 4 Plug the battery back into place noting that it can only be inserted one way and with the battery contacts facing the...

Page 100: ...well as how to use each one Practice Scanning To practice scanning turn on the TriCoder and press 3 at the Main Menu opening screen to enter NON PORTABLE MODE Use the Test Label and the technique dia...

Page 101: ...l 5 9 10 mil 0 15 40 mil 2 44 100 mil 24 84 LT5000 TriCoders 6 mil 1 7 integrated laser models 10 mil 1 13 40 mil 4 29 100 mil 24 84 ELRL Long Range Scanner 6 8 mil 8 11 10 mil 12 54 40 mil 11 13 feet...

Page 102: ...ta 2 SHELL Chassis Ground 1 Table I 1 C24 Null Modem Cable C22 USB Cable Pin outs Pin outs for Cable C22 a USB A to Worth Data I O Male 30pin connector I O Connector Function USB A 8 Vbus RED 1 6 DATA...

Page 103: ...ut 13 5VDC Out 14 Laser Trigger 15 Ground 16 Ground 17 Audio Out 18 RS 232 RXD 19 RS 232 TXD 20 Ground 21 RS 422 T 22 RS 422 T 23 RS 422 R 24 RS 422 R 25 RS 232 CTS 26 RS 232 RTS 27 5VDC Input 28 5VDC...

Page 104: ...Power Supply Adapter Cable C24 9 Pin Serial I O Cable C13 Zebra QLxxx Serial Printer Cable BD5 Battery Door H5000 Replacement TriCoder LT Handle Assembly L03 Li ion Replacement Battery NP 120 1800mAh...

Page 105: ...o the folder where you saved the download Assuming the drivers was partially installed you will have to update the driver manually following the below procedures Manually Updating TriCoder High Speed...

Page 106: ...ng Tricoder USB Driver on Windows 98 Me 1 Plug the Tricoder into the computer s USB port and turn it on Make sure it is in High Speed mode go to the Data Collection Y N prompt 2 In Windows go to Start...

Page 107: ...ouble Click on the Human Interface Devices 8 Locate the USB Human Interface Device with a in the icon 9 Click on Update Driver 10 Follow instructions If Windows fails to find the driver on the compute...

Page 108: ...its structure Each character is formed of three wide and six narrow elements made up of five bars and four spaces Code 39 s density can vary from a low of 75 characters per inch cpi to a high of 9 4...

Page 109: ...3 3 E 14 P 25 36 4 4 F 15 Q 26 37 5 5 G 16 R 27 space 38 6 6 H 17 S 28 39 7 7 I 18 T 29 40 8 8 J 19 U 30 41 9 9 K 20 V 31 42 A 10 L 21 W 32 Table A 1 Mod 43 Check character calculation for Code 39 He...

Page 110: ...ode 39 ASCII Code 39 ASCII Code 39 ASCII Code 39 NUL U SP Space V W SOH A A A A a A STX B B B B b B ETX C C C C c C EOT D D D D d D ENQ E E E E e E ACK F F F F f F BEL G G G G g G BS H H H H h H HT I...

Page 111: ...U Down Arrow Down Arrow SYN V Up Arrow Up Arrow VT K Page Up Page Up FF L Page Down Page Down ETB W Home Home CAN X End End EM Y Shift On Shift On SUB Z Shift Off Shift Off FS B Control On Control On...

Page 112: ...system For example to enter ASCII 2 encode Alt On Down Arrow number 2 on number pad LF for the unmarked 5 on number pad Insert number pad for 0 Alt OFF F11and F12 are created by encoding NULLF1 and NU...

Page 113: ...X B Ctrl C 4 ETX C Ctrl D 5 EOT D Ctrl E Ctrl Y 6 ENQ 25 EM E Y Ctrl Z 26 SUB Z Ctrl 27 ESC A Ctrl 28 FS B Ctrl 29 GS C Ctrl 30 RS D Ctrl _ 31 US E F1 0 59 Null U F F2 0 60 Null U G F3 0 61 Null U H F...

Page 114: ...including that last code is transmitted as one long bar code A double minus sign bar code clears the buffer Scanning a backspace code H in Code 39 backspaces in Full ASCII mode The ENTER code on this...

Page 115: ...the bar code The TriCoder outputs the following for the special function codes and start sequences C1 Start C Function Code 1 GS Function Code 1 as a variable string terminator If UCC EAN 128 is enabl...

Page 116: ...allows variable length bar codes scanning If you must use the 00 setting you must use the Minimum Maximum data length field when creating a program in the TriCoder to check each field for the proper l...

Page 117: ...ikely to be in the future causing conflicts in your inventory system The leading Number System Character the first number of the 11 digits to be entered should conform to these UPC assignments 0 6 7 8...

Page 118: ...ple data 18314589938 Assign even and odd positions starting at the right and moving left 8 3 9 9 8 5 4 1 3 8 1 odd even odd even odd even odd even odd even odd Starting with the leading digit 8 take t...

Page 119: ...check digit calculation described in the previous section to produce a check digit as if it were a UPC A code The check digit for the sample data is 5 The complete 8 digit code consists of the Number...

Page 120: ...y different types of labels Codabar s variable data length and extremely low error rate make for a versatile bar code Codabar start stop transmission The Codabar section on the TriCoder Setup lets you...

Page 121: ...by 2 835 x 2 1670 Add the digits of product 1 6 7 0 14 Add the even digits of the original number to the result in 3 2 4 14 20 Subtract the result from the next highest multiple of 10 20 20 0 New Che...

Page 122: ...lt in check digits greatly minimize the possibility of reader substitution errors These check digits are never transmitted by the bar code reader Code 93 s Start and Stop characters are also never tra...

Page 123: ...48 072 h 68 104 HT 09 009 29 041 I 49 073 i 69 105 LF 0A 010 2A 042 J 4A 074 j 6A 106 VT 0B 011 2B 043 K 4B 075 k 6B 107 FF 0C 012 2C 044 L 4C 076 l 6C 108 CR 0D 013 2D 045 M 4D 077 m 6D 109 SO 0E 014...

Page 124: ...has to do with cabling Follow the specifications for the cabling exactly as they are shown Use only the wire specified don t use whatever is lying around and be sure to test your communications thoro...

Page 125: ...Both B Brnch X Xtra Prompt Text Data ID Unique 3 Chars or table ID or Time Display Data Type D N A or Blank Min Chs 00 99 2 Chs Input Device K W or Blank Next Stmt Num or Yes Branch End Branch or No...

Page 126: ...14 036 24 052 34 068 44 084 54 100 64 116 74 005 05 021 15 037 25 053 35 069 45 085 55 101 65 117 75 006 06 022 16 038 26 054 36 070 46 086 56 102 66 118 76 007 07 023 17 039 27 055 37 071 47 087 57...

Reviews: