


Sawmill Setup
Tracking The Blade
3
3-35
WMdoc072919
Sawmill Setup
3.
Engage the blade, rotating the blade until the blade positions itself on the wheels.
WARNING!
Do not spin the blade wheels by hand. Failure to follow
this could result in death or serious injury.
4.
Disengage the blade.
5.
Turn off the engine, remove the key, and check the position of the blade on the blade
wheels.
6.
Position 1 1/4” wide blades on the wheels so the gullet is 1/8" (3.0 mm) out from the edge
of the wheel. Position 1 1/2” wide blades on the wheels so the gullet is 3/16” (4.5 mm) out
from the edge of the wheel.
7.
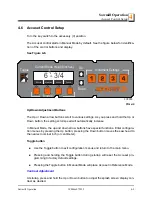
To adjust where the blade travels on the blade wheels, use the cant control.
If the blade is too far out or in, turn the cant control counterclockwise or clockwise,
respectively, by 1/8th of a turn until the gullet of the blade is the correct distance from the
front edge of the wheel.
See Figure 3-16.
8.
Adjust the blade tension if necessary to compensate for any changes that may have
occurred while adjusting the cant control.
9.
Close the blade housing covers.
IMPORTANT!
After aligning the blade on the wheels, always dou-
ble-check the blade guide spacing and location. (
for
more information.)
FIG. 3-16
LX0009-01
Blade Tensioner Gauge
Blade Tensioner Handle
Cant Control


