background image

TRK

12

3061285_1206

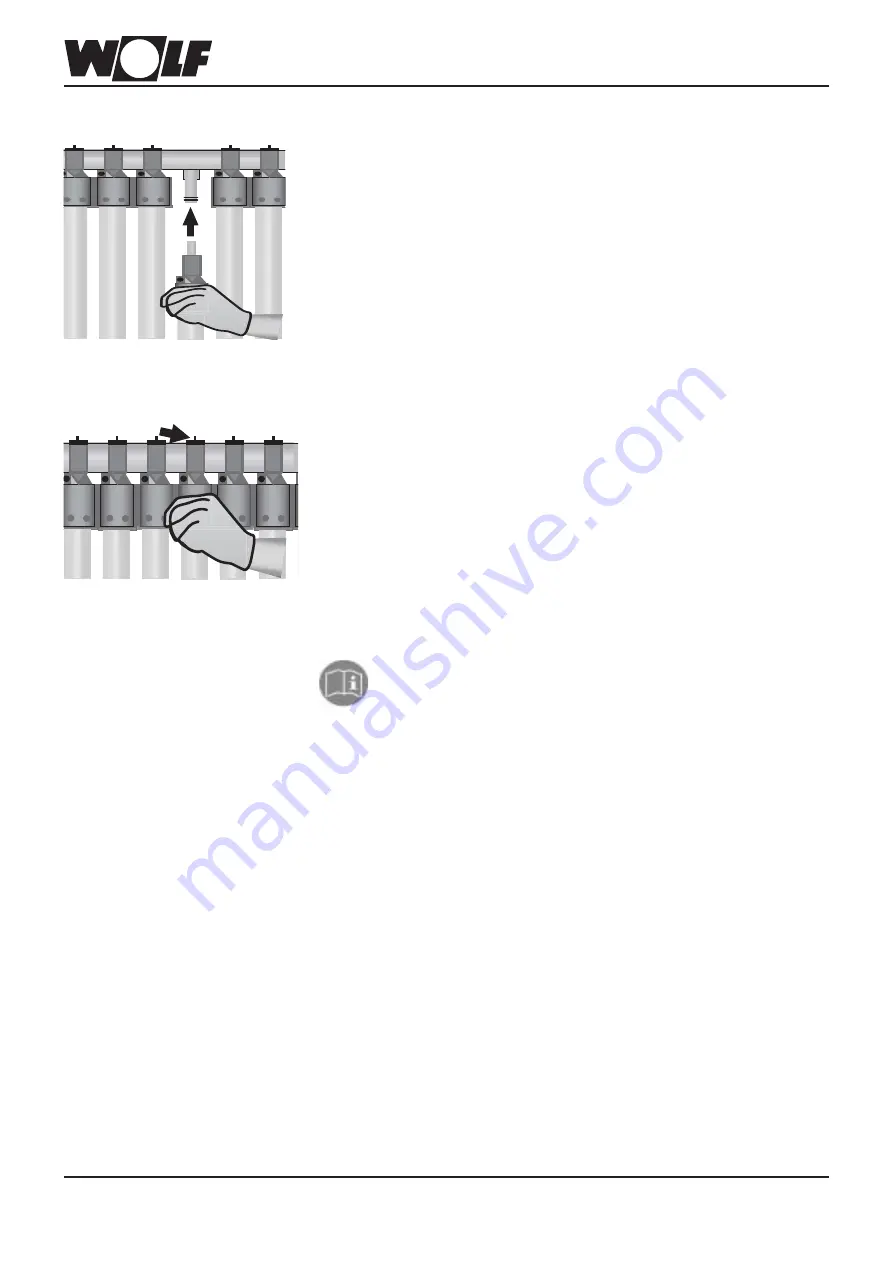
Inserting the replacement tube

Now take up the new tube. Push the coaxial pipe into the header connection and push
the tube onto the header. Ensure that the plastic pieces run properly in the tongue and
groove of the adjacent parts. Push the tube simultaneously at the top and bottom onto
the collector retainers. Ensure that the tube is not lifted out of the collector level. Risk
of breakage.

Secure the tube at the top of the header by pushing the plastic slider supplied inwards.
If you have undone one of the M8 screws, retighten it now.

Replace the cover with insulation and secure it with the screws previously removed.
At the foot end, push the retaining plate behind the fixing rail towards the tubes again
so they are held in place; then retighten both screws at the bottom fixing rail.

Restarting the system

Observe the installation instruction for the system as a whole when taking
the system into use again.

Carry out a leak test before taking the system back into use, and completely ventilate
the collector and solar circuit. Manual fill pumps are unsuitable for this purpose; this
task requires a jet pump (at least 800 W, 40 m head). The fill pressure should be 0.5
bar higher than the expansion vessel inlet pressure.

Run the pump on pre-purge for at least 30 minutes and start/stop it several times. For
this, the heat transfer medium must flow through a fill & drain valve, fitted into the
return between the heat exchanger and the circulation pump into a container and from
there back into the system, propelled by the jet pump.

The system is properly ventilated when no more bubbles appear in the returning
medium for a longer period of time.

The collector can now be taken into use again, subject to being free of airlocks.
If required, it may need to be ventilated again after a few days.

Summary of Contents for TRK

Page 1: ...nleitung Einzelr hre Austausch R hrenkollektor TRK 1 4 D Instrucciones de montaje Tubo individual Cambio Captador multitubular TRK 5 8 ES Istruzioni per il montaggio Sostituzione del singolo tubo Coll...

Page 2: ...R hren Tragen Sie bei diesen Arbeiten Schutz handschuhe und Schutzbrille VORSICHT VERBRENNUNGSGEFAHR Wenn der Kollektor vor dem R hrenaustausch direkter Sonneneinstrahlung ausge setzt war kann er seh...

Page 3: ...den Schieber vom Sammler ab WARNUNG VERLETZUNGSGEFAHR Da die R hre nun nicht mehr vom Kollektor gehalten wird k nnte sie aufgrund der Neigung nach unten aus dem Kollektor gleiten und vom Dach fallen...

Page 4: ...en Schrauben unten an der Befestigungsschiene wieder fest Anlage wieder in Betrieb nehmen Beachten und befolgen Sie bei der Wiederinbetriebnahme die Montage anleitung des Gesamtsystems Vor der Wiederi...

Page 5: ...schen dient Technik Wolf GmbH Postfach 1380 84048 Mainburg Tel 08751 74 0 Fax 08751 741600 Internet www wolf heiztechnik de Con reserva de modificaciones Instrucciones de montaje Tubo individual Cambi...

Page 6: ...cambio de los tubos de captador defectuosos se confiar exclusivamente a profesionales cualificados que est n familiarizados con la instalaci n y ejecuci n segura instaladores especializados Para camb...

Page 7: ...tubo al colector Desmonte la corredera del colector ADVERTENCIA PELIGRODELESIONES Puesto que el captador ya no lo sujeta el tubo podr a deslizarse hacia abajo debido a la inclinaci n y caer del tejad...

Page 8: ...oner en marcha nuevamente la instalaci n Para la nueva puesta en marcha respete lo especificado en las instrucciones de montaje del sistema Antes de la nueva puesta en marcha es preciso comprobar la e...

Page 9: ...hen dient Technik Wolf GmbH Postfach 1380 84048 Mainburg Tel 08751 74 0 Fax 08751 741600 Internet www wolf heiztechnik de Subject to technical modifications GB Installation Instructions Replacing indi...

Page 10: ...are familiar with the installation and safe implementation contractor on account of their vocational professional qualification Two people are needed to replace the tubes Approved replacement tubes On...

Page 11: ...er WARNING RISKOFINJURY As the tube is no longer held by the collector the slope of the roof could lead to it sliding down out of the collector and falling off the roof This represents a risk for anyo...

Page 12: ...rail Restarting the system Observe the installation instruction for the system as a whole when taking the system into use again Carry out a leak test before taking the system back into use and complet...

Page 13: ...1 74 0 Fax 08751 741600 Internet www wolf heiztechnik de WolfItaliaS r l Via25Aprile 17 20097S DonatoMilanese MI Tel 02 5161641 Fax02 515216 Internet www wolfitalia com Subject to technical modificati...

Page 14: ...tubi sottovuoto deve essere eseguita solo da persone in possesso dei requisiti tecnici per quanto riguarda l installazione e l esecuzione dell impianto a regola d arte ed in modo sicuro tecnico specia...

Page 15: ...un panno facendo attenzione di non danneggiare le superfici di tenuta Pulire l attacco del collettore con il panno Spingere i due nuovi O Ring iniziando con quello nero giallo e di seguito quello nero...

Page 16: ...o del collettore Pericolo di rottura Rimessa in funzione dell impianto Per la rimessa in funzione dell impianto seguire attentamente le istruzioni di montaggio dell intero sistema Prima della messa in...

Reviews: