


C O N T R O L P A N E L
page 3 – 13
D-9 / Oct 2003
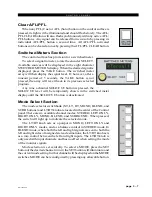
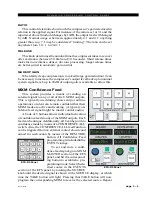
Taking an Event
Rotate the PREVIEW SCROLL encoder until
the desired event is shown in the PROGRAM/PRE-
VIEW display. To prevent accidental takes, the
ARM button must be pressed to arm the function.
The TAKE button will now flash indicating that the
panel is ready to act on a take. Then press the TAKE
button to execute the EVENT.
Undoing an Event
To recover from a premature or erroneous EVENT
take, press the ARM and UNDO buttons. This will
return the system to its status prior to the last take,
with the last program event being once again the
current program event, and the last preview event
(the one just taken) becoming the preview event
once again. There is only one level of undo. If undo
has been done and a subsequent take has not been done, the undo function
will do nothing.
Modifying the Currently Selected Event
It is presumed an event has already been executed on the control surface.
Modifications to that event can be accomplished by simply adjusting the
controls and switches as desired and then pressing the MODIFY button,
then the SAVE button. In this way the modified event will overwrite the old
event setting and be saved, with the same name, in its place.
Deleting an Event
Rotate the PREVIEW SCROLL encoder until the Event to be deleted is
shown in the PROGRAM/PREVIEW display. Press the Modify button,
then press the PREVIEW SCROLL knob; the display will ask
“DELETE?”. Press the TAKE button to delete the previously displayed
Event. Do nothing and Delete mode will time out after approximately 7
seconds. Deleted Events may NOT be restored.
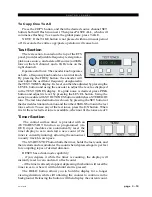
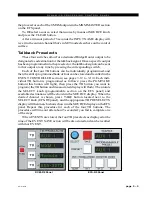
Previewing an Event
Rotate the PREVIEW SCROLL encoder and available EVENT names
will be shown in the 8-character PROGRAM/PREVIEW display. When the
desired event is shown in the display, press the ARM button, then press the
PREVIEW button. This will cause the entire control surface to display all
settings associated with that event, without disturbing the current operative
event. The preview status will be indicated by illumination of the PRE-
VIEW button and flashing of all source and destination displays, to remind
the operator that these would be the intended settings when the change is
made. Pressing the PREVIEW button a second time will cancel the
preview. It should be noted that no audio signals are changed in any way
by the preview feature.
D-9 / Dec 2004
Summary of Contents for D-9
Page 63: ...D 9 May 2005 page 7 2 ...
Page 64: ...D 9 May 2005 page 7 3 ...
Page 65: ...D 9 May 2005 page 7 4 ...
Page 66: ...D 9 May 2005 page 7 5 ...
Page 67: ...page 7 6 D 9 May 2005 ...
Page 68: ...D 9 May 2005 page 7 7 ...
Page 69: ...page 7 8 IP 9 4 Inputs Panel Switch Card Load Sheet D 9 May 2005 ...
Page 70: ...page 7 9 D 9 Oct 2003 ...
Page 71: ...page 7 2 D 9 Oct 2003 S C H E M A T I C D R A W I N G S IQ 9 IQ Card Load Sheet page 7 10 ...
Page 72: ...page 7 11 D 9 Oct 2003 ...
Page 73: ...page 7 12 D 9 Oct 2003 ...
Page 74: ...page 7 13 D 9 Oct 2003 ...
Page 75: ...page 7 14 D 9 Oct 2003 ...
Page 76: ...page 7 15 D 9 Oct 2003 ...
Page 77: ...page 7 16 MN 9 Control Panel Switch Card Load Sheet D 9 Oct 2003 ...
Page 78: ...D 9 May 2005 page 7 17 ...
Page 79: ...D 9 May 2005 page 7 18 ...
Page 80: ...page 7 19 MFS 9 4 Master Panel Switch Card Load Sheet D 9 May 2005 ...
Page 84: ...D 9 Oct 2003 page 7 23 ...
Page 85: ...D 9 Oct 2003 page 7 24 ...
Page 86: ...D 9 Oct 2003 page 7 25 ...
Page 87: ...page 7 26 DCM 9 DCM Panel Switch Card Load Sheet D 9 Oct 2003 ...
Page 95: ...page 7 34 HC 9 Host Controller Card Load Sheet D 9 Apr 2008 ...
Page 96: ...page 7 35 D 9 Oct 2003 ...
Page 97: ...page 7 36 BP 9 Back Plane Card Load Sheet D 9 Oct 2003 ...
Page 98: ...page 7 37 D 9 Oct 2003 ...
Page 100: ...D 9 Oct 2003 page 7 39 ...
Page 102: ...D 9 Oct 2003 page 7 41 ...
Page 104: ...page 7 43 D 9 Oct 2003 ...
Page 106: ...page 7 45 D 9 Oct 2003 ...