


page A – 8
D-9 / Jan 2007
A P P E N D I C E S
A Second Example
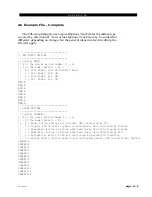
As a second example, lets look at something a little more involved. Once
again, scroll through the Options Text File to find the following code (please
note that some surfaces may have a different number of code lines in this
section; the following is just for the purposes of example):
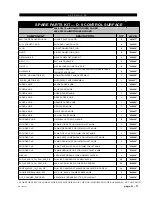
// Syntax: SPARE#:?
// # is the spare button number (1 - 12)
// ? is the mode (default = 2)...
// 0 = None, Button presses are ignored, LED controlled by DIO
// 1 = Toggle, Button state toggles on each press, LED controlled by Surface
// 2 = Momentary, Button is active when held down, LED controlled by Surface
// 3 = Momentary, Button is active when held down, LED controlled by DIO
// 4 = Automation, Button & LED are controlled by automation interface
// 5 = Preset Select, Button selects pre-configured preset, LED controlled by Surface
SPARE1:2
SPARE2:2
SPARE3:2
SPARE4:2
SPARE5:2
SPARE6:2
SPARE7:2
SPARE8:2
SPARE9:2
SPARE10:2
SPARE11:2
SPARE12:2
Once again, our first line is a comment line that shows the syntax used for
this particular option. In this case there are several code lines, each one
referring to a different spare (or programmable) button. Thus the '#' in the
example syntax is replaced with a number on the actual code line to indicate
which of the spare buttons that particular code line refers to. This fact is
described on the second comment line.
The third comment line explains that a number indicating button mode will
be used in place of the '?' on each actual code line.
The next few comment lines explain the possible modes that the spare
buttons can operate in. You may have fewer or greater modes available
depending on the surface model and vintage. In any event you can select the
same or a different mode from the available modes for each programmable
button on the surface.
Summary of Contents for D-9
Page 63: ...D 9 May 2005 page 7 2 ...
Page 64: ...D 9 May 2005 page 7 3 ...
Page 65: ...D 9 May 2005 page 7 4 ...
Page 66: ...D 9 May 2005 page 7 5 ...
Page 67: ...page 7 6 D 9 May 2005 ...
Page 68: ...D 9 May 2005 page 7 7 ...
Page 69: ...page 7 8 IP 9 4 Inputs Panel Switch Card Load Sheet D 9 May 2005 ...
Page 70: ...page 7 9 D 9 Oct 2003 ...
Page 71: ...page 7 2 D 9 Oct 2003 S C H E M A T I C D R A W I N G S IQ 9 IQ Card Load Sheet page 7 10 ...
Page 72: ...page 7 11 D 9 Oct 2003 ...
Page 73: ...page 7 12 D 9 Oct 2003 ...
Page 74: ...page 7 13 D 9 Oct 2003 ...
Page 75: ...page 7 14 D 9 Oct 2003 ...
Page 76: ...page 7 15 D 9 Oct 2003 ...
Page 77: ...page 7 16 MN 9 Control Panel Switch Card Load Sheet D 9 Oct 2003 ...
Page 78: ...D 9 May 2005 page 7 17 ...
Page 79: ...D 9 May 2005 page 7 18 ...
Page 80: ...page 7 19 MFS 9 4 Master Panel Switch Card Load Sheet D 9 May 2005 ...
Page 84: ...D 9 Oct 2003 page 7 23 ...
Page 85: ...D 9 Oct 2003 page 7 24 ...
Page 86: ...D 9 Oct 2003 page 7 25 ...
Page 87: ...page 7 26 DCM 9 DCM Panel Switch Card Load Sheet D 9 Oct 2003 ...
Page 95: ...page 7 34 HC 9 Host Controller Card Load Sheet D 9 Apr 2008 ...
Page 96: ...page 7 35 D 9 Oct 2003 ...
Page 97: ...page 7 36 BP 9 Back Plane Card Load Sheet D 9 Oct 2003 ...
Page 98: ...page 7 37 D 9 Oct 2003 ...
Page 100: ...D 9 Oct 2003 page 7 39 ...
Page 102: ...D 9 Oct 2003 page 7 41 ...
Page 104: ...page 7 43 D 9 Oct 2003 ...
Page 106: ...page 7 45 D 9 Oct 2003 ...