background image

Before Use

48

EN

•  The factors which affect the quality of 

the welding are the current, the distance 

between the welding edges, the tilt of the 

electrode and the corresponding diameter.

•  Avoid stiffening of the welded structure to 

prevent breakages as far as possible in the 

weld. These difficulties can be reduced. If 

at all possible, rotate the workpiece so that 

the structure can be welded in two opposite 

places. In this case the electrode must be 

kept inclined at 50 / 70° to the vertical axis 

going through the joint. Advance steadily 

with a light cross oscillation.

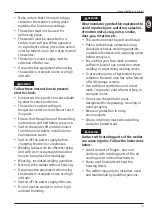
•  The electrode is held 

at an angle of 45 ° / 

55 ° to the horizontal 

surface, which passes 

through the welding 

axis. Remember that 

increasing the value 

mentioned above results in increased 

penetration and vice versa.

•  If possible, fix the work pieces with clamps or 

clips to prevent deformation during material 

hardening.

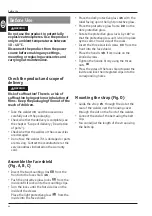
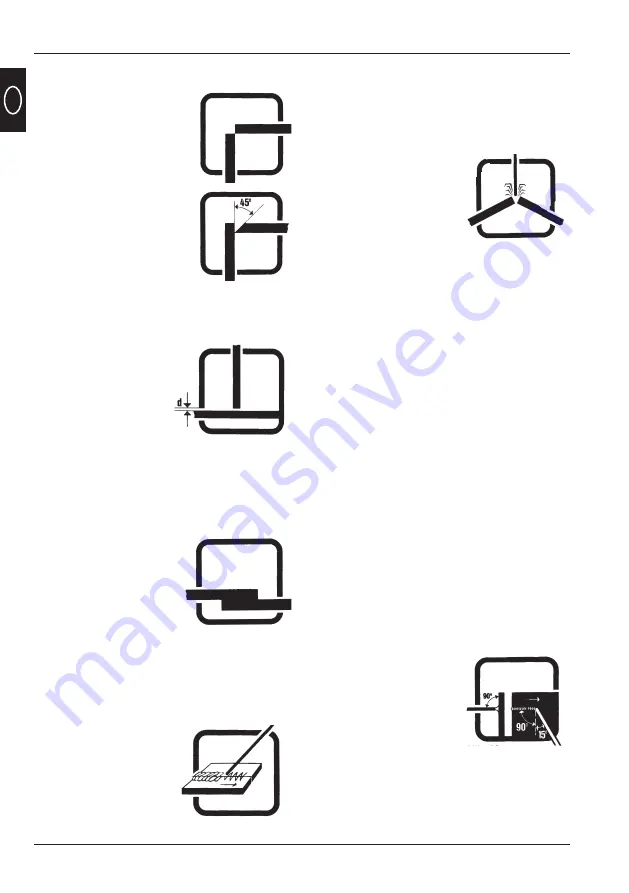
External corner joints

The preparation for this 

type is very simple, but it 

is no longer appropriate 

for thicknesses exceeding 

10 mm. In this case, it is 

preferable to prepare a joint 

as shown in the second 

figure.

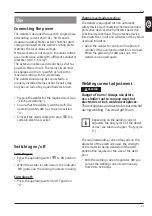
Flat butt joints

Frontal butt welded joints

The weld must be 

performed in a single 

operation with sufficient 

penetration of the base 

material. For this reason 

it is important to prepare 

well.

Up to a thickness of 

approximately 4mm it is 

not necessary to prepare 

a junction. The welding 

is carried out with the 

electrode at an angle of 

90° + 15° as shown in the 

figure.

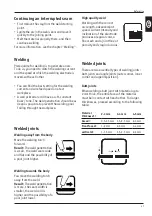
Internal corner joints

This joint is very simple 

to achieve, and is used 

for materials up to 

5mm thickness. The 

value of 'd' should 

be kept to a minimum 

and should in no 

circumstances be less 

than 2 mm.

Overlap joints

The most common 

preparation is with right 

angle edges; the weld is 

completed with a standard 

angle cord. The two 

workpieces have to be as 

close together as possible.

Summary of Contents for WWS-120B2-K01

Page 1: ...er welder 20 120 A Operating manual Inverter Schwei ger t 20 120 A Bedienungsanleitung CZ Invertorov sv e ka 20 120 A N vod k obsluze SI Varilni aparat inverter 20 120 A Navodila za uporabo FR Poste s...

Page 2: ...Page 56 CZ Prevod originalnih navodil za uporabo Strana 82 SI Origin ln n vod k obsluze Stran 106 www walteronline com servicecentre 00800 925 837 88 AT DE service walteronline com EN service en walte...

Page 3: ...1 2 3 4 5 6 7 8...

Page 4: ...9 10 11 12 13 14 15 16 17 18 19 20 21 22 23 24 25...

Page 5: ...A C B 11 16 22 21 20 16 24 19 23 18 17 24 25 10 15 4 5 13 12 14 E F D...

Page 6: ...ngen 15 Unfallgefahr durch spr hende Funken 16 Unfallgefahr durch spritzende Schlacketeilchen 16 Brandgefahr durch spr hende Funken 16 Explosionsgefahr 16 Zus tzliche Sicherheitshinweise 17 Vor Verwen...

Page 7: ...ie Die folgenden Symbole und Signalworte werden in dieser Bedienungsanleitung auf dem Schwei ger t oder auf der Verpackung verwendet Bezeichnet eine gef hrliche Situation die wenn sie nicht vermieden...

Page 8: ...ind M gliche Beispiele f r nicht bestimmungsgem e oder falsche Verwendung sind Verwendung des Schwei ger ts f r andere Zwecke als f r die es bestimmt ist Nichtbeachtung der Sicherheitshinweise und War...

Page 9: ...ntsprechender Kopfschutz zu tragen Tragen Sie feste isolierende Schuhe die Schuhe sollen auch bei N sse isolieren Halbschuhe sind nicht geeignet da herabfallende gl hende Metalltropfen Verbrennungen v...

Page 10: ...mmen werden kann Ein Schwei ger t ist kein Spielzeug und geh rt nicht in Kinderh nde Bei missbr uchlicher Benutzung k nnen irreparable Sch den auftreten Kinder d rfen nicht mit dem Schwei ger t arbeit...

Page 11: ...falscher Bedienung sind Haftungs und Garantieanspr che ausgeschlossen n Halten Sie das Schwei ger t von Regen oder N sse fern Das Eindringen von Zus tzliche Sicherheitshinweise f r das Schwei en a Ac...

Page 12: ...agen zu befestigen oder um den Stecker aus der Steckdose zu ziehen d Halten Sie das Netzkabel fern von Hitze l scharfen Kanten und knicken Sie es nicht e Schlie en Sie das Schwei ger t nur an eine gut...

Page 13: ...Leitungsquerschnitt entsprechende Sicherungen bzw Sicherungs Automaten verwendet werden 16 A Leitungsschutzschalter Eine bersicherung kann Leitungsbrand bzw Geb udebrandsch den zur Folge haben Comput...

Page 14: ...rateteile und dergleichen i Achten Sie bei Verwendung von Gleichstrom Schwei stromquellen zum Schwei en unter erh hter elektrischer Gef hrdung wie z B in engen R umen aus elektrisch leitf higen Wandun...

Page 15: ...Auffangen der Last c Zur sicheren Lastenhandhabung verwenden Sie den Tragegriff W hrend der Arbeit muss der Schwei er an seinem ganzen K rper durch die Kleidung und den Gesichtsschutz gegen Strahlen...

Page 16: ...rennbare Gegenst nde von Ihrem Arbeitsbereich Halten Sie einen passenden Feuerl scher bereit Achten Sie dabei insbesondere auf folgende Materialien Papier Lumpen Textilien Holz und Holzfasern Gummi Ku...

Page 17: ...n und den Schwei bereich nur nach R cksprache mit dem Arzt betreten Das Ger t darf nur von Fachpersonal bzw Personen mit entsprechender Erfahrung installiert bedient oder gewartet werden Das Ger t dar...

Page 18: ...lang rmlige Arbeitskleidung Lederhandschuhe Schutzstiefel und eine Ledersch rze an Stellen Sie sicher dass die w hrend des Schwei ens oder beim berwachen des Schwei vorgangs verwendete Schutzausr stun...

Page 19: ...in das Schwei schutzschild 24 ein Stecken Sie die Schutzglasverriegelungen 16 von innen bis zum Einrasten auf die Montageclips Drehen Sie die Schutzglasverriegelungen so dass die flache Seite zur Inn...

Page 20: ...uten abk hlen Wenn die gelbe berlastungsanzeige 8 erlischt ist das Schwei ger t wieder betriebsbereit Bereiten Sie das Schwei ger t f r die gew nschten Arbeiten vor siehe Kapitel Elektroden Schwei en...

Page 21: ...Sie den Klemmhebel 12 am Elektrodenhalter 14 und stecken Sie den unbedeckten Teil der Elektrode in die Elektrodenklemme 13 Schalten Sie den Betriebsschalter 2 auf ein I Halten Sie das Schwei schutzsc...

Page 22: ...gkeit ermitteln Sie anhand von Tests auf einem Probest ck Ein gut eingestellter Lichtbogen hat einen weichen gleichm igen Summton Die Einbrenntiefe sollte m glichst tief sein das Schwei bad jedoch nic...

Page 23: ...mmern um Verformungen w hrend der Materialh rtung zu verhindern Schwei verbindungen an der Au enecke Eine Vorbereitung dieser Art ist sehr einfach bei St rken von mehr als 10 mm ist sie jedoch nicht m...

Page 24: ...Vorw rtsspr nge machen um dem Bad Zeit zum H rten zu geben Flachschwei verbindungen Wenn man das Werkst ck besser handhaben kann sollte es wie in der Abbildung angeordnet werden Wenn man das Werkst c...

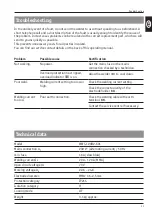
Page 25: ...kluft erforderlich VORSICHT Achten Sie darauf dass keine Fl ssigkeiten in das Innere des Produkts gelangen Lagerung Reinigen Sie das Schwei ger t vor dem Lagern gr ndlich siehe Kapitel Reinigung Bei N...

Page 26: ...ng Keine Funktion Kein Strom Lassen Sie die Netzsicherung bzw den Netzanschluss vom Fachmann pr fen berlastschutz hat angesprochen berlastungsanzeige 8 leuchtet Lassen Sie das Schwei ger t 1 abk hlen...

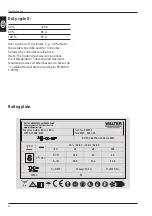
Page 27: ...ne H chsttemperatur wurde entsprechend einer Pr fung bei 40 C Umgebungstemperatur gem EN 60974 1 2005 rechnerisch korrigiert 30 120 A 60 85 A 100 65 A WALTER WERKZEUGE SALZBURG GmbH Gewerbeparkstr 9 5...

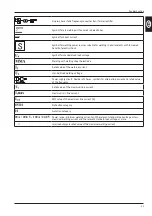
Page 28: ...telelektrode Bemessungswert des Schwei stroms genormte Arbeitsspannung Netzstromkreis Anzahl der Phasen Bildzeichen f r Wechselstrom und Bemessungswert der Frequenz Bemessungswert des maximalen Netzst...

Page 29: ...Explosionszeichnung 29 DE Explosionszeichnung 6 7 8 9 14 13 10 11 15 12 4 16 19 20 21 22 23 24 29 28 27 26 25 1 18 5 2 17...

Page 30: ...Kundin sehr geehrter Kunde Sie erhalten auf dieses Produkt 3 Jahre Garantie ab Kaufdatum Im Falle von M ngeln dieses Produkts stehen Ihnen gegen den Verk ufer des Produkts gesetzliche Rechte zu Diese...

Page 31: ...ng und bei Eingriffen die nicht von unserer autorisierten Service Niederlassung vorgenommen wurden erlischt die Garantie Abwicklung im Garantiefall Um eine schnelle Bearbeitung ihres Anliegens zu gew...

Page 32: ...32...

Page 33: ...UV radiation and burns 41 Dangers of flying sparks 41 Dangers of slag or molten metal 41 Risk of fire from flying sparks 42 Danger of explosion 42 Additional safety instructions 42 Before Use 44 Check...

Page 34: ...ual carefully before using the welder Pay particular attention to the safety instructions and warnings Failure to follow the instructions in this manual may result in serious The following symbols and...

Page 35: ...nd cleaning instructions given in this operating manual Use of accessories or spare parts that are not suitable for the welder Changes to the welder Repair of the welder by a person other than the man...

Page 36: ...hes Any protective clothing or accessories used should conform to the Personal protective equipment guidelines 89 686 EWG c Wear appropriate protective glasses and protective clothing because the ligh...

Page 37: ...bare hands Note that the earthing conductor in electrical equipment or devices can be damaged by the welding current in case of negligence For example if the earth terminal is placed on the welder s h...

Page 38: ...e chipping hammer Slag is hard and brittle after solidification Using the chipping hammer on the hardened slag can cause sharp pieces to break off and cause eye injuries The connection should be done...

Page 39: ...on limits of the standard As the user you are responsible for any disruptions caused by welding Selecting and connecting to the supply network has to be done by qualified personnel according to releva...

Page 40: ...ntended for use in residential areas where the power is supplied via a low voltage public supply system It may be difficult to ensure electromagnetic compatibility in these areas caused by both cables...

Page 41: ...damage before use A welder s apron can be worn to prevent damage to clothing For welding in difficult positions e g overhead welding a protective suit and appropriate protective head wear should be wo...

Page 42: ...the welding current circuit The torch and the earth clamp must always be one circuit Do not place yourself in the welding circuit Additional safety instructions WARNING Implement the following precaut...

Page 43: ...sing Use protective equipment when using the welder in cramped rooms ore high altitude Switch off the power supply after use Do not use the welder in rain or high ambient humidity WARNING Wear mandato...

Page 44: ...the two mounting clips 19 from the front into the face shield 24 Push the protective glass locks 16 from the inside until it locks onto the mounting clips Turn the locks until the flat side lies on th...

Page 45: ...inutes if the overload protection is tripped When the yellow light 8 goes out the welder can be used again Prepare the welder for the required work see Electrode welding Ensure that the welder is swit...

Page 46: ...ive or positive terminal as described in steps 1 and 2 Hold the clamping lever 12 on the electrode holder 14 and slide the uncovered part of the electrode into the electrode clamp 13 Turn the operatin...

Page 47: ...t workpiece A well primed arc will have a soft constant buzz tone The weld penetration should be as deep as possible to prevent the welding pool falling through the workpiece There are two essential t...

Page 48: ...or clips to prevent deformation during material hardening External corner joints The preparation for this type is very simple but it is no longer appropriate for thicknesses exceeding 10 mm In this c...

Page 49: ...rection of advancement and moved lightly from side to side The arc must be kept very short and if necessary make quick jumps forward to ensure that the bath has time to solidify Joints on a flat surfa...

Page 50: ...a very dusty environment the welder should be cleaned monthly with compressed air CAUTION Make sure that liquids do not get inside the product Storage Clean the welder thoroughly before storing see c...

Page 51: ...Not working No power Get the mains fuse or the mains connection checked by a technician Overload protection has tripped overload indicator 8 is on Allow the welder 1 to cool down Poor weld Welding cur...

Page 52: ...asured maximum temperature was corrected based on a test at 40 C ambient temperature according to EN 60974 1 2005 30 120 A 60 85 A 100 65 A WALTER WERKZEUGE SALZBURG GmbH Gewerbeparkstr 9 5081 Anif Au...

Page 53: ...ed value of the welding current standardised working voltage Power supply circuit Number of phases symbols for alternating current and rated value of the frequency Rated value of the maximum line curr...

Page 54: ...Exploded view 54 EN Exploded view 6 7 8 9 14 13 10 11 15 12 4 16 19 20 21 22 23 24 29 28 27 26 25 1 18 5 2 17...

Page 55: ...duct comes with a 3 year warranty from the date of purchase In case of defects in the product you may be entitled to legal claims against the seller of the product These legal claims are not restricte...

Page 56: ...at have not been carried out by our authorised service centre Processing a warranty case To ensure quick processing of your issue please follow the below instructions Please be ready with the sales re...

Page 57: ...isque d accident d aux projections d tincelles 67 Risque d accident d des projections de particules de scories 67 Risque d accident d aux projections d tincelles 67 Risque d explosion 67 Consignes de...

Page 58: ...e avant d utiliser le poste souder Veillez en particulier aux consignes de s curit et aux avertissements Le non respect des Les symboles et les termes d avertissement suivants sont utilis s dans cette...

Page 59: ...ples d utilisation non conforme ou incorrecte Utilisation du poste souder d autres fins que celle pour laquelle il est destin Non respect des consignes de s curit et des mises en garde ainsi que des i...

Page 60: ...t une protection pour la t te Portez des chaussures solides et isolantes les chaussures doivent aussi isoler dans l eau Les chaussures basses ne conviennent pas car les gouttes de m tal incandescent q...

Page 61: ...ue le poste souder ne puisse pas tre utilis par des enfants Un poste souder n est pas un jouet et n a rien faire entre les mains d enfants Toute utilisation abusive peut provoquer des dommages irr m d...

Page 62: ...it L infiltration d eau dans un outil lectrique accro t le risque de choc lectrique o Veillez ce qu aucune poussi re ne soit aspir e car il y a un ventilateur Consignes de s curit suppl mentaires pour...

Page 63: ...e de la prise de courant d Tenir le c ble l cart de la chaleur de l huile d ar tes vives et ne le pliez pas e Ne branchez le poste souder qu une prise de courant bien accessible afin de pouvoir le d b...

Page 64: ...omates de protection peuvent tre utilis s disjoncteur de protection 16 amp res Une protection trop importante peut entra ner des incendies de c bles et des dommages aux b timents Lignes de r seau de c...

Page 65: ...ties conductrices de l appareil et autres i En cas d utilisation de sources de soudage courant continu pour soudage dans des conditions de risque lectrique lev p ex dans des espaces exigus aux parois...

Page 66: ...Pour une manipulation s re des charges utilisez la poign e de transport Quand le soudeur travaille il doit tre prot g int gralement visage et corps par des v tements et des protections du visage cont...

Page 67: ...soudage vous devez enlever tous les objets inflammables de votre zone de travail Tenez un extincteur ad quat pr t l utilisation Faites particuli rement attention aux mat riaux suivants Papier chiffon...

Page 68: ...non autoris es ne doivent pas p n trer dans la zone de soudage Les personnes portant un stimulateur cardiaque ne doivent pas utiliser l appareil et ne peuvent p n trer dans la zone de soudage qu apr...

Page 69: ...commencer le travail avec l appareil afin de prot ger vos yeux portez galement une tenue de travail manches longues des gants en cuir des bottes de protection et un tablier de cuir Assurez vous que l...

Page 70: ...de soudage 24 Enfoncez les verrouillages de la vitre de protection 16 de l int rieur sur les clips de montage jusqu l enclenchement Tournez les verrouillages de la vitre de protection de mani re ce qu...

Page 71: ...surcharge 8 s teint le poste souder est de nouveau op rationnel Pr parer le poste souder pour le travail effectuer voir le chapitre soudage l lectrode Assurez vous que le poste souder est arr t L inte...

Page 72: ...ppuyez le levier de blocage 12 au porte lectrode 14 et enfichez la partie non recouverte de l lectrode dans la pince porte lectrode 13 R glez l interrupteur de fonctionnement 2 sur marche I Maintenez...

Page 73: ...met un son doux et uniforme La profondeur de p n tration doit tre la plus importante possible attention toutefois ne pas traverser la pi ce souder Il existe deux types de raccords fondamentaux dans l...

Page 74: ...viter toute d formation lors du durcissement du mat riau Raccords soud s sur l angle ext rieur Ce type de pr paration est tr s facile mais n est plus appropri pour des paisseurs sup rieures 10 mm Dan...

Page 75: ...pour laisser au bain le temps de durcir Raccords soud s plat Afin de pouvoir mieux manipuler la pi ce usiner la disposer comme le montre l illustration S il s av re impossible de tourner la pi ce sou...

Page 76: ...ment Dans les atmosph res particuli rement encrass es un nettoyage mensuel l air comprim s av re n cessaire ATTENTION Veillez ce que des liquides ne s infiltrent pas l int rieur du produit Stockage Av...

Page 77: ...fusible secteur ou le raccordement au secteur par un sp cialiste La protection contre les surcharges s est d clench e l indicateur de surcharge 8 s allume Laissez le poste souder 1 refroidir Mauvais c...

Page 78: ...ut temp rature ambiante La temp rature maximale selon EN 60974 1 2005 une temp rature d air de 40 C fut corrig e par voie de calcul 30 120 A 60 85 A 100 65 A WALTER WERKZEUGE SALZBURG GmbH Gewerbepark...

Page 79: ...e du courant de soudage Tension de travail normalis e Circuit secteur Nombre de phases symbole pour le courant alternatif et valeur nominale de la fr quence Valeur nominale du courant maximum du r sea...

Page 80: ...Dessin clat 80 FR Dessin clat 6 7 8 9 14 13 10 11 15 12 4 16 19 20 21 22 23 24 29 28 27 26 25 1 18 5 2 17...

Page 81: ...ntie de Walter Werkzeuge Salzburg GmbH Ch re cliente cher client Ce produit est couvert par une garantie de 3 ans compter de la date d achat En cas de d fauts pr sents sur le produit vous disposez env...

Page 82: ...t effectu es par notre centre de r paration agr la garantie devient caduque Prise en charge sous garantie Pour garantir un traitement rapide de votre demande veuillez vous conformer aux instructions...

Page 83: ...z en a pop len 91 Nebezpe razu odletuj c mi jiskrami 91 Nebezpe razu od odst ikuj c ch ste ek strusky 92 Nebezpe po ru odletuj c mi jiskrami 92 Nebezpe exploze 92 Dodate n bezpe nostn pokyny 92 P ed...

Page 84: ...luze Vezm te na v dom zejm na bezpe nostn a v stra n upozorn n Nerespektov n instrukc v tomto n vodu k obsluze m e v st k t k m V tomto n vodu k obsluze na sv e ce nebo obalu jsou uvedeny n sleduj c s...

Page 85: ...ro dr bu a i t n obsa en ch v tomto n vodu k obsluze pou it p slu enstv nebo n hradn ch d l kter nejsou pro tuto sv e ku vhodn pravy sv e ky oprava sv e ky jinou stranou ne v robcem nebo odborn m prac...

Page 86: ...slu enstv mus odpov dat sm rnici Osobn ochrann pom cky 89 686 EWG c Noste odpov daj c ochrann skla a ochrann od v proto e sv teln z en elektrick ho oblouku m e po kodit o i a vyvolat pop len poko ky E...

Page 87: ...rick oblouk bylo mezi ukost ovac sv rkou a dr kem elektrod nap t napr zdno U0 Toto nap t m e b t ivotu nebezpe n Nedot kejte se nikdy sou asn elektrody nebo kovov ch elist dr ku elektrod a ukost ovac...

Page 88: ...inul dn kabel e Bezpodm ne n dejte pozor na to abyste nebyli v obvodu sva ovac ho proudu Dr k elektrod a kostra se mus nach zet v dy na stejn stran f Sv e ku nikdy nepou vejte k rozmrazov n potrub g I...

Page 89: ...u veden v konov jisti 16 A Nadm rn ji t n m e m t za n sledek po r veden pop po r budovy Dodate n bezpe nostn pokyny pro p ipojen sv e ky do ve ejn rozvodn s t Vysoce v konn p stroje mohou v d sledku...

Page 90: ...n mu tak i k vyza ovan mu ru en f P ed pracemi zajist te dostate n v tr n pracovi t P i sva ov n elektrick m obloukem se uvol uj v pary kter mohou b t eventu ln kodliv g P i siln m v vinu kou e za a t...

Page 91: ...ezpe nou manipulaci pou ijte dr adlo B hem pr ce mus m t sv e oble en m a ochranou obli eje chr n n cel sv t lo p ed z en m a pop len m Na obou rukou mus nosit shrnovac rukavice z vhodn l tky k e Ty m...

Page 92: ...rev Dejte d le pozor d le na n sleduj c Pokud je sv e ka v provozu nepokl dejte ho k ani na sv e ku samotnou na jin elektrick za zen P ed ukon en m Va ich sv e sk ch prac se nedot kejte ani trysky ani...

Page 93: ...n n plo e mus b t p ijata opat en aby se zabr nilo jeho p du Pokud nen pou v n mus b t p stroj odpojen od nap jen Pokud p stroj pou v te ve st sn n m prostoru nebo ve v ce pracujte s ochrann m vybaven...

Page 94: ...ou t pokud je odstran n kryt P stroj sm j instalovat obsluhovat a opravovat pouze kvalifikovan osoby Kontrola sv e ky a rozsahu dod vky P ed pou it m V STRAHA Nepou vejte produkt ve v bu n m prost ed...

Page 95: ...avy sm prov d t pouze odborn elektrik i Pou it P ipravte sv e ku pro po adovan pr ce viz kapitola Sva ov n elektrodami Zkontrolujte e je sv e ka vypnut Provozn sp na 2 mus b t v poloze o P ipojte s ov...

Page 96: ...c kabel s ukost ovac sv rkou 15 s druh m p pojem tzn minusov m pop plusov m p lem Stla te sv rnou p ku 12 na dr ku elektrod 14 a neopl ovanou st elektrody zasu te do sv rky elektrod 13 Sepn te provozn...

Page 97: ...c ho proudu a rychlosti veden elektrody zjist te na z klad zkou ky na zku ebn m vzorku Dob e nastaven elektrick oblouk vyd v m kk stejnom rn bzu iv zvuk Hloubka prova en by m la b t pokud mo no co nej...

Page 98: ...afixujte obrobky utahov ky nebo sv rkami pro vylou en deformac b hem tvrdnut materi lu Svarov spoje na vn j hran P prava tohoto typu svaru je velmi jednoduch p i tlou k ch v ce ne 10 mm ji ale tento s...

Page 99: ...kolik skok dop edu aby l ze m la as na zatuhnut Ploch svarov spoje Kdy lze obrobkem l pe ot et m l by se svar prov d t dle vyobrazen Kdy obrobkem nelze ot et prov d se svar tak e se vylou p n pohyb a...

Page 100: ...e v istot Usazeniny prachu mohou negativn ovlivnit chlazen V p pad siln zne i t n ho vzduchu je zapot eb i t n stla en m vzduchem jednou m s n POZOR Dejte pozor aby do vnit ku sv e ky nevnikly dn kapa...

Page 101: ...zkontrolovat ji t n s t pop s ovou p pojku odborn m pracovn kem Aktivov na ochrana proti p et en indik tor p et en 8 sv t Nechte sv e ku 1 vychladnout patn svarov spoj Nastaven sva ovac ho proudu p l...

Page 102: ...axim ln teplota byla v po etn korigov na v souladu s kontrolou p i okoln teplot 40 C dle EN 60974 1 2005 30 120 A 60 85 A 100 65 A WALTER WERKZEUGE SALZBURG GmbH Gewerbeparkstr 9 5081 Anif Austria www...

Page 103: ...i se obalen mi elektrodami Jmenovit hodnota sva ovac ho proudu Normovan pracovn nap t Obvod s ov ho proudu Po et f z piktogram pro st dav proud a jmenovitou hodnotu frekvence Jmenovit hodnota maxim ln...

Page 104: ...V kres d l 104 CZ V kres d l 6 7 8 9 14 13 10 11 15 12 4 16 19 20 21 22 23 24 29 28 27 26 25 1 18 5 2 17...

Page 105: ...bek m te z ruku 3 roky od data koup V p pad vad tohoto v robku V m p slu v i prodejci tohoto v robku z konn pr va Tato z konn pr va nejsou omezena na d le uvedenou z rukou Z ru n podm nky Z ru n doba...

Page 106: ...z ruky Pro zaru en rychl ho zpracov n va z le itosti postupujte pros m dle n sleduj c ch pokyn Pro v echny dotazy m jte pros m jako doklad o koupi p ipravenou pokladn tenku a slo v robku slo v robku z...

Page 107: ...radi brizganja delcev lindre 115 Nevarnost po ara zaradi lete ih isker 116 Nevarnost eksplozije 116 Dodatni varnostni napotki 116 Pred uporabo 118 Preverjanje tra nega brusilnika in obsega dobave 118...

Page 108: ...e posebej pazite na varnostne napotke in opozorila Neupo tevanje napotkov v teh navodilih za uporabo lahko povzro i te ke telesne po kodbe V teh navodilih za uporabo na varilnem aparatu ali embala i s...

Page 109: ...a monta o obratovanje vzdr evanje in i enje ki so v teh navodilih za uporabo uporaba opreme in nadomestnih delov ki niso predvideni za ta varilni aparat spremembe na varilnem aparatu popravila varilne...

Page 110: ...e Uporabljena za itna obla ila in celotna oprema morata ustrezati direktivi Osebna varovalna oprema 89 686 EGS c Nosite ustrezna za itna o ala in za itna obla ila ker lahko sevanje svetlobe obloka kod...

Page 111: ...elovanca Obvezno upo tevajte da lahko zaradi malomarnosti varilni tok uni i za itni vodnik v elektri nih napravah ali aparatih e se npr sponka za maso polo i na ohi je varilnega aparata ki je povezano...

Page 112: ...lindra je trda in krhka Nato jo lahko s kladivom za lindro razbijete v delce z ostrimi robovi ki lahko nevarno po kodujejo o i Priklopite morate na vti nico z varovalko 16 amperov Kabli do elektri ne...

Page 113: ...kot lastnik Za izbiro in priklop napajalnega omre ja morajo pridobiti kvalificirane osebe merodajne in krajevne predpise a e je treba se posvetujte z va im podjetjem za oskrbo z elektri no energijo b...

Page 114: ...nega toka za varjenje pod pove anim elektri nim ogro anjem kot npr v ozkih prostorih iz elektri no prevodnih sten kotli cevi itd v vro ih prostorih prepotena delovna obla ila ne sme biti izhodna napet...

Page 115: ...bli ini Nepoobla eni se ne smejo zadr evati v bli ini mesta varjenja V neposredni bli ini fiksnih delovnih mest naj stene ne bodo svetlih barv in se ne smejo ble ati Okna je treba zavarovati do najma...

Page 116: ...nega toka Gorilnik in masa morata biti vedno na isti strani Dodatni varnostni napotki OPOZORILO Za prepre evanje po ara eksplozij in razpok upo tevajte naslednje predpise Eksplozije ali po ar lahko po...

Page 117: ...te aparat v ozkih prostorih oz na veliki vi ini delajte z za itno opremo Po koncu varjenja odklopite napajanje s tokom Aparata ni dovoljeno uporabljati ob de ju ali na mestih z relativno visoko vla no...

Page 118: ...a ni sponki vstavite 19 s sprednje stani v varilsko za itno masko 24 Zapah za itnega stekla 16 vstavite z notranje strani dokler se ne zasko ijo na monta nih sponkah Zapahe za itnega stekla obrnite ta...

Page 119: ...parat ohlajati pribl 15 minut Ko ugasne rumeni prikaz za preobremenitev 8 je varilni aparat znova pripravljen za delovanje Varilni aparat pripravite za eleno delo glejte poglavje Varjenje z elektrodam...

Page 120: ...olom minus in polom plus Pritisnite vpenjalno ro ico 12 na dr alu elektrode 14 in vstavite nepokrit del elektrode v sponko elektrode 13 Preklopite stikalo za obratovanje 2 na Vklop I Varilno za itno m...

Page 121: ...ovite s pomo jo testa na preizkusnem kosu Dobro nastavljen oblok bren i mehko in enakomerno Globina pre iga naj bo im globlja varilna kopel pa naj ne pade prezgodaj skozi obdelovanec V varilni tehniki...

Page 122: ...rime i ali sponkami da bi prepre ili deformacije med strjevanjem materiala Varjeni spoji na zunanjem vogalu Priprava te vrste je zelo preprosta pri debelinah ve kot 10 mm pa ni ve smiselna V tem prime...

Page 123: ...i Da bi lahko z obdelovancem bolje rokovali ga je priporo ljivo namestiti tako kot je prikazano na sliki e obdelovanca ne morete obra ati varjenje izvr ujte tako da zmanj ate pre no premikanje pri eme...

Page 124: ...plivajo na hlajenje e je zrak posebej onesna en je potrebno mese no i enje s stisnjenim zrakom PREVIDNOST Pazite da nobena teko ina ne vdre v notranjost izdelka Shranjevanje za dalj asa Pred shranjeva...

Page 125: ...elektri ni priklju ek naj preveri strokovnjak Spro ila je za ita proti preobremenitvi prikaz za preobremenitev 8 sveti Pustite da se varilni aparat 1 ohladi Slab zvar Nastavitev varilnega toka je pre...

Page 126: ...rjena najvi ja temperatura je bila v skladu s preizkusom ob 40 C temperature okolja ra unsko popravljena v skladu z EN 60974 1 2005 30 120 A 60 85 A 100 65 A WALTER WERKZEUGE SALZBURG GmbH Gewerbepark...

Page 127: ...rednost varilnega toka normirana delovna napetost Omre ni tokokrog tevilo faz simbol izmeni nega toka in dimenzionirana vrednost frekvence dimenzionirana vrednost najve jega omre nega toka najve ji ef...

Page 128: ...Razstavljena risba 128 SI Razstavljena risba 6 7 8 9 14 13 10 11 15 12 4 16 19 20 21 22 23 24 29 28 27 26 25 1 18 5 2 17...

Page 129: ...ancijo od dneva nakupa Ob pomanjkljivostih pri tem izdelku imate zakonske pravice do prodajalca izdelka Te zakonske pravice niso omejene v garanciji predstavljeni v nadaljevanju Garancijski pogoji Gar...

Page 130: ...janja garancije Da bi zagotovilih hitro obdelavo va ega primera sledite naslednjim navodilom Za vse zahtevke imejte pripravljen blagajni ki ra un in tevilko izdelka kot dokazilo o nakupu tevilka izdel...

Page 131: ...131...

Page 132: ...opyright Walter Werkzeuge Salzburg GmbH 2021 All rights reserved Copyright Walter Werkzeuge Salzburg GmbH 2018 2021 All rights reserved WALTER Werkzeuge Salzburg GmbH Gewerbeparkstr 9 5081 Anif AUSTRI...

Reviews: