background image


245.805.011 

22 

Date: 2021-12-09


Detailed explanation of parameters 

MAN SPEED 

Speed for manual driving 

Range 

200-1,500 

MAN SPEED sets the speed for manual driving the motor 
 

MAN UP/DWN 

Manually driving the motor 


MAN UP/DWN is used for manual control of the motor. 
Pressing the 

UP

 button, makes the wire run up. Pressing the 

DOWN

 button, makes the wire run down, unless the 

limit switch or slack detection is activated. 
 

DMX ADDRESS 

DMX start address 

Range 

1-506 

DMX start address defines which DMX address the Winch 50 reacts on.  
 

TAC RANGE 

Tacho range 

Range 

1-99,999 

The tacho range is setting the range of the Winch from the soft TOP limit to the soft BOTTOM limit. 
The tacho range can be adjusted, using channel 6 for the soft BOTTOM limit. If the same tac range is required for a 
range of winches, use the menu to set the same tac range easily. 
 

RAMP TIME 

Ramping time 

Range 

0.5   10.0 

RAMP TIME is the time it takes for the winch to accelerate from a standstill to its maximum speed, and decelerate 
from maximum speed to a standstill when positioning. 
 

SPEED MAX 

Maximum speed 

Range 

500-5,000 

SPEED MAX sets the maximum speed. 
If set to 1000, the motor will run at 1000 RPM when DMX speed is set to full. SPEED MAX can be used to lower the 
maximum speed, if desired.  
 

SP MIN UP 

Minimum speed up 

Range 

50-1,000 

The motor minimum speed, for the up direction. 
The  motor  can  run  at  different  minimum  speeds  for  each  direction;  this  is  to  differentiate  between  different 
mechanical loads for up and down, see SP MIN DWN.  
Set this value to a speed where the motor will still run up at full load. 
 

SP MIN DWN 

Minimum speed down 

Range 

50-1,000 

The motor minimum speed, for the down direction. 
The  motor  is  allowed  to  run  at  different  minimum  speeds  for  each  direction;  this  is  to  differentiate  between 
different mechanical loads for up and down, see SP MIN UP. 
Set this value to a speed where the motor will still run down at full load. 
 

E STOP 

Enable/disable emergency stop 

Range 

ON / OFF 

This  enables/disables  the  emergency  stop  from  the  software.  However,  to  get  the  full  functionality  of  the 
emergency stop a wire has to be plugged in inside the winch. See section on how to change the wire setting for 
more details. 

ADV. MENU 

Show advanced menu 

Range 

OFF/ON 

View the extended menu with advanced options described below. The user should be extra cautious when changing 
these  values  since  some  combinations  may  lead  to  dangerous  movement  and  damage  to  either  the  unit  or 
equipment attached. 
 

SLACK DELAY 

Delay from slack activation to stop 

Range 

0   9999 

Slack delay is a delay in pulses from when slack is activated to when the winch registers it and tries to stop. It can 
be used if the load is around the minimum load and slack is bouncing. 


Summary of Contents for 50 Series

Page 1: ...JUULS VEJ 1 TELEPHONE 45 86 18 14 20 8260 VIBY EMAIL sales wahlberg dk DENMARK Winch 50 Series Item No 245 246 701 and 246 704 User Manual Winch 50 Winch 50 Double Winch 50 Double No 245 No 246 701 P...

Page 2: ...rig or structure as described in this manual Ensure that any supporting hardware can hold at least 10 times the weight of all the devices they support Block access below the work area whenever install...

Page 3: ...CY STOP SWITCH OPTIONAL 16 ENABLE EMERGENCY STOP 17 LIFTING WIRE POWER ETHERNET ONLY MODEL 246 704 17 LIFTING CABLE CONNECTION PLUG 17 CONNECTING THE POWER WIRE 17 SETUP 18 MENU SETTING 18 MENU STRUCT...

Page 4: ...N F Output Neutrik powerCON TRUE1 EtherCON M Power 16A 240VAC 2x1 5mm2 AWG 16 Signal Two twisted pairs Cat5 100 Mbit s Lifting capacity 50 kg 110 2 lb Lifting height 12 5 m 41 ft Lifting speed 3 84 cm...

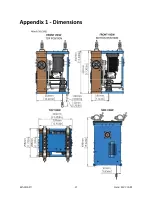
Page 5: ...245 805 011 5 Date 2021 12 09 Winch 50 245 More detailed drawings and from more angles can be found in Appendix 1 on page 37...

Page 6: ...245 805 011 6 Date 2021 12 09 Winch 50 Double 246 701 More detailed drawings and from more angles can be found in Appendix 2 on page 38...

Page 7: ...245 805 011 7 Date 2021 12 09 Winch 50 Double Power and Cat5 246 704 More detailed drawings and from more angles can be found in Appendix 3 on page 39...

Page 8: ...nches a standard lighting desk can be used but when many winches are used more advanced desks should be used to maintain easy control of the units The Winch 50 Series uses 6 channels of the DMX line a...

Page 9: ...persons or equipment damage Exceeding the load rating may cause failure of the equipment Use only the Wahlberg Motion Design approved mounting connectors to secure the load to the winch Failure to mo...

Page 10: ...re transport it is important to roll the wire of the winch up fix the wire with a cable tie or an elastic cord If the wire is slack it may jump off the drum during transport and cause damage to the wi...

Page 11: ...ight of all products and equipment to be installed on it Mounting the product on a truss The Winch 50 Series can be clamped to a truss or similar rigging structure To clamp a product to a truss 1 Chec...

Page 12: ...TION The load must be mounted on the wire in a way to secure that the load never can run into the winch The load can be mounted using a suitable loading hook designed for lifting Ensure that the loadi...

Page 13: ...ble connector for AC mains power input The cable must rated 20A minimum have three conductors 1 5mm2 AWG 16 minimum conductor size and an outer cable diameter of 6 16mm 0 24 0 47 inch Cables must be h...

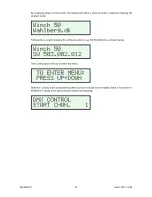
Page 14: ...ce showing the product name Followed by a screen showing the software version e g SW 503 002 012 as shown below Then a description of how to enter the menu Before it is ready to be controlled by DMX c...

Page 15: ...a DMX universe and another daisy chained link Tips for reliable data transmission Use shielded twisted pair cable designed for RS 485 devices standard microphone cable cannot transmit control data rel...

Page 16: ...nnels to 0 and this will also cause the winch to stop when assigned correctly If the emergency stop switch is activated the red Error LED will be lit and the screen display shows and the current start...

Page 17: ...so that the lifting wire attachment can easily be disconnected from power Warning Check that the voltage range specified for the lifting wire matches the attached power voltage before applying power t...

Page 18: ...G Only experienced DMX users should operate the product Contact Wahlberg Motion Design for further information and education on DMX protocol Menu setting Use the buttons on the display to enter and ch...

Page 19: ...urrent position with tachometer value 10 000 and the wanted position has the tachometer value of 24 250 Shift to next screen press and hold The screen shows the DMX channel values if e g DMX channel 1...

Page 20: ...otor is stopped and DMX input has no effect the motor can be moved by the MANUAL RUN GOING UP GOING DOWN menu though Press the arrows or to go up or down in the menu choices The bottom line of the dis...

Page 21: ...le disable emergency stop OFF ON OFF ADV MENU Show advanced menu OFF ON OFF SLACK DELAY Delay from slack activation to stop 0 9999 0 POS OUT Position feedback OFF ON OFF UNSAFE MODE Disable all limit...

Page 22: ...SP MIN UP Minimum speed up Range 50 1 000 The motor minimum speed for the up direction The motor can run at different minimum speeds for each direction this is to differentiate between different mech...

Page 23: ...K SLACK Stop quickly when slack activates OFF ON Stops the winch quickly if slack is enabled If the load is light or fast accelerations are used slack may be activated by accident leading to a stutter...

Page 24: ...ed before shutdown the soft top limit must be set again when the unit is powered on 5 Setting the soft TOP limit Channel 5 is used to manually move the fabric up and setting the soft TOP When the valu...

Page 25: ...et in a position where the load can run into the winch itself this will damage the winch For guidance see below illustration of the soft and hard limits Figure 1 Illustration of the hard and soft limi...

Page 26: ...in the unit whenever a setup procedure has been initiated by using DMX channel 5 and 6 About the hard limits The hard limit switch determines the maximum and minimum travel distance of the winch The h...

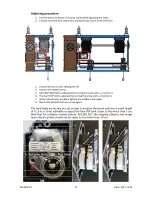
Page 27: ...a 1 next to it 6 The hard TOP limit is adjusted by turning the screw with a 2 next to it 7 When adjustments are done tighten the middle screw again 8 Mount the lid with the two screws again The hard l...

Page 28: ...th in minutes E g a max duty cycle of 30 10 min ON 23 min OFF means that the motor may not be active more than 10 minutes every 33 minutes or after 10 minutes of ON the motor must be OFF for 23 minute...

Page 29: ...one position to another over a certain amount of time In that way the Winch 50 Series will follow the fade curve and multiple Winch 50 Series can follow the same fade curve When fading the positions 1...

Page 30: ...m while inspecting that the wire comes out of the winch evenly Afterwards the wire is rolled back onto the drum Reset the top position afterwards The winch cannot move to its position this usually occ...

Page 31: ...mperature is below 10 C Make sure to warm up electronic equipment to room temperature before applying power 14 DRIVE OVER TEMP Shut down due to inverter overheat The temperature of the power electroni...

Page 32: ...ENTIFICATION Motor identification run has failed See remedy for No 3 The motor identification has already been initiated once at the manufacturing facility Repeating the identification procedure may o...

Page 33: ...wire to wear down faster and shortens the lifetime of the wire significantly Wire damage caused by mounting the winch in an angle is not covered by the product warranty Attention Signs of malfunction...

Page 34: ...is wound neatly on the drum Check the wire ferrule crimp and thimble Check that the load is securely mounted Monthly At regular intervals but at least every month when the Winch 50 Series is in use C...

Page 35: ...e wire should be discarded when When the overall diameter of the is reduced by 8 or the outer wires have lost its diameter by 33 through wear This reduction in diameter of the is measured on a portion...

Page 36: ...rely worn or damaged that it is possible to insert the cable connector the wrong way However when inserted the wrong way the cable connector should not twist lock into place A cable connector inserted...

Page 37: ...245 805 011 37 Date 2021 12 09 Winch 50 245...

Page 38: ...245 805 011 38 Date 2021 12 09 Winch 50 Double 246 701...

Page 39: ...245 805 011 39 Date 2021 12 09 Winch 50 Double Power and Cat5 246 704...

Page 40: ...245 805 011 40 Date 2021 12 09...

Page 41: ...245 805 011 41 Date 2021 12 09...

Page 42: ...DMX signal in XLR 5 pole Control input DMX signal Controller Motor controller Encoder Gear M Power supply Emergency Stop Manuel Control B Power in Bar powerCON TRUE 1 Cat5 in Bar EtherCON Cat5 out Bar...

Page 43: ...245 805 011 43 Date 2021 12 09 This page is intentionally left blank...

Page 44: ...travel range has now been set from the soft TOP limit to the soft BOTTOM limit 7 Set DMX channel 1 to 100 and DMX channel 3 to 20 The winch moves with 20 speed to the 100 position 8 Set DMX channel 1...

Reviews: