background image

wc_si000493gb.fm

19

DS 70

Labels

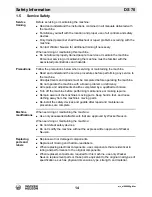
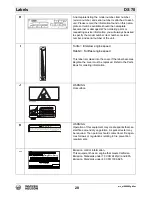
C

WARNING
Springs are compressed. Release cover slowly to avoid 
spring ejection.
See the Repair Manual for proper disassembly instruc-
tions.

D

Move lever forward to stop machine. Move lever 
backward to run machine.

This label is molded into the cover. If the label becomes 
illegible, the cover must be replaced. Refer to the Parts 
Book for ordering information.


E

For optimal control, performance, and minimal hand/arm 
vibration, grasp handle as shown.
Read the Operator’s Manual.

This label is molded into the cover. If the label becomes 
illegible, the cover must be replaced. Refer to the Parts 
Book for ordering information.


F

Guaranteed sound power level in db(A)

AVERTISSEMENT

AVERTISSEMENT

Los resortes son comprimidos. Con el fin de evitar 

la expulsion de los resortes, consulte el Manual de

Reparaciones para las instrucciones de desmontaje 

correcto.

The springs are compressed. In order to avoid ejection

of the springs, refer to Repair Manual for proper

disassembly instructions.

Les ressorts sont sous pression. Afin d'eviter 

l'ejection des ressorts, consulter le Manuel de 

Reparation pour les instructions de demontage correct

ADVERTENCIA

ADVERTENCIA

118859

WARNING

WARNING

115416

Summary of Contents for DS 70

Page 1: ...Operator s Manual Vibratory Rammer DS70 Type DS70 Document 5000184604 Date 0217 Version 15 Language EN 5 0 0 0 1 8 4 6 0 4...

Page 2: ...distribution not authorized by Wacker Neuson Production Americas LLC represents an infringement of valid copyrights Violators will be prosecuted Trademarks All trademarks referenced in this manual are...

Page 3: ...please contact Wacker Neuson to order a replacement or visit www wackerneuson com When ordering parts or requesting service information be prepared to provide the machine model number item number rev...

Page 4: ...on service center according to written instructions published by Wacker Neuson Unapproved parts attachments and modifications are those that do not meet the approved criteria Unapproved parts attachme...

Page 5: ...rification Limited Notified Body No 0038 71 Fenchurch Street London EC3M 4BS United Kingdom Directives and Standards We hereby declare that this product meets and complies with the relevant regulation...

Page 6: ......

Page 7: ...17 2 2 Label Meanings 17 3 Lifting and Transporting 21 3 1 Lifting the Rammer 21 3 2 Transporting the Rammer 22 4 Operation 24 4 1 Preparing the Machine for First Use 24 4 2 Recommended Fuel 24 4 3 Re...

Page 8: ...Fins 39 5 9 Checking and Changing the Ramming System Oil 40 5 10 Replacing the In Line Fuel Filter 42 5 11 Long Term Storage 43 5 12 Machine Disposal Decommissioning 44 6 Basic Troubleshooting 45 7 T...

Page 9: ...ersonal hazards f Obey all safety messages that follow this symbol DANGER DANGER indicates a hazardous situation which if not avoided will result in death or serious injury f To avoid death or serious...

Page 10: ...s a ladder support or work surface Using the machine to carry or transport passengers or equipment Using the machine as a hammer or for other demolition work Attaching the machine to any other machine...

Page 11: ...Application area Be aware of the application area Keep unauthorized personnel children and pets away from the machine Remain aware of changing positions and the movement of other equipment and personn...

Page 12: ...ction of operating controls Do not leave the rammer running unattended Personal Protective Equipment PPE Wear the following Personal Protective Equipment PPE while operating this machine Close fitting...

Page 13: ...lift or hold the machine safely See section Technical Data for machine weight Remain aware of the location of other people when lifting the machine Only use the lifting points and tie downs described...

Page 14: ...ate the machine with a known problem or deficiency All repairs and adjustments shall be completed by a qualified technician Turn off the machine before performing maintenance or making repairs Remain...

Page 15: ...ls and solvents can become explosive Personal Protective Equipment PPE Wear the following Personal Protective Equipment PPE while servicing or maintaining this machine Close fitting work clothes that...

Page 16: ...refueling the engine Clean up any spilled fuel immediately Refill the fuel tank in a well ventilated area Reinstall the fuel tank cap after refueling Do not smoke Do not refuel a hot or running engin...

Page 17: ...493gb fm 17 DS 70 Labels 2 Labels 2 1 Label Locations 2 2 Label Meanings Wacker Neuson machines use international pictorial labels where needed These labels are described below wc_gr007312 A E I D K C...

Page 18: ...Asphyxiation hazard Engines emit carbon monoxide Do not run the machine indoors or in an enclosed area unless adequate ventilation through such items as exhaust fans or hoses is provided No sparks fla...

Page 19: ...This label is molded into the cover If the label becomes illegible the cover must be replaced Refer to the Parts Book for ordering information F Guaranteed sound power level in db A AVERTISSEMENT AVE...

Page 20: ...ordering information J WARNING Hot surface K WARNING Operation of this equipment may create sparks that can start fires around dry vegetation A spark arrester may be required The operator should conta...

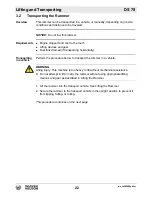
Page 21: ...the lifting gear to the central lifting cable a 2 Lift the rammer a short distance making sure that all connections are secure 3 Continue lifting the rammer as required wc_gr009035 a e WARNING Crushi...

Page 22: ...orizontally Transporting in a vehicle Perform the procedure below to transport the rammer in a vehicle 1 Lift the rammer into the transport vehicle See Lifting the Rammer 2 Secure the rammer to the tr...

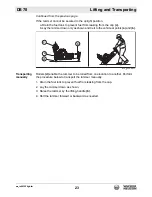
Page 23: ...down only as shown and tie it to the vehicle at points a and b Transporting manually Rollers d enable the rammer to be rolled from one location to another Perform the procedure below to transport the...

Page 24: ...dd fluids as needed and applicable including fuel engine oil and battery acid 6 Move the machine to its operating location 4 2 Recommended Fuel Type Use only clean pure No 2 diesel fuel with a cetane...

Page 25: ...ult The machine has now been refueled WARNING Fire and burn hazard Fuel and its vapors are extremely flammable f Keep all sources of ignition away from the machine while refueling f Do not refuel if t...

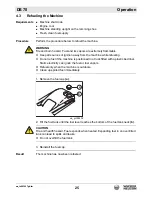
Page 26: ...slowly and guiding the direction of travel as the machine moves forward Note Hand Arm Vibration HAV has been optimized for the hand position shown Reported HAV levels are measured at position A in co...

Page 27: ...e machine 1 Turn the fuel valve a to the O open position 2 Move the throttle to the slow idle position c2 3 Pull the starter rope repeatedly until the engine starts Multiple pulls of the starter rope...

Page 28: ...e the rammer in such a way that you are not squeezed between the rammer and solid objects Make sure you have solid footing when operating the rammer on uneven ground or when compacting coarse material...

Page 29: ...edure Perform the procedure below to remove air from the fuel line between the fuel tank and injection pump 1 Fill the fuel tank 2 Open the fuel valve a 3 Repeatedly squeeze and release the fuel line...

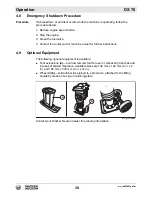
Page 30: ...ner for further instructions 4 9 Optional Equipment The following optional equipment is available Foot extensions a a narrow rammer foot for use in compacting trenches and in areas of limited clearanc...

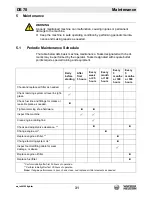
Page 31: ...Every week or 25 hours Every month or 100 hours Every 3 months or 300 hours Every 5 months or 500 hours Checkand replace air filter as needed 3 Check ramming system oil level in sight glass 3 Check f...

Page 32: ...llow the procedure below to clean the filter elements 1 Remove the air cleaner cover a 2 Remove the main paper filter element b and secondary prefilter c and inspect them for holes or tears Replace th...

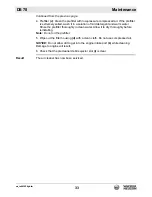
Page 33: ...arm water Rinse the prefilter thoroughly in clean water Allow it to dry thoroughly before reinstalling Note Do not oil the prefilter 5 Wipe out the filter housing d with a clean cloth Do not use compr...

Page 34: ...the dipstick with a clean cloth 3 The oil surface should reach no higher than the bottom of the filler neck H but no lower than L see drawing or visible on the dipstick when it is inserted not screwe...

Page 35: ...ccordance with current environmental protection regulations Changing the engine oil Perform the procedure below to change the engine oil 1 Place the rammer so that the engine is level 2 Remove the dip...

Page 36: ...s on the oil filter To replace the oil filter Discard the old oil filter in accordance with environmental regulations Replace with a Wacker Neuson supplied oil filter and O ring 4 Reinstall the oil fi...

Page 37: ...cracks and leaks 2 Repair or replace components as needed Result The fuel lines and fittings have now been checked 5 6 Checking the Shoe Hardware On new machines or after replacing shoe check and tigh...

Page 38: ...heck for Loose or missing fasteners Cracked corroded or missing parts Damaged controls 2 Tighten loose fasteners Replace missing fasteners as needed 3 Replace damaged or missing parts Use only Wacker...

Page 39: ...und the combustion chamber Free air circulation is necessary to prevent the engine from overheating Requirements Engine stopped and cool to the touch Compressed air Procedure Perform the procedure bel...

Page 40: ...ce it upright and allow it to stand in the upright position for 15 minutes before checking the oil level This will allow the oil to settle and provide a more accurate reading 1 Tip the rammer so that...

Page 41: ...ls 1 2 to 3 4 of the sightglass 7 Torque the sightglass to 9 Nm 6 ft lbs Changing oil Perform the following procedure to change the ramming system oil Note Dispose of used oil in accordance with local...

Page 42: ...replace the in line fuel filter a 1 Close the fuel valve b 1 Clamp and disconnect the fuel lines c on both sides of the fuel filter 2 Remove and discard the old in line fuel filter in accordance with...

Page 43: ...t the engine owner s manual for instructions on preparing the engine for storage Stabilizing the fuel After completing the procedures listed above fill the fuel tank completely and add a high quality...

Page 44: ...l safety and environmental regulations pertaining to the disposal of construction equipment Preparation Perform the following tasks to prepare the machine for disposal Move the machine to a protected...

Page 45: ...leaner Engine overheats Improper fuel mix not enough oil Drain fuel and refill with proper fuel oil mixture Dirty cooling fins and or fan blades Clean cooling fins and or fan blades Engine runs rammer...

Page 46: ...ke Yanmar Engine model L48V4LF9T9EWSA L48EE DWK3 Max rated power rated speed kW hp 3 1 4 1 3450 rpm Displacement cm in 211 12 8 Engine speed operating rpm 3450 Engine Speed idle rpm 1050 150 Engine sp...

Page 47: ...033 and EN500 4 where applicable HAV 11 9 m s2 HAV Uncertainties Hand transmitted vibration was measured per ISO 5349 1 This measurement includes an uncertainty of 1 5 m s2 DS 70 0620049 0620050 DS 70...

Page 48: ...wc_td000405gb fm 48 Technical Data DS 70 7 6 Dimensions mm in...

Page 49: ...rveonderdelen Importante Para obter informa es sobre as pe as sobresselentes consulte o seu fornecedor da Wacker Neuson ou aceda ao site Web da Wacker Neuson em http www wackerneuson com Wa ne W celu...

Page 50: ......

Reviews:

Related manuals for DS 70