background image

56

WebUI

Using the WebUI

Use an Internet browser to access the Web User Interface (WebUI) that resides 

on your deskset. After you log on to the WebUI, you can configure the following 

features:

•  Call Settings
•  User Preferences
• 

Programmable Keys

•  Speed Dial
•  Local Directory
•  Blacklist
•  Call History
•  User Password
The WebUI also has a Status page, where you can view status and information.

To access the WebUI:

1.  Ensure that your computer is connected to the same network as your 

deskset. Your computer may already be connected to the network through 

the PC port on the back of your deskset.

2. 

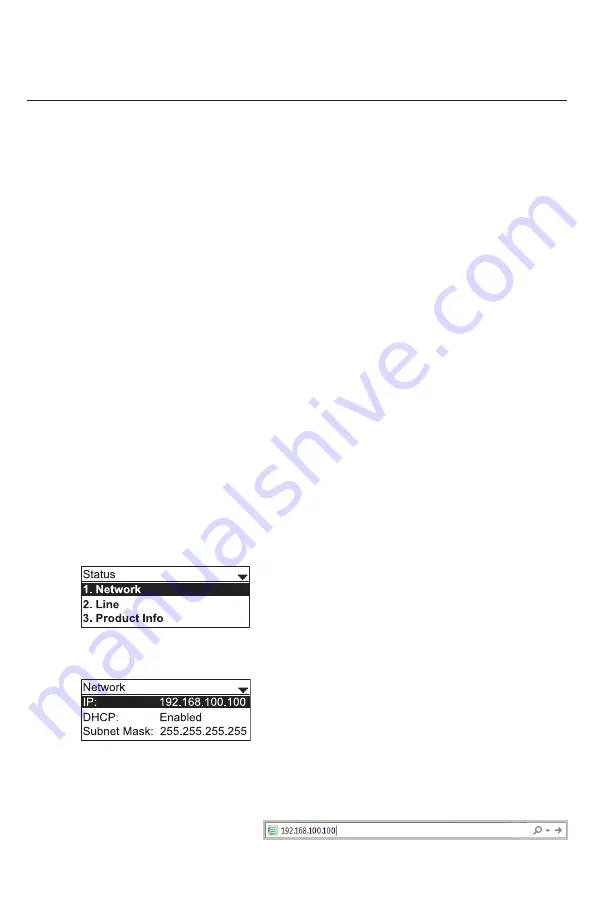
Find the IP address of your phone:

a.  When the phone is idle, press 

MENU/SELECT

.

b.  Press 

q

 to highlight 

Status

, and then press 

MENU/SELECT

. The Status 

menu appears.

c.  On the Status menu, ensure that 

Network

 is highlighted, and then press 

MENU/SELECT

. The Network screen appears.

d.  On the Network screen, note the IP Address.

3.  On your computer, open an Internet browser. Depending on your browser, some 

of the pages presented here may look different and have different controls.

4.  Type the phone IP address in 

the browser address bar and 

press 

ENTER

 on your computer keyboard. 

A Login page appears.

Summary of Contents for Eris Terminal VSP715A

Page 1: ...ErisTerminal SIP Deskset VSP715A User Guide ...

Page 2: ...2 ...

Page 3: ...ubleshooting information necessary to install and operate your product For customer service or warranty service please contact our regional offices or distributors in the country or region where you purchased your product Please note the serial number of your product which can be found on the back of the deskset Save your sales receipt and original packaging in case it is necessary to return your ...

Page 4: ...ing pool or in a wet basement or shower 7 Do not place this product on an unstable table shelf stand or other unstable surfaces 8 Slots and openings in the back or bottom of the telephone base and handset are provided for ventilation To protect them from overheating these openings must not be blocked by placing the product on a soft surface such as a bed sofa or rug This product should never be pl...

Page 5: ...16 Do not use the telephone to report a gas leak in the vicinity of the leak Under certain circumstances a spark may be created when the adapter is plugged into the power outlet or when the handset is replaced in its cradle This is a common event associated with the closing of any electrical circuit The user should not plug the phone into a power outlet if the phone is located in an environment co...

Page 6: ...he mounting studs of the wall plate Then slide the telephone base down on both mounting studs until it locks into place Refer to the full instructions in Deskset Installation in this user guide 22 CAUTION Keep small metallic objects such as pins and staples away from the handset receiver SAVE THESE INSTRUCTIONS ...

Page 7: ...7 Declaration of Conformity Hereby VTech declares that this VSP715A is in compliance with the essential requirements and other relevant provisions of Directive 1999 5 EC ...

Page 8: ...ing the Phone Idle screen 20 Idle mode screen icons 20 Active call screen icons 20 Using the menu 21 Main menu items 22 Making calls 22 Answering calls 24 Putting a call on hold 25 Forwarding calls 26 Transferring calls 28 Making a conference call 30 Retrieving messages 32 Using a shared line 33 Putting a shared line call on hold 33 Barging in 34 Busy lamp field 35 Paging 36 Automatic Call Distrib...

Page 9: ...mable keys 55 WebUI Using the WebUI 56 Status 57 Call Settings 58 User Preferences 60 Programmable Keys 62 Directory 65 Speed Dial 68 Troubleshooting General issues 69 Specifications Electrical and environmental specifications 70 Soft Keys Index of soft keys 71 Special Characters Entering special characters 72 Maintenance Taking care of your telephone 73 GPL License Information GPL code requests 7...

Page 10: ... port allows the VSP715A deskset to connect to the hosted IP PBX via a router The PC port is for another device such as a personal computer to connect to the local area network through the deskset The VSP715A deskset supports paging and call transfers between system extensions and can connect you and two other parties on the same conference call The telephone also has two programmable keys You or ...

Page 11: ...GE WAITING LED HEADSET INPUT on side SPEAKER Press to turn the speakerphone on or off SPEAKERPHONE MICROPHONE SCREEN Displays call information soft key labels and deskset menus SOFT KEYS Perform the actions indicated by the on screen labels See page 12 ...

Page 12: ...iguration MENU SELECT Press to display the deskset menu select a menu item CANCEL While in a menu press to cancel an operation and exit the menu NAVIGATION KEY Press q or p to scroll through menus highlight items or change settings Press t or u to view the next set of soft key labels move the cursor left or right when entering names numbers or other text DIAL PAD MUTE During a call press to preven...

Page 13: ...he shared line is on hold Do not disturb Off Steady ORANGE DND is off DND is on Call forward Off Steady ORANGE Call forward is off Call forward is on Busy lamp field Off Steady ORANGE Quickly flashing ORANGE Flashing ORANGE Monitored phone is idle Monitored phone is on a call or has a held call The monitored phone is ringing Registration error See your system administrator Automatic Call Distribut...

Page 14: ... pressing the key dials the number programmed for the key BLF Busy lamp field keys let you monitor activity at other phones The key LED indicates call status See Programmable feature key lights on page 13 ACD If you are subscribed to this feature pressing the Automatic Call Distribution ACD key displays the ACD state menu Page If this feature is enabled press the Page key to call one or a group of...

Page 15: ...same subnet as the desksets so that IP addresses can be auto assigned In most cases your network router will have a DHCP server By default the deskset has DHCP enabled for automatic IP address assignment Note Some DHCP servers have default settings that limit the number of network IP addresses assigned to devices on the network You should log in to your server to confirm that the IP range is suffi...

Page 16: ...telephones Excessive heat sources Noise sources such as a window with traffic outside motors microwave ovens refrigerators or fluorescent lighting Excessive dust sources such as a workshop or garage Excessive moisture Extremely low temperature Mechanical vibration or shock such as on top of a washing machine or work bench ...

Page 17: ...lug in place if it is plugged into a ceiling under the table or cabinet outlet To install the phone 1 If you plan to place the phone on a flat surface attach the stand Line up the tabs on the stand with the slots on the rear of the phone Two sets of slots allow you to attach the stand at either a 45 degree or 35 degree angle 2 Plug the end of the coiled handset cord into the Handset jack on the re...

Page 18: ...utlet not controlled by a wall switch If there is a networked computer and no extra Ethernet wall jacks near the phone then the phone and PC can share the same network connection To share a network connection with a PC 1 Plug a Cat 5 Ethernet cable into the PC port on the phone marked by 2 Plug the other end of the Cat 5 Ethernet cable into your computer s Ethernet port If a GigE network is being ...

Page 19: ... The protruding edge of the tab holds the corded handset when the phone is mounted on the wall 3 Connect the network cable s and if required the power adapter 4 Place the deskset base over the mounting screws Align the upper wall mounting hole on the back of the phone with the upper mounting screw Make sure the lower wall mounting hole on the phone also aligns with the lower mounting screw 5 Slide...

Page 20: ...on page 45 Note that the default Idle screen soft keys are shown above Your phone s soft keys are programmable and may differ from what is shown here Idle mode screen icons In idle mode the following screen icons indicate your phone s current settings Icon Status Call Forward All is on See To set Call forward on page 39 The ringer is off Do Not Disturb is on See To set Do Not Disturb on page 39 Th...

Page 21: ...esponding dial pad key to select a highlighted menu item For example when Features is highlighted you can press MENU SELECT or you can press 1 on the dial pad to view the Features submenu 4 Press SELECT or an appropriate soft key to save changes 5 Press CANCEL to cancel an operation exit the menu display or return to the idle screen ...

Page 22: ...ift the handset press HEADSET or press SPEAKER You hear a dial tone Note You may be able to select a specific line by pressing one of the programmable keys depending on how your phone is configured 2 Use the key pad to enter the desired phone number Press Backspc if you enter an incorrect digit Press 123 to change from entering digits to entering letters if you need to enter a domain name as part ...

Page 23: ...ng the desired Line key Pressing SPEAKER or HEADSET When the call is answered the active call screen appears To end the call hang up or press End If you are on speakerphone and the handset is on hook press SPEAKER to end your call Note that the default active call screen soft keys are shown above Your phone s soft keys are programmable and may differ from what is shown here To make a call using qu...

Page 24: ...On the incoming call screen you can also press Reject to terminate the incoming call Forward to forward the call to another number If you don t respond to an incoming call the phone displays a missed call alert screen If a missed call alert screen appears you can press Exit to return to the Idle screen Callback to immediately dial the caller s number View to see the caller s information in the cal...

Page 25: ...ars From the On hold screen you can press End to end the call New to dial a new call Resume to take the call off hold Transfer to transfer the held call to another party Conf to start a conference with the held call Note that the default On hold screen soft keys are shown above Your phone s soft keys are programmable and may differ from what is shown here If another party puts you on hold you may ...

Page 26: ...u can reach the deskset to forward the call yourself If you have problems forwarding calls because of the Call Forward No Answer setting ask your system administrator to extend your Call Forward No Answer delay See also Using the Call menu on page 38 To forward a call using manual entry 1 When an incoming call appears press Forward The deskset stops ringing and the Forward to screen appears If you...

Page 27: ...reen appears 2 Press a programmable key if available to display the directory or call history You can also navigate to the call history or directory using the deskset Features menu Select the call history folder or directory you want to access 3 If necessary press or until Dial appears and then press Dial The Call Forwarded screen appears Your phone returns to idle mode if you have no other active...

Page 28: ...fer The call is automatically put on hold and the transfer setup screen appears 2 Dial the number to which you want to transfer the call You can also use a number from a list such as the Directory or Call History 3 When the second caller answers you can talk to the caller to notify them of the transfer then press Transf to transfer the call The Call transferred screen appears and your phone return...

Page 29: ...atically dial once it recognizes a valid number The Call transferred screen appears and your phone returns to idle mode To transfer a call to a held call 1 During a call press t or u to view the next set of soft keys 2 Press XferCall The call is automatically put on hold and a list of held calls appears 3 On the Transfer to screen press Select to talk to the held call and then press Transf to tran...

Page 30: ...u can also use a number from a list such as the Directory or Call History 4 When the second call is established press Conf The conference begins and the conference screen appears To cancel the conference setup press Cancel on the conference setup screen The active call screen reappears End when the second call is established You will hang up on the second call and return to your first call Split w...

Page 31: ...conference screen appears To end a conference call Press one of the following soft keys End which hangs up on both calls Split which puts both calls on hold The screen shows information for the second call Bridge which joins both calls and returns your phone to idle mode Setting up a Network Conference A Network Conference is hosted by your service provider and allows multiple parties to join a co...

Page 32: ... phone If your phone has more than one line you may be able to access multiple mailboxes Press p or q to highlight the desired mailbox and press MENU SELECT to access messages in that mailbox When there is no New Message alert screen you can access the Messages menu using the deskset menu To view the Message menu 1 When the phone is idle press MENU SELECT 2 With Features highlighted press MENU SEL...

Page 33: ...se private lines for direct calls to other desksets within your organization If you use a shared line to call other desksets all the other desksets that use that line will ring Putting a shared line call on hold After you answer a call on a shared line you have two options for putting that call on hold You can put a call on hold by pressing the Hold soft key This puts a call on normal hold On a sh...

Page 34: ...ng Your deskset may have shared lines but be unable to barge in on calls If barging in is disabled on your deskset pressing the key with the steady orange LED will do nothing Bridged calls differ from conference calls in that you can join a call in progress at any time However because the caller ID of the active call is not visible to you other participants in the call may need to notify you of an...

Page 35: ...r The BLF feature may not be available on your deskset For BLF LED states see Programmable feature key lights on page 13 To dial a monitored extension Press the BLF key for that extension The monitored extension can be idle or have an active or held call Your deskset dials the extension using the first available line When the other person answers your deskset indicates two active calls one active ...

Page 36: ... To send a multicast page 1 Press the programmable key assigned as the Multicast Page key You will hear a paging tone before your phone broadcasts a page to the assigned paging zone 2 Press End to terminate the page Automatic Call Distribution If you are subscribed to Automatic Call Distribution ACD pressing the ACD key will display the ACD State Menu To set your ACD state 1 Press the programmable...

Page 37: ...ber of the desired menu To access the Features menu 1 When the phone is idle press MENU SELECT The Main Menu appears 2 If necessary press p or q to highlight Features and then press MENU SELECT The Features menu appears The Features menu includes the following items Setting See page Description 1 Call 38 Manages how your phone handles incoming calls 2 Directory 42 Stores contact information and ca...

Page 38: ...ou can enable the following types of call forwarding Call forward always incoming calls are forwarded immediately and the phone does not ring Call forward busy incoming calls are forwarded if all your available lines are busy Call forward no ans incoming calls are forwarded after the no answer delay expires 3 Block anonymous 40 Enables the phone to reject incoming calls that have no caller ID 4 Di...

Page 39: ...r u to turn Do Not Disturb On or Off 4 Press Save When Do Not Disturb is on DND appears on the idle screen To set Call forward 1 From the Call menu press q to highlight Call forward 2 Press MENU SELECT The Call forward menu appears 3 Highlight the line for which you want to configure call forward settings and then press MENU SELECT 4 On the next screen press q to highlight the desired option Call ...

Page 40: ...tor can also configure programmable keys to turn Call forward always Call forward busy and Call forward no answer on or off To block anonymous callers 1 From the Call menu press q to highlight Block anonymous 2 Press MENU SELECT The Block anonymous menu appears 3 Highlight the desired line and then press t or u to turn anonymous call blocking On or Off for that line 4 Press Save To dial as an anon...

Page 41: ... off 4 Press Save To enable call waiting alerts 1 From the Call menu press q to highlight Call waiting 2 Press MENU SELECT The Call waiting menu appears 3 Press t or u to turn call waiting alerts on or off 4 Press Save When Show alert is on and you are on a call incoming calls are displayed on the screen When Show alert is off incoming calls are rejected and no notification appears on the screen S...

Page 42: ... Directories screen appears listing all your available directories and the blacklist Any directories other than Local are server based and will vary with your installation You can edit the Local directory and the blacklist 4 With Local highlighted press MENU SELECT The Local directory appears showing the first entry sorted alphabetically by first name 5 Press p or q to view other entries The follo...

Page 43: ...dial pad keys to enter the first name last name and contact numbers Press ABC to switch between entering upper case letters lower case letters and numbers Press Backspc to delete incorrect characters After completing a line press q to move to the next line 4 When you have entered the desired information and selected the ringtone you want to use for this contact press Save To edit a directory entry...

Page 44: ...ee times for C for example 5 Press Search The deskset searches for the first name or last name beginning with the letter you entered The first entry found appears If more than one entry was found press p or q to view other entries To delete a directory entry 1 Press p or q or Search to view the desired directory entry 2 Press t or u until the Delete soft key appears 3 Press Delete 4 When the confi...

Page 45: ... calls incoming calls that were not answered Received calls incoming calls that you answered forwarded or rejected Dialed calls all outgoing calls You can use this as a redial list To view the call history 1 When the phone is idle press MENU SELECT 2 If necessary press p or q to highlight Features and then press MENU SELECT 3 Press p or q to highlight Call History and then press MENU SELECT The Ca...

Page 46: ...e desired entry press Dial The phone dials the number immediately or Press Edit Dial The predial screen appears allowing you to edit the number before pressing Dial To add a call history entry to the directory 1 While viewing the desired entry press t or u until the Save soft key appears 2 Press Save 3 On the Save to menu select the location to which you want to save the entry To save the entry to...

Page 47: ...e available 6 Select a ringer for calls from this entry 7 Select a line to used for outgoing calls for this entry 8 Press Save to save the entry To delete a single call history entry While viewing the desired entry press Delete To delete multiple call history entries 1 While viewing the list of call history folders press q to highlight the folder for which you would like to delete all entries All ...

Page 48: ...Press q to highlight Speed dial and then press MENU SELECT The Speed dial menu appears 4 Press q to highlight a speed dial entry marked Empty 5 Press Add A blank speed dial entry appears 6 Use the dial pad keys to enter the name and number Press 123 to switch between entering numbers lower case letters and upper case letters When you start entering characters the Cancel soft key changes to Backspc...

Page 49: ...our phone 1 When the phone is idle press MENU SELECT 2 On the Main menu press q to highlight Status and then press MENU SELECT 3 On the Status screen press q to highlight Product Info and then press MENU SELECT 4 On the Product Info screen press q until Firmware Ver appears ...

Page 50: ...1 Press MENU SELECT 2 Press q to highlight User Settings and then press MENU SELECT or press 3 User Settings on the dial pad The User Settings menu appears The User Settings are Setting Options 1 Preferences Language Date Time Clock time Clock date Time zone NTP server Set manually Restart phone 2 Display Contrast Level 1 7 Backlight ON Off Low Medium High Backlight idle Off Low Medium High Timeou...

Page 51: ...ress MENU SELECT The Preferences menu appears 3 Press p or q to highlight the desired option and then press MENU SELECT The available options are Language Date Time Restart phone Setting the language 1 From the Preferences menu press p or q to highlight Language and then press MENU SELECT The Language menu appears 2 Press p or q to highlight the desired language 3 Press MENU SELECT Setting the dat...

Page 52: ...ave To enable or disable the NTP Network Time Protocol server 1 From the Date Time menu press q to highlight NTP server 2 Press t or u to select Enabled or Disabled 3 Press Save Note If the NTP server is disabled you must manually set the time and date This setting is valid only if the system administrator has already configured the Network Time settings For more information see the VSP715A Deskse...

Page 53: ...lt setting 3 Press Save To set the backlight level that applies when the phone is active 1 From the Display menu press q to highlight Backlight ON 2 Press t or u to select Off Low Medium or High High is the default setting 3 Press Save To set the backlight level that applies when the phone is idle 1 From the Display menu press q to highlight Backlight idle 2 Press t or u to select Off Low Medium o...

Page 54: ...to highlight Audio then press MENU SELECT The Audio menu appears To select different ringer tones for each line 1 From the Audio menu ensure that Ringer tone is highlighted and then press Select 2 On the Ringer tone menu press q if necessary to highlight a line for which to select a ringer tone and then press Select 3 On the selected line screen press t or u to select one of ten ringer tones The d...

Page 55: ...e key or Answer the call is started or answered using the selected audio mode Lifting the handset takes priority in all instances Configuring the programmable keys You can configure the Programmable Keys on the Deskset You can also configure these keys on the WebUI See Programmable Keys on page 62 To configure the programmable keys 1 Press MENU SELECT then select User Settings or press 3 The User ...

Page 56: ... computer may already be connected to the network through the PC port on the back of your deskset 2 Find the IP address of your phone a When the phone is idle press MENU SELECT b Press q to highlight Status and then press MENU SELECT The Status menu appears c On the Status menu ensure that Network is highlighted and then press MENU SELECT The Network screen appears d On the Network screen note the...

Page 57: ... entry fields into which you type information For your security the WebUI times out after 10 minutes so if it is idle for that time you must log on again The remaining procedures in this section assume that you have already logged on to the WebUI Status The Status page shows General information about your phone including model MAC address and firmware version Account Status information about your ...

Page 58: ...d Call Forward using the desket See Using the Call menu on page 38 When you have finished changing settings on this page click Save to save them General Call Settings Setting Description Anonymous Call Reject Select to block incoming calls that have no caller ID Enable Anonymous Call Select to make outgoing calls that remove your own caller ID information Do Not Disturb Settings Setting Descriptio...

Page 59: ...able call forwarding for calls when you are on another call on that account Target Number Enter a number to which calls will be forwarded when the line is busy Enable Call Forward No Answer Select to enable call forwarding for unanswered calls on that account Target Number Enter a number to which unanswered calls will be forwarded Delay Select the number of rings before unanswered calls are forwar...

Page 60: ...one For example English French Spanish etc English Phone Language Sets the language that appears on your phone Any language supported by your phone For example English French Spanish etc English Backlight Timer Sets how long the screen backlight stays on after the last button press 10 to 60 seconds 30 seconds Ringer Volume Sets the ringer volume for incoming calls You can also use the VOLUME q or ...

Page 61: ...ne 10 300 seconds 30 seconds Call Waiting Settings Setting Description Range Default Call Waiting Off Rejects additional incoming calls No notification appears on the screen n a Select to enable Disabled Call Waiting On Shows additional incoming calls on the screen n a Select to enable Enabled Enable Call Waiting Tone Enables or disables Call Waiting Tone n a Select to enable Enabled Tone Interval...

Page 62: ... view the Directory menu Call History Configures the key to access the Call History list You can then press the key to view the Call History list Redial Configures the key to access the Redial list You can then press the key to view the Redial list Messages Configures the key to access the Message menu You can then press the key to view the Message menu Do Not Disturb Configures the key to turn Do...

Page 63: ...icast pages In the Value column enter a valid Paging Zone ID ranging from 1 to 10 Multicast paging differs from standard paging in that it is handled locally by the Deskset and does not require a subscription through the hosted server To use multicast paging your System Administrator must first set up paging zones on the WebUI Park Call Enables you to park a call Pressing the key dials the Call Pa...

Page 64: ...ickup Enables you to answer a call ringing at a specific deskset Pressing the key dials the Direct Call Pickup feature access code FAC Depending on the server requirements you may then need to enter the number of the ringing extension ...

Page 65: ...irectory or import a local directory file The export function lets you back up your contacts to your computer Phone numbers appear as links If your service provider s click to dial feature is enabled you can dial a number by clicking its link The Local Directory lists entries on up to 10 pages with 20 entries per page Click Next First Last or a page number to view the desired page of entries Note ...

Page 66: ... Entry The Create Local Directory Entry page appears 2 Enter the required information At minimum a first and last name are required Setting Description Range Default First Name Enter the appropriate names in these fields n a n a Last Name Ringer Tone Sets a unique ringer tone for calls from this directory entry Auto Tone 1 10 Auto Account Sets the account used when you dial this directory entry De...

Page 67: ... desired Note Directory files are xml files containing contacts and contact information For more information about creating or editing a directory file consult your system administrator To import a local directory file 1 Click Choose File 2 In the Choose File to Upload window navigate to the directory file 3 Click the file and then click Open 4 On the WebUI click Import Export Local Directory You ...

Page 68: ...led out You can also add speed dial entries using the deskset The Speed dial list is accessed through the Features menu See Speed Dial on page 48 After entering information on this page click Save to save it Note Your system administrator can also assign programmable function keys to be quick dial keys but you cannot add or edit phone numbers for these keys Use the Speed Dial page to enter numbers...

Page 69: ...on page 55 My computer can t connect to the network after plugging the Ethernet cable through the PC port Make sure the deskset is connected to power The PC port does not work when the deskset does not have power source or during a power outage Make sure you plug the Ethernet cable connected to the router into the deskset Ethernet port and the Ethernet cable connected to the computer into the desk...

Page 70: ...70 Specifications Electrical and environmental specifications Operating temperature 32 122 F 0 50 C AC adapter output voltage 5 0 Vdc 700 mA Ethernet network jacks 10 100 Mbps RJ 45 Jacks ...

Page 71: ...onfCall Displays a list of held calls as a target for conferencing with the active call Del All Deletes all records in a list Delete 1 Deletes current entry 2 Deletes assignment 3 Deletes Directory group Dial Sends and dials currently displayed highlighted digits Directory Opens the list of available directories Edit Displays the entry group editor EditDial Edits a number stored in a list before d...

Page 72: ... progress into multiple calls Status Access the status submenu Transfer Opens the live dialing editor to enter or insert digits of the transfer target Type Switches between the Directory number types within an entry View Displays a database list XferCall Displays a list of held calls as a transfer target for the active call Yes Confirm Special Characters Entering special characters When entering t...

Page 73: ...rms Electrical storms can sometimes cause power surges harmful to electronic equipment For your own safety take caution when using electric appliances during storms Cleaning your telephone Your telephone has a durable plastic casing that should retain its luster for many years Clean it only with a soft cloth slightly dampened with water or a mild soap Do not use excess water or cleaning solvents o...

Page 74: ...and their officers directors employees and representatives VTech Parties from any liability or responsibility relating to such code and you acknowledge that the VTech Parties make no representations with respect to the origin accuracy usability or usefulness of such code and the VTech Parties have no responsibility to you whatsoever concerning the code including without limitation any responsibili...

Reviews: