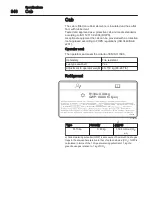
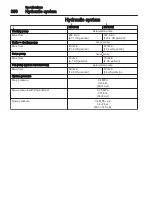
background image

F

F

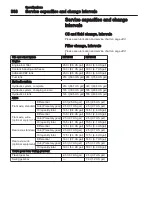
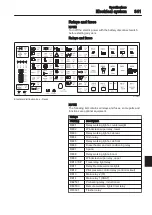
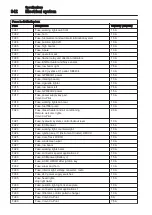
uses close to the batteries

Fuse

Designation

Capacit

t

y (Ampere)

FC02

Main fuse for Electric distribution box

80 A

FC03

Fuse, auxiliary heater

20 A

Fu

u

s

s

e on

n

th

h

e

e

eng

g

in

n

e

e

Fu

u

s

s

e

De

e

signat

t

i

i

o

o

n

n

Ca

a

pac

c

it

t

y

y

(Am

m

pe

e

r

r

e)

)

FU2501

Fuse, Preheater induction air

150 A

Sp

p

e

e

c

c

if

f

i

i

c

c

at

t

i

i

o

o

n

n

s

s

El

l

e

e

c

c

tr

r

i

i

c

c

al

l

syste

e

m

m

34

4

3

3

Summary of Contents for 322001

Page 1: ...EW160E SN 322001 322999 EW180E SN 322001 322999 EW160E EW180E operator s Manual PUB 20052711 C 2019 03 English operator s manual English ...

Page 2: ...ning a passenger vehicle or off road vehicle can expose you to chemicals including engine exhaust carbon monoxide phthalates and lead which are known to the State of California to cause cancer and birth defects or other reproductive harm To minimize exposure avoid breathing exhaust do not idle the engine except as necessary service your vehicle in a well ventilated area and wear gloves or wash you...

Page 3: ...ed machine make up a reliable powerful and profitable combination T Th he eref fo or re read d th he safe et ty y in ns str ructi ion ns an nd d fo ol ll lo ow th hem m We constantly strive to develop and improve the efficiency of our products by making changes to their design We reserve the right to make design modifications to the products even after they have been delivered Also we reserve the ...

Page 4: ...G The safety symbol combined with this signal word indicates a hazardous situation which if not avoided could result in deat th h or ser rious s in njur ry CA AU UT TI IO ON N The safety symbol combined with this signal word indicates a hazardous situation which if not avoided could result in mod de er rat te e or min nor in nj ju ury NO OT TI IC CE E I In nd di ic cat te es s a po ot te en nt ti ...

Page 5: ...ti in ng g in ns str ru uc cti io on ns s 14 40 0 Safety rules when operating 146 Measures before operating 152 Starting engine 153 Hydraulic system warming up 157 Operating 158 Steering 160 Braking 163 Exhaust aftertreatment system 165 Stopping 176 Parking 177 Retrieving and towing 179 Attachments alternative lowering 183 Transporting machine 186 Op pe er ra at ti in ng g te ec chn ni iq qu ue es...

Page 6: ...87 Maintenance service every 500 hours 295 Maintenance service every 1000 hours 300 Maintenance service every 2000 hours 301 Maintenance service when required 302 Sp pe ec cif fi ic cat ti io on ns s 32 27 7 Recommended lubricants 327 Fuel system 332 Service capacities and change intervals 338 Engine 339 Electrical system 340 Wheels 344 Cab 348 Noise and vibrations 349 Hydraulic system 350 Machine...

Page 7: ...5 5 ...

Page 8: ...ponents Always state the number when contacting the manufacturer and when ordering spare parts Man nu uf fa ac ctu ur rer r Volvo Construction Equipment Germany GmbH D 54329 Konz Könen Germany Machine PIN Serial number Axles Travel gearbox 6 Id de en nt ti if fi ic cat ti io on n nu um mb be er rs s ...

Page 9: ... a four stroke straight six cylinder turbocharged direct injected diesel engine with charge air cooling In order to reduce nitrogen oxides particles hydrocarbons and carbon monoxide the engine includes external cooled exhaust gas recirculation EGR and an exhaust aftertreatment system EATS with AdBlue DEF injection The exhaust aftertreatment system is a certified spark arrestor in accordance with D...

Page 10: ...Volvo CEA2 Common Electronic Architecture 2 electrical system a computerized monitoring and control system The different control units are communicating via bus systems Re el la ay ys an nd d fu us ses s The relays and fuses are grouped in the electrical distribution box in the cab behind the driver seat under the cover Br ra ak ke syste em m The brake system is a dual circuit system with two accu...

Page 11: ...dent flow sharing hydraulic system which always ensures that each movement receives oil according to the demand and no function stops The diesel engine drives the machine s working pump which gives a hydraulic flow to the working hydraulics and the travel motor The double gear pump is mounted behind the working pump and supplies the servo brake and steering hydraulics Eq qu ui ipm me en nt t Depen...

Page 12: ...tor with gearbox to reduce the speed and increase the torque Lo og gg ge ed d ma ac chi ine e da at ta a The machine is equipped with a software system which records various information about the machine and this information is transferred from the machine to Volvo and used by Volvo and its authorized workshops in the product development process and for possible malfunction detection Questions reg...

Page 13: ...and side or on both sides drawer type toolbox on left hand side right hand side or both sides Too ol lb bo ox x con nt te en nt t A daily maintenance kit is an optional equipment which contains the following tools V1183891 3 2 6 5 4 1 8 7 Tool bag for daily maintenance kit 1 Screwdrivers 2 and 3 Grease gun with extension 4 and 5 8 open end wrenches in different sizes 6 Allen wrench 7 Drain hose 8 ...

Page 14: ...First boom on two piece boom 14 Hydraulic oil tank 5 Boom cylinders 15 Boom on mono block boom 6 Two piece boom cylinder 16 Boom cylinder on mono block boom 7 Second boom on two piece boom 17 Side cover 8 Dipper arm cylinder 18 Engine cover 9 Dipper arm 19 Stabiliser legs 10 Bucket cylinder 20 Stabiliser blade 12 2 Pr re es sen nt ta at ti io on n Ma ac chi in ne e vie ew w ...

Page 15: ...sued by Volvo CE for each separate machine This EU declaration also covers attachments manufactured by Volvo CE The documentation is a valuable document which should be kept safe and retained for at least ten years The document should always accompany the machine when it is sold If the machine is used for other purposes or with other attachments than described in this manual safety must at all tim...

Page 16: ...ew where permitted limits have been determined and given according to international standards A machine or device which meets the requirements should be CE marked Our machines have been tested particularly for electromagnetic interference The CE marking of the machine and the declaration of conformity also cover the EMC directive If other electronic equipment is fitted to this machine the equipmen...

Page 17: ... dB is s com mplian nt t wi it th h th he fo ol ll lo owi in ng relevant pr rov visio on ns EC Directive Machinery 2006 42 EC EC Directive Noise Emissions 2000 14 EC EU Directive EMC 2014 30 EU Significant harmonised standards used in connection with this EN 474 1 and 474 5 The Volvo EW160E EW180E conforms to directive 2000 14 EC Annex VIII Full Quality Assurance The sound marking is based on issu...

Page 18: ...urroundings The antenna cable must be of the coaxial type Be careful to ensure that the cable is undamaged that the sheath and braid are not split at the ends the braid covers the connector ferrules and has good galvanic contact with them The mating surface between the antenna mounting bracket and the bodywork must have clean metal surfaces with all dirt and oxide removed Protect the mating surfac...

Page 19: ...p pl le es s of f saf fe et ty y c cla as ssif fi ie ed d ma ac chi in ne e pa ar rt ts s s spa ar re e pa ar rt ts s Removable protective devices guards over rotating parts and hot surfaces Protective plates rails covers and steps Components included in systems to reduce sound and vibrations Components included in systems to improve the operator s visibility Complete operator s seat incl seatbelt...

Page 20: ...g gi in ne e pr ro od du uc ct pl la at te e The engine product plate contains type designation and part and serial numbers and is positioned on the engine Tra av vel l ge ea ar rb bo ox x pr ro od du uc ct pl la at te e The gearbox product plate contains type designation and part and serial numbers and is positioned on the travel gearbox A Ax xle e pr ro od du uc ct pl la at te e The axle product...

Page 21: ...hat they can be read and understood If they have been lost or no longer are legible they must be replaced immediately The part number order number is given on the respective plates decals and in the Parts Catalogue N NO OT TE E The word WARNING is given on the warning decals for North America V1189982 4 1 13 11 1 1 2 3 7 6 8 9 10 15 16 18 19 12 20 21 2 22 8 23 24 17 25 26 15 2 2 14 5 48 Pr re es s...

Page 22: ...V1189983 1 15 15 1 13 49 28 8 31 22 35 8 36 37 8 18 27 2 34 30 38 26 2 2 39 32 33 29 20 Presentation Information and warning decals ...

Page 23: ...3 43 45 V1187251 46 47 44 33 49 Hydraulic elevated cab V1189984 42 40 41 42 41 15 15 1 1 Pr re es sen nt ta at ti io on n In nf fo or rm ma at ti io on n an nd d wa ar rn ni in ng g de ec ca al ls s 21 1 ...

Page 24: ...187459 5 Grapple changeover decal optional equipment V1179548 6 WARNING Electric digging brake optional equipment read the Operator s manual V1152064 7 Lifting capacity see page 373 V1065340 8 WARNING First read the Operator s manual before operating the machine 22 2 Pr re es sen nt ta at ti io on n In nf fo or rm ma at ti io on n an nd d wa ar rn ni in ng g de ec cal ls s ...

Page 25: ...wer lines See page 199 V1108866 11 WARNING Attachment may strike the cab V1108862 12 Lifting instruction WARNING V1065351 13 WARNING Risk of crushing Do not stand in the vicinity of a raised load boom V1180289 XXXXXXX 14 EMC compliance decal only for NA Pr re es sen nt ta at ti io on n In nf fo or rm ma at ti io on n an nd d wa ar rn ni in ng g de ec cal ls s 23 3 ...

Page 26: ...ocation V1065352 18 WARNING Risk of slipping or falling 19 AdBlue DEF filling see page 302 V1099517 MAX 15 ppm SULFUR A B ULTRALOW SULFUR FUEL ONLY MAX 10 ppm SULPHUR SULPHUR FREE FUEL ONLY 15152938 15286257 20 Sulphur content information See page 332 A for North America B for Europe 24 4 Pr re es sen nt ta at ti io on n In nf fo or rm ma at ti io on n an nd d wa ar rn ni in ng g de ec cal ls s ...

Page 27: ...5A 24 WARNING Engine preheater optional equipment either with 240V or 120V See page 154 for more information V1065370 25 Machine position when checking hydraulic oil level V1161457 26 Type of hydraulic oil filled at factory example V1065344 27 WARNING Hot coolant under pressure 28 Sound pressure level in cab Pr re es sen nt ta at ti io on n In nf fo or rm ma at ti io on n an nd d wa ar rn ni in ng...

Page 28: ...sen PL Z awie r rowane gazycieplarnian e P rados com e feito de estu fa R rate cu e fect de se r rovanésklení kové plyny ranetoplog redne pline reradev äxthusgaser 29 Refrigerant information decal example of new version See pages 348 and 262 for more information V1161456 30 Pressure check points V1152070 31 Fuse box layout decal inside the fuse box V1108872 32 Lubrication and service chart V117335...

Page 29: ...d pedal functions example V1152073 39 WARNING Pattern changer optional equipment see page 94 V1065380 40 Emergency exit V1108878 41 WARNING Risk of crushing Do not enter the excavator s working area V1187457 xxx 42 only with trailer towing option example Maximum allowed loads for trailer towing see page 234 Pr re es sen nt ta at ti io on n In nf fo or rm ma at ti io on n an nd d wa ar rn ni in ng ...

Page 30: ...52135 46 47 only with Hydraulic elevated cab Notice Hydraulic elevated cab V1197619 XXXXXXXX 48 California Prop 65 decal V1205601 49 When climbing on the machine a personal fall arrest system PFAS or an external access system must be used It has to be connected to the external climbing fixture underneath this decal Read also instruction on page 255 28 8 Pr re es sen nt ta at ti io on n In nf fo or...

Page 31: ...liance with the regulations prior to its sale and delivery to the ultimate purchaser You also may not knowingly remove or render inoperative any such device or element of design after such sale and delivery to the ultimate purchaser This includes for example operating an engine with the use of incorrect fuel or engine oil that renders the emissions control system inoperative A civil penalty up to ...

Page 32: ...tative maintenance including the recommended engine emission control maintenance In order to document that the proper regular maintenance has been performed on the non road engine Volvo recommends that the owner keep all records and receipts of such maintenance These records or receipts should be transferred to each subsequent purchaser of the non road engine Se er rv vic ce pe er rf fo or rm me e...

Page 33: ... d Lu ub br ri ic can nt ts s This engine is designed to operate with fuels and lubricants as specified in the Recommended Lubricants section of this manual Failure to use specified fuels and lubricants may render the emissions control systems inoperative operate outside of certified emission limits permanently damage emission components and reduce service intervals Fu ue el rec com mmend da at ti...

Page 34: ...imentation and to minimize the emissions of sulfur dioxide the fuel s sulfur content should be as low as possible Do not use of kerosene JP8 and additives that may contain higher level of sulfur The diesel fuels recommended for use shall meet ASTM designation D 975 no 1 D C B or no 2 D T T with a cetane level above 42 and sulfur content not exceeding 15 ppm Your machine is equipped with a Diesel P...

Page 35: ...te the machine until you know the function and position of the instruments and operating controls Always ensure that the seat belt is fastened before starting the machine V1147241 1 Instrument panel left 2 Instrument panel right 3 Instrument panel front Instrument Cluster 4 Instrument panel rear In ns str ru um me en nt t pa an ne el ls s 33 3 ...

Page 36: ...sition 12 on machines without steering wheel 11 Unassigned depending on options 12 Unassigned depending on options Le eft t in ns str rum ment t pan ne el l in com mbinati ion wi ith h Co omfo ort Driv ve Co ontr rol CDC C wi it th ho ou ut t ste eer rin ng g col lu um mn di if ff fe er rences s to o sta an nd da ar rd in ns str rumen nt t pa an ne el 13 Left control lever L8 5 control lever 14 Wi...

Page 37: ...p tr ra ai il le er r o on nl ly y wi it th ho ou ut t jo oy ysti ic ck con nt tr ro ol ll le ed d sup pp po or rt t If f th he mac chin ne is s equ ui ip pp pe ed d wi ith h th he op pt ti io on na al l joysti ick con ntr roll led d sup pp po ort fu unc cti io on n th hi is s con nt tr rol le ever 4 is s no ot ex xisti ing g in n th hi is case see e po oi in nt t 7A A 7B B fo or r deta ailed de e...

Page 38: ...t control lever once to activate joystick controlled support The buzzer sounds when activated Only for models with serial number start EW160E 322329 EW7R180E 322114 The stabiliser control menu is shown in the IC Instrument Cluster as long as the left control lever is in neutral position In this menu the stabilisers or blade depending on machine configuration to be moved can be selected Move the le...

Page 39: ...position 11 on the right instrument panel must be pressed to initiate the opening of the attachment quick coupler The buzzer sounds continuously after this switch is pressed See page 80 for the operation O Op pe eni in ng g of f th he e att ta ac chm men nt quick cou up pl le er r Press down and hold the upper end of the spring returned quick coupler confirmation switch on the left instrument pane...

Page 40: ...pressing the lower end of the switch for dump trailer NO OT TE E With the single acting option the loading platform is tilted down by its own weight when pressing the lower end of the switch This can be a very fast movement 11 1 Un na as ssig gn ne ed d de ep pe en nd di in ng g on n op pt ti io on ns s 12 2 Un na as ssig gn ne ed d de ep pe en nd di in ng g on n op pt ti io on ns s 13 3 Le ef ft ...

Page 41: ...ork even if the engine is not running Upper end of switch pressed down hazard flasher on Lower end of switch pressed down hazard flasher off V1085712 In ns str ru um me en nt t pa an ne el ls s In ns str ru um me en nt t pa an ne el l le ef ft t 39 9 ...

Page 42: ...E E The front instrument panel is designed to display one of the supported languages Refer to page 58 for details on how to set the language and the units V1134960 Adjustable direction of IC Instrument Cluster l 5 6 2 3 4 V1101766 1 0 rpm FLOW CLIMATE SPEED MODE 180 L W 1 Central warning light screen 2 Gauge screen 3 Time and engine speed screen 4 Mode screen 5 CCM Climate Control Module screen 6 ...

Page 43: ...e machine runs out of fuel during operation refuel and refer to page 304 for correct instructions to bleed air from the fuel system Fuel tank capacity see page 338 E Eng gi in ne e cool lant t te em mperat tu ure ga au ug ge e The gauge shows the temperature of the engine coolant and it has a red mark meaning engine overheated NOT TE E The red central warning light flashes if the coolant temperatu...

Page 44: ... ag ge 91 1 Time segment 2 displays the current time Refer to page 58 for instructions on how to set current time Engine speed screen 3 is displayed when the Menu screen is not shown in the Main screen For main menu screen see page 50 The Engine speed step selected on Engine speed control switch is displayed on an engine speed graph which is a segmented bar graph The actual speed 4 is displayed be...

Page 45: ...n the right side Indicators fill the space from left to right An indicator that has higher priority is put on the left side of the one that has lower priority Indicators on both sides can extend their display area to the other side if there is no indicator on the other side When the whole area is filled and there are more indicators to display indicators keep replacing the others so that the user ...

Page 46: ...needed Yellow V1194562 8 DPF regeneration ongoing or EATS temperature above 550 C Yellow V1194563 9 Attachment quick coupler closed Yellow V1194564 10 Trailer lifting selected Green 11 Working light front on Yellow V1194566 12 Working light rear on Yellow V1065465 13 Single acting option hydraulic tool selected Green V1065466 14 Double acting option hydraulic tool selected Green V1065467 15 Overlo...

Page 47: ...ake warning Red V1085786 4 Electric digging brake warning Red V1065488 5 Seat belt warning Red Fa as ste en n your sea at t be elt t 6 Brake pressure low warning Red V1195691 7 Steering servo pressure low warning Red V1065483 8 Pattern change warning Red V1065481 9 Engine coolant temperature high warning Red critically above range Yellow moderately above range V1065479 10 Attachment quick coupler ...

Page 48: ...60 17 SCR Warning Yellow Alarm AdBlue DEF low level Alarm AdBlue DEF quality Alarm SCR Tampering V1065486 18 Fuel level low warning Yellow V1065485 19 Auto grease low warning Yellow Automatic lubrication system failure Ta ab bl le e Fi ix xed d indicat to or rs 1 Turn alignment White only in T Mode Flashing undercarriage and superstructure not aligned Solid undercarriage and superstructure aligned...

Page 49: ...e engine is started within 15 seconds time adjustable with TechTool after having turned it off the code does not have to be entered again 4 Daily maintenance is shown once a day for five seconds This screen can be dismissed by pressing the ESC button 5 The standard screen appears N NOT TE E The camera view is shown in the IC Instrument Cluster at every machine start it could be closed with the ESC...

Page 50: ... is detected Ch he ec ck the e al lar rm m tex xt in n th he e di ispl la ay y for r the e al la ar rm m re ea as son n an nd d th he e re eq qu ui ire ed d ac cti io on n The alarm text is shown in a yellow box and provides information on reason for alarm and required action The amber central warning symbol is shown The buzzer sounds four times Press SELECT button to obtain more information about...

Page 51: ...n in a white box and provides the result of a selection The buzzer does not sound The text will hide by pressing the ESC button Fun nc cti io on n de es scri ip pt ti io on n This screen provides help for the operator on activated functions The text is shown in a green box and provides information about an activated function The buzzer sounds one time The text is shown for eight seconds and then c...

Page 52: ...s between 30 100 the oil level is okay Yel ll lo ow The value is between 3 30 check the oil level with the dipstick at next daily maintenance Red d The value is between 0 3 the oil level too low Check the level immediately with the dipstick and take the necessary actions Gr rey y System failure Reg ge en ner rati io on See page 165 for information how to run a parked regeneration DPF F soo ot t le...

Page 53: ...abnormal Re eversib bl le e fa an n opt ti ion na al eq qui ip pm ment t This informs the operator which mode is selected at the moment It also allows the operator to select a reversible fan mode from 4 different modes The operator can select a reversible fan mode with the arrow buttons When pressing the SELECT button the marked mode is set The screen reverts to the former screen displaying the ne...

Page 54: ... ipm men nt t This informs the operator which X3 response mode is selected at the moment It also allows to select a response mode from 3 different modes The operator can select a X3 response mode from the three modes with the arrow buttons When pressing the SELECT button the marked response mode is set The screen reverts to the former screen displaying the name of the newly selected item A Acti iv...

Page 55: ...tton when the Work timer value is highlighted Press ESC button to Cancel or SELECT button to Yes Aver rag ge e fu ue el l con ns This shows the calculated average fuel consumption from the last 24 hours Re eset fu uel l cons s Fuel consumption can be reset by pressing the SELECT button when the Average fuel cons value is highlighted Press the ESC button to Cancel or SELECT button to Yes V1137873 E...

Page 56: ...en with Time remaining and Interval will pop up on the IC Instrument Cluster Service the maintenance items which should be serviced in that interval For the service interval and maintenance items see page 268 Res set t ti ime rem main ning After servicing the maintenance items the time can be reset Press ESC button to Cancel or SELECT button to Yes When the time is reset the next service interval ...

Page 57: ...ms the time can be reset Press ESC button to Cancel or SELECT button to Yes When the time is reset the next service interval and Time remaining will be displayed If operator does not maintain the parts and reset this value it turns to zero and then to negative Hy ydr rau ul li ic c oi il l In nte er rval l This shows the value of hydraulic oil interval in the unit hours The operator can adjust the...

Page 58: ...interval in the unit hours The operator can adjust the hydraulic oil filter interval The setting range is 100 2000 hours Ti ime rem maini in ng g This shows the value for remaining time to next hydraulic oil filter service When the Time remaining reaches 40 h 20 h and 0 h the check screen with Time remaining and Interval will pop up on the IC Instrument Cluster Service the maintenance items which ...

Page 59: ...dition is sensed then the message will display the specific error failure Contact a qualified service technician if needed When pressing the SELECT button to view detail information about a headline the displayed information replaces the whole main screen The information content includes F Fa au ult Ac cti ive Er rror Cod de e So ource Fi ir rst Even nt No o of f even nts s La as st ev ven nt t V1...

Page 60: ...elected item using the SELECT button Use the ESC button to cancel without saving There are 3 possibilities N Ne ew w Ch ha an nge e De el let te e New w The New setting is used to add new X1 tools Follow the steps from 1 through 8 described below to set and Save the parameters for the new attachment NO OT TE E If the Save procedure described in 8 is not performed all settings are cancelled automat...

Page 61: ...aving 5 C Control Choose the control type for the X1 tool Select the preferred control type using the arrow buttons Save the selected item using the SELECT button Use the ESC button to cancel without saving Possible control types are Pu us sh To og gg gle e Pr rop por rti io on nal l For information on control types see page 79 V1137891 Set flow 280 l Flow 280 l New X1 work tool New X1 work tool V...

Page 62: ...re is not performed all the settings will be cancelled automatically If some items are not set up the error message Fill out all items will appear 9 The added X1 tool is newly listed Cha an ng ge This is to modify the setting of preset X1 tools 1 Select C Cha an ng ge e after entering X1 wo or rk to oo ol l 2 Select the tool to be modified using the arrow buttons and press the SELECT button 3 Foll...

Page 63: ...322552 EW160E 322344 EWR170E 320079 EW180E322119 EW220E 320043 1 For changing the X1 direction click the checkbox 2 Click save Sho or rtc cut t fu un ncti io on n fo or X1 work to oo ol change e By keeping the hammer shear button A on the machine control keypad right instrument panel pressed for more than 2 seconds the X1 work tool menu can be opened directly without navigating through the setup m...

Page 64: ...WR170E 320079 EW180E322119 EW220E 320043 For changing the X3 direction click the checkbox CD DC C ste ee er ri in ng g spe ee ed d This is to select the steering speed of the Comfort Drive Control CDC optional equipment in dependency of the travel speed During standstill the speed response is always at maximum Select the preferred steering speed using the arrow buttons Save the selected item using...

Page 65: ...which shall be changed using the arrow buttons Open the selected item using the SELECT button 1 R Response mode With this setting the response mode in the selected profile can be adjusted Select the preferred response mode using the arrow buttons Save the selected item using the SELECT button Use the ESC button to cancel without saving Possible response modes are acti ive normal sof ft t V1185605 ...

Page 66: ...h the SELECT button Use the ESC button to cancel without saving NO OT TE E The speed may have to be reduced on extra function to allow handling of work tools with limited hydraulic capabilities 6 A AUX function LH lever Depending on which hydraulic line supplies the Steelwrist either X1 or X3 see point 9 Main hydraulic supply the AUX function on the left control lever is connected to the other hyd...

Page 67: ...ESC button to cancel without saving 8 F Fully hydraulic quick coupler preparation Remove Tiltrotator With this function a tiltrotator with a fully hydraulic quick coupler can be disconnected from the machine quick coupler without leaving the cab This menu item can only be set if a fully hydraulic quick coupler is connected to the machine By default the setting is cancel To enable the machine quick...

Page 68: ...rol lever See page 94 and following for the position of the shortkey button Select the preferred function for the joystick shortkey using the arrow buttons Save the selected item using the SELECT button Use the ESC button to cancel without saving Possible functions are N Non ne e no function Au ud di io o mute e Wi ipe er r Cam mer ra Also the selected item is displayed with a symbol on the IC Ins...

Page 69: ...buttons Save the selected item using the SELECT button Use the ESC button to cancel without saving The units stored in the IC Instrument Cluster are as follows It te em m Metr ric US S Time h h Fluid rate l h USgal h Volume L USgal Voltage V V Current A A Temperature C F Revolution rpm rpm Speed km h mph Pressure bar psi Distance km mile V1137903 Setup Language Language English English Deutsch Esp...

Page 70: ... the SELECT button Use the ESC button to cancel without saving 3 D Date format The items yyyymmdd mmddyyyy and ddmmyyyy decide how the IC Instrument Cluster shows the date yyyy means year mm means month and dd means day Select the preferred format using the arrow buttons Save the selected item using the SELECT button Use the ESC button to cancel without saving V1137905 Setup Time date Date set 201...

Page 71: ... Contrast Night the machine s work lights should be turned on The adjusting bar in the screen is controlled with the arrow buttons and the value is set with the SELECT button Use the ESC button to cancel without saving Ke ey ypa ad d ba ac ckli ig gh ht t The brightness of the keypad backlight is changed by the adjustment The adjusting bar in the screen is controlled with the arrow buttons and the...

Page 72: ... on the authorization code display is shown if the anti theft system is selected as an optional equipment Wrong code display appears on the IC when the operator or machine owner has entered the wrong code After 3 inputs of an incorrect code the authorization will be limited for 5 minutes and a wrong code alarm will send to the CareTrack portal The default code lock s delay time is 2 minutes and it...

Page 73: ...nce in the CareTrack portal and the machine is outside the geofence the geofence broken message will appear on the IC When the machine owner activates a geofence and configures automatic immobilization in the CareTrack portal and the machine is outside the geofence the geofence broken warning message will appear on the IC and the machine is immobilized at the next stop WECU sends the warning messa...

Page 74: ...orms the operator with the warning message on the IC and activates machine immobilization GSM 3G tampered If someone cuts the GSM 3G antenna the GPMECU1 informs the operator with the warning message on the IC and activates machine immobilization Open box detection If someone tries to open the WECU enclosure the GPMECU1 informs the operator with the warning message on the IC and activates machine i...

Page 75: ...he IC WECU sends the warning message to the CareTrack portal The warning condition is revoked when the trigger has disappeared Rem mot te e im mmob bil li iz zati io on If dealer level 3 code owner requests machine immobilization in the CareTrack portal the remote immobilization warning message will appear on the IC and the machine is immobilized at the next stop If machine owner requests machine ...

Page 76: ...n the WECU and GPMECU1 check the machine serial number of the other ECUs If the machine s serial number is different the GPMECU1 prevents machine start immediately and a warning message will appear on the IC If the WECU is disconnected from key on cable and the machine is turned on the GPMECU1 prevents machine start immediately and a warning message will appear on the IC The warning condition is r...

Page 77: ...nna This disables the anti theft system except for remote immobilization no coverage immobilization and machine serial number check and the WECU informs the CareTrack portal The anti theft system will be activated when the ignition is turned on the next time V1137943 0 Anti theft system Pin code menu Anti theft system One time code Enter owner PIN code Enter owner PIN code V1137944 1 2 3 4 Read PI...

Page 78: ...r r an nt ti i t th he ef ft t syste em m In nf fo or rmat ti ion n The blue information symbol is shown The buzzer sounds two times Alarm text is shown for seven seconds and then changes to operating display V1137933 Geofence broken GO BACK TO SITE V1137935 Timefence broken Go back to site Geofence broken Timefence broken V1139553 7 4 0 9 7 1 2 Anti theft system Pin code menu Anti theft system On...

Page 79: ...roken Immobilization at next stop Timefence broken Immobilization at next stop Anti Theft system tampered Immobilization at next stop V1139554 No coverage Days before immob XXX V1137942 No coverage Immobilization at next stop V1137939 Remote immobilization activated by level 3 Immobilization at next stop No coverage Days before immob No coverage Immobilization at next stop Remote immobilization ac...

Page 80: ... V1139558 Electronic system tampered Contact service ECU Machine inoperable ECU Machine immobilized Geofence broken Timefence broken System tampered Machine movement Battery power lost Remote immobilization No coverage Contact service Electronic system tampered Machine inoperable V1155510 Anti Theft system tampered Machine immobilized Contact service V1137938 Electronic sys power lost Contact serv...

Page 81: ...ev ver rs s Pus sh To og gg gle fo or r sli id di ing g swi it tc ches s 1 an nd 16 The control of the X3 tool and the rotation of the tiltrotator if installed is done by sliding the sliding switch 1 on the left control lever The control of the X1 tool is done by sliding the sliding switch 16 on the right control lever The controls with proportional switches are similar to the ones with on off swi...

Page 82: ...le lock and cruise control switch optional equipment 10 Light control switch 11 Attachment quick coupler switch optional equipment 12 IC Instrument Cluster control keypad 13 Machine control keypad 14 Mode selector control 15 Audio remote control 16 Ignition switch 17 Power outlet 12V 18 Drink and cup holder 19 Hour meter placed on the right hand panel in the cabin 20 Hazard flasher switch placed u...

Page 83: ...d of switch pressed down rotating warning beacon off 2 Tr ra av vel l spe ee ed d sel le ec cti io on n swi it tc ch A Travelling speed high B Travelling speed low C Travelling speed creep 3A A Ri ig gh ht t con nt tr ro ol l le ev ver r See page 94 3 3B B Ri ig gh ht t con nt tr ro ol l le ev ver r L L8 8 5 5 con nt tr ro ol l le ev ver r See page 94 4 4 Co om mf fo or rt t Dr ri iv ve Co on nt t...

Page 84: ...echanical stress on the lifting frame and drive line the machine can be equipped with an optional boom suspension system BSS See page 197 for detailed information 7 7 El le ec ctr ri ic c di ig gg gi in ng g br ra ak ke o op pt ti io on na al l eq qu ui ip pm me en nt t Upper end of switch pressed down electric digging brake is selected or deactivated Releasing the red locking device 1 by pressing...

Page 85: ...h if conditions for automatic lock is not fulfilled any more See page 150 S Sw wi it tc ch po osit ti io on n B Cr ruise contr rol l op pt ti io on na al l eq qu ui ipmen nt t Engage the cruise control by pressing the travel pedal until the desired speed is reached and then press down the lower part of the switch B until the cruise control symbol appears in the IC Instrument Cluster Cr rui is se c...

Page 86: ...heck message for unlocked quick coupler will appear in the IC Instrument Cluster Additionally the buzzer sounds continuously NO OT TE E The attachment quick coupler confirmation switch position 8 on the left instrument panel must be pressed to open the attachment quick coupler See page 34 for the operation Connect the attachment according to the operation description on page 210 I In ni it ti iat ...

Page 87: ...n clockwise counter clockwise order Press SELECT to turn the selected working light on off If the light is on the icon is yellow The selection menu can be closed by pressing ESC on the keypad The position where you escape the menu is saved 4 H HVAC auto mode select button This button is used to control the HVAC system See page 119 5 A Arrow up button Press this button to scroll between items and a...

Page 88: ...peed by control counter clockwise 2 A Auto idle button The Auto idle button activates or deactivates Auto idle function The engine speed will be reduced automatically to idle in order to reduce fuel consumption if any of control levers pedals or engine speed control switch are not operated for 5 seconds If any one of the above is operated the engine speed returns to the speed set with the engine s...

Page 89: ...annels automatically It searches the lower frequencies automatically and stops at a receivable frequency Music c select bu ut tt to on n backwar rd It selects the previous song in the play list in your cell phone When music plays for more than 1 second it turns back to the start of the song and if you press the button again it returns to the previous song 2 V Volume up button Press the button to i...

Page 90: ...ptional equipment When you talk using a hands free device you can hear a voice with this mic 16 6 Ig gn ni it ti io on n swi it tc ch This ignition switch has four positions Make sure to activate the battery disconnect switch before trying to start engine 1 O OFF position 0 Turn the ignition switch to position 0 to turn off engine 2 R Radio position R Turn the ignition switch to position R to turn...

Page 91: ... tr ro ol l le ev ver r L L8 8 5 5 con nt tr ro ol l le ev ver r See page 94 for information about the L8 5 control lever functions 2 23 3 Li ig gh ht t con nt tr ro ol l swi it tc ch fo or r mac chi in ne es s wi it th hout ste eer rin ng wheel l see e mult ti i fu un nc cti io on lever de es scrip pti io on n on pag ge e 91 A High beam B Travel lights with parking lights C Lights off For working...

Page 92: ...e 126 2 S Service socket This socket is for Volvo s service tools MATRIS and Tech Tool 3 A Auxiliary heater optional equipment See page 132 3 2 1 V1147430 Instrument panel rear 90 0 In ns str ru um me en nt t pa an ne el ls s In ns str ru um me en nt t pa an ne el l re ea ar r ...

Page 93: ... tr ro ol l le ev ver r See detailed description starting on page 94 2 2 Ri ig gh ht t con nt tr ro ol l le ev ver r See detailed description starting on page 94 3 3 St te ee er ri in ng g wh he ee el l o op pt ti io on na al l eq qu ui ip pm me en nt t ma ac chi in ne e wi it th ho ou ut t ste ee er ri in ng g col lu um mn n The machine can be steered with the steering wheel or with the control l...

Page 94: ...r to the steering wheel Wi in nd ds screen n wi ip per r Turn the lever to put the windscreen wiper in the required position Position A Off position Position B Intermittent wiping 1 Position C Intermittent wiping 2 Position D Continuous wiping Wi in nd ds screen n wa ashe er Push the lever in towards the steering wheel to start the washer and turn the lever to select continuous wiping Ho or rn Pre...

Page 95: ...l pe ed da al l The speed is controlled with the travel pedal 9 St te ee er ri in ng g wh he ee el l ad dj ju us stm me en nt t o op pt ti io on na al l eq qu ui ip pm me en nt t ma ac chi in ne e wi it th ho ou ut t ste ee er ri in ng g col lu um mn n WA AR RN NI IN NG G Risk of fatal accidents Adjusting the steering wheel while operating could cause a loss of machine control Alwa ays sto op p th...

Page 96: ...lts in dipper arm in and superstructure swing to the left N Neutral superstructure and dipper arm in neutral position 1 Dipper arm out 2 Dipper arm out and swing superstructure right 3 Swing superstructure right 4 Dipper arm in and swing superstructure right 5 Dipper arm in 6 Dipper arm in and swing superstructure left 7 Swing superstructure left 8 Dipper arm out and swing superstructure left Sw w...

Page 97: ... to position 6 see below results in raised boom and bucket in N Neutral superstructure and dipper arm in neutral position 1 Lower boom 2 Lower boom and bucket out 3 Bucket out 4 Raise boom and bucket out 5 Raise boom 6 Raise boom and bucket in 7 Bucket in 8 Lower boom and bucket in V1193101 Right control lever 1 Lower boom 2 Raise boom 3 Bucket in 4 Bucket out Ot th he er r con nt tr ro ol ls s Co...

Page 98: ...ng the position of the pattern change valve The pattern change valve is located close to the swing motor and is changed as follows 1 Pull knob 1 down and move lever 2 to position B by turning it 45 2 Release the knob in order to secure the lever after the machine control pattern is set Change the control pattern back to SAE ISO in the same way Le ever mov vem ment ts s fo or r th he bac ckhoe e lo...

Page 99: ...st see page 222 2 X X3 left right sliding switch see page 98 and 79 2 X X1 left right sliding switch see page 99 and 79 3 S Shortkey see page 58 o or r Tw wo Pie ec ce off fs set t boom opti io ona al eq quipm ment t see page 227 3 B Boom float position optional equip pment see page 222 4 P Pivot axle locking see page 150 4 F Forward neutral rearward travel dir rection see page 160 5 J Joystick co...

Page 100: ...on with Two Piece offset boom 13 F Fl lo oa at t po osit ti ion n see page 222 6 C CD DC C op pt ti io ona al eq qu ui ip pm men nt see page 161 14 S Sho or rtk key y see page 58 o or r Tw wo Pi ie ece off fs set bo oo om op pti io on nal equ ui ipment see page 227 7 U Un na as ssig gne ed 15 P Pow we er bo oost see page 222 8 U Un na as ssig gne ed 16 X X1 le eft t right t ti il lt t see page 102...

Page 101: ...ow setting value of the IC Instrument Cluster see page 58 X1 flow control is used for special equipment such as hydraulic hammer breaker or hydraulic shear The function is controlled by the right control lever There are three control types push toggle or proportional which can be selected in the IC Instrument Cluster see page 79 The X1 function can also be controlled by the optional X1 pedal see p...

Page 102: ...tory settings 1 Proportional joystick left 5 L8 5 Joystick left 2 Proportional joystick right 6 L8 5 Joystick right 3 Slider X3 7 Main control valve MCV A side bottom A dipper arm left B side on top B dipper arm right 4 Slider X1 10 00 0 Ot th he er r con nt tr ro ol ls s Co on nt tr ro ol ls s ...

Page 103: ... Grab piping left Position for EW180E EW220E 9 X1 right 5 Slope piping both connections left 10 Hammer return just one right For the hydraulic pressure flow specifications and for the connection port specifications see 350 X1 and X3 direction can be changed for more information see 58 and the following chapters X1 work tool Change X1 direction X3 operation Change X3 direction O Ot th he er r con n...

Page 104: ...ional hydraulics Volvo X Function Steelwrist AUX X For details about Volvo X Function see page 58 The Steelwrist AUX speed to the left and to the right can be adjusted in the Setup menu see page 58 For details about Steelwrist AUX see Steelwrist manual 5 J Joystick controlled support optional equipment For details see page 34 6 C CDC optional equipment For details see page 161 7 U Unassigned 8 U U...

Page 105: ...right to lower the right hand side of the attachment Drag the slider to the left to lower the left hand side of the attachment The more the slider is moved the faster the attachment will tilt The maximum tilting speed for the tiltrotator can be adjusted in the Setup menu see page 58 Depending on the setting in the setup menu you can have a Toggle or Push function activated on the button see page 7...

Page 106: ... shall be replaced immediately NO OT TE E Never carry out any unauthorized alterations to the cab for example lowering the roof height drilling welding on brackets for fire extinguisher radio aerial or other equipment without first having discussed the alteration with personnel at the Volvo Engineering Department This department will decide whether the alteration may cause the approval to become v...

Page 107: ...rking install the necessary additional protection guards in accordance with job site conditions and local government regulations Contact authorized Volvo dealer to meet local regulations Any damage can affect the strength of the structure Contact a qualified service technician for repairing safety structure after damage Prevent persons from entering or remaining in the dangerous area NO OT TI IC C...

Page 108: ...ine while FOG Falling Object Guard is tilted Otherwise FOG can be damaged by the bucket W Wi in ndshiel ld wi it th h saf fe ety y ne et t cleaning 1 Remove the handle B and then take away the safety net 2 Clean the windshield 3 Install the safety net 4 Fasten the handle B by pushing the safety net V1134949 C A B A Screws B C FOG C FOPS V1134950 A B A Safety net B Handle 10 06 6 Ot th he er r con ...

Page 109: ...il 3 and reinstall it with front bracket Install two lower brackets 5 Install the side bracket 6 Ti ig gh hte en ning g to orque e 1 2 4 4 0 2 24 4 kgf m 23 3 5 53 3 3 9 9 Nm m 17 3 32 2 2 9 9 lbf f ft t 2 8 7 7 0 9 9 kgf f m 85 5 3 31 8 8 8 Nm m 62 8 8 6 4 4 lb bf f ft t 3 4 5 4 9 9 0 5 5 kgf f m 48 8 0 05 4 9 9 Nm m 35 3 37 3 6 6 lbf ft t 6 1 0 0 0 1 1 kgf f m 10 0 1 Nm 7 2 2 0 7 7 lb bf f ft t ...

Page 110: ...ust be in the lower position During travelling or blade operations the cab must always be in the lowest position During operation the left side cover of the cooler and the adjacent side cover must be closed Li if ft t th he e el le ev vat ti in ng g cab b 1 Close the cab door 2 Start the engine 3 Fasten the seat belt 4 Place the control lockout lever in upper position 5 Lift the cab by pressing th...

Page 111: ...f the machine 2 The red knob B of the emergency lowering valve is located on the frame below the side cover next to the cab 3 Make sure nobody can be injured by the cab down movement 4 Pull out the red know B and the cab starts lowering Hold the red knob until the cab is completely down V1186188 B B Red knob on the alternative emergency lowering valve O Ot th he er r con nt tr ro ol ls s Ca ab b 1...

Page 112: ... ev ver r and console e 2 1 By pulling the release lever the control lockout lever is put in down position locked 2 By pulling the release lever a bit further the console tilts up A Au ut to om ma at ti ic c en ng gi in ne e shu ut t do ow wn n Automatic engine shut down system is to stop the engine automatically when the machine is not operated for a certain period of time Default time is set to ...

Page 113: ...e control the working lights on the cab and the optional working light on the tank are switched on After 110 seconds factory setting or if the ignition is switched on they are automatically switched off again The remote welcome light function is disabled as long as the ignition is switched on NOT TE E The remote control is equipped with a battery under the rear side cover type 3V CR2032 V1182611 1...

Page 114: ...nce with controls CA AU UT TI IO ON N Risk of crushing Sudden movement of seat may cause crushing injury Ens sur re th hat al ll l seat t ad djus sti in ng g le evers are locked d in nt to o po ositi io on NO OT TE E Make sure that no objects are placed within the moving area of the operator seat NO OT TI IC CE E I In ns sta allat ti io on and d mai in nte ena an nc ce of f th he e op per rato or ...

Page 115: ...The locking lever must latch in the desired position It should not be possible to move the seat into another position when it is locked 5 Ho oriz zon nt ta al adjus stm ment to op sea at an nd d con ns sole es The seat and the consoles can be adjusted forwards and backwards Lift the lever 5 and move the seat and consoles to the desired position The locking lever must latch in the desired position ...

Page 116: ...ob 10 mounted on the underside of the armrest The armrests can be manually tipped up if required 11 1 Lu umba ar r supp po or rt adjus stm men nt t Rotate the knob 11 in the direction of the arrow to increase the amount of lumbar support five positions Further rotation in the same direction causes the lumbar support to return to minimum 12 2 Sea at he ea at ti in ng g switc ch op pt ti io on na al...

Page 117: ... operator s weight off the seat 3 Lift and hold the lever A until air bag is completely inflated 4 Sit and push down the lever A to deflate 5 Stop deflating when seat starts lowering The set weight should be within the green zone of the ride indicator NO OT TE E After adjusting the suspension with operator s weight the suspension height should be in the position within suspension stroke V1065684 A...

Page 118: ...nsoles 8 Headrest adjustment 9 Heating and ventilation switch 10 Lumbar support adjustment 11 Height adjustment armrest 12 Pad adjustment armrest 13 Width adjustment The lateral position of the armrest can be adjusted by turning the armrests around the vertical pins 13 14 Pad angle adjustments Turn the pad around the 14 to adjust the angle NO OT TE E Adjusting the armrest height The knob 11 must t...

Page 119: ...eflating When the engine is stopped you can also hear the compressor when inflating the balloon Ven nt ti il la at ti ion n he eat ti ing g These functions are controlled by the switch position 9 The ventilation and heating are located on the backrest and the cushion NOT TE E Function check To check the ventilation functionality you can turn off the engine switch on the ignition and listen if you ...

Page 120: ...ious injury or death A damaged seat belt could cause serious injury or death Ch he ec ck th he e sea at t bel lt t and assoc cia at te ed d pa ar rts s be efo or re sta ar rt of f machi ine ope erat ti ion n Check the seat belt and associated parts daily Ensure mounting hardware is tight Replace the entire seat belt immediately if there is any wear the webbing is worn cut has loose stitching the b...

Page 121: ... turned off Press and hold in the button to setup the HVAC system NOT TE E Even if the HVAC system is turned off when CCM Climate Control Module gets an auxiliary heater signal the CCM turns on the cooling fan setting 1st step in manual mode 2 Ar rrow w up bu ut tt to on This button is used to scroll between items and adjust each segment on the screen 3 Def fr ros ste er r sel le ec ct bu utt to o...

Page 122: ...r arrow right button B Te empe er rat tu ur re contr rol l Au ut to o mod de e Temperature can be adjusted with the arrow left or arrow right button Default setting value is 22 C 71 6 F and the setting range is 16 C 32 C 60 8 F 89 6 F If the temperature sensor in cab fails auto mode shall turn off Se ee e pa ag ge 58 8 f fo or de et ta ai il ls s on n ho ow w to o cha an ng ge e th he e te em mpe ...

Page 123: ... is hooked onto support A to avoid damaging the wiper 3 Incline the steering wheel away from the window 4 Push both buttons C in order to unlatch the window from locked position B while holding both grips D and then pull the window upwards and backwards 5 Fix the window in the locked position CA AU UT TI IO ON N Risk of crushing Crushing injury could be caused when a window slams shut Ens sur re t...

Page 124: ...us sly y Doo or r The catch is used for keeping the cab door secure in the open position 1 Open the door completely 2 Make sure it is securely fixed to the catch Release the door by pressing lever B inside the cab S Su un n sha ad de e Use the front 1 roof 2 and rear 3 sun shades to protect from the sun light coming in through windows Ra ai in shi ie el ld The rain shield A prevents rain from fall...

Page 125: ...hat tc ch must be sec cur rel ly y loc cked wh he en tr rans spo orti ing NOT TE E Cab with fixed roof hatch is provided as an optional equipment In this case there is no handle and gas spring V1065695 1 2 3 1 Handle 2 Open direction 3 Roof hatch Ot th he er r con nt tr ro ol ls s Op pe er ra at to or r com mf fo or rt t 12 23 3 ...

Page 126: ...me en nt t Pull the top edge of the ashtray A in order to open it Pull the ashtray upward out of the console when cleaning it N NO OT TE E Make sure that you close the ashtray after use in order to prevent any possibility of fire NO OT TE E The ashtray can be put into the cup and drink holder Co oa at t ho oo ok k The coat hooks A are inside the cab NO OT TE E Do not hook any item that may obstruc...

Page 127: ...en install the fire extinguisher Em me er rg ge en nc cy ex xit t The cab s alternative exit path is the rear window Regardless of window type break the glass with the hammer attached to the rear wall inside in the cab There is a knife on the hammer for the emergency exit Cut off the seat belt with the knife if the buckle cannot be opened NOT TE E The hammer must not be removed or used for other p...

Page 128: ...TE E Setting is completed when NA message is shown Others Press the FM AM button and then press preset 5 for 2 seconds NO OT TE E Setting is completed when INT message is shown 2 Tuning ranges Ban nd Fr req qu ue en nc cy Eur rop pe e FM 87 50 108 MHz AM MW 531 1602 KHz LW 153 279 KHz No or rth h Amer ric ca FM 87 50 107 9 MHz AM 530 1710 KHz Ot th he ers FM 87 50 108 MHz AM 531 1602 KHz 12 26 6 O...

Page 129: ...at a frequency with the best reception SEEK Searches frequencies higher than current frequency TRACK Searches frequencies lower than current frequency Track up down button SEEK TRACK While playing a USB device press the SEEK button to play the beginning of the next song Press the TRACK button to return to the beginning of the current song Press the button again to play the beginning of the previou...

Page 130: ...ia player to the audio system will automatically convert to AUX mode even if another mode is playing and then songs on the portable media player are played automatically PR RE ES SET bu ut tt to ons s 7 8 9 10 0 11 1 an nd d 12 2 Select the preset button 7 8 9 10 11 and 12 to which you want to save the selected frequency Press and hold the preset button The frequency will be saved to the preset bu...

Page 131: ...he button Pressing the button briefly will not operate REW US SB con nne ecto or 13 It is the connector for direct connection of a USB device Connecting a USB device to the audio system will play the songs on the USB device Charging is not possible with the USB connector NOT TE E When using an external USB device make sure to keep the device disconnected and connect only some time after turning on...

Page 132: ...ns done to the machine that affect the operator s visibility must be verified by a Volvo dealer Ca am me er ra a syste em m The camera screen in the IC Instrument Cluster A opens by pressing the camera button B on the keypad The camera button is illuminated when the camera view is displayed Mirrors Cameras 1 Rear view camera 2 Side view camera A B V1151952 A IC Instrument Cluster B Camera button 1...

Page 133: ...on bar is used to show or hide camera views on the IC Instrument Cluster Press the camera button B on the keypad to rotate the camera views clockwise Select one of the camera icons and press SELECT on the keypad to show or hide this camera view Re ea ar r vie ew w cam me er ra a The rear view camera C is installed on top of the counterweight Si id de e vie ew w cam me er ra a The side view camera ...

Page 134: ...be set and if necessary changed with only 4 buttons 1 P Power on confirm button SHORTPRESS button if the display shows OFF Timer On the start display appears A selected function is confirmed Inputs are confirmed LONGPRESS button The button must be pressed for longer than 2 seconds The heater is switched on immediately if On or OFF appears in the display V1154252 A Display window B Buttons V1154253...

Page 135: ...Timer is in the Main menu and the start display appears in the Menu bar the next left hand symbol appears in the middle and flashing Timer is in the submenu the displayed value is changed smaller or the next selection is displayed If the display shows OFF Timer On the start display appears 4 F Forward button Timer is in the Main menu and the start display appears in the Menu bar the next right han...

Page 136: ...tion different information is displayed in the status area Sub bm men nu u In the submenu the symbol of the selected menu item appears in the middle of the display The corresponding set value is displayed flashing in the entry area and can be set using the Backward button 3 or Forward button 4 and confirmed with the Confirm button 1 V1154254 Main menu A Menu bar B Status area V1154255 Submenu A Me...

Page 137: ...h SHORTPRESS button 1 in addition confirm and set the operating time Select a new menu item 1 H Heating ON OFF Heating immediately with LONGPRESS without settings 1 Press the LONGPRESS button 1 for longer than 2 seconds 2 Screen shows remaining operating time 3 If LONGPRESS is pressed during heating mode the display switches to the heating submenu set and set operating time During heating mode it ...

Page 138: ...s are ended Press the button 2 for less than 2 seconds heater OFF After the heating off the start display appears if the vehicle lighting is off the display lighting goes out after 10 seconds Th he e fo ol ll lo ow wi in ng g ac cti io on ns s ar re e po os ssib bl le e du ur ri in ng g th he e he ea at ti in ng g of ff f di is spl la ay y Use the forward or backward button to select a menu item P...

Page 139: ...ming is required De epa ar rtu ure ti im me op pe erati ing g mode fa ac cto or ry set tt ti in ng g Under the following conditions the preselected heating mode is not started on the current day The current day and the preselected day are identical The current time lies within the time period departure time minus operating time Ex xam mp pl le e Current day preselected day Mon Current time 06 45 D...

Page 140: ... the setting menu by pressing the confirm button 3 Use the backward or forward button to select the submenu which want to change the setting 4 Press the confirm button to confirm the setting value V1154262 Mon 09 31 A Current day B Current time C Settings submenu bar 1 13 38 8 Ot th he er r con nt tr ro ol ls s Op pe er ra at to or r com mf fo or rt t ...

Page 141: ... has finished then set the time and weekday V1154444 NO SIGNAL No communication Check and if necessary renew the heater fuse Contact a qualified service technician V1154445 Heater fault Contact a qualified service technician V1154447 Voltage too low Charge battery if necessary contact a qualified service technician NOT TE E If you are unable to remedy the error or fault contact a qualified service...

Page 142: ...sibility additional devices such as warning systems mirrors and closed circuit television cameras CCTV may be used For more information about the rear and side view camera system see page 130 N NO OT TE E Some parts of the basic machine may restrict visibility for example the cab s pillars frames exhaust pipe engine hood as well as optional equipment such as buckets pallet forks grapples and so on...

Page 143: ...nclude all aspects of the operator s visibility but gives information to determine if optional equipment for indirect visibility is necessary e g warning systems The operator must be informed if other equipment and attachments are used and visibility has been reduced NO OT TE E If the machine configuration has been changed a new risk assessment and test regarding ISO5006 must be performed O Op pe ...

Page 144: ...djust mirrors until the imaginary boundary line is visible to the operator see table and figures below Stand the unloaded machine straight and on level ground Close up visibility boundary according to ISO 5006 thick line A 1 2 m 47 2 in B 1 0 m 39 4 in C 1 0 m 39 4 in D 1 0 m 39 4 in 14 42 2 Op pe er ra at ti in ng g in ns str ru uc cti io on ns s ...

Page 145: ...ood visibility as possible towards the machine s superstructure and lower frame and with as wide angle as possible If not adjust the rear view mirrors until good visibility is obtained see figures Left mirror Op pe er ra at ti in ng g in ns str ru uc cti io on ns s 14 43 3 ...

Page 146: ...Right mirrors 1 14 44 4 Op pe er ra at ti in ng g in ns str ru uc cti io on ns s ...

Page 147: ...ules and procedures established by the job site organisation Always pay attention around the machine to identify any obstacles Prevent persons from entering or remaining in the work area i e the area around the machine and at least 7 m 23 ft beyond the maximum reach of the attachment Some applications e g Lifting operation requires a person in the vincity of the machine Depending on the job site o...

Page 148: ... the machine Pay attention to the effect of different distances to the centre of gravity and the influence of different attachments You must check that all mirrors and cameras are in good condition clean and properly adjusted for good visibility before operating the machine For detailed information about adjustment of mirrors and cameras see page 140 You must be in control of the working area of t...

Page 149: ...lo oo os se screw ws s are fo ou un nd d sto op p op per rati io ons s im mmed di ia at te ely y and con nt ta ac ct a qu ua ali if fi ie ed ser rvic ce te ec chnician Ac ccid de en nt ts s Accidents and also incidents should be reported to the site management immediately If possible leave the machine in position Only take necessary action so as to reduce the effect of damage especially personal i...

Page 150: ...n for the working site or other instructions about measurements in case of accidents During a parked DPF regeneration the exhaust temperature is rising above the normal temperature level therefore during a parked regeneration following rules apply Make sure that there is no flammable material around the machine this is important to prevent risk of fire Move the machine to a safe area if there is a...

Page 151: ...160E optional Watch the decal A and move the arm out until the arrowhead is aligned with the underside of the second boom B If a trailer is attached to the machine during operation on public roads it must not be lifted Put the mode selector back to T mode and check that the superstructure is still aligned and all hydraulics are locked Close the windscreen s Switch off the working lights Wear seat ...

Page 152: ... he wh he ee els Al li ig gn n th he e sup pe er rs str ru uc ctu ur re e wi it th h th he e un nd de er rc car rr ri ia ag ge e NO OT TE E In T mode all hydraulic functions are locked if the machine is aligned If attachment must be moved the mode needs to be changed to W or C mode Make sure to switch back to T mode before travelling on public roads 1 Put the mode selector in T mode 2 Swing the su...

Page 153: ... IC Instrument Cluster The automatic axle locking is disengaged if none of the above mentioned conditions is fulfilled and the axle is not manually locked If the pivot axle is unlocked the pivot axle unlocked symbol C is shown in the IC Instrument Cluster Ma an nu ua al l pi iv vot t ax xle e lo oc ckin ng g The axle can be manually locked by pressing the upper part of the switch A on the right in...

Page 154: ...inter use 3 Make sure the fire extinguisher if equipped is fully charged 4 Check that hoods and covers are closed 5 Check that the battery disconnect switch is switched on 6 Check the IC Instrument Cluster for failure messages 7 Adjust the steering wheel and the operator seat see pages 91 and 112 8 Fasten the seat belt 9 Check that there are no persons in the work area of the machine 10 Check that...

Page 155: ...t every machine start it could be closed with the ESC button 6 If the machine is equipped with anti theft protection see page 70 Cold starting see page 154 N NOT TE E Do not keep the ignition switch in start position 2 for more than 20 seconds as this may seriously damage the starting system If the engine does not start turn the switch back to OFF position 0 and wait a couple of minutes before the...

Page 156: ...operating preheating position 1 and keep it there as long as the engine preheating symbol is displayed in the IC Instrument Cluster 2 As soon as the preheating symbol has extinguished turn the ignition switch to start position 2 and keep it there until the engine starts NO OT TI IC CE E N Ne ev ver r rac ce th he engi in ne e im mmed di ia at te el ly y af ft te er r a col ld sta art 3 If the engi...

Page 157: ...oo os st sta arte ed d must not t com me in n con nt ta ac ct wi ith h th he sup pp plyin ng mac chi in ne Fol ll lo ow w th he es se ste ep ps s 1 Turn OFF the battery disconnect switch 2 Remove the protections from the battery pole studs 3 Check that the booster batteries or other power source have the same voltage as the standard batteries 4 Do not disconnect the cables to the standard batterie...

Page 158: ...y damage the turbocharger Run the engine at low idling speed for at least half a minute after start and before it is turned off This is to ensure the lubrication of the turbocharger 15 56 6 Op pe er ra at ti in ng g in ns str ru uc cti io on ns s St ta ar rt ti in ng g en ng gi in ne e ...

Page 159: ...l sin nc ce fo orced d wa ar rmin ng g can damag ge th he e mac chi in ne 1 Start the engine and leave it running at low idling for five minutes ten minutes at below 15 C 5 F 2 Turn the mode selector switch to working mode W 3 Increase the speed to approx 1200 rpm 4 Run the bucket cylinders piston rod to the outer end position and at the same time run the dipper arm out and in 5 Check on the displ...

Page 160: ...nction see page 161 S Sp pe ee ed d The travel speed high low creep is selected with the travel speed switch A on the right instrument panel and controlled with the travel pedal B For details about the travel speed switch see page 158 M Mo od de e sel lec cti ion n Select mode with the mode selector on the right instrument panel P parking mode parking brake and pivot axle locking are applied T tra...

Page 161: ...vel pedal is let up only the hydrostatic brake becomes active but this brake function is not sufficient to reduce the speed and has also an impact on wear resistance of the driveline because of overheating NOT TE E Overheating the hydraulic motor and brake system could cause serious failures avoid overheating of the machine by operating it carefully V1147555 A C B Travelling speed button A high B ...

Page 162: ...ra al l R Re ea ar rw wa ar rd d The driving direction F N R is selected with a dedicated switch on the right control lever F N N R R swi it tc ch But tt to on con ntr rol l le ev ver rs switch 4 Propo or rti io ona al l cont tr rol l le ev ver rs switch 5 L8 8 5 con ntr rol le ever rs switch 17 F N N R R swi it tc ch po osit ti io on ns s Position 1 Forward Position 2 Neutral Position 3 Reverse V...

Page 163: ...ward Forward in n mid dd dl le e positi ion n Neutral swi it tc ched d ba ac ckwa ar rd Reverse CD DC C ac cti iv vat ti io on n w wi it th h ste ee er ri in ng g col lu um mn n The CDC function can be activated by pressing the CDC activation switch on the right instrument panel for 2 seconds Fo ol ll lo owi in ng con ndi iti ions s mus st be e fu ulfi illed fo or CD DC C acti iv vati io on Engine...

Page 164: ...strument Cluster with the text CDC still active and the buzzer sounds as long as T Mode and CDC are active CD DC C ac cti iv vat ti io on n di is spl la ay y me es ssag ge es s w wi it th ho ou ut t ste ee er ri in ng g col lu um mn n If the machine does not have a steering column it can only be steered with the control levers with Comfort Drive Control CDC option NO OT TE E It is not allowed to d...

Page 165: ...e should only be used when the machine is stationary Apply the parking brake by setting the mode selector in P mode or setting the control lockout lever in the downward position Release the parking brake by setting the mode selector in T W or C mode and setting the control lockout lever in the horizontal position NO OT TI IC CE E N Nev ver ap ppl ly y th he pa ar rkin ng brak ke whe en n th he e m...

Page 166: ...essed down electric digging brake is selected or deactivated Releasing the red locking device 1 by pressing it down and pressing down the upper end of the electrical digging brake switch 2 simultaneously electric digging brake is applied provided that W or C mode is selected the toggle lever is locked parallel to the service brake and the machine is standing still The electric digging brake is rel...

Page 167: ...th high sulfur content The purpose of regeneration is to raise the temperature in the aftertreatment system so that any trapped substances are burned off to allow the system to regain its full capacity No or rm ma al l op pe er ra at ti io on n During normal operation passive regeneration occurs continuously No further action is required from the operator during the passive regeneration Only if th...

Page 168: ...uring the entire parked regeneration To o sta art a parked d reg ge ener rati ion Select Start in the regeneration menu on the IC Instrument Cluster NO OT TE E The regeneration can be started immediately by pressing the SELECT button on the IC Instrument Cluster control keypad when an alarm indication for regeneration pops up on the IC Instrument Cluster The HEST High Exhaust Temperature light is ...

Page 169: ...g g re eg ge en ne er ra at ti io on n engine derate higher fuel consumption shorter diesel particulate filter service life damage to the aftertreatment system Ca an nc cel ll li in ng g pa ar rk ked d re eg ge en ne er ra at ti io on n NOT TE E On nl ly y canc cel l in n an emer rge ency 1 Select Stop in the regeneration menu on the IC Instrument Cluster An alarm indication on the instrument pane...

Page 170: ...n is can ncel lle ed d if f th he e contr rol lo oc ckou ut lev ver r is set t to o unlo oc cked d pos sit ti io on n NO OT TE E Th he e idl le e spe ee ed d in nc crea ases s du uring th he en nti ire reg ge en ne er rat ti ion n pr rocess Keep machine parked Regeneration ongoing Warning amber buzzer sounds amber central warning on 1 Keep the machine parked Regeneration cancelled Derate soon Warn...

Page 171: ...ark the machine in a non heat sensitive area Move the control lockout lever down to lock the system 2 Switch off the engine 3 Contact a qualified service technician to have the diesel particulate filter replaced NOT TE E Th he e soo ot t loa ad d can only y be res set t by y a quali ifi ied ser rvice te echn ni ic cia an n Regeneration not needed Warning blue V1088268 buzzer sounds blue central wa...

Page 172: ...1 170 Operating instructions Exhaust aftertreatment system ...

Page 173: ...m There are two levels of engine power reduction derate that are activated after a certain time depending on the type of problem as well as if the malfunction reoccurs or not Res sto or rin ng g engine e fu un nc cti ion If the engine is restarted by turning the ignition off and on when engine power has been reduced then full engine power called restored engine function can be obtained twice durin...

Page 174: ...ue reduction 1 Turn off the engine 2 Fill AdBlue DEF in the AdBlue DEF tank Park safely V1126376 AdBlue empty Full derate soon buzzer sounds continuously red central warning on V1205599 flashing symbol torque reduction 1 Turn off the engine 2 Fill AdBlue DEF in the AdBlue DEF tank Refill AdBlue V1126376 AdBlue empty Full derate active buzzer sounds continuously red central warning on V1205599 flas...

Page 175: ...qualified service technician Park safely V1126376 Wrong AdBlue quality Full derate soon buzzer sounds continuously red central warning on V1205599 flashing symbol torque reduction Contact a qualified service technician Replace AdBlue V1126376 Wrong AdBlue quality Full derate active buzzer sounds continuously red central warning on V1205599 flashing symbol forced idle or torque and speed reduction ...

Page 176: ...entral warning on V1205599 flashing symbol torque reduction Contact a qualified service technician Check SCR system V1201756 SCR system failure Full derate active buzzer sounds continuously red central warning on V1205599 flashing symbol forced idle or torque and speed reduction depending on market Contact a qualified service technician DP PF syste em m fa ailure moni it to or rin ng Display figur...

Page 177: ...act a qualified service technician Check DPF system V1201756 DPF system failure buzzer sounds 4 times amber central warning on V1205598 solid symbol Contact a qualified service technician Op pe er ra at ti in ng g in ns str ru uc cti io on ns s E Exha au us st af ft te er rt tr re ea at tm me en nt t syste em m 17 75 5 ...

Page 178: ...nect the battery by opening the red cover of the battery disconnect switch C and pressing the switch to the upper position A Wait until the LED on the switch has turned off to be sure that the electronic system is completely shut down NO OT TI IC CE E W Wa ai it t unt ti il th he e electr ron ni ic c syste em m is s com mplete ely shu ut t do ow wn befo or re res sta ar rti ing g For information a...

Page 179: ...ti in ng g agai ins st th he e gr roun nd d Keep in mind that the theft and burglary risk can be minimised by removing the ignition key when the machine is left unattended locking doors and covers after working hours turning off the current with the battery disconnect switch avoid parking the machine with high risk of theft burglary and damage removing all valuables from the cab such as cellular p...

Page 180: ...ries over a wooden plastic rubber surface N NO OT TI IC CE E S Sta ar rt th he e mac chine e fo or on ne e hour r on nc ce a mon nt th h an nd d run al ll cycles s of f fu un ncti io ons to o ope er rat ti ing te em mpe erat tu ur re Ch he ec cks af ft te er r lo on ng g t te er rm m pa ar rk kin ng g Check all oil and fluid levels Check tension of all belts Check air pressure Check air cleaner Ch...

Page 181: ...ucture could cause serious injury or death Ens sur re th he e supe erstr ruc ctu ur re is secur red be ef fo or re to ow wi in ng g th he e mac chi ine WA AR RN NI IN NG G Risk of runaway machine Improper towing methods or faulty equipment could cause the machine to break away from the towing vehicle causing accidents serious injury or death Ca ar ref fu ul ll ly y fo ol ll lo ow th he e to owi in...

Page 182: ...lade NO OT TE E Take care that the towing device is not scratching over any sharp edges use a protection if needed To avoid oblique loading pull the machine straight rearwards or forwards Keep the towline angle as small as possible maximum angle is 10 Max xim mum m te emporar ry fo or rce on th he e to owin ng eyes must no ot t excee ed d th he e fo oll lowi ing V1161529 L C x x x x d a N FRES Dir...

Page 183: ...le C with a grease gun until it comes out at pressure relief valve D De ea ac cti iv vat te e em me er rg ge en nc cy ac ctu ua at ti io on n on n ge ea ar rb bo ox x NOT TE E If the following procedure is done incorrectly the transmission could be damaged This shall only be done by mechanical personnel 1 Loosen bleed nipple A 2 Start the engine and select on road gear high speed To release the em...

Page 184: ...n both cylinders 1 Turn off the engine 2 Choose P mode 3 Clean the area around the plug 1 and the air vent 2 4 Place a container under the cylinder to collect any oil spills 5 Loosen the air vent 2 with 2 3 turns to release the encased pressure 6 Remove the plug 1 carefully 7 Remove the spring 3 and store it clean 8 Reinstall the plug 1 with a tightening torque of 235 265 Nm 173 195 lbf ft 9 Tight...

Page 185: ...rvo pressure in the accumulators 1 Turn the ignition switch to operating preheating position 1 and move the control lockout lever to the unlocked position 2 Operate the attachment slowly downward until it rests on the ground WA AR RN NI IN NG G Risk of burns Hot oil can cause severe burns to unprotected skin Alwa ays we ea ar pe er rsonal pr rot te ec cti iv ve gl lo oves s go og gg gl le es an nd...

Page 186: ...s s Li in ne rup ptu ur re while e rai isin ng g or lo ow we er rin ng th he bo oo om m The two interconnected line rupture valves are mounted directly on the boom cylinder bottom sides The main function of the valves is to prevent the boom from making an uncontrolled movement towards the ground in case of a line rupture between the main valve block MCV and the line rupture valves If the line rupt...

Page 187: ...by a qual lifi ied d ser rvic ce te ec chnician WA AR RN NI IN NG G Risk of serious injury A valve under pressure could result in serious injury Do not t di is sas ssem mbl le th he e li in ne e rup pt tu ur re valves conta ac ct a qu ua al lif fi ie ed d ser rvic ce te ec chnician A line rupture valve may be under pressure from the oil in the boom cylinder even if the rest of the hydraulic system...

Page 188: ...on the machine Do not move the machine before you know how to operate the steering and the control system NO OT TE E Various steering options are available for information about the Comfort Drive Control CDC see page 160 Engage the pivot axle locking and swing brake on the machine before loading on the trailer see page 150 Make sure that all covers and doors on the machine are locked before starti...

Page 189: ...ings on front and 2 on the rear of the machine as shown on the picture Cross lashing is permitted if angle areas are not exceeded Op pe er ra at ti in ng g in ns str ru uc cti io on ns s Tr ra an ns spo or rt ti in ng g ma ac chi in ne e 18 87 7 ...

Page 190: ...Ty yin ng g do ow wn n machine e fo or rail tr ran ns sport Mod de el l EW1 16 60E E EW1 18 80 0E Fr ric cti io on n coe ef ff fi ic cien nt μ 0 2 2 μ rubber r ty yres on dirty y an nd we et t ste ee el ls surfa ac ce FRES LC daN 12200 daN 13000 daN Angle α 15 45 15 45 Angle ßX 15 35 15 35 Fr ric cti io on n coe ef ff fi ic cien nt μ 0 5 5 μ wi it th h rubbe er r an nti i slip mat t on cont ta ac ...

Page 191: ...ok k on out tr rigge er r Mod de el l EW W1 16 60E E EW W1 180 0E Direction FX 12300 daN 12300 daN FY 1000 daN 1000 daN 1000 kg 9810 N 981 daN 9 81 kN Load on pull pin device Cou un nt te er rwe eigh ht WA AR RN NI IN NG G Risk of crushing Incorrect handling of counterweight could cause serious crushing injury or death Nev ver remov ve or r in ns sta al ll l th he e cou unt te erwe ei ig gh ht t b...

Page 192: ...cket arm and boom as illustrated below 2 Move the control lockout lever down to lock the system securely 3 Stop the engine check the safety around the machine 4 Close and lock windows doors and hoods securely 5 Remove the covers from the lifting points on top of the counterweight 6 Attach the lifting slings according to the decal on the right side of the cab 7 At the beginning of the lift check th...

Page 193: ...les on how the most common attachments are used It is important that the correct technique is used to obtain safe and efficient use of the machine This machine is equipped with load sensing hydraulics which means that the oil in the system is supplied proportionally according to the position deflection of the control levers If the control levers are in neutral position consequently no oil is suppl...

Page 194: ...vel Operating to reduce fuel consumption also lowers wear on the machine and is environmental friendly Additionally to the ECO mode function also the operating behaviour has an influence on economical machine operating Always try to 1 Avoid unnecessary machine motions 2 Plan your work site Take stock of your work area and plan its layout with regard to the machines that will work there your work w...

Page 195: ...n Keep the terrain and haul roads in good condition Remove any large rocks or obstacles Fill any ditches and holes Provide equipment and schedule time to maintain terrain conditions Adjust the speed and travel path to minimize the vibration level Drive around obstacles and rough terrain conditions Reduce the speed when it is necessary to go over rough terrain Maintain machines according to the man...

Page 196: ...ociated with whole body vibrations may be caused by other risk factors The following guidelines can be effective to minimize risks of back pains Adjust the seat and controls to achieve good posture Adjust the mirrors to minimize twisted posture Provide breaks to reduce long periods of sitting Avoid jumping down from the machine Minimize repeated handling and lifting of loads Maintain reasonable we...

Page 197: ...er self of that the anticipated movements are obtained when actuating the pedals An unexpected movement may entail risk of an accident A cab provided with protective grill over the roof window meets the requirements for falling object guard in accordance with stated testing methods FOPS ISO 3449 Use the falling object guard when there is risk of heavy falling objects NO OT TI IC CE E W Wi ith h ce...

Page 198: ...lso very dangerous carry out lifting work Basically using this machine as a crane is prohibited However local or national regulations may allow it on some markets If permitted a properly installed rated bucked hook and certified slings shackles are required Contact an authorised dealer for more information Lo oa ad di ing g on n to a veh hi icle If possible position the machine higher than the veh...

Page 199: ... he e un nd der rcarria age e th he e bo oom m suspen ns sio on n syste em m will sta ay y ac cti iv ve al ll th he e ti im me NOT TE E The activation speed for W and C mode is adjustable by a parameter this can only be done by a service technician Tra av vel l po os sit ti io on n wi it th h BS SS S A maximum machine height of 4 m 13 ft 1 5 in must not be exceeded when travelling on public roads ...

Page 200: ...e boom suspension system press the lower end of the BSS switch down The BSS symbol is not shown in the display if the system is switched off 19 98 8 Op pe er ra at ti in ng g te ec chn ni iq qu ue es s Boo om m Su us spe en ns sio on n Sy yste em m B BS SS S ...

Page 201: ...a High h vol lta ag ge e ov ver rh he ea ad d po ow wer r lin ne e DA AN NG GE ER R Risk of electrocution Working near or making contact with overhead power lines may lead to electrical flashover and electrocution Al lw wa ay ys kee ep p th he min nimum m cle ear ran nce fr rom overhe ea ad d powe er r li ines s High voltage is lethal and may be powerful enough to destroy both the machine and atta...

Page 202: ...d de erat ti io on Ra ai il lr ro oa ad d ov ver rh he ea ad d con nt ta ac ct syste em m Ke ee ep in n mind th hat t th he e power lines fo or r th he ad dj ja ac cen nt t tr racks may al lso be e li iv ve Loading and unloading is only permitted between the designated limit signs The signs may be installed on the contact line or on special posts Contact authorised railroad personnel for permissio...

Page 203: ...sonnel may expose and arrange provisional suspension of cables Make use of a signal man when you cannot see the actual point where you are working or when the position of the pipe or cable is critical see page 243 The position of the pipe or cable may deviate from the drawing or distances may be incorrectly determined Regard all electrical cables as live O Op pe er ra at ti in ng g te ec chn ni iq...

Page 204: ... If the engine shuts down on a slope lower the attachment to the ground Do not operate the swing function since the upper structure may be swung under its own weight and cause tipping or side slipping NO OT TE E Keep in mind while working on a slope that the lifting charts are only valid if the machine is placed on firm level ground Also the liability of the overload function is limited if the mac...

Page 205: ...er banks or in other similar places where the ground is soft There is a risk that the machine because of its own weight and own vibrations may sink and this could lead to accidents Keep in mind that the ground conditions may have changed after heavy rain Therefore be careful when restarting work This is particularly important when working near the edge of ditches road verges or similar as the grou...

Page 206: ...on the machine causing slippery conditions Step only onto anti slip surfaces Use an ice scraper on a long handle or a ladder when removing ice from the windows 2 20 04 4 Op pe er ra at ti in ng g te ec chn ni iq qu ue es s Wo or rk kin ng g wi it th hi in n da an ng ge er ro ou us s ar re ea as s ...

Page 207: ... the demolition object Leave sufficient space in front of the machine for debris to fall to the ground and not hit the cab Fence off the dangerous part of the work site Spray water over the demolition site to prevent harmful dust from spreading Boots with steel reinforcements in the soles and toe caps protective goggles and a hard hat are obvious protective items to be worn on a demolition site If...

Page 208: ...ds and changeable between 20 to 180 seconds by Volvo s service tool Contact a qualified service technician Au ut to o1 1 mode e Repeats a cycle consisting of normal rotation and reverse rotation Normal rotation time is set up as 60 minutes and changeable between 5 to 120 minutes by Volvo s service tool Contact a qualified service technician Reverse rotation time is set up as 20 seconds and not cha...

Page 209: ...he Operator s manuals from the respective suppliers It is the responsibility of the machine owner to make sure that these attachments are approved for mounting on the machine The machine owner is responsible for the safety of the combination machine attachment For more detailed information regarding the choice of attachments contact a Volvo Construction Equipment dealer The machine is prepared for...

Page 210: ... in the quick coupler section on page 210 N NO OT TE E Be careful so no hydraulic or electrical lines are damaged on the tiltrotator 2 Place the tiltrotator on the ground and position the machine for best access to the hydraulic connectors 3 S Stop the engine and depressurize the hydraulic system see page 221 4 Connect the hydraulic lines on the tiltrotator to the connectors C on the machine Start...

Page 211: ...ectrical connector B and reinstall the protection plug A for the electrical connector on the dipper arm 6 Remove the hydraulic lines from the hydraulic connectors C on the dipper arm 7 Remove the tiltrotator from the machine s quick coupler 1 according to information about the quick coupler in the quick coupler section on page 210 N NOT TE E Be careful so no hydraulic or electrical lines are damag...

Page 212: ...attachment quick coupler can be used for lifting operations As the lifting hook is fitted on the attachment quick coupler it can be used without an attachment This improves visibility for the operator and increases the maximum permissible load NO OT TE E Read the information in the Operator s Manual about lifting objects before using the lifting hook At tt tac chm me en nt t qu ui ick cou up pl le...

Page 213: ...Initiate the opening of the attachment quick coupler as follows Push the red button 1 of the attachment quick coupler switch 2 on the right instrument panel and push down the upper end of this switch simultaneously The switch will be locked in this position A yellow quick coupler symbol and a check message for unlocked quick coupler will appear in the IC Instrument Cluster Additionally the buzzer ...

Page 214: ...sk of crushing If the red warning lamp for open attachment bracket lights up while working the attachment could fall off and cause serious crushing injury or death Sto op p wo orkin ng g with h th he e mac chin ne immediate ely y an nd make sur re th he at tt ta ac chm men nt t br rac cket t is pr roperly y lo ocked d be efo ore sta arti ing g to o wo ork ag gai in n NO OT TE E Even if the red ind...

Page 215: ...ch 3 on the left instrument panel for 1 second A red quick coupler symbol and a warning message for unlocked quick coupler will appear in the IC Instrument Cluster Curl the bucket fully in to open the quick coupler If necessary the release pressure can be increased by driving the bucket cylinder to its end position 4 When the red indicator pin on the quick coupler extends fully and the green indic...

Page 216: ...essure from the working hydraulics circuit Li if ft ti in ng g ho oo ok k An optional lifting hook on the attachment quick coupler can be used for lifting operations see page 210 Lifting hook for a detailed description of the lifting hook I In nd di ic cat to or r pi in n At the front on the attachment quick coupler there is an indicator pin Indicator pin a not visible S6 attachment quick coupler ...

Page 217: ... rod side the locking wedge D is released If necessary the release pressure can be increased by driving the bucket cylinder in its end position I In nd di ic cat to or r pi in n There is an indicator pin on the left side of the attachment quick coupler Indicator pin not visible Attachment quick coupler is closed Indicator pin visible Attachment quick coupler is open Co on nn ne ec cti in ng g an n...

Page 218: ...1 WA AR RN NI IN NG G Risk of crushing Attachments that move unexpectedly can cause injuries Make sur re peo opl le sta ay y out of f th he wor rking ar rea a wh he en n conn nec cti in ng g or r di is scon nne ec cti in ng at tt ta achment ts s 1 Disconnect the attachment 2 Remove any shims between the screw holder D and the screw E between the screw holder D and the spacer B 3 Hook on and lock t...

Page 219: ...rmissible load Co on nn ne ec cti in ng g at tt ta ac chm me en nt t un ni iv ver rs sal l at tt ta ac chm me en nt t qu ui ic ck cou up pl le er r WA AR RN NI IN NG G Risk of crushing Attachments that move unexpectedly can cause injuries Mak ke sur re pe eop pl le e sta ay out of f th he e wor rkin ng area a when con nn necti ing or r discon nn nec cti ing att ta ac chm ments s 1 Position the mac...

Page 220: ...he dipper arm and hold it there for approximately 5 seconds to ensure the attachment quick coupler has fully locked on to the bucket A visual indicator that the bucket is locked in the universal quick coupler is the position of the locking hook E on the bucket pin D see illustration 10 When the attachment is correctly locked in the attachment quick coupler this has to be confirmed by pressing the ...

Page 221: ...ing is wrong Di is scon nn ne ec cti in ng g un ni iv ver rs sal l at tt ta ac chm me en nt t qu ui ic ck cou up pl le er r WA AR RN NI IN NG G Risk of crushing Attachments that move unexpectedly can cause injuries Mak ke s sur re p pe eop pl le e s sta ay o out o of f t th he e w wor rkin ng a area a w when c con nn necti ing o or r d discon nn nec cti ing a att ta ac chm ments s 1 Position the m...

Page 222: ...in Otherwise the bucket pin can not be disengaged properly 6 Lower the bucket and curl out to lift up the attachment quick coupler from the bucket 7 Place the bucket flat on the ground and unhook it M Ma ai in nt te en na an nc ce un ni iv ver rs sal l at tt ta ac chm me en nt t qu ui ic ck cou up pl le er r Besides the greasing see page 278 the universal attachment quick coupler has also another ...

Page 223: ...ried out t 1 Start the engine in order to build up servo pressure and charging the pressure accumulator 2 Place the machine in a suitable service position see page 247 3 After engine is shut down turn ignition key to running position Do not start engine 4 Move the control lockout lever up to unlock the system 5 Move the operating levers forwards rearwards left right to their respective end positio...

Page 224: ...he right control lever see page 94 has been pushed the float position symbol appears in the IC Instrument Cluster Now the float position function is preselected but not active When the control lever is being actuated to lower the boom the float position becomes active The boom can then move freely upwards or downwards depending on the ground conditions when the control lever is being held in the f...

Page 225: ...he hole 3 Put O ring E at the arm position 4 Insert pins C and D 5 Install lock bolt A and nuts B of each pin NO OT TI IC CE E M Mak ke sur re th ha at t th he ere is s a cle ea ar ran nc ce of at t le ea as st 2 mm 0 0 08 in be et tw wee en n nu ut an nd pi in bos ss Lub br ricat te e th he e pi in n Gra ab b bu uc cket t C Cl la am ms she el ll l bu uc cket t A grab bucket also called clamshell ...

Page 226: ...on n as s th he e at tt ta ac chi ing pl la ate e wi il ll l th he en n li ie e on on ne e sid de e or r th he oth her r Th hi is may y cau use inju ur ries an nd mak ke it more di if ff fi ic cul lt t to o re att ta ac ch to o th he e mac chi in ne NO OT TE E Release the pressure from the hydraulic system before attaching or disconnecting a grab bucket see page 221 A At tt ta ac chi in ng g gr ra...

Page 227: ...if bucket or grab bucket is used select the correct position by turning the valves with the supplied lever as shown in the picture R Rel le ea as se th he e pres ssure fr rom th he e hydrau ulic c syste em m be ef fo or re changin ng g th he valve po os sit ti ion n see e pa age 22 21 1 Turn the two valves completely in the required position for the bucket A or the grab bucket B Both valves must c...

Page 228: ...e To move the cylinder in again it is not necessary to switch over the shut off valves This functionality is already integrated in the shut off valves merely the function bucket out has to be actuated Move the control lever in direction bucket out until the piston rod is moved in completely see page 94 2 22 26 6 Op pe er ra at ti in ng g te ec chn ni iq qu ue es s Bu uc cket ts s ...

Page 229: ... eq qu ui ip pm me en nt t WA AR RN NI IN NG G Risk of tipping over Excavating with a fully angled offset boom affects the balance of the machine and could cause the machine to tip over Alwa ays low wer r th he e sta ab bil lis ser r leg gs s and d op pe er rat te e wit th h gr rea at te est care whe en n ex xcav vati in ng g wi it th h th he boo om m in n th he of ff fs set t pos sit ti io on n T...

Page 230: ...the hydraulic cylinders closer to their end positions than 10 cm 4 in If the machine is provided with an attachment quick coupler this must be checked every day at the same time as rectifying any play Lubricate the excavator unit bearings twice a day When a new machine is delivered pipe clamps on the excavator unit should be check tightened Repeat at intervals of a couple of days until the clamps ...

Page 231: ...d close to the vertical line The arm and bucket cylinders are then also far from their end positions which is preferable Avoid working with the hammer horizontally as this will cause great wear When the material breaks catch hold of the hammer before the block breaks up completely Switch off the hammer immediately to avoid idle strokes otherwise the locking of the hammer bar may be damaged at the ...

Page 232: ...dipper arm and boom lengths and counterweight mass Choose the correct lifting chart taking into account all attachments and rigging materials that will be used during the lift The weight of the rigging materials and attachments should be deducted from the load capacity Warm up the machine to normal working temperatures Position the machine on firm level ground Properly set outriggers and blade whe...

Page 233: ...the maximum values in the loading table page 373 are taken Do not make fast slewing movements with a suspended load Bear the centrifugal force in mind S Sl li in ng gi in ng g lo on ng g lo oa ad ds s Boards planks reinforcing irons or similar should have the sling arranged so that they cannot fall out When lifting girders a pair of girder scissors should preferably be used Place for example cut u...

Page 234: ... must be clean and in a serviceable condition Before lifting check that the lifting device is correctly secured WA AR RN NI IN NG G Risk of fatal accidents A suspended load could drop if the hydraulic system fails and cause fatal accidents and serious injury or death Ne ev ver r lea ave th he e mac chi in ne wi it th h a sus spe en nded load d Li if ft ti in ng g de ev vic ce on n con nn ne ec cti...

Page 235: ...void jerks lift slowly Never leave the machine with a suspended bucket or load The undercarriage should be aligned with the superstructure in order to achieve best stability N NOT TE E The pivot axle locking must be engaged see page 80 O Ov ver rl lo oa ad d war rn ni in ng g NO OT TI IC CE E T Th he e ov ver rlo oad d wa arni ing do oe es s not t gi iv ve th he actu ua al mac chi in ne lim mit t ...

Page 236: ...ion about trailer towing contains rules that must be followed in order to operate the machine safely with a trailer However these rules are to be followed in conjunction with laws or other national regulations applicable in the area where the machine is operated CA AU UT TI IO ON N Risk of crushing An open jaw of a trailer hitch could close unexpectedly and crush your fingers Fo or al ll l wo ork ...

Page 237: ...and secure it on the back side with the bolt 3 and the safety clip 2 from the plug 4 Stand on the right side of the blade hoist right side means when facing the front side of the blade Connect the mechanical fixation 5 behind the blade on the lower end of the blade hoist and secure it with the bolt 6 5 Install the safety clip 7 for the bolt 6 on the inner side of the blade hoist by reaching with y...

Page 238: ...an ni ic cal l fi ix xat ti io on n be efo ore lo ow we er ring g or r li if ft ti in ng th he e bl la ad de 8 Tension the mechanical fixation without play by screwing it A in direction B and lock it with the lock nut C 9 If the trailer hitch is not needed unlock and remove it and reinstall the plug 1 again Also the mechanical fixation 5 must be removed in order to be able to use the blade for nor...

Page 239: ... lever cannot be moved more than 4 mm 0 16 in to the left b Fo or r 50 mm dr raw wb bar ey ye tr railer hi it tc ch Hold the trailer hitch coupling on the handle 4 on top with one hand and choose the required height for the coupling With the other hand pull the small hand lever 5 on one side of the hitch up to the outside and then down to move the locking bolt 6 on one side of the hitch outside Do...

Page 240: ...inside M Ma ai in nt te en na an nc ce For information about greasing of the trailer hitch see page 283 More information about the wear checking and maintenance of the trailer hitch can be found in the Service manual 2 23 38 8 Op pe er ra at ti in ng g te ec chn ni iq qu ue es s Eq qu ui ip pm me en nt t to ow wi in ng g ...

Page 241: ... signal man when hitching or unhitching a trailer During hitching or unhitching nobody is allowed to stand between the excavator and the trailer Only carry out hitching or unhitching operations on firm level ground Make sure the trailer hitch is installed correctly and not damaged Check for visually damages on the trailer and the machines towing device Never reach into the opened coupling with you...

Page 242: ...e visible outside of the control sleeve anymore If it is not completely in the trailer is not correctly attached In this case drive approx 1 m 3 ft 3 4 in forwards and then backwards and check the control pin again 8 Connect the electric 7 pin connector for trailer lightning to the machine Make sure the connector is plugged in properly and check the functionality of the trailer lights and directio...

Page 243: ... position 3 Secure the trailer against rolling away or extend support feet 4 Remove the electric connector for the trailer lightning from the machine 5 Remove the hydraulic connector of the trailer from the machine 6 Open the coupling 7 Move the excavator forwards NO OT TI IC CE E R Risk of f mac chi in ne dam mag ge e Th he e machine e ha as s a diff fe eren nt t be ehavio or wi it th h a tr rai ...

Page 244: ...d 50 0 mm dr rawb ba ar eye D Value 60 kN 13489 lbf 60 kN 13489 lbf Max vertical hitch load 1000 kg 2205 lb 500 kg 1102 lb Max trailer mass without brakes on trailer 3000 kg 6614 lb 3000 kg 6614 lb Max trailer mass with brakes on trailer 8000 kg 17637 lb 8000 kg 17637 lb Height hitch blade 500 830 mm 19 69 32 68 in 500 750 mm 19 69 29 53 in Height hitch outrigger 400 895 mm 15 75 35 24 in 400 895 ...

Page 245: ...in small horizontal circles LO OW WE ER R LO OA AD D VE ERT TI IC CA ALL LY Y With either arm extended downward forefinger pointing down move hand in small horizontal circles MOV VE E LOA AD IN N HO OR RI IZ ZO ON NT TA ALLY With either arm extended hand raised and open toward direction of movement move hand in direction of required movement V1065924 V1065925 V1065926 MOV VE LO OA AD OU UT T HO OR...

Page 246: ...of turn Move other fist in vertical circle indicating direction of track or wheel rotation C COU UN NT TE ER R ROT TA AT TE E Place hand on head indicating side or reverse track or wheel rotation Move other hand in vertical circle indicating forward rotation of other track or wheel V1065939 V1065940 V1065935 TR RA AVEL Raise forearm with closed fist indicating inside of turn Move other fist in ver...

Page 247: ...izontally in front of body close fingers and point thumb in direction of required movement EXTE END TE ELE ES SC COP PI IC C DIP PPE ER ARM With either arm outstretched horizontally in front of body close fingers and point thumb in direction of required movement Op pe er ra at ti in ng g te ec chn ni iq qu ue es s Si ig gn na al ll li in ng g di ia ag gr ra am m 24 45 5 ...

Page 248: ...void personal injuries Further safety rules and warnings texts are given within the respective sections WA AR RN NI IN NG G Risk of burns Hot machine parts could cause burns All lo ow hot t machi in ne parts s to o coo ol be ef fo ore pe er rfo orming ad dju us stm ments s or ser rvice We ea ar pe erson na al l pr rot te ec cti iv ve eq qu ui ipmen nt 24 46 6 Sa af fe et ty y wh he en n ser rv vic...

Page 249: ...ve the ignition key 4 During on going service work fasten a warning sign on the steering wheel with information that service is in progress 5 Release the pressure from the hydraulic system see page Hydraulic system releasing pressure N NO OT TE E After pressure release move the control lockout lever down and turn off the electrical power with the battery disconnect switch 6 Block the wheels with s...

Page 250: ...Service position 2 B Service position 3 C Service position 4 F 2 24 48 8 Sa af fe et ty y wh he en n ser rv vic cin ng g Se er rv vic ce po os sit ti io on n ...

Page 251: ...ust first be secured Engage the control lever lockout and apply the parking brake if the machine is equipped with one Turn off the engine before opening the rear door and engine cover When the engine is stopped there is a remaining accumulated pressure in the pressurized systems If a system is opened without having first released the pressure liquid under high pressure will jet out When checking f...

Page 252: ...ed by the manufacturer Machines which are used within a polluted or in another way insanitary area should be equipped for this kind of work Special safety regulations apply when servicing such a machine When installing two way radio mobile telephone or similar equipment the installation should be carried out in accordance with the manufacturer s instructions in order to eliminate interference with...

Page 253: ... suitable vessels and steps taken to avoid spillage Used filters must be drained of all liquid before they are passed on as waste Used filters from machines which work in environments with asbestos or other dangerous dust must be placed in the bag supplied with the new filter Batteries contain substances dangerous to the environment and health Used batteries must therefore be handled as waste dang...

Page 254: ...ibution box which is located inside the cab behind the operator seat NO OT TI IC CE E R Ri is sk of f fi ir re An in nap pp pr ropria at te e fu us se could res sul lt t in n dam mage or fi ir re on th he e cir rcui it bo oar rd Ne ev ver r ins sta al ll l a fu us se with h a hig ghe er r am mpe er rag ge e th ha an n wh ha at t is sta at te ed on n th he e dec cal l Relays and fuses are easily ac...

Page 255: ...system including the pressure limiting valves is set to the correct values from factory For any work on the hydraulic system and on pressure limiting valves the values and tolerances from the Volvo service manual must be applied otherwise the guarantee from the manufacturer will be void Only a qualified service technician is allowed to work on the hydraulic system Sa af fe et ty y wh he en n ser r...

Page 256: ... t is s al lread dy y in n th he e syste em Th he hydrau ulic syste em m may y be e damag ged if f di if ff fe er ren nt t br ran nds of hy ydrauli ic oi il l ar re mix xed d Hy ydraul li ic bi io o oil 1 When changing from a mineral oil to a bio oil the oil must be drained as much as possible and it is required to flush the hydraulic system 2 For the drain points and changing method please contac...

Page 257: ...otboards handrails and your footwear especially clean the windows rear view mirrors and lights Clean your boots and wipe your hands before getting on the machine Do not use hand grip A of the cab door as a support when entering leaving and climbing the machine It is not strong enough to be used as a support it should only be used for closing the door Do not hold the steering wheel inside the cab w...

Page 258: ...bing fixture B next to the handhold at the rear side of the standard cabin or on the rear side of the tower for the elevating cab depending on cab option NOT TE E Any repair work on the external climbing fixture B is forbidden If damaged it must be immediately replaced B V1153820 B external climbing fixture on standard cab machine V1184627 B B external climbing fixture on hydraulic elevating cab m...

Page 259: ... place clean where the service is to be carried out Oil and water can make the floor slippery and is also dangerous in connection with electrical equipment or electrically powered tools Oily and greasy clothes are a serious fire hazard Check daily that the machine and the equipment for example underbelly plates are free from dust and oil Besides reducing the risk of fire it is also easier to detec...

Page 260: ...he battery disconnect switch 8 Attempt to put out the fire if possible Otherwise move away from the machine and out of the danger zone Ac cti io on ns s af ft te er r fi ir re e Wh he en ha an nd dling g a mac chi in ne e wh hi ic ch ha as s bee en damag ge ed by fi ir re or r bee en expos sed to o int te en ns se he ea at th he e fo oll low wi ing g prot te ec cti iv ve mea asures must be e fo ol...

Page 261: ... ing g or r we el ld din ng g is to o be carrie ed ou ut t ne ea ar r such mat te er rials s th he e fo ol llow wi ing g saf fe et ty y in nstr ructi io on ns mus st be e fo ol ll lo ow we ed Protect the material from heat Use protective gloves protective goggles and respiratory protective equipment He ea at te ed d fl lu uo or ro o c car rb bo on n ru ub bb be er r WA AR RN NI IN NG G Risk of ser...

Page 262: ...ning dangerous dust can lead to serious health problems We ea ar r pe er rson nal l pr rote ec cti iv ve equ uipmen nt t wh hen workin ng g in n dus sty y en nvir ron nm men nt ts s Crystalline silica is a basis component of sand and granite Therefore many activities at construction and mining sites such as trenching sawing and boring produce crystalline silica dust This dust can cause silicosis T...

Page 263: ...es Make sure that metal objects for example tools rings and watch straps do not come into contact with the battery pole studs Make sure the protections are always installed over the battery pole studs Do not tilt a battery in any direction Battery electrolyte may leak out Do not connect a discharged battery in series with a fully charged battery Risk for explosion When removing a battery disconnec...

Page 264: ...nt gloves e g neoprene or butyl rubber and appropriate personal protective equipment to protect bare skin when there is a risk of contact with refrigerant Ac cti io on ns s in n cas se of f ex xpo os sur re e Eye con nta ac ct Rinse with warm water and apply a light bandage Seek medical attention immediately Li im mite ed skin n cont ta act Rinse with warm water and apply a light bandage Seek medi...

Page 265: ...ks Tighten all connections Contact an authorized dealer for information about the recommended tightening torque The parts must be replaced if any of the following conditions are found Contact a qualified service technician End fittings are damaged or leaking Outer coverings are chafed or cut Strengthening wires are exposed Outer coverings are ballooning Flexible part of the hoses are kinked End fi...

Page 266: ... which the operator can carry out If certain operations require trained workshop personnel and special equipment this will be indicated Se er rv vic ce hi istor ry y After each completed service by a qualified service technician the service history should be filled in see page 406 Service history is a valuable document which is referred to when selling the machine A Ar rr ri iv val l In ns spe ec ...

Page 267: ...ccording to the service program established by Volvo The service program is continuous with fixed intervals The operating time between intervals only applies if the machine is used in normal environment and operating conditions Ask your Volvo dealer what is right for your specific machine There is one inspection in addition to the continuous program a first inspection at the first 500 hours This i...

Page 268: ...esel particulate filter 9 Center passage 3 SCR muffler selective catalytic reduction catalyst 10 AdBlue DEF tank 4 Engine 11 Fuel tank 5 Main control valve 12 Hydraulic oil tank 6 Expansion tank 13 Swing unit 7 Pivot axle locking cylinder 14 Primary fuel filter with water trap 26 66 6 Ma ai in nt te en na an nc ce ...

Page 269: ...19 16 17 20 V1150321 15 Batteries 18 Radiator and charge air cleaner 16 Cab prefilter 19 Windscreen washer water tank 17 Engine air cleaner 20 Battery disconnect switch M Ma ai in nt te en na an nc ce 26 67 7 ...

Page 270: ...ip pe e of ff f greas se nipp pl le es an nd d grease gun n be efo or re grea as sin ng so th ha at t di ir rt an nd san nd ar re not t in nt tr rodu uc ced d th hr roug gh h th he e gr rea as se ni ipp pl les s in nt to o th he e be earin ng gs Sy ymb bo ol l key y The following standard symbols are used in the lubrication and maintenance chart En ngine Lu ubr ricati io on n Sw wing g drive un ni...

Page 271: ...6 must be filled in after each service from 500 hours D DA AIL LY Y ever ry 10 hou urs It te em Pag ge e Test running and checking 1 273 Leakage checking 1 274 Lubrication 10 hours only during the first 100 hours 274 274 Ma ai in nt te en na an nc ce Lu ub br ri ic cat ti io on n an nd d ser rv vic ce cha ar rt t 26 69 9 ...

Page 272: ...he first 500 hours and then every 2000 hours Workshop job Hydraulic oil servo filter replacing Replace once after the first 500 hours and then every 2000 hours Workshop job In line hydraulic oil filter cleaning Clean once after the first 500 hours and then every 2000 hours Workshop job Hydraulic oil drain filter replacing Replace once after the first 500 hours and then every 2000 hours Workshop jo...

Page 273: ...nd hubs oil changing Changing intervals vary according to load class see page 327 25 Workshop job Travel gearbox oil changing Replace at least once a year 25 Workshop job Cab prefilter replacing 26 Workshop job Cab main filter replacing Optional cab main HEPA filter must be replaced every 500 hours see information on decal on air conditioning unit 26 Workshop job Fuel tank breather filter replacin...

Page 274: ...hop job AdBlue DEF tank breather filter replacing At least every 4th year Workshop job Coolant changing At least every 4th year 30 Workshop job Ever ry 80 00 00 0 ho ou urs af ft te er r car rryin ng out dai il ly y 50 0 10 00 0 25 50 50 00 0 100 00 200 00 an nd d 40 00 00 ho ou ur rs ser rvic ces s It te em m Pa ag ge e Diesel particulate filter checking and cleaning Workshop job Mai in nt te en ...

Page 275: ... if required 4 Check that the cameras are clean and intact 5 Check the access routes for maintenance 6 Check the washer fluid level and add washer fluid as needed see page 274 7 Clean the dust around the engine battery and cooler 8 Check that there is sufficient fuel in the tank T Tes st r ru un n 1 Check the position of the mirrors and the function of the cameras 2 Check that the seat belt can be...

Page 276: ...r NO OT TE E When the temperature is below freezing point anti freeze should be added to the washer fluid Follow the manufacturer s recommendations as regards the ambient temperature Ex xcav vat to or r un ni it t gr re ea as sing g Gr reas se th he ex xcav vat to or un ni it t every 10 hou ur rs or r da ai ily y onl ly y dur rin ng g fi ir rst 10 00 ho ou urs Af ft te er fi ir rst 10 00 hour rs o...

Page 277: ...ad 2 Select Mode W or C on the mode selector and turn off the engine apply the parking brake and remove the ignition key 3 Remove the tyre inflation valve cap 4 Check the pressure in each tyre with an appropriate tyre gauge for the correct tyre pressure see page 344 5 After checking the tyre pressure place the valve caps to prevent dirt moisture and foreign material from damaging the valve core 6 ...

Page 278: ...th hydraulic oil NOT TE E Only hydraulic oil that is approved by Volvo may be used Use the same hydraulic oil that is already in the system The hydraulic system may be damaged if different brands of hydraulic oil are mixed NO OT TI IC CE E A Any y wo or rk on n th he hy ydr rau ulic c syste em requi ires s gr rea at t deman nd ds on cle ea an nline es ss Ev ven n ver ry smal ll l par rti ic cle es...

Page 279: ...biliser blade and stabiliser legs 2 Release the hydraulic system pressure see 221 3 Turn the ignition switch to OFF position and apply the parking brake 4 Turn off the electrical power with the battery disconnection switch in the cab and wait until the LED light switches off 5 Remove the cover plate 1 under the hydraulic tank 6 Put the end of the drain hose 2 into a container The drain hose 2 is p...

Page 280: ...hammer the excavator unit should be greased every 10 hours or daily Im mmed diat te el ly y af ft te er r wo or rking in wa at te er r grea as se th he e submerged d par rts s suc ch as s th he e bu uc cket t pi in ns to o rem move th he e ol ld d grease reg ga ar rdl less of th he e gr rea as sin ng g in nt te er rval 1 Place the machine in service position B see 247 2 Wipe off grease nipples and...

Page 281: ... to boom attachment left hand side 1 10 Bearing grabber pin 2 only grab arm Bo oo om m 1 2 3 4 5 6 8 7 8 1 5 A B 2 pcs boom A and mono boom B Gr rea ase po oint ts s 2 pc cs boo om m A and d mon no bo oo om m B 1 Bearing boom cylinder piston rod left hand side 2 Bearing between 2 pcs boom 1st and 2nd part left hand outside 3 Bearing between 2 pcs boom 1st and 2nd part left hand inside 4 Bearing ti...

Page 282: ...6 1 Offset boom Grease nipple 1 supplies the offset boom and cylinder bearings via a distributor 28 80 0 Ma ai in nt te en na an nc ce Ma ai in nt te en na an nc ce ser rv vic ce ev ver ry y 50 0 ho ou ur rs s ...

Page 283: ...fi ir rst 100 hou ur rs NOT TE E Under severe operating conditions where mud water and abrasive material may enter the bearings or after using the hydraulic hammer grease every 10 hours or daily Each remote grease nipple provides grease to the designated area as shown in the table 1 Place the machine in service position B see 247 2 Wipe off grease nipples and grease gun to avoid that dirt and sand...

Page 284: ... 2 piece boom 2 Bearing boom foot left 3 Bearing boom foot right 4 Bearing left boom cylinder foot 5 Bearing right boom cylinder foot 6 Swing ring rear side 7 Swing ring front side 8 Swing gear pinion 28 82 2 Ma ai in nt te en na an nc ce Ma ai in nt te en na an nc ce ser rv vic ce ev ver ry y 50 0 ho ou ur rs s ...

Page 285: ... ne e main nte en na anc ce NOT TE E Under severe operating conditions where mud water and abrasive material may enter the bearings grease every 10 hours or daily Im mmedi ia ate ely af ft te er workin ng g un nde er wa at te er r gr rea as se th he sub bmerged pa ar rts s such as sta ab biliser r bl la ad de pins s to o remov ve th he e ol ld d greas se rega ar rdl le es ss of f th he e greasin n...

Page 286: ...s sing g Tra ai il le er r to ow wi in ng g sol lu ut ti io on n T TTS S gr re ea as sin ng g If a removable trailer towing hitch is installed on your machine as an option either on the blade or on the outrigger it must be greased regularly Gr reas se th he e tr railer hi it tc ch as s shown bel lo ow w ev ver ry 100 0 ho ou ur rs if f req qu ui ir red d At ev ver ry 500 ho ou ur rs in ns specti i...

Page 287: ...m Grease the coupling pin 1 with the support ring 2 the bearing 3 and the lower funnel bearing 4 in regular intervals according to the condition of use and after each cleaning with pressure washers V1127298 1 2 1 3 Greasing of trailer hitch for drawbar eye 40 mm 1 Lubrication nipple 2 Drawbar eye seat 3 Cam plate Greasing of trailer hitch for drawbar eye 50 mm trailer hitch for blade 1 Coupling pi...

Page 288: ...lts 5 on both sides after each cleaning with a pressure washer Ma ai in nt te en na an nc ce The regularly inspection for wear on the towing hitch must be performed by a qualified service technician every 500 hours Greasing of trailer hitch bolt or plug for blade 1 Plug bolt 2 Trailer hitch bolt Greasing of trailer hitch fixation bolt on blade 1 Fixation bolt V1180852 5 Greasing of trailer hitch f...

Page 289: ... is runn nin ng g WA AR RN NI IN NG G Risk of burns Hot liquids and machine parts can cause burns Allow w th he e mac chi in ne to o cool be ef fo or re beginni in ng g an ny y ser rvic ce Le ev vel l che ec ckin ng g 1 Place the machine on level ground in service position B see page 247 2 Climb the machine by using the handholds and the indicated footsteps 3 Open the engine hood 4 Pull out oil di...

Page 290: ...l ll ly y safe e wa ay y see e pa age e 249 9 Co oo ol lan nt t lev vel l che ec cking g Ch he ec ck th he e coo olan nt le ev vel l ev ver ry 25 50 0 ho ou ur rs The cooling system is filled with Volvo Coolant VCS which fulfils the highest requirements regarding freeze corrosion and cavitation protection To avoid damage to the engine it is very important that Volvo Coolant VCS is used when toppin...

Page 291: ... then cooled down Check the coolant level in the expansion tank The level should be between the MAX and MIN marks on the expansion tank 5 N NOTE Coolant shall always be filled through the filling cap 1 Do not fill the coolant through the pressure cap 3 in the expansion chamber In case of low level remove the filling cap 1 and top up until the level is in the middle between MIN and MAX For coolant ...

Page 292: ...n the machine and remove the cover 4 under the radiator 5 Open the left side door and remove the drain valve cap 5 6 Attach the drain hose provided as a service tool with the machine 7 Drain only the overfilled amount of coolant into a suitable container 8 Remove the drain hose and reinstall the plug 5 and the cover 4 9 Check the coolant level again after the draining procedure T Ta ake care of f ...

Page 293: ...rication of the swing drive unit and cause costly damage To oo o much oi il l may lead to oil foaming and cause the swing drive unit to overheat 1 Place the machine in service position B see page 247 2 Pull out oil dipstick A and wipe it with a clean cloth 3 Insert oil dipstick and pull it out again 4 Check the oil level If the level is in the center of D the level is correct 5 If the level is low...

Page 294: ...urface activate the travel brake and block the wheels 2 Clean the oil level plugs before removing them 3 Remove the plugs A and B and check that the oil level is up to the lower edge of the hole fill up if necessary 4 Reinstall the oil level plugs with tightening torque 50 Nm 37 lbf ft Ax xle e hu ub bs s che ec ckin ng g oi il l le ev vel l Ch he ec ck th he e oil le evel on n ax xle e hu ub bs e...

Page 295: ... level is up to the lower edge of the hole fill up if necessary 7 Reinstall the oil level plugs with tightening torque 50 Nm 37 lbf ft Ma ai in nt te en na an nc ce Ma ai in nt te en na an nc ce ser rv vic ce ev ver ry y 25 50 0 ho ou ur rs s 29 93 3 ...

Page 296: ...en handli ing g and d cle ea an ning g th he eng gi in ne e com mpar rtm ment t coo ol le er rs an nd d air r fi ilte ers 1 Open the locking device 1 and pull out the hatch 2 2 Pull out the carrier 3 and remove the cab prefilter 4 3 Clean the cab prefilter 4 with compressed air NO OT TE E When using compressed air keep the nozzle at a distance from the fins to prevent damage Clean the filter with ...

Page 297: ...h battery acid causes serious chemical burns Al lw wa ay ys we ea ar r per rson na al l prot te ecti iv ve glov ves s go ogg gl le es s an nd cloth hi ing wh he en han nd dling g ba at tt te erie es s 1 Place the machine in service position C see page 247 2 Turn the ignition switch to OFF position 3 Turn off the electrical power with the battery disconnection switch in the cab and wait until the L...

Page 298: ... terminals are clean well tightened and coated with acid free dielectric grease 8 Reinstall the caps and close the battery cover 9 Operate the machine after topping up so that the water is mixed up with the battery electrolyte This is even more important in cold weather 29 96 6 Ma ai in nt te en na an nc ce Ma ai in nt te en na an nc ce ser rv vic ce ev ver ry y 50 00 0 ho ou ur rs s ...

Page 299: ...ers 1 Turn the ignition switch to OFF position 2 Turn off the electrical power with the battery disconnection switch in the cab and wait until the LED light switches off 3 Move the operator s seat to the front position and fold the backrest forward 4 Remove the rubber mat A 5 Unscrew the bolts B and remove the plastic case C 6 Remove the bolts D from the electrical distribution box 7 Put aside the...

Page 300: ...al power with the battery disconnection switch 3 Climb the machine by using the handholds and the indicated footsteps and open the engine hood 4 Climb down the machine and open the left side door 5 Pull out the radiator net and clean it 6 Swing out the condenser A by pulling the straps to the left side 7 Clean the intercooler B hydraulic oil cooler C and radiator D outside with compressed air flow...

Page 301: ...ine and move the control lockout lever down 4 Adjust the set screw A so that the front pin lock will open for approximately 75 of the bucket pin diameter B 5 Tighten the lock nut C and the tightening nut D with a tightening torque of 240 Nm 177 lbf ft 6 Check the functionality of the universal attachment quick coupler in a safe environment after the adjustment of the set screw C V1152009 A D B A A...

Page 302: ...ations are not permitted in particular lubricants with Cu MoS2 additives or GL5 oil Ov ver rl loa ad d war rn ni ing g Ch he ec ck th he e ov verlo oad d wa arnin ng syste em m ev ver ry 10 000 hou ur rs ac ccordi in ng to o be el lo ow pr roc cedu ur re 1 Place the machine on level and firm ground 2 Select W mode on the mode selector and engage the overload warning with the button on the keypad s...

Page 303: ...to o th he e en ng gin ne e Th he e coo ol li in ng syste em cap pacity y wh he en n changi in ng g see pa age e Lu ub br ric can nt ts s an nd d fl lu ui id ds s cap pa ac cit ti ie es s li it tres s If concentrated Volvo Coolant VCS and clean water see page 331 is used the table below shows the approximate amount of concentrated coolant needed for freezing protection The content of Volvo Coolant...

Page 304: ...electronic overfilling protection The inlet side of the pump is connected to a suction pipe via a hose At the outer end of the pipe there is an inlet strainer 1 Fold down the cover under the fuel tank 2 Put the hose in the fuel barrel 3 Start the pump by pressing green button B When the tank is full the pump stops automatically 4 If you would like to interrupt the filling press red button C 5 When...

Page 305: ...o contact with the eyes rinse thoroughly for several minutes Consult a doctor if necessary If inhaled breathe fresh air and contact a doctor if necessary If swallowed drink water and contact a doctor Do not allow AdBlue DEF to come into contact with other chemicals AdBlue DEF is not combustible If AdBlue DEF is exposed to high temperatures it will decompose into ammonia and carbon dioxide AdBlue D...

Page 306: ...i ini ing g Dr rain th he e wa at te er r sepa arat to or r if th he contr rol l la am mp lig ghts s up p on n th he e IC C In nstr rumen nt t Cl lu uste er r or r when req qu uir red d NO OT TE E Read the safety when servicing instructions before starting any work 1 Place the machine on level ground and turn the ignition switch to OFF position and apply the parking brake 2 Check for water and the...

Page 307: ...p knob NOT TE E Air bleeding may not be performed using the starter motor Fu ue el l ta an nk k dr ra ai ini ing g Drai in n th he e fu ue el ta ank k wh he en req qu ui ired d If f th he mac chi in ne is run wi ith h fu uel l of f lo ow qu ua ali it ty y it t mig gh ht t be e ne ec ces ssary to o dr rai in more oft te en n NOT TE E Read the safety when servicing instructions before starting any w...

Page 308: ...c acid which could cause severe chemical burns If f elec ctr rol ly yte e spilled d on your r ba ar re skin n rem mov ve it im mmed dia at te el ly y an nd wa ash th he e af ff fe ec cte ed d ar rea a wi ith h soa ap p and pl len nt ty y of wa at te er If f it t gets s in nto o you ur r ey yes or any y ot th he er sens siti iv ve bo od dy pa art rinse wit th h plenty y of wat te er r an nd d seek ...

Page 309: ...bb be er r par rts s or r any pl la as sti ics NO OT TI IC CE E A A fi ir re ex xti in ng gui is she er r should be e ea as sil ly y ac cces ssibl le e du urin ng g al ll l weld di ing wor rk NOT TE E The weld will be related with inferior quality and strength never weld directly on a painted surface Hea ad dl lig gh ht ts s ad dj ju us sting g The adjustment of the headlamps is very important to ...

Page 310: ...6 60E E EW1 18 80 0E E A 1120 mm 3 ft 8 1 in 1150 mm 3 ft 9 3 in B 5000 mm 16 ft 4 9 in 5000 mm 16 ft 4 9 in C 1970 mm 6 ft 5 6 in 2040 mm 6 ft 8 3 in 30 08 8 Ma ai in nt te en na an nc ce Ma ai in nt te en na an nc ce ser rv vic ce wh he en n re eq qu ui ir re ed d ...

Page 311: ...ort distance may cause damage N NOT TE E Protect electrical leads in an appropriate way and be careful not to damage the cab prefilter when cleaning the machine NO OT TI IC CE E D Do not t spr ray y wi ith h high h pr ressure in nt to o th he seali ing g of f th he sle ew win ng g rin ng th he wa at te er r may y pe ene et tr rat te e an nd d aff fe ect th he e cha ar rac cte eris sti ics of th he...

Page 312: ...ironment or environment exposed to fire hazards for example wood processing woodchip handling or grain handling and animal feed industries require daily attention and cleaning of the engine compartment and surrounding areas When operating in other environments inspection and cleaning is required at least once a week Loose material is removed with for example compressed air Cleaning should preferab...

Page 313: ...ne er r pr ri ima ar ry y filte er r clea an ni ing g an nd d re ep pl lac cing g Cl le ean or r repl lac ce th he e pr rimar ry fi ilte er if th he e check screen n fo or en ngi ine ai ir r fi ilte er clo og pop ps s up p on n th he IC C In ns str rum ment Cl lus ste er or at least on nc ce a yea ar Cl le ea an th he e cov ver r at th he sam me ti ime The filter may be cleaned at the most five ti...

Page 314: ...sk th ha at du us st ent te ers th he e air r int ta ak ke syste em m A we et t clo ot th h may be e us sed d bu ut t be e caref fu ul no ot to o pu us sh any y dust in nt to o th he ai ir r in nt ta ak ke syste em 1 Unfasten the latches and remove the cover 2 Press with both thumbs on primary filter A at the same time as you pull it out This is to prevent secondary filter B from coming out togeth...

Page 315: ... te er rs th he ai ir r in nta ake syste em m A we et t clo oth h may y be used bu ut t be e caref fu ul l no ot t to o pu ush an ny y dust in nt to o th he e ai ir in nt ta ak ke syste em m Rep pl la ac ce th he e secon nda ary fi ilte er r ev ver ry th hi ird ti im me th he pr rimary fi il lte er r is s repl la ac ced d or r at t le ea as st ev ver ry sec cond d year If f th he wa ar rni ing g l...

Page 316: ...tool may be ordered to facilitate replacement of teeth The tool are available in different sizes depending on tooth size Contact your dealer for further information Re em mo ov vin ng g to oo ot th h 1 Lower the bucket to the ground and angle it slightly upward 2 Clean the opening for tooth adapter locking device 3 Knock out the locking device with a hammer and the tool or other suitable drift 4 R...

Page 317: ...ward 5 Knock down the locking device with a hammer until it is level with the upper part of the tooth adapter 6 Knock down the locking device further with a hammer and the tool or other suitable drift until the upper part is just below the scored line in the hole NOT TE E Replace the steel pin in connection with replacement of tooth adapter V1086252 The locking device should be just below the scor...

Page 318: ... releasing pressure See page 221 for instruction how to release the pressure from the hydraulic system 3 31 16 6 Ma ai in nt te en na an nc ce Ma ai in nt te en na an nc ce ser rv vic ce wh he en n re eq qu ui ir re ed d ...

Page 319: ...op position 2 Turn the ignition switch to running position 3 Move the control lockout lever up to unlock the system see page 110 4 Put the operating lever to boom down position to lower the attachment by its own weight 5 Move the control lockout lever down to lock the system securely A Ac ccum mu ul lat tor r pr re es ssur re e re el le ea as sing g 1 Lower the attachment completely to the ground ...

Page 320: ...eeder B1 Feeder mono boom B2 Feeder 2 pcs boom D Feeder dipper arm E Feeder bucket link 1 Lubrication unit with pump control unit 2 Main line 3 Cable connection 4 Cycle switch SE9901 5 Secondary line 6 Secondary feeder for boom and slew ring 7 Secondary feeder for dipper arm 8 Secondary feeder for bucket link option if not installed the grease feed line from master feeder is connected to lubricati...

Page 321: ...L 6L 6R 11R 3R 3L 2R 2L 11L 11C 10L 9L 14 15 5 A D E B2 7 8 16 1R 1C V1156498 2 piece boom NO OT TE E Remember to grease the greasing points which are not included in the automatic lubrication system by hand Ma ai in nt te en na an nc ce Ma ai in nt te en na an nc ce ser rv vic ce wh he en n re eq qu ui ir re ed d 31 19 9 ...

Page 322: ...Pump element 5 Port for hand pump 6 Pressure limiting valve 7 Connection to main line 8 Grease filling port 9 Grease filling or pump unit installing port 10 Pump control unit 11 Grease filling port 12 Grease filling port coupler 13 Grease filling cylinder 14 Location of groove 1 place 32 20 0 Ma ai in nt te en na an nc ce Ma ai in nt te en na an nc ce ser rv vic ce wh he en n re eq qu ui ir re ed ...

Page 323: ...Ad dd di it ti io on na al l lu ub br ri ic cat ti io on n If greasing is necessary more often due to hard or wet conditions additional lubrication can be carried out without any change of the control unit set value The engine must be turned off then turn the ignition switch to position ignition ON and press the button for additional lubrication 11 Cy ycle e swi it tc ch The cycle switch checks sy...

Page 324: ...Inspect regularly if the grease level is below the minimum mark the entire system has to be bled Automatic checking The automatic lubrication system is provided with automatic checking of the filling level A message appears in the IC Instrument Cluster and the pump control unit NO OT TE E Fill only with clean lubricant through the filling port using a suitable tool Never open the pump lid to fill ...

Page 325: ...spection Daily If needed refill the reservoir up to the maximum level Is there grease coming out of the pressure limiting valve Daily Check the system In case of blocked feeder or lubrication points contact a qualified service technician Is there any error message related to the lubrication system on IC Instrument Cluster ongoing Check the error codes from the pump control unit Are lines and conne...

Page 326: ...ples shown below V1107838 Main distributor 3 grease nipples NOT TE E Read the safety when servicing instructions before starting any work V1104549 Left hand side dipper arm 2 grease nipples V1104550 Right hand side dipper arm 1 grease nipple only if bucket link distributor is installed 32 24 4 Ma ai in nt te en na an nc ce Ma ai in nt te en na an nc ce ser rv vic ce wh he en n re eq qu ui ir re ed...

Page 327: ...s at the same as the hoses When replacing the hoses always replace the O rings gaskets and other related parts at the same time The replacements should be carried out by a qualified service technician In ns spe ec cti ion int te er rval It te em Daily Fuel hydraulic hoses leakage of connections and end fittings Monthly Fuel hydraulic hoses leakage damage of connections and end fittings Yearly Fuel...

Page 328: ...m at room temperature Before parking remove the mud and the dirt from the tyres Demolition work Use fall protection against falling objects Low fuel quality Drain the sediments in fuel tank at shorter service intervals Change the engine oil and engine oil filter at shorter service intervals Dusty atmosphere Check regularly that hose and pipe connections from the air cleaner to the engine induction...

Page 329: ...particle filter DPF Oi il l gr rad de e Re ec com mmen nd de ed d vis scosit ty y at varyin ng g ambi ie en nt t te emper ratu ur res Eng gi in ne e Volvo Engine Oil VDS 4 V1177225 SAE 10W 30 SAE 15W 40 SAE 10W 40 SAE 5W 30 SAE 5W 40 C F 30 20 10 0 10 20 30 40 22 4 14 32 50 68 86 104 VDS 4 or VDS 4 5 approved oils only Other oils can be used up to 30 C 86 F Volvo Engine Oil VDS 4 5 Other approved ...

Page 330: ...nd changing The mineral oil content in bio oil should not exceed 2 If changing from mineral oil to bio oil contact a workshop authorised by Volvo CE Changing intervals vary according to type of oil Hy ydr rau ul li ic c oi il l Ch ha ang ge in nt te er rval Volvo Hydraulic Oil Volvo 98620 Ultra every 5000 hour Volvo Hydraulic Oil Volvo 98608 Super every 4000 hour Volvo Hydraulic Oil Volvo 98610 Bi...

Page 331: ...n driving time to operating hours 25 1500 h 2000 h 2 Proportion driving time to operating hours 25 1000 h 1500 h 3 Machine operated in outdoor temperatures 40 C 104 F 500 h 1000 h Tra av vel l ge ea ar rb bo ox x Oi il l gr rad de e Re ec com mmen nd de ed d vis scosit ty y at varyin ng g ambi ie en nt t te emper ratu ur res Tr rav vel l ge ear rbox x Volvo Engine Oil VDS 3 15W 40 Volvo Engine Oil...

Page 332: ...nde ed d viscos sit ty y at t var ryin ng g am mbient t te em mperat tu ur res Gr rea as se Pin ns s an nd d bu us shi in ngs s Swi in ng g rin ng g gear Aut to om mat ti ic c lu ubric cati ion syste em m Volvo Lithium Grease EP2 a V1180947 NLGI EP2 grease Or corresponding grease on lithium base with EP additives and consistency NLGI class 2 a EP extreme pressure 33 30 0 Sp pe ec cif fi ic cat ti ...

Page 333: ...th water that contains a high degree of lime hard water salt or metals Th he e cle ea an n wate er fo or r th he e coo ol li in ng syste em m must al ls so mee et th he e fo ol ll lo owi in ng requirem men nt ts s De es scrip pt ti ion Va al lu ue e Total number of solid particles 340 ppm Total hardness 9 5 dH Chloride 40 ppm Sulphate 100 ppm pH value 5 5 9 Silica 20 mg SiO2 litre Iron 0 10 mg Fe ...

Page 334: ...ystem if the machine is laid up for longer periods Wa ar rr ra an nt ty y con nd di it ti io on n The warranty does not cover damage caused be an intermix of more than 7 of bio diesel fuel Al lter rn na at tive fu ue el ls Th his sta at te em ment t is onl ly y val li id d fo or r Vol lv vo br ran nd ded en ng gi in nes Hydro treated vegetable oil HVO and fatty acid methyl ester FAME biodiesel are...

Page 335: ... biodiesel blends conform to EN590 or ASTM D975 B6 B7 biodiesel blends conform to EN590 or ASTM D7467 B8 B20 biodiesel blends conform to EN16709 B20 or ASTM D7467 En ngi in ne e em mis ssion n de es sig gn na at ti io on En ng gi in ne e siz ze Accep pt ta able e bl le en nd d EU Stage II US Tier 2 EU Stage IIIA US Tier 3 EU Stage IIIB US Tier 4 interim EU Stage IV US Tier 4 final EU Stage V Below...

Page 336: ...Use engine oil analysis tools frequently to check for fuel dilution and monitor engine oil condition Check the engine oil level daily Always change the engine oil if the oil level rises above the maximum fill level Ef ff fe ec cts s of f bi io od di ie es sel l on n fu ue el l syste em ms s Biodiesel dissolves and loosens some fuel system deposits During the initial conversion to biodiesel loosene...

Page 337: ...8 lower energy density compared to regular diesel fuel Blends equal or lower than B20 have a small impact on engine performance Ef ff fe ec cts s of f bi io od di ie es sel l on n em mi is ssio on ns s com mp pl li ia an nc ce Engines are certified to comply with U S EPA California and EU emissions standards based upon the use of test fuels with specifications established by these regulatory agenc...

Page 338: ...e fluid so that it regains its concentration with maintained quality The machine will work normally during the time that the fluid melts At AdBlue DEF temperatures above 20 C 68 F the fluid starts to degrade Then the fluid gives off ammonia which is aggressive to materials such as rubber At temperatures above 75 80 C 167 176 F ammonia production increases However high temperatures are permitted fo...

Page 339: ... cause irritation of the skin In case of eye contact rinse thoroughly for several minutes If needed contact a doctor for advice In case of inhalation breathe fresh air and contact a doctor if needed If swallowed drink water and contact a doctor Sp pe ec cif fi ic cat ti io on ns s Fu ue el l syste em m 33 37 7 ...

Page 340: ...andard Differential 9 5 l 2 5 US gal 9 5 l 2 5 US gal Hub Planetary gear 2 5 l 0 7 US gal 2 5 l 0 7 US gal Oil quantity total 14 5 l 3 8 US gal 14 5 l 3 8 US gal Front axle wide optional equipment Differential 10 5 l 2 8 US gal 10 5 l 2 8 US gal Hub Planetary gear 2 5 l 0 7 US gal 2 5 l 0 7 US gal Oil quantity total 15 5 l 4 1 US gal 15 5 l 4 1 US gal Rear axle standard Differential 12 5 l 3 3 US ...

Page 341: ...quence 1 5 3 6 2 4 Maximum torque 716 Nm 528 lbf ft at 1400 rpm 23 3 r s EW1 18 80 0E E Designation D6J Type Four stroke diesel engine with direct injection and electronic control water cooled turbo charged with charge air cooler Output 129 kW 175 PS 173 hp Engine speed 1800 rpm 30 r s Idling speed low 800 rpm 13 3 r s Fuel injection system Common rail Number of cylinders 6 vertical in line Number...

Page 342: ... Socket Ou ut tp pu ut t Headlights front H4 24 V 75 70 W Direction indicators front BA15s 24 V 21 W Parking lights front BA9s 24 V 4 W Tail light Brake light Reverse light Direction indicators rear LED Interior lighting BA15s 24 V 10 W Interior lighting spotlight BA15s 24 V 5 W Working lights H3 24 V 70 W Working lights optional equipment LED Licence plate LED Rotating beacon optional equipment L...

Page 343: ...ht RE02 Windscreen wiper relay lower RE03 Relay working lights cab rear RE04 Horn relay RE05 Relay working lights cab front RE06 Diesel heater and air conditioning relay RE07 Spare RE08 Relay working lights boom RE09 Windscreen wiper relay upper RE10 SP Trailer stop light relay RE11 Relay Remote welcome lights RE12 Pilot pressure control relay control lockout RE13 Main relay 2 15 RE14 Main relay 1...

Page 344: ...l heater and air conditioning Remote welcome lights Volvo Co Pilot 20 A FU21 Fuse hydraulic system control lockout lever 10 A FU22 Fuse ECM power 15 A FU23 Fuse working light counterweight 10 A FU24 Fuse ignition key IC Instrument Cluster HMICU 15 A FU25 Fuse CareTrack W ECU 10 A FU26 Fuse windscreen wiper 10 A FU27 Fuse low beam 10 A FU28 Fuse working lights boom 20 A FU29 Fuse connector special ...

Page 345: ...or Electric distribution box 80 A FC03 Fuse auxiliary heater 20 A Fu us se on n th he e eng gin ne e Fu us se De esignat ti io on n Ca apac cit ty y Am mpe er re FU2501 Fuse Preheater induction air 150 A Sp pe ec cif fi ic cat ti io on ns s El le ec ctr ri ic cal l syste em m 34 43 3 ...

Page 346: ... Flotation ATG single mounted 620 40 R22 5 169A8 6 5 bar 94 psi 171A8 7 bar 102 psi Rim 22 5xAG20 00 EW160E not for EW160E HEC and EW180E Nokian Excavator SF TL T445604 single mounted 600 50 22 5 24PR 173A8 6 bar 87 psi Rim 22 5xAG20 00 EW160 180E Trelleborg T 900 twin mounted 10 00 20 16PR 9 bar 131 psi Rim 7 5 20 HD EW160 180E Solideal MAGNUM Full Solid twin mounted 10 00 20 full solid Rim 7 5 2...

Page 347: ...arkt Grader twin mounted 315 80 R22 5 19t 8 5 bar 123 psi 19t 21t 9 5 bar 138 psi Rim 22 5x7 50 EW160E not for EW160E HEC 20km h 12 43 mph and EW180E NOKIAN TRS LS 2 Excavator SF TL single mounted 600 50 22 5 20PR 4 2 bar 65 psi Rim 22 5xAG20 00 EW160 180E Nokian Armor Gard 1 twin mounted 10 00 20 16PR 7 5 bar 109 psi Rim 7 5 20 HD Ty yre e sizes s an nd d pr re es ssur re es s Val li id d fo or r...

Page 348: ... Reinforced Mod de el l Ty yres s Siz ze Ty yre pressure Ri im No ot t av vai il la ab bl le e but can be e us sed d EW160 180E Bridgestone FG twin mounted 10 00 20 14PR 7 bar 102 psi Rim 7 5 20 HD EW160 180E Mitas NB38 twin mounted 11 00 20 16PR 7 25 bar 105 psi Rim 8 0 20 HD EW160 180E Alliance Flotation ATG single mounted 18PR 600 40 22 5 18PR 6 bar 87 psi Rim 22 5xAG20 00 EW160 180E Galaxy Tir...

Page 349: ...W Wheel nuts tightening torque Wheel nuts tightening torque 500 Nm 25 Nm 369 lbf ft 18 45 lbf ft Sp pe ec cif fi ic cat ti io on ns s Wh he ee el ls s 34 47 7 ...

Page 350: ...ibhausgase EL μ greenh ouse gases rados de e fecto i nvernade ro rattuja kasvihuonekaasuja FR Contient des gaz à ef fet de ser re rés HR Sadrž av r ke plino ve HU Fluo rtartalmú ü vegházhatású gázokat ta rtalmaz rati a ef fetto ser ra L r f k L r cef rati b ef fett ta ser ra NL B ev reerde b roeikasgassen PL Z awier rowanegazycieplarniane P rados com e feito de estu fa R rate cu e fect de se r rov...

Page 351: ...cordance with the intended use of the machine and should not alone be used to determine the whole body vibration exposure to the operator using the machine For this purpose the information in ISO CEN Technical Report under development is recommended To ensure that the whole body vibration emission during machine use is kept to a minimum see the guidelines page 193 S So ou un nd d in nf fo or rm ma...

Page 352: ... mp Gear pump Max flow 14 l min 3 7 US gal min 15 l min 4 US gal min Fa an n pu um mp op pt ti io on rev versib ble fa an Axial piston pump Max flow 49 l min 12 9 US gal min 53 l min 14 US gal min Syste em m pr res ssur re Max pressure 34 MPa 340 bar 4931 psi Max pressure with Power Boost 37 5 MPa 375 bar 5439 psi Servo pressure 3 4 MPa 0 2 34 2 bar 493 14 5 psi 35 50 0 Sp pe ec cif fi ic cat ti i...

Page 353: ...low adjustable 0 70 l min 0 18 5 US gal min Pressure adjustable 23 1 MPa 230 10 bar 3336 145 psi Por rt spe ec cif fi icati io ons s Di ipp per ar rm fr ront EW W1 16 60E E EW W1 18 80E Grab piping SAE 3 4 6000 PSI X1 1 SAE flange 6000 PSI X3 3 4 16 UNF port connection Slope piping 9 16 18 ORFS port connection Hammer return 1 SAE flange 6000 PSI For the port locations see 99 S Sp pe ec cif fi ic c...

Page 354: ... l mac chin ne e we ei ig gh ht inc cl sta ab bi ili is ser r legs fr ront and d rear 5 0 m 16 ft 4 9 in monoblock boom 2 45 m 8 ft 0 5 in dipper arm Attachment quick coupler S6 530 kg 750 l bucket standard 18200 kg 40124 lb 17130 kg 37765 lb 18450 kg 40675 lb heavy 18600 kg 41006 lb 17530 kg 38647 lb 18850 kg 41557 lb 5 1 m 16 ft 8 8 in two piece boom 2 45 m 8 ft 0 5 in dipper arm Attachment quic...

Page 355: ...3 9 in 8245 mm 27 ft 0 6 in M Overall height of boom 3072 mm 10 ft 0 9 in 3072 mm 10 ft 0 9 in 3165 mm 10 ft 4 6 in 3608 mm 11 ft 10 1 in 3149 mm 10 ft 4 in Tw wo o pi ie ec ce boom m 5 1 1 m 16 ft t 8 8 8 in n Di ip pp pe er r ar rm 2 0 0 m 6 ft t 6 7 7 in n 2 4 45 5 m 8 ft t 0 5 5 in n 2 6 6 m 8 ft t 6 4 4 in n 3 1 1 m 10 0 ft t 2 in n 2 9 95 m 9 ft t 8 1 1 in n L Overall length standard and hea...

Page 356: ... ft 1 9 in M1 Overall height of boom 3932 mm 12 ft 10 8 in 3932 mm 12 ft 10 8 in 4000 mm 13 ft 1 5 in 3978 mm 13 ft 0 6 in N Front overhang 3021 mm 9 ft 10 9 in 3034 mm 9 ft 11 5 in 3063 mm 10 ft 0 6 in 2923 mm 9 ft 7 1 in with dipper arm for grab without bucket with clamshell V1150853 A D D D B C B C B C E F G H I J EW160E Undercarriage De es scrip pt ti io on n EW W1 160 0E E Und der rcar rria a...

Page 357: ...S Specifications Dimensions 355 ...

Page 358: ... mid dd dle pos siti io on Ca ab bi in in hi igh he est po ositi ion A Overall high of cabin roof 3147 mm 10 ft 3 9 in 4427 mm 14 ft 6 3 in 5646 mm 18 ft 6 3 in B Overall length of superstructure 4348 mm 14 ft 3 2 in 5089 mm 16 ft 8 4 in 4441 mm 14 ft 6 8 in 35 56 6 Sp pe ec cif fi ic cat ti io on ns s Di im me en ns sio on ns s ...

Page 359: ...t 0 2 in 8735 mm 28 ft 7 9 in M Overall height of boom 3163 mm 10 ft 4 5 in 3116 mm 10 ft 2 7 in 3440 mm 11 ft 3 4 in 3662 mm 12 ft 0 2 in Tw wo o pi ie ec ce boom m 5 5 5 m 18 ft t 0 5 5 in n Di ip pp pe er r ar rm 2 4 45 5 m 8 ft t 0 5 5 in n 2 6 6 m 8 ft t 6 4 4 in n 3 0 0 m 9 ft t 10 0 1 1 in 3 2 2 m 10 0 ft t 6 in L Overall length 9122 mm 29 ft 11 1 in 9109 mm 29 ft 10 6 in 9096 mm 29 ft 10 1...

Page 360: ...rear r D Width front to rear 4906 mm 16 ft 1 2 in E Blade to wheel 1213 mm 3 ft 11 8 in F Stabiliser to wheel 1043 mm 3 ft 5 1 in Ou ut tr rig gg ge er r fr ron nt and rea ar r D Width front to rear 4821 mm 15 ft 9 8 in G Stabiliser to wheel 1128 mm 3 ft 8 4 in H Stabiliser to wheel 1043 mm 3 ft 5 1 in Bla ad de e rea ar r on nl ly y D Width front to rear 4558 mm 14 ft 11 5 in I Front to wheel 780...

Page 361: ... in 5580 mm 18 ft 3 7 in 5730 mm 18 ft 9 6 in 6230 mm 20 ft 5 3 in 4585 mm 15 ft 0 5 in D Max digging depth at 2438 mm 8 ft level 4908 mm 16 ft 1 2 in 5386 mm 17 ft 8 1 in 5544 mm 18 ft 2 3 in 6065 mm 19 ft 10 8 in E Max vertical wall digging depth 4320 mm 14 ft 2 1 in 4767 mm 15 ft 7 7 in 4913 mm 16 ft 1 4 in 5401 mm 17 ft 8 6 in F Max cutting height 8841 mm 29 ft 0 1 in 9100 mm 29 ft 10 3 in 918...

Page 362: ...8 ft 3 2 in 5717 mm 18 ft 9 1 in 6216 mm 20 ft 4 7 in 4593 mm 15 ft 0 8 in D Max digging depth at 2438 mm 8 ft level 5011 mm 16 ft 5 3 in 5466 mm 17 ft 11 2 in 5618 mm 18 ft 5 2 in 6123 mm 20 ft 1 1 in E Max vertical wall digging depth 4078 mm 13 ft 4 6 in 4547 mm 14 ft 11 in 4694 mm 15 ft 4 8 in 5181 mm 16 ft 12 in F Max cutting height 9638 mm 31 ft 7 5 in 9971 mm 32 ft 8 6 in 10081 mm 33 ft 0 9 ...

Page 363: ... max attachment offset with vertical trench walls 1505 mm 4 ft 11 3 in 1955 mm 6 ft 5 in 2105 mm 6 ft 10 9 in D Max digging depth at 2438 mm 8 ft level 4619 mm 15 ft 1 9 in 5105 mm 16 ft 9 in 5265 mm 17 ft 3 3 in E Max vertical wall digging depth 3574 mm 11 ft 8 7 in 4012 mm 13 ft 2 in 4153 mm 13 ft 7 5 in F Max cutting height 8276 mm 27 ft 1 8 in 8481 mm 27 ft 9 9 in 8548 mm 28 ft 0 5 in G Max du...

Page 364: ...ft 6 8 in 5807 mm 19 ft 0 6 in C1 Max digging depth at max attachment offset with vertical trench walls 2280 mm 7 ft 5 8 in 2731 mm 8 ft 11 5 in 2881 mm 9 ft 5 4 in C2 Min digging depth at min attachment offset with vertical trench walls 1028 mm 3 ft 4 5 in 1479 mm 4 ft 10 2 in 1629 mm 5 ft 4 1 in D Max digging depth at 2438 mm 8 ft level 5104 mm 16 ft 8 9 in 5557 mm 18 ft 2 8 in 5708 mm 18 ft 8 7...

Page 365: ...pth 5541 mm 18 ft 2 2 in 5691 mm 18 ft 8 1 n 6091 mm 19 ft 11 8 in 4679 mm 15 ft 4 2 in D Max digging depth at 2438 mm 8 ft level 5353 mm 17 ft 6 8 in 5510 mm 18 ft 0 9 in 5927 mm 19 ft 5 4 in E Max vertical wall digging depth 4703 mm 15 ft 5 2 in 4853 mm 15 ft 11 1 in 5233 mm 17 ft 2 0 in F Max cutting height 9721 mm 31 ft 10 7 in 9818 mm 32 ft 2 5 in 10068 mm 33 ft 0 4 in 8441 mm 27 ft 8 3 in G ...

Page 366: ... ft 2 5 in 6005 mm 19 ft 8 4 in 6405 mm 21 ft 0 2 in 4981 mm 16 ft 4 1 in D Max digging depth at 2438 mm 8 ft level 5760 mm 18 ft 10 8 in 5912 mm 19 ft 4 8 in 6316 mm 20 ft 8 7 in E Max vertical wall digging depth 4738 mm 15 ft 6 5 in 4900 mm 16 ft 0 9 in 5276 mm 17 ft 3 7 in F Max cutting height 10846 mm 35 ft 7 in 10973 mm 36 ft 0 in 11312 mm 37 ft 1 4 in 9749 mm 31 ft 11 8 in G Max dumping heig...

Page 367: ...1800 700 0 92 1050 41 34 550 1213 1800 1800 1600 1300 1800 1800 1800 1600 840 1 10 1200 47 24 618 1362 1600 1400 1300 1000 1800 1600 1400 1300 TD with universal quick coupler 550 0 72 1800 70 87 850 1874 1600 1600 1600 1100 1600 1600 1600 1600 550 0 72 1800 70 87 770 1698 1600 1600 1600 1200 1600 1600 1600 1600 620 0 81 2000 78 74 902 1989 1600 1500 1300 900 1600 1600 1500 1300 620 0 81 2000 78 74...

Page 368: ...m 6 6 ft t 6 7 7 in n 2 4 45 5 m 8 8 ft t 0 5 5 in n 2 6 6 m m 8 8 ft t 6 4 4 in n 3 1 1 m 1 10 0 ft t 2 in n GP S1 420 0 55 600 23 62 508 1120 1800 1800 1800 1800 1800 1800 1800 1800 560 0 73 800 31 50 583 1284 1800 1800 1800 1600 1800 1800 1800 1800 660 0 86 900 35 43 623 1373 1800 1800 1700 1300 1800 1800 1800 1700 800 1 05 1050 41 34 682 1503 1700 1500 1300 1000 1800 1700 1500 1300 950 1 24 12...

Page 369: ...1100 800 700 600 1200 900 900 700 GP S6 300 0 39 450 17 72 336 742 1800 1800 1800 1800 1800 1800 1800 1800 360 0 47 600 23 62 363 800 1800 1800 1800 1800 1800 1800 1800 1800 580 0 76 900 35 43 451 995 1800 1800 1800 1800 1800 1800 1800 1800 700 0 92 1050 41 34 496 1094 1800 1800 1700 1500 1800 1800 1800 1700 880 1 15 1250 49 21 582 1284 1700 1400 1300 1100 1800 1600 1600 1300 960 1 26 1350 53 15 6...

Page 370: ...AX S6 330 0 43 500 19 69 397 875 1800 1800 1800 1800 1800 1800 1800 1800 540 0 71 700 27 56 488 1076 1800 1800 1800 1800 1800 1800 1800 1800 CAX S60 330 0 43 500 19 69 397 875 1800 1800 1800 1800 1800 1800 1800 1800 540 0 71 700 27 56 488 1076 1800 1800 1800 1800 1800 1800 1800 1800 TGX S1 1060 1 39 1800 70 87 750 1653 1200 900 800 700 1300 1100 1100 800 TGX S6 820 1 07 1600 62 99 839 1850 1500 12...

Page 371: ... 8 ft t 0 5 5 in n Tw wo o p pi ie ec ce bo oo om m Bla ad de e re ea ar r on nl ly y Bu uc cket t ty ype e Q Qu ui ic ck cou up pl le er r Ca ap pa ac cit ty y Cu ut tt ti in ng g wi id dt th h We ei ig gh ht t Re ec com mm me en nd de ed d ma ax xim mu um m ma at te er ri ia al l de en ns sit ty y k kg m m3 Di ip pp pe er r ar rm m Li it te er r yd3 mm m in n kg Ib b 2 4 45 5 m 8 8 ft t 0 5 5 in...

Page 372: ...50 0 72 1800 70 87 821 1810 1600 1600 1600 620 0 81 2000 78 74 954 2103 1600 1600 1600 620 0 81 2000 78 74 864 1905 1600 1600 1600 TD S60 550 0 72 1800 70 87 846 1865 1600 1600 1600 550 0 72 1800 70 87 766 1689 1600 1600 1600 620 0 81 2000 78 74 898 1980 1600 1600 1600 620 0 81 2000 78 74 808 1781 1600 1600 1600 CAX S1 360 0 47 570 22 44 442 974 1800 1800 1800 650 0 85 800 31 50 570 1257 1800 1800...

Page 373: ...00 70 87 901 1986 1600 1600 1500 550 0 72 1800 70 87 821 1810 1600 1600 1600 620 0 81 2000 78 74 954 2103 1600 1600 1200 620 0 81 2000 78 74 864 1905 1600 1600 1400 TD S60 550 0 72 1800 70 87 846 1865 1600 1600 1600 550 0 72 1800 70 87 766 1689 1600 1600 1600 620 0 81 2000 78 74 898 1980 1600 1600 1300 620 0 81 2000 78 74 808 1781 1600 1600 1500 CAX S1 360 0 47 570 22 44 442 974 1800 1800 1800 650...

Page 374: ...i ip pp pe er r ar rm 2 0 0 m 6 ft t 7 in n 2 4 45 5 m 8 ft t Bucket radius 1274 mm 4 ft 2 2 in 1274 mm 4 ft 2 2 in Break out force SAE ISO with Power Boost 94 8 kN 108 kN 21312 lbf 24279 lbf 94 8 kN 108 kN 21312 lbf 24279 lbf Tear out force SAE ISO 72 6 kN 75 kN 16321 lbf 16861 lbf 63 6 kN 65 5 kN 14298 lbf 14725 lbf Angle of rotation bucket 177 4 177 4 EW W1 18 80 0E E Mon no ob bl lo oc ck bo o...

Page 375: ...ure across undercarriage b Superstructure along undercarriage u Support up d Support down Max Maximum reach maximum high Grab arm Working pressure with power boost The values are in compliance with ISO standard 10 567 They do not exceed 87 of hydraulic lifting capacity or 75 of tipping load with the machine on firm level ground Load capacities marked with an asterisk are limited by machine s hydra...

Page 376: ...E EW160E 5 m Monoblock boom 3200 kg Counterweight Blade front and outrigger rear V1106721 374 Specifications Lifting capacities ...

Page 377: ...E EW160E 5 m Monoblock boom 3600 kg Counterweight Blade front and outrigger rear V1110429 Specifications Lifting capacities 375 ...

Page 378: ...E EW160E 5 m Monoblock boom 3200 kg Counterweight 4 Outrigger front and rear V1110430 376 Specifications Lifting capacities ...

Page 379: ...E EW160E 5 m Monoblock boom 3600 kg Counterweight 4 Outrigger front and rear r V1110443 Specifications Lifting capacities 377 ...

Page 380: ...E EW160E 5 m Monoblock boom 3200 kg Counterweight Blade rear only V1110444 378 Specifications Lifting capacities ...

Page 381: ...E EW160E 5 m Monoblock boom 3600 kg Counterweight Blade rear only V1110445 Specifications Lifting capacities 379 ...

Page 382: ...E EW160E 5 1 m Two piece boom 3200 kg Counterweight Blade front and Outrigger rear V1110446 380 Specifications Lifting capacities ...

Page 383: ...E EW160E 5 1 m Two piece boom 3600 kg Counterweight Blade front and Outrigger rear V1110447 Specifications Lifting capacities 381 ...

Page 384: ...E EW160E 5 1 m Two piece boom 3200 kg Counterweight 4 Outrigger front and rear V1110448 382 Specifications Lifting capacities ...

Page 385: ...E EW160E 5 1 m Two piece boom 3600 kg Counterweight 4 Outrigger front and rear r V1110449 Specifications Lifting capacities 383 ...

Page 386: ...E EW160E 5 1 m Two piece boom 3200 kg Counterweight Blade rear only V1110450 384 Specifications Lifting capacities ...

Page 387: ...E EW160E 5 1 m Two piece boom 3600 kg Counterweight Blade rear only V1110451 Specifications Lifting capacities 385 ...

Page 388: ...E EW160E 4 75 m Monoblock offset boom 3200 kg Counterweight Blade front and outrigger rear V1110452 386 Specifications Lifting capacities ...

Page 389: ...E EW160E 4 75 m Monoblock offset boom 3600 kg Counterweight Blade front and outrigger rear V1110453 Specifications Lifting capacities 387 ...

Page 390: ...E EW160E 4 75 m Monoblock offset boom 3200 kg Counterweight 4 Outrigger front and rear V1110454 388 Specifications Lifting capacities ...

Page 391: ...E EW160E 4 75 m Monoblock offset boom 3600 kg Counterweight 4 Outrigger front and rear r V1110455 Specifications Lifting capacities 389 ...

Page 392: ...E EW160E 4 75 m Monoblock offset boom 3200 kg Counterweight Blade rear only V1110456 390 Specifications Lifting capacities ...

Page 393: ...E EW160E 4 75 m Monoblock offset boom 3600 kg Counterweight Blade rear only V1110457 Specifications Lifting capacities 391 ...

Page 394: ...E EW160E 5 2 m Two piece offset boom 3200 kg Counterweight Blade front and outrigger rear V1110458 392 Specifications Lifting capacities ...

Page 395: ...E EW160E 5 2 m Two piece offset boom 3600 kg Counterweight Blade front and outrigger rear V1110459 Specifications Lifting capacities 393 ...

Page 396: ...E EW160E 5 2 m Two piece offset boom 3200 kg Counterweight 4 Outrigger front rear V1110460 394 Specifications Lifting capacities ...

Page 397: ...E EW160E 5 2 m Two piece offset boom 3600 kg Counterweight 4 Outrigger front rear V1110461 Specifications Lifting capacities 395 ...

Page 398: ...E EW160E 5 2 m Two piece offset boom 3200 kg Counterweight Blade rear only V1110462 396 Specifications Lifting capacities ...

Page 399: ...E EW160E 5 2 m Two piece offset boom 3600 kg Counterweight Blade rear only V1110463 Specifications Lifting capacities 397 ...

Page 400: ...E EW180E 5 2 m Monoblock boom 3450 kg Counterweight Blade front and outrigger rear V1152594 39 98 8 Sp pe ec cif fi ic cat ti io on ns s Li if ft ti in ng g cap pa ac cit ti ie es s ...

Page 401: ...E EW180E 5 2 m Monoblock boom 3450 kg Counterweight Outrigger front and blade rear V1152595 Sp pe ec cif fi ic cat ti io on ns s Li if ft ti in ng g cap pa ac cit ti ie es s 39 99 9 ...

Page 402: ...E EW180E 5 2 m Monoblock boom 3450 kg Counterweight 4 Outrigger front and rear V1152596 40 00 0 Sp pe ec cif fi ic cat ti io on ns s Li if ft ti in ng g cap pa ac cit ti ie es s ...

Page 403: ...E EW180E 5 2 m Monoblock boom 3450 kg Counterweight Blade rear only V1152597 Sp pe ec cif fi ic cat ti io on ns s Li if ft ti in ng g cap pa ac cit ti ie es s 40 01 1 ...

Page 404: ...E EW180E 5 5 m Two piece boom 3450 kg Counterweight Blade front and outrigger rear V1152598 402 Specifications Lifting capacities ...

Page 405: ...E EW180E 5 5 m Two piece boom 3450 kg Counterweight Outrigger front and blade rear V1152599 Sp pe ec cif fi ic cat ti io on ns s Li if ft ti in ng g cap pa ac cit ti ie es s 40 03 3 ...

Page 406: ...E EW180E 5 5 m Two piece boom 3450 kg Counterweight 4 Outrigger front and rear V1152600 40 04 4 Sp pe ec cif fi ic cat ti io on ns s Li if ft ti in ng g cap pa ac cit ti ie es s ...

Page 407: ...E EW180E 5 5 m Two piece boom 3450 kg Counterweight Blade rear only V1152601 Sp pe ec cif fi ic cat ti io on ns s Li if ft ti in ng g cap pa ac cit ti ie es s 40 05 5 ...

Page 408: ...e 2500 hours Type of service Signature and stamp Date Hours Service and maintenance Service 3000 hours Type of service Signature and stamp Date Hours Service and maintenance Service 3500 hours Type of service Signature and stamp Date Hours Service and maintenance Service 4000 hours Type of service Signature and stamp Date Hours Service and maintenance Service 4500 hours Type of service Signature a...

Page 409: ...rvice Signature and stamp Date Hours Service and maintenance Service 8000 hours Type of service Signature and stamp Date Hours Service and maintenance Service 8500 hours Type of service Signature and stamp Date Hours Service and maintenance Service 9000 hours Type of service Signature and stamp Date Hours Service and maintenance Service 9500 hours Type of service Signature and stamp Date Hours Ser...

Page 410: ......

Page 411: ... 311 Engine air cleaner secondary filter replacing 313 Engine block heater 154 Engine oil level checking 287 Entering leaving and climbing the machine 255 Environmental requirements 7 Equipment 9 Equipment towing 234 EU conformity certificate 15 Excavator unit greasing 274 278 Exhaust aftertreatment system 8 165 Exhaust aftertreatment system alarms requiring special actions 172 F F Filter change i...

Page 412: ... cold weather 154 Starting with booster batteries 155 Steering 160 Steering system 8 Stopping 176 Storage compartment 124 Subscreens 50 Sun shade 122 Swing drive unit 10 Swing drive unit checking oil level 291 Symbol key 268 T Test run and check 273 Tiltrotator control system description 102 208 Toggle lever for brake lock digging brake 164 Tool kit 11 Touch up painting 309 Trailer towing solution...

Page 413: ......

Page 414: ...4 412 Alphabetical index Ref No 20052711 C Volvo Eskilstuna English ...

Reviews: