


Quick User Guide
page 7
POWERING ON/OFF
At key ignition, the system will automatically switch on. When the ignition is
switched off, the system will power down. To manually power the system on or off,
press and hold the
[PWR/VOL]
knob.
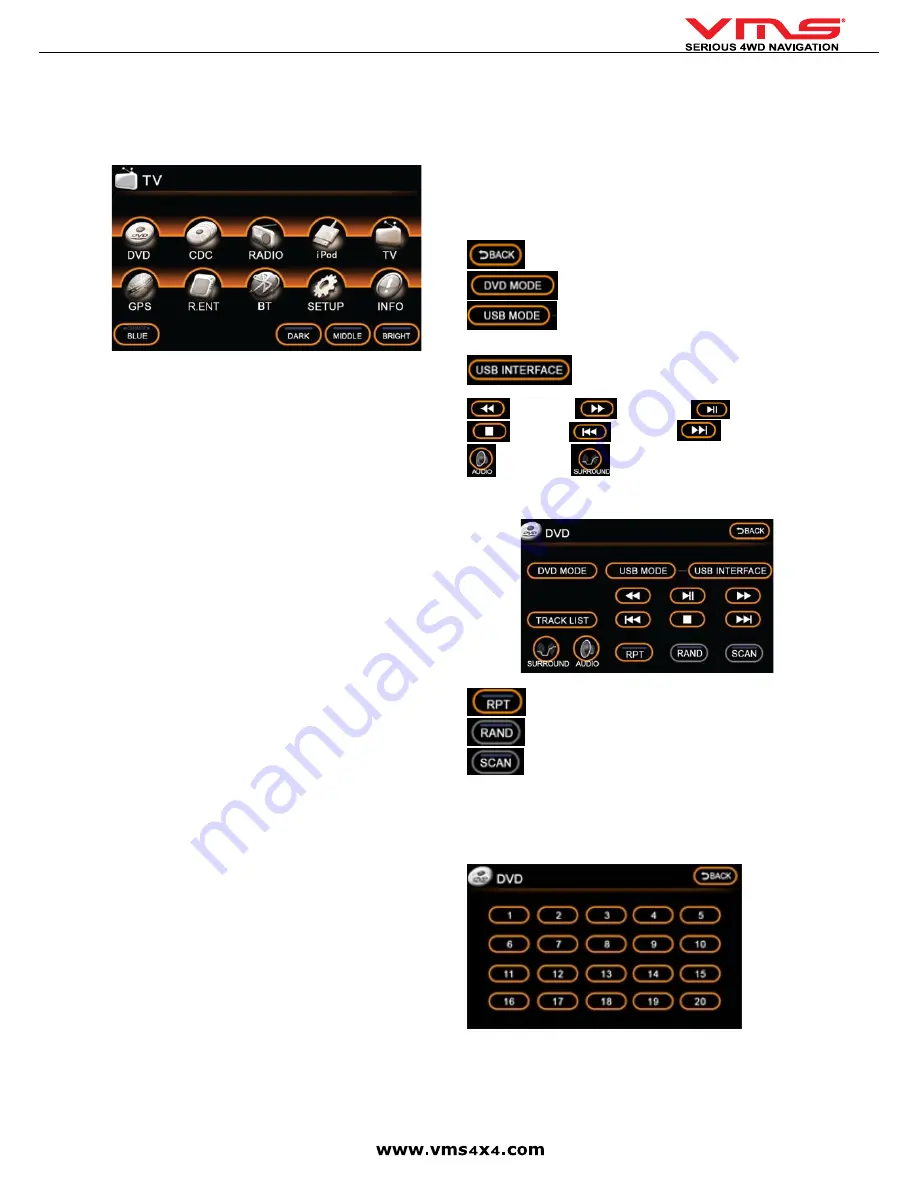
SYSTEM MENU
TO SELECT A FUNCTION, TOUCH THE SCREEN
RETURN TO SYSTEM MENU:
To return to the main menu at any time, press
the
[MENU]
button on the front fascia.
SYSTEM MENU FUNCTIONS
[DVD]
- Play DVD/CD or connected USB flash memory. (Supported formats on
USB: mp3 & WMA).
[CDC]
- CD changer can be accessed via this icon (only when CDC is con-
nected).
[Radio]
- Operate FM or AM radio.
[iPOD] or [AUX]
- operate connected iPOD or AUX input. This icon can be
changed in “SETUP” to perform either of these functions.
[TV]
- Receive TV broadcast (optional, only when ECM with TV function is con
-
nected).
[GPS]
- enters the GPS console.
[R.ENT]
- controls for rear seat entertainment.
[BT]
controls for Bluetooth phone connectivity.
[SETUP]
- configure system settings.
[INFO]
- displays TPMS & volt metre information.
[DARK / MIDDLE / BRIGHT]
- adjust LCD screen brightness.
[BLUE / ORANGE]
- toggles interface from Blue to Orange themes. Unit must
be restarted by turning the acc on & off.
CALIBRATE TOUCHSCREEN
The touchscreen requires recalibration from time to time.
1. Press the centre of the touchscreen and turn on the ignition.
2. Press and hold until the calibration screen appears.
3. Touch the + . The more precise the touch, the more accurate the touchscreen
will respond.
INSERTING A DISC
1. Press the
[OPEN]
button.
2. Place the disc in the loader slot and the system will automatically insert the disc
into the loader.
3. Close the front panel by pressing the
[OPEN]
button.
EJECTING A DISC
1. Press the
[OPEN]
button
2. Press the
[EJECT]
button and the disc will automatically be ejected from the
loader. Remove the disc.
3. Close the front panel by pressing the
[OPEN]
button.
ADJUSTING FRONT PANEL ANGLE
Due to ambient light, the screen may experience reduced visibility. The front panel
angle can be adjusted to optimise visibility.
1. Press
[ANGLE]
button.
2. Turn the
[TUNE]
knob to adjust the angle up or down.
PLEASE NOTE:
The angle of the front panel is automatically memorised. The
front panel will retract to a completely closed position when the system is off.
When it is powered on again, the panel will automatically tilt to the last position in
its memory.
MEMORY CARD
COMPATIBLE MEMORY CARDS
1GB, 2GB 4GB, 8GB class 4 micro sd cards are compatible.
All navigation software(s) and map(s) are stored on the memory card. Navigation
will not operate without the memory card.
INSERT SD CARD
PLEASE NOTE:
The memory card slot is directional. Ensure the card is in the cor
-
rect orientation. Incorrect orientation can cause physical damage to the card slot.
Insert the card into the slot and press gently until the card locks into position.
REMOVE SD CARD
Press the Memory Card gently until card unlocks.
DVD/CD playback
1. Insert disc & select DVD/CD from the main menu.
The controls below are common to both CD, DVD & USB flash memory playback.
- Return to previous menu.
- Select to play DVD or CD.
- Select to play mp3 music from USB flash memory utilising
standard DVD controls.
- Browse USB flash memory content.
- seek back
- seek forward
- play / pause
- stop
- next track
- prev track
- Audio settings
- EQ settings
CD MENU
When an audio CD is inserted, the CD menu will appear.
- enable album repeat.
- enable random track selection.
- enable track scan, plays first 10 sec of every track on the cd.
TRACK LIST MENU
[TRACK LIST]
- brings up a list of all available tracks on an audio CD (not mp3
CD).
Summary of Contents for TOURING 7000 SERIES
Page 1: ...TOURING 7000 SERIES QUICK USER GUIDE...
Page 2: ...Quick User Guide page 2...
Page 22: ...Quick User Guide page 22...
Page 23: ...Quick User Guide page 23...


