VMS TOURING 7000 SERIES Quick User Manual Download Page 16


Quick User Guide

page 16 

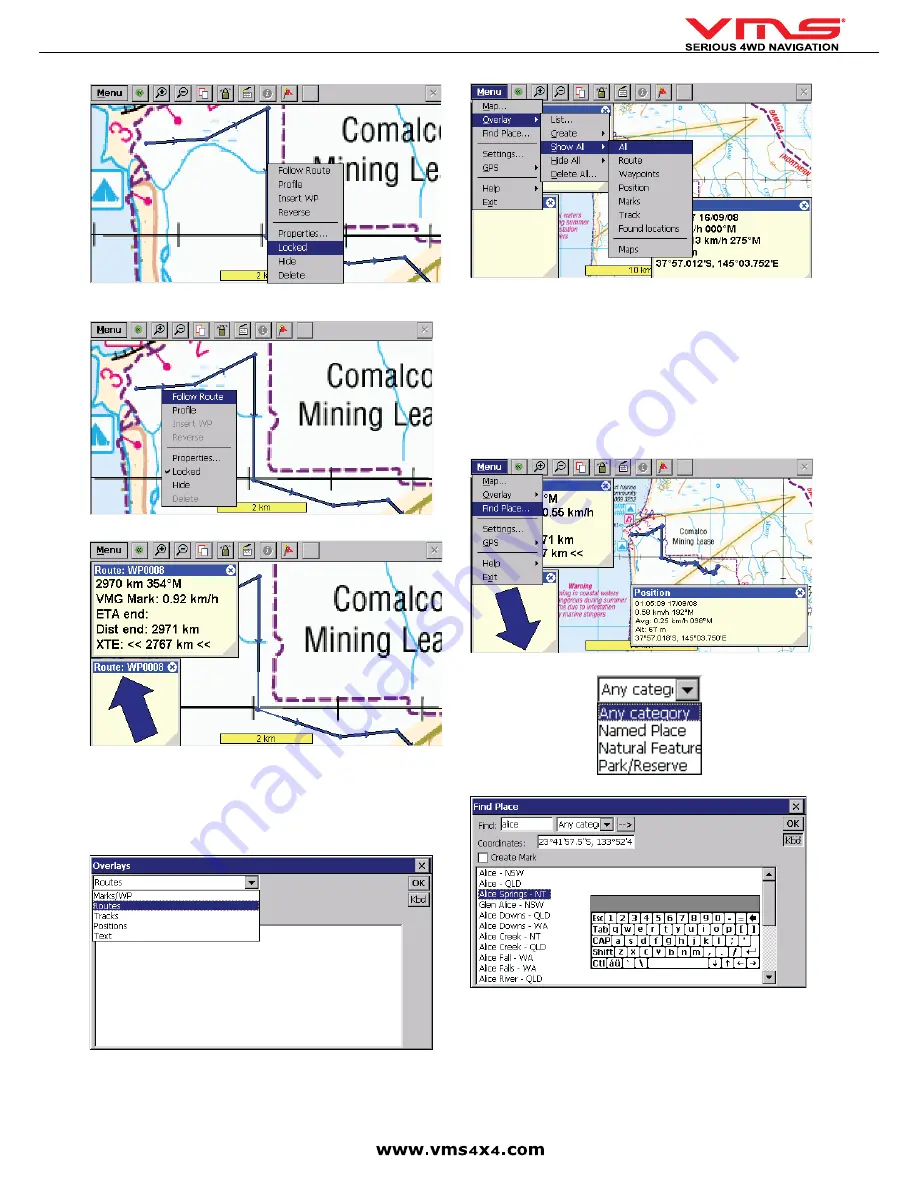
Once the route is complete, Tap-and-Hold on the route and select Lock to prevent 

any waypoints from being accidentally re-positioned.

Tap-and- Hold on the route and select [Follow Route] to Navigate along this route.

Tap-and-Hold on a route or mark and select [Follow Route] or [Goto Mark]. The 

Navigation window appears to show the distance and bearing from your current 

position together with ETA, VMG and XTE.

The Guidance Arrow indicates the direction to travel. If the arrow points left, bear 

left, if it points right, bear right. When it points straight up you are heading directly 

for the waypoint in the route or to the mark you selected

MANAGING OVERLAYS

Use the Show All / Hide All menu commands to choose which overlays to show 

on your maps.

FIND A PLACE BY NAME

Tap Menu > Find Place and tap the [Kbd] keyboard button on the right of the 

window. 

Ensure that the cursor is in the Find box and start typing. It’s best to type part of 

the word to maximise search results. In this instance Alice was typed with the 

intention of finding Alice Springs. Press the --> button to display results. 

A list of matching results will display. To reduce the number of entries, select a 

specific category from the drop down list. When the correct result appears, simply 

Tap on it and the corresponding map will appear on screen.

In the Find Place window there is a check box labelled Create Mark. By checking 

this, a Waypoint will be placed in the position of the searched item and listed in 
the Overlays List.

FIND A PLACE BY CO-ORDINATES

Tap Menu > Find Place and tap the [Kbd] button on the right of the window. In the 

Coordinates field, select and delete any displayed coordinates and enter the one 

you want to find. 

Check the create Mark check box and tap the --> button. A variety of position 

formats is available in Menu > Settings > Units.

Summary of Contents for TOURING 7000 SERIES

Page 1: ...TOURING 7000 SERIES QUICK USER GUIDE...

Page 2: ...Quick User Guide page 2...

Page 3: ...CONTROLS 13 SETTINGS 14 MEMORY MAP 15 MENU TOOLBAR 15 WAYPOINTS 15 PLACING A WAYPOINT 15 GO TO A WAYPOINT 15 BROWSING THE MAP 15 PLANNING A ROUTE 15 CREATING A ROUTE 15 NAVIGATING ALONG A ROUTE 15 MAN...

Page 4: ...45 C 113 F before turning your unit on Moisture Condensation You may notice the disc playback sound wavering due to condensation If this happens remove the disc from the player and wait about an hour...

Page 5: ...For easy identification all VMS Touring SD cards are programed to appear with a VMS icon 3 Select all the data on the SD card select COPY 4 Paste the data on to the computer 5 If the data on the SD ca...

Page 6: ...up or down 3 AV Cycles through all AV functions 4 DIMM Press to increase decrease screen brightness 5 MENU Go to System Menu 6 OPEN Open Close the front panel 7 ANGLE Press to activate front panel ang...

Page 7: ...s the OPEN button 2 Press the EJECT button and the disc will automatically be ejected from the loader Remove the disc 3 Close the front panel by pressing the OPEN button ADJUSTING FRONT PANEL ANGLE Du...

Page 8: ...gation is displayed up front with either radio or iPOD playback through the vehicle sound system All controls for rear seat dvd are accessible via the touchscreen To access Rear Entertainment controls...

Page 9: ...le Shuffle and or repeat on the iPOD 3 Connect the iPOD with the cable 4 When next track is selected the iPOD will now shuffle or repeat your selection PLAYLIST 1 Disconnect the iPOD from the cable 2...

Page 10: ...TPMS setup menu Pair TPMS sensors Copyright system info menu TPMS Tyre Pressure Monitoring System TPMS SETUP MENU TEMP SETTING Set min temperature TEMP UNIT Set Celsius or Fahrenheit MAX TYRE PRESSUR...

Page 11: ...is format Ozi Explorer Pros Can accept a wider format of maps Many users may already have maps in Oziexplorer format Offers advanced users more flexibility Ozi Explorer Cons Harder to use compared wit...

Page 12: ...if no house number is required Go to an intersection by entering another street name By default Street Navigation displays the country state and suburb of where you are If needed tap the button with t...

Page 13: ...ap to switch to a keyboard of symbol charac ters Tap MAP VIEW 6 4 Map View Toggle 3D 2D map view Detour menu Go to Cursor Navigation Menu Next turn indicator GPS signal strength Current road name Next...

Page 14: ...urrent GPS position If the map has been rotated in 3D mode automatic map rotation is also re enabled Tilt and zoom preset buttons available in Advanced mode only Tap one of the preset buttons to set t...

Page 15: ...ack to your position Icon Description Select the data box and tap on the map to see grid coordinates and route track information Use the Menu Overlay Settings command to set your preferred units of me...

Page 16: ...the Kbd keyboard button on the right of the window Ensure that the cursor is in the Find box and start typing It s best to type part of the word to maximise search results In this instance Alice was...

Page 17: ...ock your current position will be displayed on a map There is no need to manually open a map file However you can open a map file manually for trip preparation ON SCREEN FUNCTION FINDING MORE OR LESS...

Page 18: ...rking a camp site vehicles location a hazard or even your favourite fishing spot Waypoints can be marked prior to or during your trip either by manually entering coordinates or simply by marking them...

Page 19: ...s information about each waypoint Button s Description Load a Waypoint File Select a waypoint file wpt to load onto the map Save Waypoints to File All waypoints currently on the map are saved to a way...

Page 20: ...erties Dialog The properties dialog displays a list of the route waypoints Load a Route the selected route is loaded to the map Save Route to File The currently loaded route is saved as a rt2 file Sho...

Page 21: ...Exposure to liquid or infiltration of foreign particles e Servicing or modification of the product by any one other than by VMS AUSTRALIA f Use of product with other accessories attachments product s...

Page 22: ...Quick User Guide page 22...

Page 23: ...Quick User Guide page 23...

Page 24: ...er 2009 Rev 1 0 Printed in Australia VMS is a trademark of XIA GROUP PTY LTD registered in Australia and other countries and may not be used without the express permission of XIA GROUP Pty Ltd copyrig...

Reviews: