background image

5

21

E472VL / E552VL

Changing the Audio Language

Some digital free-to-air and cable channels broadcast programs in more than one 
language. The TV’s MTS (Multichannel Television Sound) feature allows you to 
listen to audio in your preferred language.

Not all programs are broadcast in multiple languages. The MTS 
feature only works when the program being viewed is being 
broadcast in the language you select.

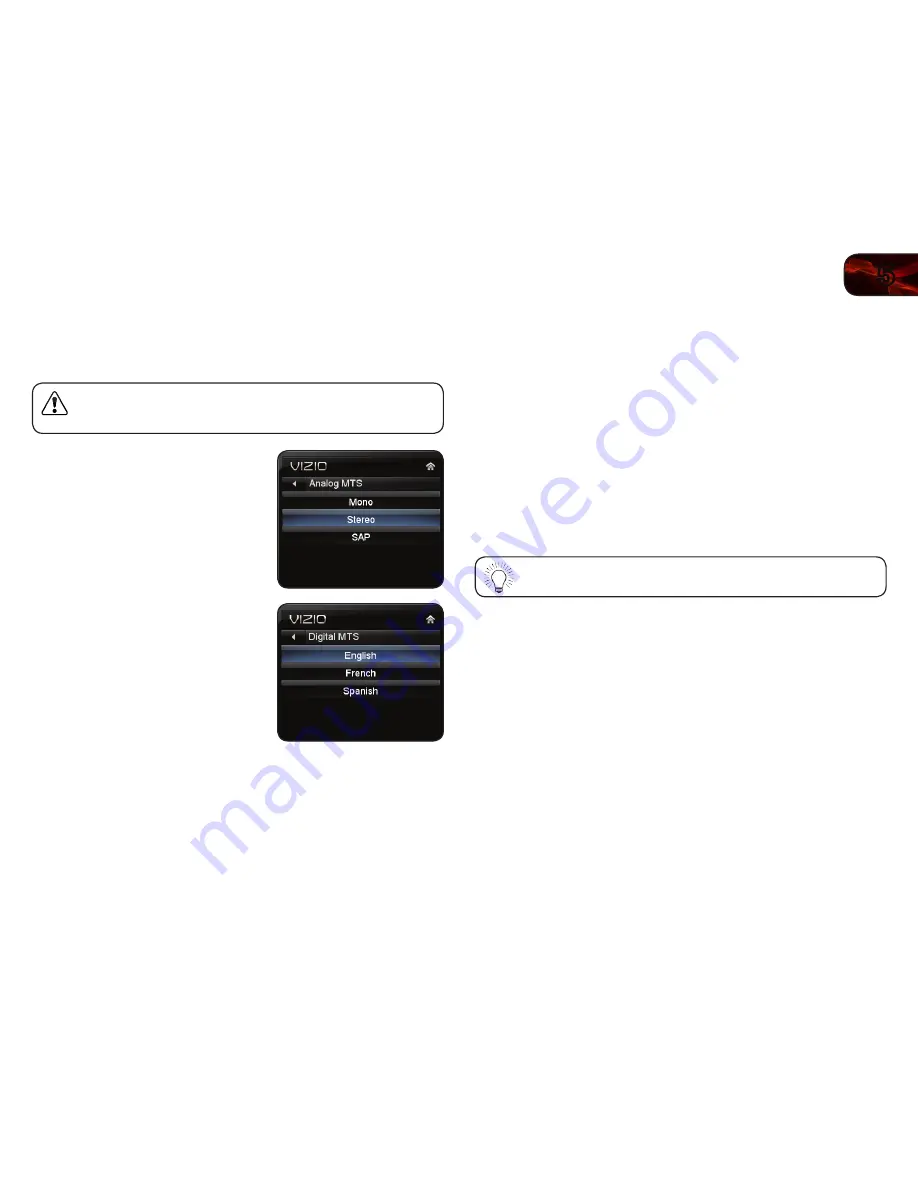
To use the Analog MTS feature:

1.  From the Tuner Settings menu, 

highlight 

Analog MTS and press OK

The 

Analog MTS menu is displayed.

2.  Select 

MonoStereo, or SAP 

(secondary audio programming). Press 
OK.

3.  Press the 

EXIT button on the remote.

To use the Digital MTS feature:

1.  From the Tuner Settings menu, 

highlight 

Digital MTS and press OK

The 

Digital MTS menu is displayed.

2.  Select your preferred language: 

EnglishFrench, or Spanish. Press 
OK.

3.  Press the 

EXIT button on the remote. 

Using the Parental Controls

The TV’s parental controls allow you to prevent the TV from displaying certain 
channels or programs without a password.

Accessing the Parental Controls Menu

To access the Parental Controls menu:

1.  Press the 

MENU button on the remote. The on-screen menu is displayed.

2.  Use the 

Arrow buttons on the remote to highlight the Settings icon and 

press 

OK. The TV Settings menu is displayed.

3.  Use the 

Arrow buttons on the remote to highlight Parental Controls and 

press 

OK

4.  Enter your parental passcode. If you have not set a passcode, enter the 

default, 

0000. The Parental Controls menu is displayed.

To set a custom parental passcode, see 

Changing the Parental 

Control Passcode on page 23.

Summary of Contents for E472VL

Page 1: ...E472VL E552VL user manual LCD HDTV WITH VIZIO INTERNET APPS ...

Page 2: ...ll be achieved Changing the factory default picture settings or enabling other features will increase power consumption that could exceed the limits necessary to qualify for ENERGY STAR rating HDMI the HDMI logo and High Definition Multimedia Interface are trademarks or registered trademarks of HDMI Licensing LLC SRS StudioSound HD is a trademark of SRS Labs Inc StudioSound HD technology is incorp...

Page 3: ... registration card Extended Warranties For peace of mind and to protect your investment beyond the standard warranty VIZIO offers on site extended warranty service plans These plans provide additional coverage during the standard warranty period To purchase an extended warranty service plan visit www VIZIO com When Reading this Manual When you see this symbol please read the accompanying important...

Page 4: ...The lightning flash with arrowhead symbol within an equilateral triangle is intended to alert the user to the presence of un isolated dangerous voltage within the inside of your TV that may be of sufficient magnitude to constitute a risk of electric shock to persons Important Safety Instructions Your DTV is designed and manufactured to operate within defined design limits Misuse may result in elec...

Page 5: ... in environments with heavy dust or high humidity may cause fire or electric shock Follow instructions for moving your TV Ensure that the power cord and any other cables are unplugged before moving your TV When unplugging your TV hold the AC DC power adapter not the cord Pulling on the power cord may damage the wires inside the cord and cause fire or electric shock When your TV will not be used fo...

Page 6: ...onwide switch to digital television broadcasting was complete on June 12 2009 Analog only television sets that receive TV programming through an antenna now need a converter box to continue to receive over the air TV Watch your local stations to find out when they will turn off their analog signal and switch to digital only broadcasting Analog only TVs should continue to work as before to receive ...

Page 7: ...ion 15 Resetting the Picture Settings 15 Adjusting the Audio Settings 15 Adjusting the Advanced Audio Settings 16 Resetting the Audio Settings 16 Using the Network Connection Menu 17 Connecting to a Wireless Network 17 Changing the Advanced Network Settings 18 Testing Your Network Connection 18 Changing the TV Settings 18 Changing the Input Source 18 Setting the Tuner Mode 19 Scanning for Channels...

Page 8: ... TV displays No Signal 35 There is no power 35 The power is on but there is no image on the screen 35 There is no sound 35 The colors on the TV don t look right 35 The buttons on the remote aren t working 35 The image quality is not good 35 The picture is distorted 36 The display image does not cover the entire screen 36 The TV has pixels dots that are always dark or always lit 36 I see noise or s...

Page 9: ...sing a VESA standard wall mount not included Installing the TV Stand Your TV includes a stand designed to support the weight of the TV and keep it from falling over However the TV can still fall over if It is placed on an uneven unstable or non level surface It is pushed pulled or otherwise improperly moved If an earthquake occurs and the TV is not properly secured Your TV comes in the box with th...

Page 10: ...nt bracket rated for the weight load of this TV See Appendix A Specifications for the weight of this TV 3 Using a philips head screwdriver attach the base to the TV by inserting and tightening the included screws 4 Move the TV with attached stand into an upright position and place on a flat level and stable surface 5 To ensure proper ventilation leave at least 1 of space between the back of the TV...

Page 11: ...MI 1 2 3 RCA Audio In For use with HDMI ports Component RCA Audio Out Optical Audio Out Cable Antenna Ethernet RGB PC PC Audio In Composite AV AC IN RGB PC Connect RGB cable from computer PC Audio In Connect 3 5mm connector from computer Ethernet Connect an Ethernet cable for VIZIO Internet Apps Composite AV Connect composite video audio device Cable Antenna Connect RF Coaxial connector from cable...

Page 12: ...el Power Menu Channel Up Volume Up Input Channel Down Volume Down USB Ports 1 2 HDMI Port Power Turn the TV on Press and hold for 3 seconds to turn off Menu Display on screen menu Channel Up Down Change the channel Volume Up Down Increase or decrease the loudness of the TVs audio Input Change the input device With each press of the button the TV will display a different input source USB Port Conne...

Page 13: ...Info Display the Info Window See Using the Info Win dow on page 27 CC Closed Captioning Open the CC Menu See Setting Up Closed Cap tioning on page 11 Menu Display the on screen menu Exit Close the on screen menu Arrow Navigate the on screen menu and episode guide OK Select highlighted menu option Back Go to the previous on screen menu options Guide Display the episode guide digital channels only S...

Page 14: ...onding cable To connect a device to the TV 1 Ensure both the TV and your device are off 2 Connect the device and the TV Use the best available connection See the Device Connection Chart on the next page Ensure each end of the cable is securely connected 3 Turn the TV on by pressing the Power Standby button on the remote 4 Turn your device on 5 When you are ready to use your newly connected device ...

Page 15: ... OR OR OR OR BETTER GOOD BEST HDMI RF COAXIAL RGB COMPONENT COMPOSITE AV DIGITAL DIGITAL ANALOG ANALOG ANALOG ANALOG Device Connection Chart Select one of the connection types Use the cable s shown to connect the TV to your device ...

Page 16: ...ired network 1 Ensure you have An ethernet cable long enough to reach your TV A router or modem with an available ethernet port A high speed internet connection 2 Connect your ethernet cable to the router and to the ethernet port on the back of the TV 3 Use the Guided Network Setup to configure the TV See Using Guided Setup on page 26 Connecting to a Wireless Network To connect to a wireless netwo...

Page 17: ... the OK and Arrow Up Down buttons on the remote to read and accept the Terms of Service and Privacy Policy for Yahoo TV Widgets When you are finished highlight Next and press OK 4 Select the name of your wireless network from the list of available networks and press OK Enter the network key using the on screen keyboard then highlight Connect and press OK If the TV is connected to your network via ...

Page 18: ...n to select that option While navigating the on screen menu you can press the BACK button at any time to return to the previous menu screen The EXIT button will close the on screen menu Changing the Input Source External devices such as DVD players Blu Ray Players and video game consoles can be connected to your TV To use one of these devices with your TV you must first change the input source in ...

Page 19: ...y available when the TV is displaying a 480i 480p source Stretch expands the display image to fill the screen Images may appear wider than intended If you are watching widescreen 1 85 1 or 2 35 1 content black bars will still appear on the top and bottom of the display image This option is only available when the TV is displaying a 720p 1080i 1080p source Setting Up Closed Captioning Your TV can d...

Page 20: ...acity Change the transparency of the text BG Color Change the background color BG Opacity Change the transparency of the background Window Color Change the edge color Window Opacity Change the edge type 4 When you are satisfied with the appearance of the closed captions press the EXIT button on the remote Activating the Sleep Timer When activated the TV s sleep timer will turn the TV off after a s...

Page 21: ...ttings for their respective sports Also try these modes for other sports Custom picture mode allows you to manually change each of the picture settings Backlight Adjusts the LED brightness to affect the overall brilliance of the picture This option is not available unless Ambient Light Sensor is set to OFF See Adjusting the Advanced Picture Settings on page 14 Brightness Adjusts the black level of...

Page 22: ...the picture for watching film Select Auto or Off Backlight Control Select Off DCR Dynamic Contrast Ratio or OPC Ambient Light Sensor The ambient light sensor detects the light levels in the room and automatically adjusts the backlight for the best picture Select Off Low Medium or High 4 When you have finished adjusting the Advanced Picture Settings press the EXIT button on the remote Adjusting the...

Page 23: ...ht More then press OK 2 Use the Arrow buttons on the remote to highlight Reset Picture Mode then press OK The TV displays Are you sure you want to RESET Picture Settings to the factory defaults 3 Highlight Yes and press OK 4 Press the EXIT button on the remote Adjusting the Audio Settings To adjust the audio settings 1 Press the MENU button on the remote The on screen menu is displayed 2 Use the A...

Page 24: ...lect On or Off Digital Audio Out Changes the type of processing for the Optical output when connected to a home theater audio system Select Off Dolby Digital or PCM Analog Audio Out Sets the volume control properties for the analog RCA red white connectors when connected to a home theater audio system Select Variable to control the external speakers volume from the TV s volume controls or select F...

Page 25: ...ight More Access Points and press OK The More Access Points menu which is a list of available wireless networks is displayed 4 Highlight the name of your wireless network this is the network s SSID and press OK 5 Using the on screen keyboard enter your network s password then highlight Connect and press OK 6 Press the EXIT button on the remote To connect to a wireless network whose network name SS...

Page 26: ...he EXIT button on the remote Testing Your Network Connection To test your network connection 1 From the Network Connection menu highlight Test Connection and press OK 2 The Test Connection screen displays the connection method network name signal strength and download speed of your network connection 3 Press the EXIT button on the remote Changing the TV Settings Using the settings menu you can Cha...

Page 27: ...s OK The Tuner Mode menu is displayed 4 Highlight Antenna or Cable and press OK 5 Press the EXIT button on the remote Scanning for Channels Before the TV can detect and display channels and their associated information you must scan for channels A channel scan may also be necessary when the TV has been moved to an area where different free to air broadcast television channels are available 1 From ...

Page 28: ...s OK The Add Analog Channel menu is displayed 2 Highlight Enter Channel and use the Number Pad on the remote to enter the number of the channel you are adding 3 Highlight Add Channel and press OK The TV scans for the channel 4 When the TV is done scanning for the channel press the EXIT button on the remote Skipping Channels After a channel scan is completed you may find that some channels are too ...

Page 29: ...ngs menu highlight Digital MTS and press OK The Digital MTS menu is displayed 2 Select your preferred language English French or Spanish Press OK 3 Press the EXIT button on the remote Using the Parental Controls The TV s parental controls allow you to prevent the TV from displaying certain channels or programs without a password Accessing the Parental Controls Menu To access the Parental Controls ...

Page 30: ...rograms that are meant for mature audiences You may not want to block the channel completely using a channel lock but you may wish to block certain programs from being viewed When this is the case you can use the TV s Rating Block feature to block content based on its rating For a list of content ratings and their definitions visit www tvguidelines org To block or unblock content by its rating 1 F...

Page 31: ...f the Inputs To make it easier to recognize the different devices attached to the inputs on your TV you can rename the inputs For example if you have a DVD player connected to the Component input you can rename that input to display DVD Player To change the name of an input 1 Press the MENU button on the remote The on screen menu is displayed 2 Use the Arrow buttons on the remote to highlight the ...

Page 32: ...orrect time you must be connected to the internet via an Ethernet cable or a wireless network 1 Press the MENU button on the remote The on screen menu is displayed 2 Use the Arrow buttons on the remote to highlight the Settings icon and press OK The Settings menu is displayed 3 Use the Arrow buttons on the remote to highlight Time Local Settings and press OK The Time Local Settings menu is display...

Page 33: ...o turn the VIZIO light on or off 1 Press the MENU button on the remote The on screen menu is displayed 2 Use the Arrow buttons on the remote to highlight the Settings icon and press OK The Settings menu is displayed 3 Highlight LED Logo Settings and press OK 4 Use the Up Down Arrow buttons to select On or Off then press OK Using the Help Menu You can use the TV s Help menu to Display system inform...

Page 34: ...you sure you would like to Restore Defaults This will erase any custom settings 5 Highlight Yes and press OK The TV displays Memory is being cleared The TV will reset shortly 6 Wait for the TV to turn off The TV will turn back on shortly afterward and the Setup App will begin Using Guided Setup The TV s Setup App can be used to easily set up the TV tuner or to connect the TV with your network To a...

Page 35: ...he channel Using the Info Window The Info Window can be displayed by pressing the INFO button on the remote Press the INFO button one time to display channel and input information Press the INFO button two times to display the program title and closed captioning information Press the INFO button three times to display the program description Digital Episode Guide Info Window Program Description Up...

Page 36: ... a USB thumb drive Remember The USB thumb drive must be formatted as FAT32 Files on the USB thumb drive must end in a supported file extension mp3 jpg etc The player is not designed to play media from external hard drives or mp3 players To play your USB media 1 Connect your USB thumb drive to the USB port on the side of the TV 2 Highlight the Media App and press OK The Media App launches 3 Highlig...

Page 37: ...ses Now Playing Information Displays song title album title and artist name Back Button Highlight this button and press OK if you would like to return to the previous screen Connected Sources Displays connected USB devices To change source highlight it and press OK Page Information If your USB thumb drive has more files than can be displayed on a single screen you can move between pages by highlig...

Page 38: ...u can move between pages by highlighting this area and pressing Left Right Arrow Back Button Highlight and press OK to return to left column Connected Sources Displays connected USB devices To change source highlight it and press OK Current Folder Back Button Highlight this button and press OK if you would like to return to the previous screen Sort by Name or Date View Thumbnails or List View Fold...

Page 39: ...ange the size of the main display window when an App is open in the sidebar Red Exit from an open App or to close the App Dock Green View settings for an open App Using the VIA Dock The VIA Dock is where all of your VIA Apps are accessed To use the VIA Dock and launch an App 1 Press the VIA button on the remote 2 Highlight a VIA App by scrolling left and right using the Left Right Arrow buttons on...

Page 40: ...t of Apps in the VIA Dock For each profile you create a different set of Apps and App settings are saved Creating an Owner PIN Creating an owner PIN allows you to restrict access to the Administrative Controls menu in the Profile App You can also restrict other profiles from installing new Apps To create an owner PIN 1 Press the VIA button on the remote 2 Highlight the Profile App by scrolling lef...

Page 41: ...location 12 Highlight OK and press OK The PIN Confirmation menu is displayed 13 Re enter your 4 digit passcode Highlight OK and press OK The Security Question dialog is displayed Press OK 14 Highlight a security question and press OK The Security Answer menu is displayed 15 Enter your security answer using the On Screen Keyboard and press OK The Create Profile menu is displayed 16 If you would lik...

Page 42: ...ighlight the My Profile App by scrolling left and right using the Left Right Arrow buttons on the remote The highlighted App is in the lower left corner of the screen 3 Select the App by pressing the OK button The Profile App is displayed 4 Highlight System Settings and press OK The System Settings menu is displayed 5 Highlight Restore Factory Settings and press OK The TV displays Are you sure you...

Page 43: ...ontrol Press the MUTE button on the remote to ensure mute is off Check the audio settings See Adjusting the Audio Settings on page 15 Ensure the speakers are set to On Ensure no headphones are connected to the TV Check the audio connections of external devices Blu ray player game console cable satellite box that are connected to the TV If you are using an antenna the signal strength of the channel...

Page 44: ... When your TV s digital capabilities exceed a digital broadcast signal the signal is up converted improved to match your TV s display capabilities This up converting can sometimes cause irregularities in the image If you are using an antenna the signal strength of the channel may be low Ensure your antenna is connected securely to the TV and move the antenna around the room or close to a window fo...

Page 45: ... 1920 x 1080 1920 x 1080 Dynamic Contrast Ratio 100 000 1 100 000 1 Response Time 5 ms 5 ms Brightness 500 nits 500 nits HDMI Inputs 4 3 Rear 1 Side 4 3 Rear 1 Side Component Video Inputs 1 1 Composite Inputs 1 1 RF Coaxial Input 1 1 USB Ports 2 2 RGB Inputs 1 1 OSD Language English Spanish French English Spanish French Audio Outputs Optical Digital Audio Out RCA Optical Digital Audio Out RCA Numb...

Page 46: ... Yes Compliance Energy Star 4 1 ATSC Spec A 65 EIA CEA 766 A Energy Star 4 1 ATSC Spec A 65 EIA CEA 766 A Voltage Range 100 240 VAC 50 60Hz 100 240 VAC 50 60Hz Standby Power 1W 1W Ethernet Ports 1 1 Wireless WiFi 802 11n 802 11n Remote Control Model VR17 VR17 ...

Page 47: ...stomer misuse modifications or adjustments as well as installation and set up issues or any repairs attempted by anyone other than by a VIZIO authorized service center Products with unreadable or removed serial numbers or requiring routine maintenance are not covered This one year limited warranty does not cover Products sold AS IS FACTORY RECERTIFIED or by a non authorized reseller THERE ARE NO E...

Page 48: ...s not expressly approved by the party responsible for compliance with the FCC Rules could void the user s authority to operate this equipment Caution Always use an AC DC power adapter that is properly grounded Use the AC cords listed below for each area USA UL Canada CSA Germany VDE UK BASE BS Japan Electric Appliance Control Act Open Source Software Notice Your VIA device may contain GPL executab...

Page 49: ......

Page 50: ...SED ARE FOR ILLUSTRATION PURPOSES ONLY VIZIO THE V LOGO WHERE VISION MEETS VALUE AND OTHER VIZIO TRADEMARKS ARE THE INTELLECTUAL PROPERTY OF VIZIO INC PRODUCT FEATURES AND SPECIFICATIONS ARE SUBJECT TO CHANGE WITHOUT NOTICE 2011 VIZIO INC ALL RIGHTS RESERVED 110104ST NC ...

Reviews: