background image

28

White Balance

The human eye adapts to changes in light so that white objects still appear white even
when the light changes. With cameras, however, the color of the subject is influenced by
the color of the light surrounding it. This color adjustment is called “white balance
adjustment”. This setting allows you to set the white balance when capturing images under
specific lighting condition.

1. Rotate the mode dial to [ 

 ] manual photography

mode,and press the 

OK

 button.

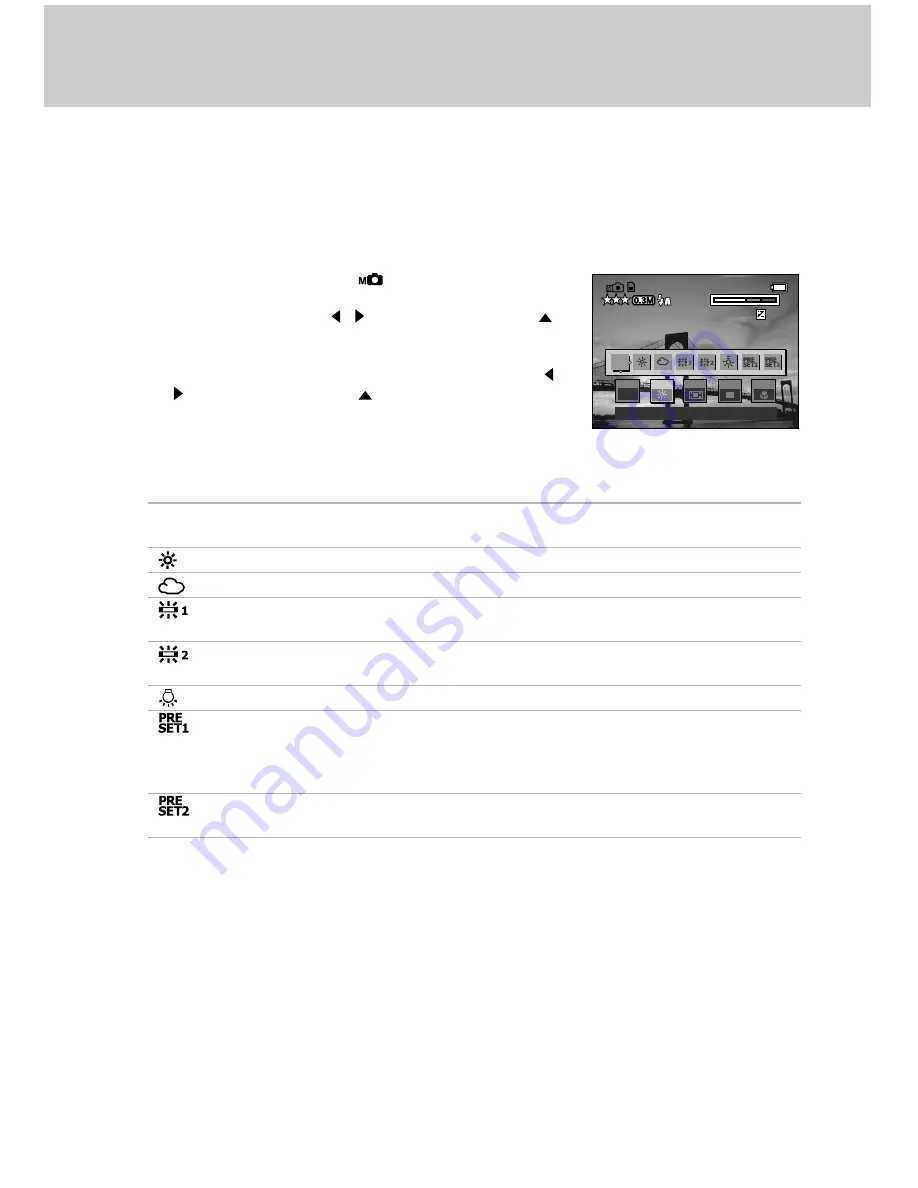
2. Select [

WB

] using the   /   buttons, and press the 

button.

A list of white balance icons is displayed.

3. Select the icon of the desired setting item using the 

/   buttons, and press the 

 button.

4. Press the 

OK

 button again and the camera is ready to

take the next-shot.

WB icons

Description

[

AW

]    AUTO

Automatic white balance adjustment (the camera will
determine appropriate wite balance settings)

 ]   SUNLIGHT

Photography outdoors in sunlight

 ] CLOUD

Photography outdoors under cloudy conditions

 ] FLUORESCENT LIGHT1

Photography under fluorescent lighting
(bluish glow fluorescent lamp)

 ] FLUORESCENT LIGHT2

Photography under fluorescent lighting
(reddish glow fluorescent lamp)

 ]   INCANDESCENT LAMP

Photography under incandescent lighting.

 ] PRESET 1

You may manually set with balance and save the setting. (Up
two white balance patterns can be saved.) Use this setting
when the white balance cannot be obtained using standard
white-balance presets.

 ] PRESET 2

You may manually set with balance and save a second
setting.

+ 1.0

+ 1.0

F8.0

F8.0

1/1000

1/1000

E X P

PRG

PRG

A E

S / C

W B

FOCUS

2 0 0 3 . 1 0 . 2 5     1 4 : 3 8

2 0 0 3 . 1 0 . 2 5     1 4 : 3 8

2 0 0 3 . 1 0 . 2 5     1 4 : 3 8

0 0 0 1 2

0 0 0 1 2

0 0 0 1 2

T

T

W

W

AUTO

AW

Summary of Contents for Vivicam 3755

Page 1: ...tions However there is no guarantee that interference will not occur in a particular installation If this equipment does cause harmful interference to radio or television reception which can be determ...

Page 2: ...neral reference guide for the product 2 The product and accessories that come with your camera may be different from those described in this manual This is due to the fact that different retailers oft...

Page 3: ...fire or an electrical shock Do not touch the power plug during a thunderstorm if you are using the AC power adapter This may cause an electrical shock Do not use the camera if any foreign objects have...

Page 4: ...unplug the camera from the power source batteries or AC power adapter for safety If you are using the AC power adapter unplug the adapter from the AC power outlet after you have disconnected the camer...

Page 5: ...ewing Your Images Single Frame Playback 32 Displaying Image Information 33 Displaying Thumbnail Images 34 Zoom Playback 34 Slide Show Display 35 Protecting Images and Video Clips 36 Protecting one ima...

Page 6: ...ER 50 PICTURE 50 DISPLAY SETTINGS 50 LCD BRIGHTNESS 50 Playback Menu 51 PROTECT 51 SLIDE SHOW 51 RESIZE 51 DISPLAY SETTINGS 51 LCD BRIGHTNESS 51 Movie Menu 52 ISO 52 DIGITAL ZOOM 52 QUALITY SETTING 52...

Page 7: ...oting lighting conditions and determines whether the flash should be used This feature helps ensure that your images turn out right In addition to still images you can record short videos using the mo...

Page 8: ...3 Shutter button 4 Remote control sensor 5 Flash adjustment sensor 6 Front LED 7 Lens 8 Flash 9 Flash open button 10 Speaker 11 Microphone 12 Terminal cover 13 MIC terminal 14 Digital terminal 15 AV t...

Page 9: ...wfinder 4 Viewfinder LED 5 LCD monitor 6 Menu button 7 Erase button 8 Tripod socket 9 Display button 10 Flash button 11 W Wide angle button 12 T Telephoto button 13 Strap eyelet 14 SD card cover 15 OK...

Page 10: ...es to your computer LED Indicators 1 2 6 5 3 4 State On Flashing On Flashing On Flashing Color Green Red Orange During photography Auto focusing successful without unsteady hold warning Auto focusing...

Page 11: ...ng Shaking hand icon 7 Image resolution 2048 x 1536 1600 x 1200 1280 x 960 1024 x 768 640 x 480 8 Flash mode Automatic Red eye reduction Forced fill flash Flash off Slow sync 9 Photography tab menu 10...

Page 12: ...0 1280 x 960 1024 x 768 640 x 480 8 Flash mode Automatic Red eye reduction Forced fill flash Flash off Slow sync 9 Photography tab menu 10 Current date and time 11 Battery level Full battery power Fai...

Page 13: ...x 1536 1600 x 1200 1280 x 960 1024 x 768 640 x 480 4 Image folder and files number 5 Protect icon when playing back a protected image or movie 6 Battery level Full battery power Fairly consumed Nearl...

Page 14: ...ine Normal Basic 4 Movie resolution 320 x 240 5 Photography tab menu 6 Current date and time 7 Battery level Full battery power Fairly consumed Nearly exhausted Virtually no battery power 8 Sound inpu...

Page 15: ...Fine Normal Basic 4 Movie resolution 320 x 240 movies are always 320 x 240 5 Battery level Full battery power Fairly consumed Nearly exhausted Virtually no battery power 6 Volume 7 Movie status bar 8...

Page 16: ...ded period of time remove them from the camera to prevent leakage or corrosion Never use manganese batteries Never use batteries of different type together or mix old and new batteries Avoid using bat...

Page 17: ...Make sure the camera is off Open the SD card cover Press lightly on the edge of the memory card and it will eject To prevent valuable data from being accidentally erased from an SD card you can slide...

Page 18: ...e by choosing CANCEL 1 Select the desired item using the buttons Enter the values of the time and date by using the buttons To increase the value for each option press the button To decrease the value...

Page 19: ...iewfinder 4 Press the shutter button down halfway to set the focus and exposure and then press the shutter fully down to capture the image After the image is taken the viewfinder LED display your imag...

Page 20: ...ood focus while the background details are slightly out of focus The flash mode is set to Automatic with Red eye Reduction LANDSCAPE Select this mode to enhance color and saturation for mountains fore...

Page 21: ...ots within 10cm to 50cm 4 to 20 inches with the lens at wide zoom off or 90cm to 120cm 3 to 4 feet with the optical zoom full zoomed 10X INFINITY Select this mode when you want to take images of subje...

Page 22: ...ited depending on the scene mode 2 Press the flash open button to pop up the flash 3 Press the flash button to select the desired mode Flash mode is indicated on the display When scene mode is set to...

Page 23: ...ages is captured with the second firing Forced Fill Flash The flash will always fire regardless of the surrounding brightness Select this mode for recording images with high contrast backlighting fluo...

Page 24: ...Compose your image press the shutter button down halfway to set the focus and exposure and then press the shutter fully down to capture the image The front LED will blink and the images is taken af te...

Page 25: ...maximum of 40X is possible using the 10X optical zoom and 4X digital zoom 1 Rotate the mode dial to one of automatic photography mode manual photography mode or movie mode 2 Compose the image using t...

Page 26: ...h you specify 1 Rotate the mode dial to manual photography mode and press the OK button 2 Select EXP using the buttons and press the button A list of exposure mode icons is displayed 3 Select Av using...

Page 27: ...before capturing images 1 Rotate the mode dial to manual photography mode and press the OK button 2 Select EXP using the buttons and press the button A list of exposure mode icons is displayed 3 Sele...

Page 28: ...ext shot WB icons Description AW AUTO Automatic white balance adjustment the camera will determine appropriate wite balance settings SUNLIGHT Photography outdoors in sunlight CLOUD Photography outdoor...

Page 29: ...and press the button CENTER PRIORITY PHOTOMETRY The exposure is determined giving precedence to the center of the image when metering the entire image SPOT PHOTMETRY The exposure is determined giving...

Page 30: ...ge Recommendations for using EV compensation Positive Compensation Imaging of printed text black characters on white paper Backlit portraits Very bright scenes such as snowfields and highly reflective...

Page 31: ...mber of frames varies according to the photographic conditions subject recording medium etc AEB 3 Frame Shooting The shutter operates three times and photographs are taken with the exposure changed in...

Page 32: ...ay back still images one image at a time 1 Rotate the mode dial to playback mode 2 Turn the camera on by sliding the POWER switch 3 View and select your recorded images by using the buttons Pressing t...

Page 33: ...d display Displays detailed image information metadata Histogram Displays a histogam graph indicating the distribution of brightness black to white in the image The vertical axis indicates the number...

Page 34: ...tion of the currently enlarged area within the context of the entire frame 4 Use the or buttons to scroll over the image 5 To return to the regular display from 4X enlarged status press the OK button...

Page 35: ...ears 4 Select the PLAY INTERVAL using the buttons then press the button 5 Select the desired interval using the buttons then press the OK button This sets the slide show timing 6 Select the SLIDE SHOW...

Page 36: ...ion process select CANCEL and press the OK button All of the images in a folder can be selected by press the buttons if multiple folders exist To display the image full on screen for confirmation pres...

Page 37: ...ur new images will be assigned image numbers starting after the highest previously assigned number i e if you have taken images 1 2 3 4 5 6 and you deleted images 2 and 6 the next image you capture wi...

Page 38: ...t Format using the buttons and press the OK button The message FORMAT CARD is displayed 4 Select YES using the buttons and press the OK button The message SURE is displayed Select YES using the OK but...

Page 39: ...e external microphone to record sound and voice Flash photography is not possible in the movie mode Viewing Video Clips You may play back the video clips recorded on the camera Sound is also played ba...

Page 40: ...es and video clips from the camera to your computer follow the steps below Step 1 Installing the USB driver Step 2 Connecting the camera to your computer Step 3 Downloading images and video clips CPU...

Page 41: ...complete the installation After the USB driver installation is complete restart your computer Installing the USB Driver on Macintosh Computers Mac OS 8 6 users must install a USB driver For Mac OS 9 0...

Page 42: ...on For Computers Running Windows Open the removable disk and subsequent folders by double clicking on them Double click on the folder Your images are inside these folder s Select the images that you w...

Page 43: ...PhotoSuite 1 Inset the CD ROM packaged with the camera in to the CD ROM drive The welcome screen appears 2 Click Install PhotoSuite Follow the on screen instructions to complete the installation For i...

Page 44: ...to create spectacular 3600 panoramic images please refer to its online help For Windows 2000 XP users make sure to install and use the PhotoVista while logged in as a user with an Administrator accoun...

Page 45: ...packaged with the ca mera into the CD ROM drive The welcome screen appears 2 Click Install Acrobat Reader Follow the on screen instructions to complete the installation For Mac users 1 Insert the CD R...

Page 46: ...lled in your computer 1 Insert the CD ROM packaged with the ca mera into the CD ROM drive The welcome screen appears 2 Click Install User s Manual Follow the on screen in structions to complete the in...

Page 47: ...ISO sensitivity value the greater sensitivity but the greater the noise With a higher sensitivity selected images can be taken with less light AUTO 200 ISO 70 to ISO 200 Automatic selection by camera...

Page 48: ...menu and press the button 2 Select one of COLOR CONTRAST or SHARPNESS using the buttons and press the button 3 Select the setting item using the buttons and press the button COLOR NORMAL Color VIVID B...

Page 49: ...atic photography menu and press the button 2 Select the item using the buttons and press the button DISPLAY SETTINGS AUTO Display the photography tab menu only momentarily then auto hide ON Always dis...

Page 50: ...l photography menu 5 To exit the manual photography menu press the menu button ISO Refer to ISO in Automatic Photography menu DIGITAL ZOOM Refer to DIGITAL ZOOM in Automatic Photography menu QUALITY S...

Page 51: ...s manual titled Slide Show Display for further detail RESIZE Using the resize feature you can reduce the size resolution of image to 320 x 240 pixels or 160 x 120 pixels to create a smaller image 1 Se...

Page 52: ...5 To exit the movie menu press the menu button ISO Refer to ISO in Automatic Photography menu DIGITAL ZOOM Refer to DIGITAL ZOOM in Automatic Photography menu QUALITY SETTING Refer to QUALITY SETTING...

Page 53: ...asion where silent operation is required and the function beeps are not desired you may disable all sounds or you may specify shutter and operational tones individually 1 Select SOUND using the button...

Page 54: ...s Deutsch Espa ol VIDEO OUT In order to play back images and movies on a TV you must select the video output standard according to the country in which your camera is used NTSC Select this standard wh...

Page 55: ...55 USB Cable Notebook Computer TV PCMCIA Adapter SD Card Reader SD Card Reader VIDEO Cable SD Memory Card Printer CONNECTING YOUR CAMERA TO OTHER DEVICES...

Page 56: ...nual Sunlight Cloud Fluorescent light 1 Fluorescent light 2 Incandescent lamp Preset1 Preset2 Sensitivity Auto Auto 200 Auto 400 ISO 70 100 200 400 Manual ISO 70 100 200 400 Compression JPEG File form...

Reviews: