


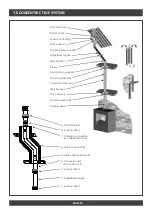

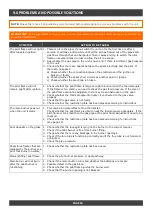


2.0 POSITIONING THE APPLIANCE
2.4 Fitting the ceramic log set (see appendix 5)
Method:
Remove mesh deco plate and burner out of the burning chamber.
Unscrew the premix bracket from the burner.
Place the premix bracket for G20 with the holes Ø5mm.
Place the premix bracket for G20/20-25 with the holes Ø7mm.
Place screws back in place.
Replace the mesh deco plate .
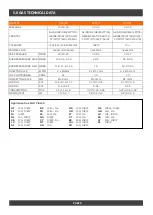
Check the burner pressure, for more information see technical data.
Mix the glowing material (lava granules) and the “fusilli” (spiral-shaped ceramic material) and spread them
evenly over the burner and the burner plate so that they are just covered. Glowing embers can be placed
here and there as decoration.
Place the ceramic wood blocks in the correct order as shown on Appendix 5.
Place the logs carefully. Other location can seriously affect the flames or malfunction of the burn process
(sooting).
Slot/opening between burner and mesh deco plate must be kept free of glowing material.
Before replacing the windows make sure if there must be a restriction plate to be placed or not.
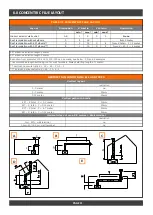
See chapter 6
"Concentric chimney lay out"
If there is a restriction required for your situation, remove the baffle plate by unscrewing it from the front
of the plate and move the plate backwards and then out. Now install the restriction plate with two screws
and replace the baffle plate.
Also see appendix 3, pictures 6 and 7.
Now place the window in reverse order as described at 2.2 on appendix 3.
2.5 Fitting the pebble set (see appendix 6)
Scatter vermiculite evenly over the burner tray. Make sure the pilot light remains unobstructed.
Place a row of medium-sized and large pebbles at the front of the burner plate
Fill the burner tray with small and medium-sized pebbles from the front to the rear.
Place the pebbles as closely as possible to each other on the burner tray.
Fill the rear of the burner plate with medium-sized and large pebbles.
Before replacing the window make sure if there must be a restriction plate to be placed or not.
See chapter 6
"Concentric chimney lay out"
If there is a restriction required for your situation install the restrictor plate with two screws.
Now place the window in reverse order as described at 2.2 on Appendix 3.
NOTE:
When installing the log set and the various glowing materials and accessories, the following must be
taken into account:
A:
No glowing material in or on the pilot burner.
B:
Prevent that ceramic material falls on the glass seals. Remove this if necessary. The window can be
damaged.
C:
Slot /opening between burner and mesh deco plate must be kept free of glowing material. Too much
placed glowing material can affect the combustion process. Remaining materials may be stored.
PAGE 5
NOTE:
Before placing the log set; when heating on G25 20-25mBar (I2L / I2ELL) the premix brackets
underneath both burners needs to be changed.
IMPORTANT:
Make sure the pilot light remains unobstructed.
Summary of Contents for TL73
Page 1: ...INSTALLATION INSTRUCTIONS FOR MODELS TL73 TL73H TL73T TL73RD ...
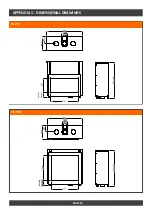
Page 20: ...APPENDIX 2 INSTALLATION EXAMPLES PAGE 21 1 2 3 4 MAX 1500 ...
Page 21: ...APPENDIX 2 INSTALLATION EXAMPLES PAGE 22 4 5 6 ...
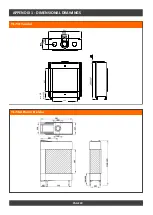
Page 22: ...APPENDIX 3 PREPARATION AND INSTALLATION PAGE 22 1 1 2 3 4 5 6 7 ...
Page 27: ...APPENDIX 6 ARRANGEMENT OF VARIOUS BURNER FILLINGS PAGE 29 PEBBLES 1 2 ...


