background image

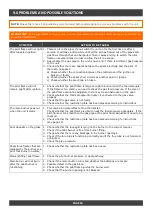
9.0 PROBLEMS AND POSSIBLE SOLUTIONS 

IMPORTANT: 

Solving problems with your unit, whether gas related or electrical, must always be performed by  

a qualified technician.  

NOTE: 

Please first check if all guidelines were followed before attempting to solve any problems with the unit. 

PAGE 18 

SYMPTOM 

ACTION TO BE TAKEN


The pilot flame will not light 
after repeated ignition.  

1.  There is air in the pipes if you switch the unit on for the first time or after a 

service.


It will take a little while until all the air has flowed out of the pipes and 

gas flows through that can be ignited.


Take it away and try to switch the pilot 

flame on several times in order to allow the air to escape. 

2.  See whether the gas pipe to the unit is open and if there is sufficient gas pressure 

to the unit.  

3.  Check whether there are sparks between the spark electrode and the pilot.


If 

there are no sparks: 

a)  Check whether the connection between the electrode and the ignition is 

broken or faulty. 

b)  Check whether the spark short circuits at another point or jumps. 

c)  Check whether the electrode is broken. 

The pilot flame will not 

remain alight after ignition.  

1.  Check whether the pilot flame is large enough to burn around the thermocouple.


If the flame is too small, you need to check the gas feed pressure.


If the size of 

the pilot flame cannot be adjusted, there may be an obstruction in the pilot. 

2.  Check whether the thermocouple interrupter is connected to the gas valve 

properly.  

3.  Check that the gas valve is not faulty.  

4.  Check whether the restriction plate has been placed according to instructions  

The main burner goes out 

when the unit is warm.  

1.  This can be a normal effect of the thermostat.


Check whether the pilot flame is able to heat the thermocouple adequately.


If the 

pilot flame is too small then the gas pipe or the pilot flame adjustment need to be 

checked.  

2.  Check whether the restriction plate has been placed according to instructions 

(see page

 25).


Soot deposits on the glass.   1.  Check whether the lava split is lying on the burner in the correct manner. 

2.  Check if the pilot burner is free from burner filling. 

3.  Check whether there is any blockage in the burner openings. 

4.  Check if the flue tube is functioning correctly and if the flue tube is not hindered 

or blocked. 

5.  Check the pipe pressure. 

Sharp blue flames that are 

released by the burner or a 

pilot that burns too wildly.  

1.  Check whether the restriction plate has been used.  

Weak (stifling) pilot flame.  1.  Check the pilot burner pressure or duct pathway.  

Main burner will not burn 

after the pilot burner is 

functioning.  

1.  Check if the motor button turns and whether the batteries are empty. 

2.  Possible defect in the gas block. 

3.  Check whether the pilot flame ignites the burner well. 

4.  Check that the burner opening is not blocked.  

Summary of Contents for TL73

Page 1: ...INSTALLATION INSTRUCTIONS FOR MODELS TL73 TL73H TL73T TL73RD ...

Page 2: ... FLUE LAYOUT Page 11 7 0 CONCENTRIC FLUE SYSTEM Page 12 7 1 Components of the concentric flue system 7 2 Construction of concentric flue system 7 3 Installation instructions regarding existing flues 7 4 Components 7 5 Installation 7 6 Cleaning and maintenance 8 0 TROUBLESHOOTING FLOW CHART MERTIK GV60 Page 15 9 0 PROBLEMS AND POSSIBLE SOLUTIONS Page 18 APPENDIX 1 DIMENSIONAL DRAWINGS Page 19 APPEN...

Page 3: ...echnical information for the relevant country needs to be consulted and modifications discussed with the manufacturer There will be air in the gas pipes when the unit is first used The gas pipes therefore need to be purged first Ignite the fire according to operating instructions and check whether the burner flame is uniform After the unit has been used for the first time you should remove any dep...

Page 4: ...tly to the rear wall mounting material not included 4 The legs of the device can be adjusted Min 150 Max 455 5 The adjustable feet allow refined adjustment of the appliance Build the gas cassette in the self assessed surround casing The distance between the gas cassette and the unit is determined by the cable lengths of which control cabinet to the pilot burner and the gas control etc Max 1500 mm ...

Page 5: ... appendix 3 pictures 6 and 7 Now place the window in reverse order as described at 2 2 on appendix 3 2 5 Fitting the pebble set see appendix 6 Scatter vermiculite evenly over the burner tray Make sure the pilot light remains unobstructed Place a row of medium sized and large pebbles at the front of the burner plate Fill the burner tray with small and medium sized pebbles from the front to the rear...

Page 6: ...er Before replacing the window make sure if there must be a restriction plate to be placed or not See chapter 6 Concentric chimney lay out If there is a restriction required for your situation remove the baffle plate see Appendix 4 by unscrewing it from the front of the plate after the plate backwards and then out Now install the restrictor plate with two screws and replace the baffle plate Now pl...

Page 7: ...tlet front burner D Thermocouple connection E pilot burner connection Unit category C11 C31 C91 Pilot flame SIT 3 flames Combustion gas discharge and combustion air supply Ø130 200 mm PAGE 7 B C A E D Main valve knob Thermocouple c Pressure regulator Ignition connection Pilot gas adjustment MAN knob Side inlet Side outlet Bottom outlet Bottom inlet Inlet pressure Outlet pressure Thermocouple conne...

Page 8: ...For automatic start via the transmitter the receiver and the control the gas control valve should be switched The oval disk on the gas control block should be turned to the ON position The I 0 switch should to be set to I The ignition must be connected to the receiver box at the terminal SPARK The transmitter s contains the thermostat sensor system The transmitter operates best at 2 to 3 m from th...

Page 9: ...W MBAR 11 8 11 6 11 6 18 18 2 22 2 INJECTOR SIZE Ø MM 2 x Ø2mm 2 x Ø1 1mm 2 x Ø1 1mm INJ PILOTBURNER CODE 51 30 30 LOWSETTING SIZE MM Ø2 4mm Ø1 3mm Ø1 3mm LOAD Hs KW 12 8 10 6 11 7 9 7 8 7 9 6 9 7 8 7 9 6 LOAD Hi KW 11 6 9 56 8 94 8 94 CONSUMPTION M h 1 2 1 16 1 3 0 27 0 32 0 36 0 27 0 32 0 36 NOM OUTPUT kW 7 5 6 2 7 5 8 5 2 5 8 5 8 5 2 5 8 Appliance has NoX Class 5 AT I2H I3B P BE I2E I3 DK I2H I...

Page 10: ... lay out restriction 0 3 meter no 3 7 meter 30mm 7 12 meter 50mm Vertical path with bends 45 X total Y 3 7 meter 30mm 45 X total Y 7 12 meter 50mm 90 X total Y 4 7 meter 30mm 90 X total Y 7 12 meter 50mm Horizontal lay out max 5 5 metres Wall terminal restriction 1m 90 wall terminal no 1 4m 90 5 5m wall terminal no 45 elbow calculation length 1 meter 90 elbow calculation length 2 meter Reduction f...

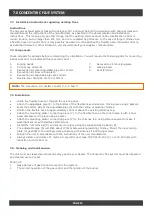
Page 11: ... should be cased if necessary Sufficient fireproof measures must also be taken when the flue is being mounted along flammable materials Determine the position of the unit and outlet and begin construction of the flue with the connection on the unit paying attention to the direction of installation and connecting the elements by means of locking bands An adjustable length can be used between the be...

Page 12: ...ugh the existing duct Attach the adjustable pipe 5 to the bottom of the flexible hose and secure this in place using 2 parkers Level the bottom side of the adjustable pipe 5 with the ceiling of existing chimney Shorten the flexible hose to approximately 100 mm above the existing chimney top Attach the mounting plate connecting piece 7 to the flexible hose on the roof Clamp it with a hose band and ...

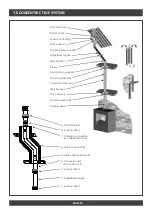
Page 13: ...all bracket Elbow Floor ceiling support Fire stop plate flat Concentric element Wall bracket Floor support Fire stop plate flat Locking band 9 Roof terminal 8 Locking band 7 Chimney connection set Renovation kit 6 Flexible hose 316L 5 Slider Renovation kit 4 Connection set Renovation kit 3 Locking band 2 Adjustable length 1 Locking band ...

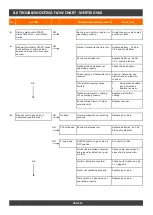
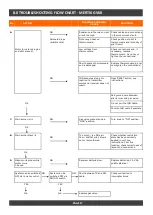
Page 14: ...ns and label on receiver OK Transmitter receiver range limited 1 Move antenna cable see instructions 2 Replace receiver Optional wall switch cabling not operating properly Replace wall switch cabling Receiver fuse blown in older versions only Replace receiver 2 Magnet unit in gas valve is energised audible click NO No beep Impulse magnet not operating properly Replace gas valve NO 3 short beeps Re...

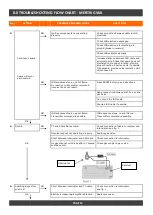
Page 15: ...ton see instructions Add ground wire between pilot burner and gas valve Do not coil the IGN cable Shorten IGN cable if possible NO IGN sequence stops no pilot flame Transmitter command is possible IGN sequence stops no pilot flame Transmitter command is possible OK 4 Pilot lit NO TC and SW cable reversed Check connection of cable to receiver and interrupter see fig 1 Impulse magnet not operating p...

Page 16: ...nsmitter command receiver does not react Press RESET button see instructions Add ground wire between pilot burner and gas valve OK Do not coil the IGN cable Shorten IGN cable if possible 7 Main burner is lit NO Gas valve manual knob in MAN position Turn knob to ON position OK 8 Main burner stays lit NO Too much too little air flow draft at pilot blows out or is smothered Check whether restriction ...

Page 17: ...ize of the pilot flame cannot be adjusted there may be an obstruction in the pilot 2 Check whether the thermocouple interrupter is connected to the gas valve properly 3 Check that the gas valve is not faulty 4 Check whether the restriction plate has been placed according to instructions The main burner goes out when the unit is warm 1 This can be a normal effect of the thermostat Check whether the...

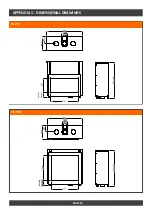
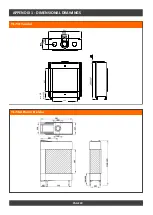
Page 18: ...APPENDIX 1 DIMENSIONAL DRAWINGS PAGE 19 TL73 TL73h 732 961 200 130 157 320 382 Min 155 Max 455 1025 1325 732 961 200 130 157 320 657 Min 155 Max 455 1025 1325 ...

Page 19: ...APPENDIX 1 DIMENSIONAL DRAWINGS PAGE 20 TL73t Tunnel TL73rd Room Divider 732 961 200 130 165 330 657 Min 155 Max 455 1000 1295 ...

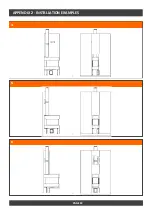
Page 20: ...APPENDIX 2 INSTALLATION EXAMPLES PAGE 21 1 2 3 4 MAX 1500 ...

Page 21: ...APPENDIX 2 INSTALLATION EXAMPLES PAGE 22 4 5 6 ...

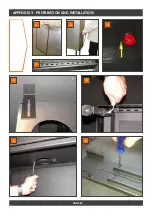
Page 22: ...APPENDIX 3 PREPARATION AND INSTALLATION PAGE 22 1 1 2 3 4 5 6 7 ...

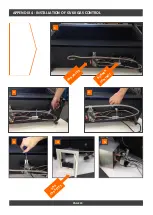
Page 23: ...APPENDIX 4 INSTALLATION OF GV60 GAS CONTROL PAGE 23 G A S V A LV E B U R N ER CO N TR O L G A S CA SSETTE 1 2 2 3 4 5 ...

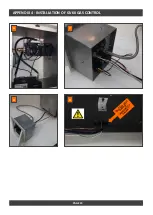
Page 24: ...APPENDIX 4 INSTALLATION OF GV60 GAS CONTROL PAGE 24 6 PO SITIO N PILO T B U R N ER U N D ER N EA TH TH E U N IT 7 8 9 ...

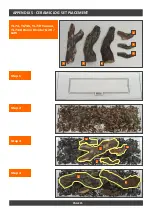
Page 25: ...APPENDIX 5 CERAMIC LOG SET PLACEMENT PAGE 25 TL73 TL73h TL73t Tunnel TL73rd Room Divider G20 G25 5 2 4 3 6 1 6 5 Step 1 Step 2 Step 3 Step 4 2 1 4 1 ...

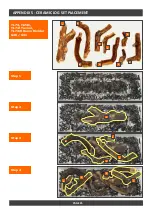
Page 26: ...APPENDIX 5 CERAMIC LOG SET PLACEMENT PAGE 25 TL73 TL73h TL73t Tunnel TL73rd Room Divider G30 G31 5 4 9 2 6 1 Step 1 Step 2 Step 3 Step 4 8 3 7 1 4 3 5 2 8 6 7 9 ...

Page 27: ...APPENDIX 6 ARRANGEMENT OF VARIOUS BURNER FILLINGS PAGE 29 PEBBLES 1 2 ...

Page 28: ...Brought to you by Imperial Point Express Trading Estate Stone Hill Road Farnworth Bolton BL4 9TN Tel 01204 868 550 Fax 01204 868 551 Email sales percydoughty com www visionfires co uk ...

Reviews: