Viking K-1900-7-EWP Product Manual Download Page 9

9

C.  Configuring the K-1900-6/7-IP Network Settings

Step 1.

Open the “Viking IP Programming” software on a windows PC that is connected to the same LAN as the 

K-1900-6/7-IP

phone to be

programmed.

Step 2.

The window will show you each 

K-1900-6/7-IP

phone that is connected to that LAN. Select the unit with the same MAC address

shown on the label located on the top of the Ethernet connector on the 

K-1900-6/7-IP

phone.

Step 3.

Click the “Connect” button. If a pop up window appears, enter the unit’s security code (factory set to 

845464

) then click “OK”.

Step 4.

The program will then read and display the 

K-1900-6/7-IP

phone’s IP and programming settings.
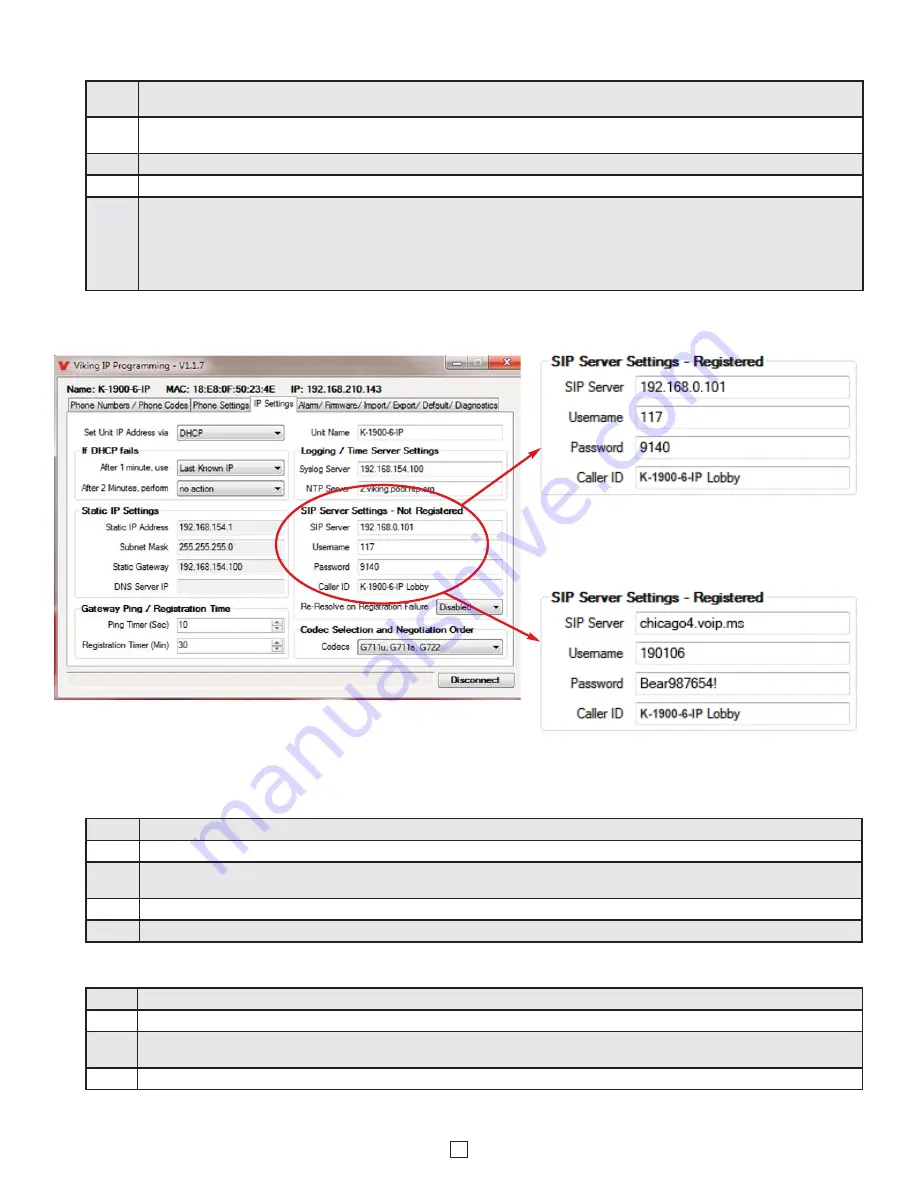
Step 5.

Click on the “IP Settings” tab and fill in the three required fields of SIP Server, Username and Password. The SIP provider or the phone
system programmer provide the information to put in these fields. The SIP Server field can contain an IP address or a fully qualified
domain name. Some examples are shown below. Our phones use port “5060” for traffic by default but another port can be specified by
adding a “:” (colon) and the desired port number at the end of the SIP server IP address (for example “192.168.210.61:5070” to specify
port “5070”). You can also assign a name for the 

K-1900-6/7-IP 

in the Unit Name field. When finished, click on the “Apply” button to send

the IP settings to the connected unit.   See Examples 1 and 2 of the required fields below:

E.  Manually Resetting All Network Parameters to Factory Default

Step 1.

Power down the 

K-1900-6/7-IP

phone by disconnecting the LAN Cable (RJ45 plug).

Step 2.

Take the handset offhook, then reconnect the LAN Cable (RJ45 plug).

Step 3.

8-12 seconds after connecting the LAN Cable you should hear 2 beeps in the handset. 6 seconds later you should hear 4 beeps, go
back on-hook within *6 seconds. Unit will reset and 2 beeps will be heard in approximately 7 seconds.

Step 4.

You can now enter programming by following the steps in section 

C

above.

Step 1.

Power down the 

K-1900-6/7-IP

phone by disconnecting the LAN Cable (RJ45 plug).

Step 2.

Take the handset offhook, then reconnect the LAN Cable (RJ45 plug).

Step 3.

8-12 seconds after connecting the LAN Cable you should hear 2 beeps in the handset. Go back on-hook within 6 seconds and you
should hear 2 more beeps.

Step 4.

The security code is now reset to 

845464

(factory default).

Step 5.

You can now enter programming by following the steps in section 

above.

D.  Manually Resetting the Security Code to Enter Programming

*Note:  

if you do not go back on-hook within 6 seconds, the handset will beep twice and provide busy signal until back on-hook. This indicates an

error and network parameters will remain unchanged.

Example 2:  Voip.ms

Example 1:  Panasonic TDE 100/200

Summary of Contents for K-1900-7-EWP

Page 1: ...del Phone only 5 0 x 10 0 x 5 1 127mm x 254mm x 130mm Including rough in box 5 0 x 10 0 x 5 4 127mm x 254mm x 137mm Shipping Weight for K 1900 6 IP 2 0 lbs 0 9 kg Shipping Weight for K 1900 7 IP 3 7 l...

Page 2: ...tform V6 2 9 or earlier Avaya IP Office Platform BlueBox Brekeke Cisco Unified Communications Manager CUCM Cisco Unified Communications Manager Express CUCME Elastix epygi QX200 4 Freeswitch Grandstre...

Page 3: ...nsport Protocol is an Internet protocol standard that specifies a way for programs to manage the real time transmission of multimedia data over either unicast or multicast network services Server A co...

Page 4: ...designed for insulation displacement on 19 26 gauge wire with a maximum insulation of 0 082 inches Front View of the K 1900 7 IP VoIP Panel Phone Condensation Drain Hole Mounting Screws 8 6 32 x 3 4...

Page 5: ...g the K 1900 6 IP B Installing the K 1900 7 IP To install the K 1900 7 IP panel phone attach the panel to a standard double gang electrical box using the provided screws or use the optional VE 5x10 or...

Page 6: ...IP Entry Phone 4 K 1900 6 IP Entry Phone 3 N O COM 2 Gel Filled Butt Connectors included Doorstrike Magnetic Lock 120V AC Door near Entry Phone 2 N O COM Relay 4 Output Contacts 5A 30VDC 250VAC max C...

Page 7: ...oIP Phone System SIP VoIP PBX or PC with SIP Server Software 100m 328 ft maximum Viking supplies Customer s Responsibility Internet 10 100 Mbps Maximum Viking K 1900 6 7 IP VoIP Phone Note A PoE exten...

Page 8: ...ame MAC addresses must be used to identify each phone When finished programming click on the Disconnect button at the bottom Closing the program will also automatically disconnect the unit With the un...

Page 9: ...it Name field When finished click on the Apply button to send the IP settings to the connected unit See Examples 1 and 2 of the required fields below E Manually Resetting All Network Parameters to Fac...

Page 10: ...Mode Ring Ring Flash factory set to Door Strike 14 13 Relay Activation Command 1 or 2 digits factory set to QQ Relay Mode must be set to Door Strike 15 13 Relay Activation Time 0 5 99 sec factory set...

Page 11: ...her way to update is accomplished by clicking the IP firmware Update button You can then browse to the folder that contains the PIP file for updating the unit s IP firmware This method is typically on...

Page 12: ...ing pattern selected in Ring Cadence The call can then be answered by taking the handset off hook Ring High In the High mode the phone will output a slightly louder higher pitched ring signal out of t...

Page 13: ...ory setting is 5 seconds THis also controls the length of relay closure in Door Bell Mode 16 Relay Activation Time Doorstrike Mode When programmed for Doorstrike Mode the relay is intended for door st...

Page 14: ...you are making an outbound call through your VoIP phone system and are relying on In Band analog audio for ringback or busy detection The factory default is Enabled 19 In Band Audio Call Progress The...

Page 15: ...nd you can now enter the Remote Access Operation Commands below The relay must be set to Door Strike Mode to be controlled by these commands Note Latching commands must be enabled in programming Troub...

Page 16: ...m panel The user can customize the clear coated aluminum panel to mount an PRX 1 card reader PRX 2 keypad or switch The kits come complete with box gasket panel and screws Model numbers that end with...

Page 17: ...r SIP VoIP phone systems with PoE The unit can be programmed from any PC on the same LAN or remotely using a Static IP Address The K 1900 8 IP phone can dial up to 250 programmable numbers and another...

Page 18: ...to a PO Box 4 RA number on carton In large printing write the R A number on the outside of each carton being returned RETURNING PRODUCT FOR EXCHANGE The following procedure is for equipment that has...

Reviews: