background image

8.3. INSTALLATION

Installation menu helps you to setup a variety of
parameters necessary for receiving signal, add new
service, upgrade the new software and reset the
channel data. 
Select Installation menu in Main Menu and you will
be asked to enter your PIN code.
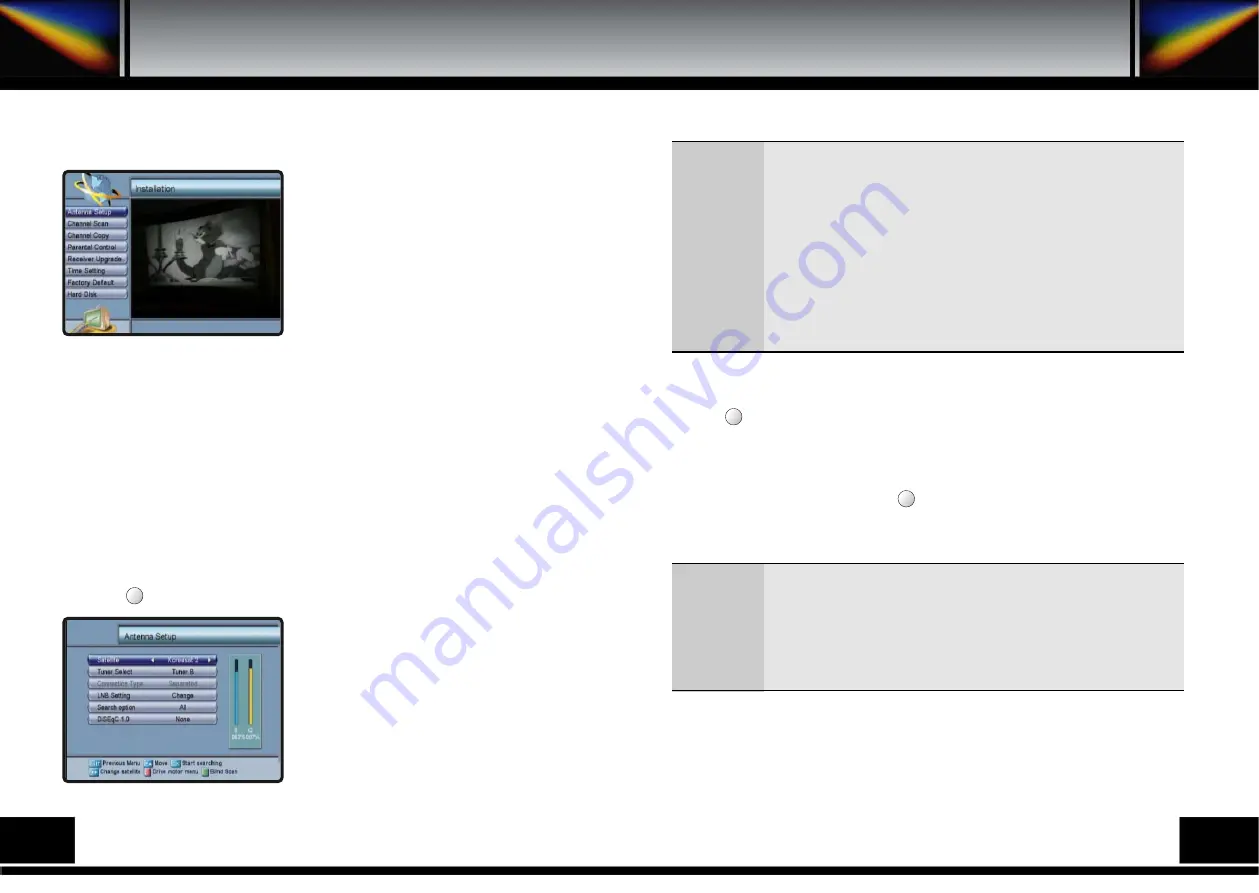
You can find the Installation screen on the left by
entering it.

8.3.A. ANTENNA SETUP 

Your receiver includes the preprogrammed information of transponders contained in various
satellites. You can update the transponder list preprogrammed for a satellite by adding a new
transponder to it or modifying the information of the existing transponder (Refer to the
Channel Scan described in section 7.3.B). 
Select Antenna Setup menu in Installation menu and the following screen will be displayed.

Select the desired satellite using the left/right keys(

◀∙▶

) and the up/down keys (

▲∙▼

)

and select Tuner A or B as you want to watch. Select the LNB Setting using the left/right
keys(

◀∙▶

) then you can set LNB Power, LNB Type, LNB Freq., 22KHz with left/right

keys(

◀∙▶

) at each field.  And you can set Search option, DiSEqC 1.0 to the appropriate

value using the left/right keys (

◀∙▶

) at each field.

Press the         key to select Drive motor menu and you can set Motor and USALS setting.

8.3.A.1. Automatic Scan
Check the signal strength. Press OK key to start the
scan procedure. You can see the progressive status
of channel searching.
Please note that the scan procedure may take a few
minutes.
Press the MENU key or EXIT key to return to
previous menu.

F1

LNB Power

LNB Type
LNB Freq.

22KHz 

Search option

DiSEqC 1.0

: Depending on the user’s antenna LNB, you can supply either LNB power 

by  setting ON or not by setting OFF. Normally set this to ON.

: You can select the LNB type.
: You can select the predefined LNB frequency or manually enter a specific 

frequency in MHz unit by pressing numeric keys.

: In case you are using two antennas connected to a 22KHz tone switch box, 

you can supply either 22KHz by setting ON or off by setting OFF to select 
antenna.

: You can search all the free channels & scramble channels or only free 

channels or only scramble channels by setting the search option.

: If you have DiSEqC 1.0 you can choose port by selecting port number. 

Otherwise, choose None.

TP Freq.
Mode
Move
Move Fine
Limit
Store Position
Goto Position

: You can select TP frequency of the selected Satellite.
: Mode 1.2(Motor) / Mode 1.3(USALS)
: You can move East, West direction consecutively.
: You can move East, West direction by stages.
: Set the limit or go to reference.
: Store the current position of the motor for the selected satellite.
: Move the motor to the stored position of the selected satellite.

8.3.A.2. Blind Scan
Blind Scan 
search the channel when you don’t know the transponder information.
Press the        key to start the blind scan procedure. Please note that the scan procedure may take a
few minutes. Press the MENU key or EXIT key to return to previous menu. 

8.3.A.3. Motor Setting
If you have a DiSEqC 1.2 or 1.3 (USALS) motorized system, then you can take advantage of the
Motor Setting functions available. Press the         key to drive your motor. Then adjust antenna
direction using the left/right keys(

◀∙▶

) with checking the signal strength. Press the MENU key or

EXIT key to return to previous menu. 

F2

F1

20

21

Summary of Contents for PVR7000

Page 1: ......

Page 2: ...AGE 9 4 SLEEP MODE 9 5 ZOOM FUNCTION 9 6 PIP Picture in Picture 9 7 PREVIOUS CHANNELS 10 HOW TO DO RECORD PLAYBACK 11 HOW TO DO RESERVATION RECORD 11 1 RESERVATION RECORD IN RECORD SERVICE MENU 11 2 R...

Page 3: ...led and used in accordance with the instructions may cause harmful interference to radio communications However there is no guarantee that interference will not occur in a particular installation if t...

Page 4: ...receiver Place the receiver at least 30mm from the wall ATTACHMENTS Do not use any attachment that is not recommended by the manufacturer as it may cause a hazard or damage the equipment SERVICING Do...

Page 5: ...ct your Receiver Fully MPEG 2 DVB Compliant 2 Tuners Time shifting MP3 MPEG 1 Layer3 decoding Powerful trick mode supported Playback of the selected region repeatedly USB supported for fast PC interfa...

Page 6: ...you record channels in tuner A and B at the same time you can watch the channels that have the same TP of recording channel at each tuner 2 One Antenna and Loop through Connect antenna cable to tuner...

Page 7: ...upply 13 POWER SWITCH This is switch to turn on and off the AC main power 5 B REAR PANEL 1 8 2 3 9 5 4 4 6 12 13 10 11 7 1 POWER This key is used to turn the receiver on and off stand by 2 MENU This k...

Page 8: ...Menu Installation Aantenna Setup using up down key OK keys Select the satellite which you want to search using left right keys Insert all information of your antenna Press OK key and the receiver will...

Page 9: ...insert all the transponder information i e Frequency Symbol Rate Polarity and FEC Press OK key and the receiver will automatically search for all channels contained in the selected transponder Antenna...

Page 10: ...list Once the channel is locked every time you try to watch the program you will be asked to enter PIN code Press the MENU key or EXIT key to return to previous menu 8 1 B DELETE CHANNEL Select the De...

Page 11: ...l that you want to delete from the favorite channel list using the up down keys and the page up down keys Press the OK key and the selected channel will disappear from the favorite channel list Press...

Page 12: ...KHz Search option DiSEqC 1 0 Depending on the user s antenna LNB you can supply either LNB power by setting ON or not by setting OFF Normally set this to ON You can select the LNB type You can select...

Page 13: ...ight keys at each field Check the signal strength and press EXIT key Select the Search Edit TP icon using the left right keys Press OK key and select the desired transponder using the up down keys Pre...

Page 14: ...ware is released Please contact the distributor for receiver upgrade Distributor supports you useful information and new software for the receiver 8 3 F TIME SETTING You can adjust date and time in Ti...

Page 15: ...state of Hard disk You can get information of Hard disk If you want Hard Disk Format press OK key and enter PIN code If you want to continue select Yes cell Time Shifting Over Time Quick Record Time H...

Page 16: ...ist you can edit the recorded channels using the key delete the recorded channels using the key lock unlock the recorded channels using the key And you can make folders using the key You can sort the...

Page 17: ...wer menu in Record Service menu And you can select files using the up down keys and OK key If you want to do capture screen when you watch a program full screen press the key 8 6 F USB You can transmi...

Page 18: ...you to easily select the channel that you want to watch Press OK key and the screen on the left will be displayed You can get the information of channel number channel name and whether the program is...

Page 19: ...gh the PIP channel List If you want to use it press key Then the screen on the left will be displayed You can move to the channel of the same TP which you want to watch using up down keys and OK key M...

Page 20: ...In order to increase rewind playback speed push key several times 3 For returning to normal speed push key Rewind playback speed can be increased by 5 steps How To Do Record Playback 10 HOW TO DO RECO...

Page 21: ...ORD There are 2 ways for Reservation Record One is the way to set the date time and duration of the event you want to record in the Record Service menu The other is the way to set program event that y...

Page 22: ...f you want to see the reserved programs push key and reservation table shows them Press the MENU key or EXIT key to return to previous menu In case you have three events at once only two can be record...

Page 23: ...ing program If your connection is not complete you can see the message of USB Disconnected When connection is complete you can see the four folders under the Files folder and the Programs folder Four...

Page 24: ...the signal strength in the Antenna Setup menu Unrecognized smartcard Please insert your smartcard Check the smartcard Insert the smartcard About the Receiver On Screen Error Messages Trouble Shooting...

Page 25: ...Stereo Joint Stero 32 44 1 48 KHz 4 RCA Cinch 2 RCA Cinch 1 S PDIF Optical 1 S VIDEO 3 RCA Cinch CH3 4 NTSC F Type Female F Type Female RS 232 Max 115200 bps 9 Pin D Sub male 4M Byte 40M Byte System 1...

Page 26: ...15 PRORAMING THE REMOTE CONTROL Programing The Remote Control 48 49...

Page 27: ...50 51...

Page 28: ...16 WARRANTY CARD Warranty Card 52...

Reviews: