background image

17

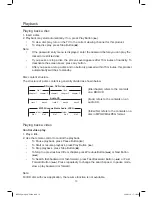
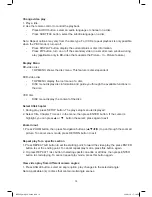
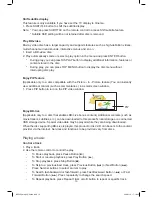
Play from USB device

Play or view MP3, WMA or JPEG files on the following USB devices.

-  flash drive

-  memory card reader

1. Connect a USB device to the USB jack.

2. Press USB button. A contents menu is displayed.

3. Select a file to play, then press ENTER button. To stop play, press 

L

 or remove the USB 

  device.

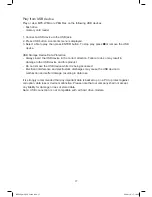
USB Storage Device Data Protection
-   Always insert the USB device in the correct direction. Failure to do so may result in 
  damage to the USB device and this product.
-   Do not remove the USB device while it is being accessed.
-  Electrical interference and electrostatic discharges may cause the USB device to 
  malfunction and suffer damage, resulting in data loss.

It is strongly recommended that any important data is backed up on a PC to protect against 
corruption, data loss or device malfunction. Please note that our company shall not accept 
any liability for damage or loss of stored data.
Note:  USB  connection  is  not  compatible  with  all  hard  drive  models.

BDP600_draft_30 Oct 09.indd   17

2009-11-2   17:19:05

Summary of Contents for VBR500

Page 1: ......

Page 2: ...necting the AC Power Cord 7 Installation of Batteries in the Remote Control 8 ECO Power Standby Features 9 Control Section 10 Top View 10 Front View 10 Rear View 10 Remote Control 11 Getting started 12 How to insert a disc 12 Switch on and set up the player 12 Playback 13 Playing back a disc 13 Playing back a video 13 Playing a music 15 Play photo 16 Play from USB device 17 DVD Menu settings 18 Ge...

Page 3: ...d power CAUTION TO REDUCE THE RISK OF ELECTRIC SHOCK DO NOT REMOVE COVER NO USER SERVICEABLE PARTS INSIDE REFER SERVICING TO QUALIFIED SERVICE PERSONNEL CAUTION RISK OF ELECTRIC SHOCK DO NOT OPEN Precautions 1 Before operating this system check the voltage of this system to see if it is identical with the voltage of your local power supply 2 Unplug the system from the wall outlet if it is not used...

Page 4: ...he player Should this occur the unit will not operate properly Remove the disc and leave the unit turned on for about an hour until the moisture evaporates 12 Should any solid object or liquid fall into the unit unplug the system and have it checked by qualified personnel before operating it again 13 Unplug this product from the wall outlet before cleaning Do not use liquid cleaners or aerosol cle...

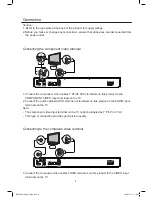
Page 5: ...COMPONENT VIDEO input terminals on the TV 2 Connect the audio cables AUDIO L R line out terminals on this product to the AUDIO input terminals on the TV Note The component video input terminal on the TV might be labeled as Y Pb Pr or YUV This type of connection provides good picture quality Connecting to the composite video terminal 1 Connect the composite video cables VIDEO terminals on this prod...

Page 6: ...This type of connection provides standard picture quality Connecting the digital receiver Connect to coaxial terminal Connect a COAXIAL terminals on this product to the COAXIAL DIGITAL input terminals on the device Connect to optical terminal Connect an OPTICAL terminal on this product to the OPTICAL DIGITAL input terminal on the device COAXIAL OPTICAL BDP600_draft_30 Oct 09 indd 5 2009 11 2 17 18...

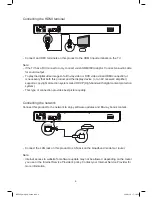
Page 7: ...pport a copyright protection system called HDCP High bandwidth digital content protection system This type of connection provides best picture quality Connecting the network Connect this product to the network to enjoy software updates and Blu ray bonus content Connect the LAN jack on this product to LAN jack on the broadband modem or router Note Internet access to website for software update may ...

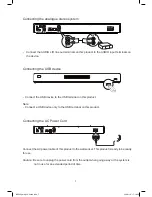
Page 8: ...al on this product Note Connect a USB device only to the USB terminal on this product Connecting the AC Power Cord Connect the AC power cable of this product to the wall socket This product is ready to be ready for use Caution Be sure to unplug the power cord from the outlet when going away or the system is not in use for an extended period of time AUDIO IN BDP600_draft_30 Oct 09 indd 7 2009 11 2 ...

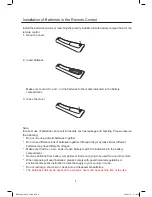
Page 9: ...ot use different kinds of batteries together Although they may look similar different batteries may have different voltages Make sure that the and ends of each battery match the indications in the battery compartment Remove batteries from battery compartment that is not going to be used for a month or more When disposing of used batteries please comply with governmental regulations or environmenta...

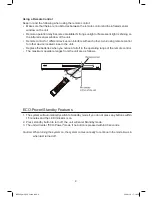
Page 10: ... close to the unit Replace the batteries when you notice a fall off in the operating range of the remote control The maximum operable ranges from the unit are as follows ECO Power Standby Features 1 The system will automatically switch to Standby mode if you do not press any buttons within 15 minutes and the LED indicator is on 2 Press standby button to turn off the unit will enter Standby mode 3 ...

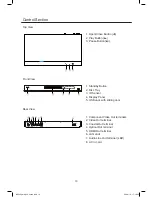
Page 11: ...utton 2 Disc Tray 3 IR Sensor 4 Display Panel 5 USB Jack with sliding door Rear View 1 Component Video Out terminals 2 Video Out terminal 3 Coaxial Out terminal 4 Optical Out terminal 5 HDMI Out terminal 6 LAN Jack 7 Audio Line Out terminal L R 8 AC In cord BDP600_draft_30 Oct 09 indd 10 2009 11 2 17 19 02 ...

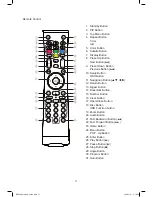
Page 12: ...igation Button 12 Return Button 13 Digest Button 14 Bookmark Button 15 Number Button 16 Clear Button 17 Open Close Button 18 Disc Button USB Function button 19 Zoom Button 20 Audio Button 21 Fast Backward Button D 22 Fast Forward Button C 23 Home Button 24 Menu Button POP Up Button 25 Enter Button 26 Play Button B 27 Pause Button F 28 Stop Button L 29 Angle Button 30 Program Button 31 Goto Button ...

Page 13: ... selected will be applied not only here but also in other OSD windows menus etc ENTER Next English French Previous Page 3 5 Initial Wizard Choose a resolution that fit your TV Change will be applied immediately you have 15s to determine whether to save the setting or rollback to prior resolution Better performance will be provided by a HDMI connection ENTER Next Auto 480I 576I 480P 576P 720P 1080I...

Page 14: ... Use the remote control to control the playback To Pause playback press Pause Button F To Start or resume playback press Play Button B To Stop playback press Stop Button L To Skip to a previous next title or chapter press Previous Button H or Next Button G To Search fast backward or fast forward press Fast Backward Button D or Fast Forward Button C Press repeatedly to change the search speed In pa...

Page 15: ...splay the content of the disc Select title chapter 1 During play press SETUP button The play setup menu is displayed 2 Select Title Chapter Time ect in the menu then press ENTER button If the cursor is highlight you can press or button the select press again to exit Zoom in out 1 Press ZOOM button then press Navigation buttons to pan through the zoomed picture To cancel zoom mode press RETURN butt...

Page 16: ...es in a small screen window 1 Press PIP button to turn on the PIP video window Enjoy BD live Applicable only to a disc that enables BD Live bonus content Additional contents such as movie trailers subtitles etc can be downloaded to this product s local storage or a connected USB storage device Special video data may be played while they are being downloaded When the disc supporting BD Live is play...

Page 17: ...o folder then press ENTER button to enter To select a photo press the Navigation buttons To enlarge the selected photo and start slide show press ENTER button 2 Press ENTER button to start slide show play Note It may require longer time to display the disc content on the TV due to the large number of songs photos compiled onto the disc This product can only display digital camera pictures accordin...

Page 18: ... to do so may result in damage to the USB device and this product Do not remove the USB device while it is being accessed Electrical interference and electrostatic discharges may cause the USB device to malfunction and suffer damage resulting in data loss It is strongly recommended that any important data is backed up on a PC to protect against corruption data loss or device malfunction Please not...

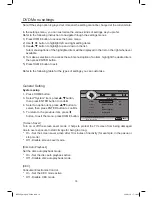
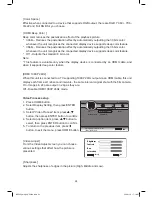
Page 19: ...ME button 3 Select System item press button then press ENTER button to confirm 4 Select an option item press button to select then press ENTER button to confirm 5 To return to the previous item press button to exit the menu press HOME button Screen Saver Turn on or off the screen saver mode It helps to protect the TV screen from being damaged due to over exposure to static image for being too long...

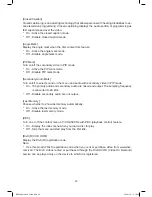
Page 20: ...ect an audio language for disc play Subtitle Select a subtitle language for disc play Playback setup 1 Press HOME button 2 Select Playback item then press ENTER button 3 Select a setting press button then press ENTER button to confirm 4 Select an option item press button to select then press ENTER button to confirm 5 To return to the previous item press button to exit the menu press HOME button Ho...

Page 21: ... video in PIP mode On The primary audio and secondary audio are mixed and output The sampling frequency is converted to 48 kHz Off Disable secondary audio are not output Last Memory Choose whether to show last memory automatically On Active the last memory mode Off Disable last memory mode PBC Turn on or off the content menu of VCDs SVCDs with PBC playback control feature On Display the index menu...

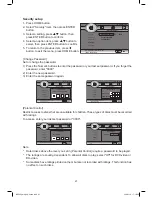
Page 22: ...cs to play select Off for DVD video or BD video Some discs have ratings printed on them but are not recorded with ratings This function has no effect on such discs Home Menu System Language Playback Security Network Use cursorkey to move focus use Enter key to select HOME Exit General Setting Change Password Parental Control Country Code More Home Menu System Language Playback Security Network Use...

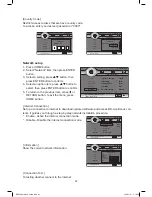
Page 23: ... Use cursorkey to move focus use Enter key to select HOME Exit General Setting Internet Connection Information Connection Test IP Setting Host Name Setting Disable Enable Home Menu System Language Playback Security Network Network Information RETURN Return General Setting Network Information nterface Ethernet Auto Address Type P Address Subnet Mask Default Gateway DNS 0 0 0 0 0 0 0 0 0 0 0 0 0 0 0...

Page 24: ...n Resolution Select a component video output resolution that is compatible with the TV display capability There are Auto 480I 576I 720P 1080I and 1080P for you choose Select a video resolution setting that is best supported by the TV See the TV manual for details Note The selected resolution must also be supported by your TV monitor TV System Select the TV system in your area there are NTSC PAL an...

Page 25: ...porting 1080P 24Hz output via an HDMI cable this unit display each frame at 1 24 second intervals the same interval original shot with the film camera On Images in 24p are output in 24p as they are Off Disable HDMI 1080P 24Hz mode Video Process setup 1 Press HOME button 2 Select Display Setting then press ENTER button 3 Select Video Process item press button then press ENTER button to confirm 4 Se...

Page 26: ...o experience Dolby or DTS audio BD video special sound effect is disabled PCM The audio device does not support multi channel format Audio is downmixed to two channel sound Reencode Enable the reencode audio output mode Off Disable the HDMI audio output mode Down_samp Set the sampling rate for PCM audio output from the Digital out terminal 48K PCM audio is down sampled at 48 kHz 96K PCM audio is d...

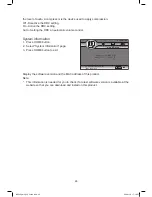
Page 27: ...n page 3 Press HOME button to exit Display the software version and the MAC address of this product Note This information is needed for you to check if a latest software version is available at the website so that you can download and install on this product Home Menu Software Version BDP V2 0 MAC FF FF FF FF FF FF Use cursorkey to move focus use Enter key to select System information HOME Exit BD...

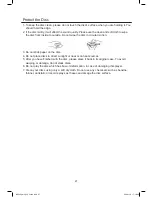
Page 28: ... stick paper on the disc 4 Do not place discs in direct sunlight or near or on heat sources 5 After you have finished with the disc please place it back in its original case To avoid warping or damage do not stack discs 6 Do not play the disc which has flaw or deformation in case of damaging this player 7 Clean your discs using only a soft dry cloth Do not use any chemicals such as benzine thinner...

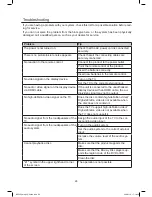
Page 29: ...t contain it Does the TV support high definition video High definition video is not available when the TV does not support it No audio signal from the loudspeakers of the TV Assign the audio input of the TV to the cor responding video input No audio signal from the loudspeakers of the audio system Turn on the audio system Set the audio system to the correct external input Increase the volume level...

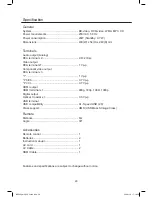
Page 30: ...t RCA terminal x 3 Y 1 Vp p Pb Cb 0 7 Vp p Pr Cr 0 7 Vp p HDMI output HDMI terminal x 1 480p 720p 1080i 1080p Digital output Optical Coaxial x 1 0 5 Vp p USB terminal USB compatibility Hi Speed USB 2 0 Class support UMS USB Mass Storage Class Remote Distance 6m Angle 30O Accessories Remote control 1 Batteries 2 Instruction manual 1 AC cord 1 AV Cable 2 HDMI Cable 1 Features and specifications are ...

Page 31: ......

Page 32: ......

Reviews: