background image

Pag. 2                                                                       SQ4C 9950

Introduction

Contenu de l’emballage

  1 compresseur vidéo digital couleurs SQ4C

  1 manuel d’emploi

 1 

alimentateur

Lors de la livraison du produit, vérifier si l’emballage est intègre et s’il n’a pas subi de signes évidents de chutes ou de
choc. Si l’emballage présente des signes évidents de dommage, contacter immédiatement le transporteur. Vérifier que
le contenu correspond à la liste du matériel indiqué ci-dessus.

Contenu du Manuel d’Emploi

Dans ce manuel on décrit le compresseur vidéo digital couleurs SQ4C avec les procédures particulières d’installation,
configuration et emploi.
Il est nécessaire de lire attentivement ce manuel, surtout le chapitre concernant les normes de sécurité, avant
d’installer et employer le compresseur vidéo.

Destinataire du Manuel d’Emploi

Les différentes parties de ce manuel veulent satisfaire deux exigences opérationnelles: celle du technicien installateur
et celle de l’opérateur.
Technicien installateur: c’est le technicien qualifié qui effectue l’installation de sécurité et en vérifie le caractère
fonctionnel.
Il a les connaissances techniques nécessaires pour installer, raccorder et configurer l’installation. Seulement le
technicien installateur peut effectuer les opérations contenues dans ce manuel réservées au “Personnel technique”.
Opérateur: c’est l’utilisateur final qui emploie le compresseur vidéo pour établir le fonctionnement de tout le système.

Ce qu’on doit lire

Les procédures d’installation , adressées principalement au technicien installateur, sont décrites à partir de la page
5.
L’opérateur doit lire à partir de la page 8, pour la description de l’emploi du compresseur vidéo.

Conventions typographiques

Dans ce manuel on emploie des symboles graphiques différents, dont le sens est résumé ci-dessous:

 Risque de décharge électrique; couper l’alimentation avant de procéder avec toute opération, si le contraire

n’est pas expressément indiqué.

 Lire attentivement la procédure ou les renseignements indiqués, et éventuellement les exécuter suivant les

modalités prévues. Une execution incorrecte de la procédure peut entraîner un fonctionnement erroné du système ou
un endommagement du même.

 Lire attentivement pour comprendre le fonctionnement du système.

Summary of Contents for SQ4S 9950

Page 1: ...MANUALE D USO __________________________ OPERATING INSTRUCTIONS __________________________ MANUEL D INSTRUCTIONS __________________________ BEDIENUNGSANWEISUNG S S Q Q 4 4 C C ...

Page 2: ...MANUALE D USO S S Q Q 4 4 C C ...

Page 3: ... 8 ALLARME 8 VIDEO LOSS RILEVAZIONE DELL ASSENZA VIDEO 9 DATA ORA 9 VIDEO ADJUST 9 ALTRE IMPOSTAZIONI 10 DEFAULT 10 INSTALLAZIONE 11 FUNZIONE D ALLARME 12 ISTRUZIONI RS232 12 CARATTERISTICHE TECNICHE 13 Il produttore declina ogni responsabilità per eventuali danni derivanti da un uso improprio delle apparecchiature menzionate in questo manuale si riserva inoltre il diritto di modificarne il conten...

Page 4: ... impianto di sicurezza e ne verifica la funzionalità Dispone delle conoscenze tecniche necessarie a installare collegare e configurare l impianto Solo il tecnico installatore può effettuare quelle operazioni descritte in questo manuale come riservate al Personale tecnico Operatore è l utilizzatore finale che opera sul compressore video per stabilire le modalità di operazione dell intero sistema Co...

Page 5: ...pparecchio si considera disattivato soltanto quando la spina di alimentazione è disinserita e i cavi di collegamento con altri dispositivi sono stati rimossi Non utilizzare cavi di prolunga con segni di usura o invecchiamento in quanto rappresentano un grave pericolo per l incolumità degli utilizzatori Evitare di bagnare con qualsiasi liquido o di toccare con le dita bagnate l apparecchio in funzi...

Page 6: ...econdo le norme vigenti nel Paese di utilizzo Controllo della marcatura Prima di procedere all installazione controllare se il materiale fornito corrisponde alle specifiche richieste esaminando le etichette di marcatura secondo quanto descritto al capitolo Dati di marcatura Non effettuare per nessun motivo alterazioni o collegamenti non previsti in questo manuale l uso di apparecchi non idonei può...

Page 7: ...u PROG entrata uscita dal menu principale sotto menu PAUSE tasto playback riproduzione immagine da VCR PAUSE arresto freeze di un immagine riprodotta con 2x zoom Tabella 1 Freeze canale 1 pieno Aumenta il numero o il carattere Tabella 1 Freeze canale 2 pieno Diminuisce il numero o il carattere Tabella 1 Freeze canale 3 pieno Muove il cursore in direzione sopra sinistra Tabella 1 Freeze canale 4 pi...

Page 8: ...le 1 Playback riproduzione Visualizza 2x Zoom del canale 2 Playback riproduzione Visualizza 2x Zoom del canale 3 Playback riproduzione Visualizza 2x Zoom del canale 4 Playback riproduzione PAUSE Blocco 2x Zoom immagini del canale Programmazione Aumenta il numero o il carattere Programmazione Diminuisce il numero o il carattere Programmazione ENTER Passa al sotto menu Programmazione Muove in direzi...

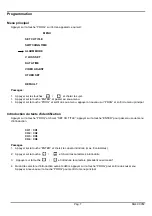
Page 9: ...uscire dal menu principale Impostazione del testo di identificazione Premere il tasto PROG e scegliere SET CH TITLE premere il tasto ENTER per passare al sotto menu di impostazione CH1 CH1 CH2 CH2 CH3 CH3 CH4 CH4 Passaggi 1 Premere il tasto ENTER e scegliere il canale da impostare max 8 caratteri 2 Premere il tasto e scegliere i caratteri da impostare 3 Premere il tasto ed impostare il carattere p...

Page 10: ...per uscire dal sotto menu e premere nuovamente PROG per uscire dal menu principale Allarme Premere il tasto PROG e scegliere ALARM MODE premere il tasto ENTER per entrare al sotto menu di impostazione CH1 N O CH2 N O CH3 N O CH4 N O ALARM TIME 10 Passaggi 1 Premere il tasto per scegliere il canale da impostare 2 Premere il tasto per impostare il tempo di reset allarme e scegliere la modalità di al...

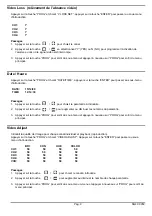
Page 11: ...12 99 TIME 12 14 30 Passaggi 1 Premere il tasto per scegliere il parametro da impostare 2 Premere il tasto per aumentare o diminuire i numeri del parametro 3 Premere il tasto PROG per uscire dal sotto menu e premere nuovamente PROG per uscire dal menu principale Video Adjust Imposta la qualità dell immagine per ogni canale individuale e play back riproduzione Premere il tasto PROG e scegliere VIDE...

Page 12: ...e informazioni che verranno visualizzate sullo schermo Data Ora Identificazione BUZZER premere il tasto per attivare il BUZZER su allarme ON OFF SECURITY premere il tasto per impostare lo stato di sicurezza ON OFF se ON è abilitato solo l autoreset degli allarmi 2 Premere il tasto PROG per uscire dal sotto menu premerlo nuovamente per uscire la menu principale Default Imposta i parametri originali...

Page 13: ...Pag 11 SQ4C 9950 Installazione ...

Page 14: ...pulsante di reset non viene premuto e l allarme viene disattivato a tempo il led corrispondente continuerà a lampeggiare per segnalare l avvenuta condizione di allarme 2 Video loss Fissa freeze l ultima immagine Il buzzer suona ed il LED lampeggia Appare il simbolo sul canale corrispondente Premere il tasto del canale relativo per tacitare il buzzer e spegnere il led Istruzioni RS232 Specifiche di...

Page 15: ...niche Alimentazione 100 240 V 47 63 Hz Potenza 20W Dimensioni 435 x 250 x 49 5mm Peso 2 8 kg PAL 720x576 Temperatura 10 50 C Contatto allarme N C N O contatto secco 0 5A 12V Finitura scatola in alluminio verniciata con polveri epossidiche ...

Page 16: ...OPERATING INSTRUCTIONS S S Q Q 4 4 C C ...

Page 17: ...HING TIME 8 ALARM 8 VIDEO LOSS VIDEO LOSS DETENCTION 9 DATE TIME 9 VIDEO ADJUST 9 OTHER SETTINGS 10 DEFAULT 10 INSTALLATION 11 ALARM FUNCTION 12 RS232 INSTRUCTIONS 12 SPECIFICATIONS 13 The manufacturer declines all responsibility for any damage caused by an improper use of the appliances mentioned in this manual furthermore the manufacturer reserves the right to modify its contents without any pri...

Page 18: ...d technician able to carry out the safety system installation and to verify its functionality He has the necessary technical knowledge to install connect and configurate the system Only the installer technician is allowed to carry out the operations reserved to Technical staff Operator end user who operates on the video compressor to set up the operating modes of the whole system What to read The ...

Page 19: ...letely off line only when the plug is diconnected and the cables connected to other appliances have been removed Do not use extensions showing wear or ageing since they may seriously compromise the users safety Avoid wetting the appliance or touching it with wet hands while it is in operation Do not leave the appliance exposed to atmospheric agents Do not use the appliance in the presence of infla...

Page 20: ...ccording to the differentiated collecting modalities or anyway according to the normative laws in force in the Country of use Check of identification data Before installing the appliance check that the material supplied corresponds to the specifications indicated on the data plate following the chapter Identification data page 3 Do not carry out any modification or connections which are not provid...

Page 21: ...e sub menu PROG enter exit from the main menu sub menu PAUSE playback key from VCR PAUSE freeze the playback image with 2x zoom Table 1 Freeze channel 1 is full It increases the number or the character Table 1 Freeze channel 2 is full It decreases the number or the character Table 1 Freeze channel 3 is full It moves the cursor in direction up left Table 1 Freeze channel 4 is full It moves the curs...

Page 22: ...nel 1 Playback It displays 2x zoom of the channel 2 Playback It displays 2x zoom of the channel 3 Playback It displays 2x zoom of the channel 4 Playback PAUSE It freezes 2x Zoom images of the channel Programming It increases the number or the character Programming It decreases the number or the character Programming ENTER It enters the sub menu Programming It moves in the cursor in direction up le...

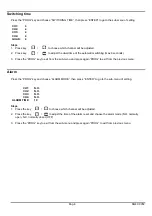
Page 23: ... press again the PROG key to exit from main menu Set the identification text Press the PROG key and choose SET CH TITLE Press ENTER key to enter the setting sub menu CH1 CH1 CH2 CH2 CH3 CH3 CH4 CH4 Steps 1 Press the ENTER key and choose which channel will be adjust max 8 characters 2 Press the key and choose the characters to adjust 3 Press the key and adjust the previous character or the next one...

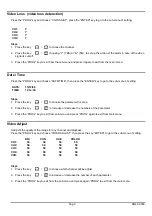
Page 24: ...ROG key to exit from the sub menu and press again PROG to exit from the previous menu Alarm Press the PROG key and choose ALARM MODE then press ENTER to go to the sub menu of setting CH1 N O CH2 N O CH3 N O CH4 N O ALARM TIME 10 Steps 1 Press the key to choose which channel will be adjusted 2 Press the key to adjust the time of the alarm reset and choose the alarm mode N O normally open N C normal...

Page 25: ... 12 99 TIME 12 14 30 Steps 1 Press the key to choose the parameter to set up 2 Press the key to increase or decrease the numbers of the parameter 3 Press the PROG key to exit from sub menu and press PROG again to exit from main menu Video Adjust It adjusts the quality of the image for any channel and playback Press the PROG key and choose VIDEO ADJUST then press the key ENTER to go to the sub menu...

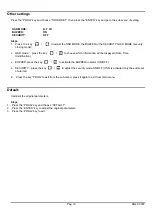
Page 26: ...y to choose which information will be dispayed Date Time Identification BUZZER press the key to activate the BUZZER on alarm ON OFF SECURITY press the key to adjust the security mode ON OFF if ON is activated only the autoreset of alarms 2 Press the key PROG to exit from the sub menu press it again to exit from main menu Default It adjusts the original parameters Steps 1 Press the PROG key and cho...

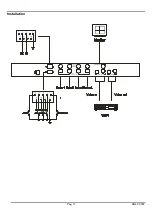
Page 27: ...Pag 11 SQ4C 9950 Installation ...

Page 28: ... will not be pressed and the alarm not deactivated at time the relevant led will continue blinking in order to warn about the occurred alarm condition 2 Video loss Freeze the last image The buzzer rings and the led blinks The symbol is displayed on the relevant channel Press the key of the relevant channel to shut off the buzzer and turn off the led RS232 instructions Transmission specifications B...

Page 29: ...tions Power supply 100 240 V 47 63 Hz Power consumption 20W Dimensions 435 x 250 x 49 5mm Weight 2 8 kg PAL 720x576 Temperature 10 50 C Alarm contact N C N O dry contact 0 5A 12V Finishing aluminium case coated with epoxy powder ...

Page 30: ...MANUEL D INSTRUCTIONS S S Q Q 4 4 C C ...

Page 31: ... 8 ALLARME 8 VIDEO LOSS RELÈVEMENT DE L ABSENCE VIDÉO 9 DATE HEURE 9 VIDEO ADJUST 9 AUTRES INTRODUCTIONS 10 DEFAULT 10 INSTALLATION 11 FONCTION D ALARME 12 INSTRUCTIONS RS232 12 CARACTÉRISTIQUES TECHNIQUES 13 Le producteur décline toute responsabilité pour les dommages éventuels dus à une utilisation non appropriée des appareils mentionnés dans ce manuel on réserve en outre le droit d en modifier ...

Page 32: ...ation de sécurité et en vérifie le caractère fonctionnel Il a les connaissances techniques nécessaires pour installer raccorder et configurer l installation Seulement le technicien installateur peut effectuer les opérations contenues dans ce manuel réservées au Personnel technique Opérateur c est l utilisateur final qui emploie le compresseur vidéo pour établir le fonctionnement de tout le système...

Page 33: ...ation l appareil est désactivé seulement quand la prise d alimentation est débranchée et les câbles de raccordement avec d autres dispositifs ont été enlevés Ne pas employer de rallonges avec signes d usure ou vieillissement parce qu ils peuvent compromettre sérieusement la sécurité des utilisateurs Éviter d exposer l appareil en fonction à tout liquide ou de le toucher avec les mains mouillées Ne...

Page 34: ...lon les modalités de recolte diversifiée ou en tout cas suivant les normes en vigueur dans le Pays d emploi Contrôle des caractéristiques techniques Avant d installer l appareil vérifier si les caractéristiques techniques du matériel fourni figurant sur les plaques correspondent aux spécifications requises en se rapportant au chapitre Caractéristiques techniques Ne jamais effectuer d altérations o...

Page 35: ...ser au sous menu PROG entrée sortie du menu principal sous menu PAUSE touche playback reproduction image de VCR PAUSE arrêt freeze d une image reproduite avec 2x zoom Tableau 1 Freeze canal 1 rempli Augmente le nombre ou le caractère Tableau 1 Freeze canal 2 rempli Diminue le nombre ou le caractère Tableau 1 Freeze canal 3 rempli Déplace le curseur en haut gauche Tableau 1 Freeze canal 4 rempli Dé...

Page 36: ...u canal 2 Playback reproduction Visualise 2x Zoom du canal 3 Playback reproduction Visualise 2x Zoom du canal 4 Playback reproduction PAUSE Bloc 2x Zoom images du canal Programmation Augmente le nombre ou le caractère Programmation Diminue le nombre ou le caractère Programmation ENTER Passe au sous menu Programmation Bouge en direction du curseur en haut à gauche Programmation Bouge en direction d...

Page 37: ...menu principal Introduction du texte d identification Appuyer sur la touche PROG et choisir SET CH TITLE appuyer sur la touche ENTER pour passer au sous menu d introduction CH1 CH1 CH2 CH2 CH3 CH3 CH4 CH4 Passages 1 Appuyer sur la touche ENTER et choisir le canal à introduire max 8 caractères 2 Appuyer sur la touche et choisir les caractères à introduire 3 Appuyer sur la touche et introduire le ca...

Page 38: ...du sous menu et appuyer à nouveau sur PROG pour sortir du menu principal Allarme Appuyer sur la touche PROG et choisir ALARM MODE appuyer sur la touche ENTER pour entrer dans le sous menu d introduction CH1 N O CH2 N O CH3 N O CH4 N O ALARM TIME 10 Passages 1 Appuyer sur la touche pour choisir le canal à introduire 2 Appuyer sur la touche pour introduire le temps de retour de position reset des al...

Page 39: ... 14 30 Passages 1 Appuyer sur la touche pour choisir le paramètre à introduire 2 Appuyer sur la touche pour augmenter ou diminuer les numéros du paramètre 3 Appuyer sur la touche PROG pour sortir du sous menu et appuyer à nouveau sur PROG pour sortir du menu principal Video Adjust Introduit la qualité de l image pour chaque canal individuel et play back reproduction Appuyer sur la touche PROG et c...

Page 40: ... seront affichées sur l écran Date Heure Identification BUZZER appuyer sur la touche pour activer le BUZZER sur alarme ON OFF SECURITY appuyer sur la touche pour introduire l état de sécurité ON OFF si ON est habilité seulement l auto retour de position des alarmes 2 Appuyer sur la touche PROG pour sortir du sous menu refaire la même action pour sortir du menu principal Default Introduit les param...

Page 41: ...Pag 11 SQ4C 9950 Installation ...

Page 42: ...tour de position n est pas effectuée et si l alarme est désactivée à temps le relatif led continuera à clignoter pour signaler la présence de condition d alarme 1 Video loss Fixe freeze la dernière image Le buzzer sonne et le LED clignote Il est affiché le symbole sur le canal correspondant Appuyer sur la touche du canal approprié pour faire taire le buzzer et éteindre le led Instructions RS232 Sp...

Page 43: ...stiques techniques Alimentation 100 240 V 47 63 Hz Puissance 20W Dimensions 435 x 250 x 49 5mm Poids 2 8 kg PAL 720x576 Temperature 10 50 C Contact d alarme N F N O contact sec 0 5A 12V Finition boîte en aluminium peinture epoxy ...

Page 44: ...BEDIENUNGSANWEISUNG S S Q Q 4 4 C C ...

Page 45: ...fikationstextes 7 UMSCHALTZEITEN 8 ALARM 8 VIDEO LOSS ERFASSUNG VIDEOAUSFALL 9 DATUM UHRZEIT 9 VIDEO ADJUST 9 ANDERE EINSTELLUNGEN 10 DEFAULT 10 INSTALLATION 11 ALARMFUNKTION 12 ANLEITUNG RS232 12 TECHNISCHE EIGENSCHAFTEN 13 Der Hersteller lehnt jede Haftung für eventuelle Schäden ab die aufgrund unsachgemäßer Anwendung der in diesem Handbuch erwähnten Geräte entstanden ist Ferner behält er sich d...

Page 46: ...prüft Er verfügt über jene technischen Kenntnisse die für die Installation den Anschluß und die Konfiguration der Anlage erforderlich sind Nur der Installationstechniker darf die in diesem Handbuch beschriebenen und dem technischen Personal vorbehaltenen Arbeitsschritte durchführen Operator er ist der Endbenutzer der den digitaler Farbvideokompressor bedient um die Arbeitsmodalitäten des gesamten ...

Page 47: ...ann deaktiviert wenn der Stromstecker ausgesteckt ist und die Verbindungskabel zu anderen Vorrichtungen entfernt wurden Keine Verlängerungskabel verwenden die Abnützungen und Alterungserscheinungen aufweisen da diese eine große Gefahr für die Anwender darstellen Es darauf zu achten daß das in Betrieb befindliche Gerät nicht mit Flüssigkeiten in Berührung kommt oder mit nassen Fingern berührt wird ...

Page 48: ...prechend den im jeweiligen Einsatzland gültigen Vorschriften zu entsorgen Überprüfung der Betriebseigenschaften Vor der Installation ist zu kontrollieren ob das Material den gewünschten Eigenschaften entspricht indem die Etiketten mit den Betriebseigenschaften laut Beschreibung unter dem Kapitel Betriebseigenschaften auf den Datenschildern pag 3 geprüft werden Es dürfen keinesfalls Änderungen oder...

Page 49: ...nü PROG Aufrufen Verlassen des Hauptmenüs Untermenüs PAUSE Playback Taste Bildreproduktion von VCR PAUSE Stop Einfrieren eines reproduzierten Bildes mit 2x Zoom Tabelle 1 Festbild Kanal 1 voll Erhöht die Zahl oder das Zeichen Tabelle 1 Festbild Kanal 2 voll Vermindert die Zahl oder das Zeichen Tabelle1 Festbild Kanal 3 voll Bewegt den Cursor nach oben links Tabelle 1 Festbild Kanal 4 voll Bewegt d...

Page 50: ...ack Reproduktion Zeigt das Bild auf Kanal 2 in 2x Zoom Playback Reproduktion Zeigt das Bild auf Kanal 3 in 2x Zoom Playback Reproduktion Zeigt das Bild auf Kanal 4 in 2x Zoom Playback Reproduktion PAUSE Stop 2x Zoom Bilder des Kanals Programmierung Erhöhung der Zahl oder des Zeichens Programmierung Verminderung der Zahl oder des Zeichens Programmierung ENTER Wechsel zum Untermenü Programmierung Be...

Page 51: ...ptmenü verlassen Eingabe des Identifikationstextes Die Taste PROG drücken und SET CH TITLE wählen mit der Taste ENTER zum Untermenü für die Eingabe wechseln CH1 CH1 CH2 CH2 CH3 CH3 CH4 CH4 Zwischenschritte 1 ENTER drücken und den einzustellenden Kanal wählen max 8 Zeichen 2 Mit den Tasten die einzugebenden Zeichen auswählen 3 Die Taste drücken um das vorhergehende oder folgende Zeichen einzugeben ...

Page 52: ...ROG das Untermenü verlassen durch erneutes Drücken von PROG kann das Hauptmenü verlassen werden Alarm PROG drücken und ALARM MODE auswählen mit der Taste ENTER das Untermenü für die Einstellung aufrufen CH1 N O CH2 N O CH3 N O CH4 N O ALARM TIME 10 Zwischenschritte 1 Mit den Tasten den einzustellenden Kanal auswählen 2 Mit den Tasten die Zeit für das Alarmreset einstellen und die Alarmmodalität wä...

Page 53: ... 30 Zwischenschritte 1 Mit der Taste den einzustellenden Parameter auswählen 2 Mit der Taste lassen sich die Ziffern des Parameters erhöhen oder verringern 3 Mit PROG das Untermenü verlassen und erneut die Taste PROG drücken um das Hauptmenü zu schließen Video Adjust Legt die Bildqualität für jeden individuellen Kanal und das Playback Reproduktion fest PROG drücken und VIDEO ADJUST wählen mit der ...

Page 54: ...hirm erscheinen sollen Datum Uhrzeit Identifizierung BUZZER Mit der Taste den BUZZER Summer bei Alarm aktivieren ON OFF SECURITY Die Taste betätigen um das Sicherheitslevel einzustellen ON OFF auf ON ist nur das Auto Alarmreset eingeschaltet 2 Mit PROG das Untermenü verlassen durch erneutes Drücken dieser Taste wird das Hauptmenü geschlossen Default Setzt die Parameter auf die Voreinstellungen Zwi...

Page 55: ...Seite 11 SQ4C9950 Installation ...

Page 56: ...der Resetknopf nicht gedrückt und der Alarm automatisch nach einer festgelegten Zeit aufgehoben wird blinkt die entsprechende LED weiter um den Alarmzustand anzuzeigen 2 Video loss Festes Eingefrorenes letztes Bild Der Summer ertönt und die LED blinkt auf Auf dem entsprechenden Kanal erscheint das Symbol Mit der Taste des zugehörigen Kanals den Summer quittieren und die LED zum Erlöschen bringen A...

Page 57: ...igenschaften Versorgung 100 240 V 47 63 Hz Leistung 20W Maße 435 x 250 x 49 5mm Gewicht 2 8 kg PAL 720x576 Temperatur 10 50 C Alarmkontakt NC NO trockener Kontakt 0 5A 12V Fertigbearbeitung Aluminiumgehäuse mit Epoxydstaub lackiert ...

Reviews: