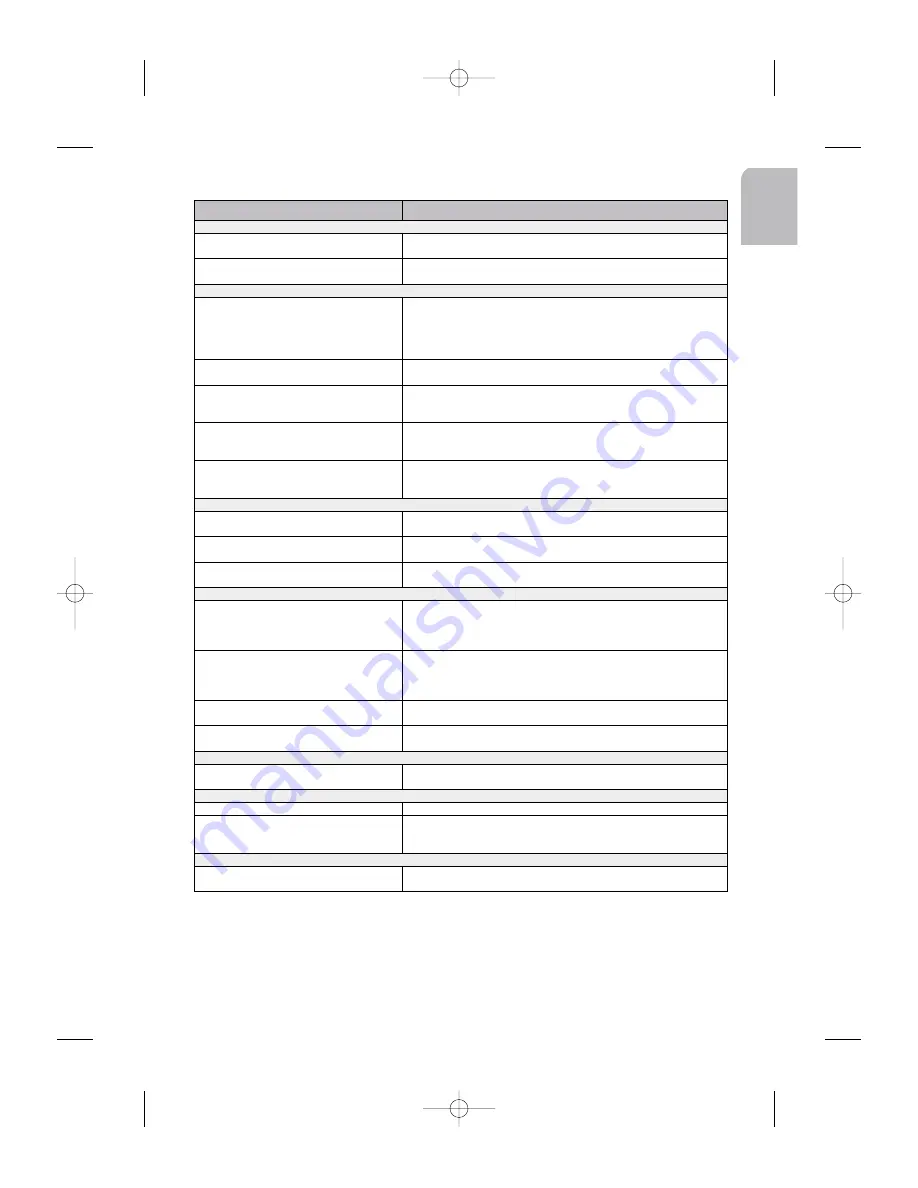
background image

29

En

gl

ish

SYMPTOMS

CAUSE/REMEDY

NO POWER

Verify:

The radio does not function.

> the set is well inserted in the dashboard (see MOUNTING).
> the set is well connected (see Installation Card and INSTALLATION)

The set does not function and the display
screen does not light up.

> Switch off the set.
> Check the fuse (see INSTALLATION).

NO SOUND

Verify:

The display screen lights up but the set gives
no sound (or only a whistle).

> Increase the volume: if you are listening to the radio, move to an area
where the station reception is better.
> Check the antenna and its connection (see INSTALLATION).
> Check if the station search is finished.
> If your mobile phone is connected, check the Phone setting.

There is no sound from the loudspeakers
(front and rear), either for radio or for CD.

Verify the speakers connections to C1 (see INSTALLATION) and the
speakers balance (see Sound Menu).

There is no sound from the rear loudspeakers
after having installed a subwoofer.

Verify your subwoofer installation:
> connection on the left rear connector C1 (see INSTALLATION)
> the subwoofer amplifier setting to ON (see Sound Setup Menu).

There is no sound from the loudspeakers after
having connected a telephone.

Verify your telephone installation:
> connection inside the TEL IN connector D1 (see INSTALLATION)
> the detection level setting (see Main Init Menu).

There is no sound from the subwoofer after
having connected an external amplifier

Verify your external amplifier installation:
> connection of the external amplifier on D2 (see INSTALLATION)
> the subwoofer amplifier setting to OFF (see Main Init Menu).

SOUND TROUBLE

Verify:

The sound level is too low during traffic
announcements or news bulletins

Adjust the volume for announcements (see Sound Setup Menu).

The sound level decreases

Display the set temperature: if the temperature is too hot, the sound level
automatically decreases.

The telephone sound is distorted

> decrease the telephone sound volume until no more distorsion.
> increase with the set, the phone volume (see Main Init Menu).

CD ERRORS

Verify:

During use of the CD player or the MP3
player, the set does not function and displays
ERROR CD.

> the CD is properly inserted in the CD player,
> the player contains at least one CD,
> the disc has been correctly inserted ; no dirty, exotic or damaged disc
has been loaded ; the player front is properly shut.

During use of the CD changer, the set does
not function and displays ERROR CD.

> the magazine is properly inserted in the CD changer,
> the changer contains at least one CD,
> the discs have been correctly inserted ; no dirty, exotic or damaged
discs have been loaded ; the changer front is properly shut.

The Fast Forward function does not work
with your CD.

Verify that your CD is not a MP3 CD: in that case, this function doesn’t
work with MP3 CD.

CD name not available in the CD menu

Delete at least one CD name using the Del name function. Remember
that you can’t name more than 50 CD names.

CDC ERROR

Verify:

The display shows CDC ERR

The link between the CD changer and the amplifier is inoperative.
Contact your dealer.

TEMPERATURE ERROR

Verify:

The display shows TEMP ERR

Verify the temperature sensor is well connected (see INSTALLATION).

The display shows HI TEMP

The audio system has switched to heat-protection mode: the sound level
is reduced. The audio system will return to normal performance as soon
as the ambient temperature has dropped.

FUNCTION ERROR

Verify:

SDVC not available

> the speedometer is well connected in A1 (see CONFIGURATION)
> the speed calibration is not calibrated (see CONFIGURATION)

AN 2001 2L gb.qxd  16/07/01  14:55  Page 29

Summary of Contents for CD 4402 -

Page 1: ...arch lvl Tuner SAM SAM SAM ENTER ENTER Key in TUNER source TUNER MENU Band Start AST PTY search AF Tuning Save in Tuner Init Scan preset Start memo MUTE MUTE Key MAIN MENU Mute the selected source SOU...

Page 2: ...arch lvl Tuner SAM SAM SAM ENTER ENTER Key in TUNER source TUNER MENU Band Start AST PTY search AF Tuning Save in Tuner Init Scan preset Start memo MUTE MUTE Key MAIN MENU Mute the selected source SOU...

Page 3: ...er 2 Scrn Saver Trigger SAM Sound Reset SAM ANIMATION MENU Display infos Analyser 1 DSC Style SAM D1 9 10 13 14 15 D2 C1 C2 C3 D1 and D2 connectors are accessories sold separately see your dealer JIN...

Page 4: ...er 2 Scrn Saver Trigger SAM Sound Reset SAM ANIMATION MENU Display infos Analyser 1 DSC Style SAM D1 9 10 13 14 15 D2 C1 C2 C3 D1 and D2 connectors are accessories sold separately see your dealer JIN...

Page 5: ...er 2 Scrn Saver Trigger SAM Sound Reset SAM ANIMATION MENU Display infos Analyser 1 DSC Style SAM D1 9 10 13 14 15 D2 C1 C2 C3 D1 and D2 connectors are accessories sold separately see your dealer JIN...

Page 6: ...ue for the pre viously chosen function 4 keys to increase decrease the volume 5 ESC key to escape the function or to validate the option modified value By either a short or long press on the six first...

Page 7: ...AD If your car is fitted with fully ISO connectors you can directly install the car radio If your car s connectors comply with other standards see your dealer to obtain specific adapter cables see fig...

Page 8: ...t fronts left and right rears see Fig 3 Warning Do not connect any loudspeaker leads to earth or directly to a booster amplifier or via an external fader unless equipped to receive such an high level...

Page 9: ...interface for external equipments as naviga tion system subwoofer and traffic messages channel see Fig 8 Navigation Interface Use the Navigation interfaces Pins 21 25 to transmit TMC data to your VDO...

Page 10: ...max length screws 4 Mount the frame front 5 Reconnect the negative terminal of the car battery see Fig 15 the installation is now complete Removing the radio see Fig 14 You can unlock the radio using...

Page 11: ...10 seconds after removal of the ignition key Replacing the front 1 Put the right side whole of the front into the socket of the set 2 Push the left side of the front into place until it clicks into p...

Page 12: ...automatically set to Auto EQ Note To be successful the auto equalization acquisition needs 2 or 4 speakers to be con nected direct or via an amplifier Warning In case you have connec ted a subwoofer...

Page 13: ...ome cars mobile phones or navi gation system can automatically interrupt the audio output if they are linked to the set c Wake up The car radio can be used as an intermediate system by other devices t...

Page 14: ...ncement war ning errors welcome by by or car intrusion 5 Use the keys to select a bleep which will be associated to the previously selec ted chime type 6 Press ESC to enter the value Setting the Messa...

Page 15: ...erwise SDVC will be without calibration Note 2 2 You choose a SDVC curve according to the state of your environment noise Setting the Light Display Brightness This source independent function adjusts...

Page 16: ...earch for FM stations using the PTY code Programme TYpe This one gives you direct access to preselected types of program e g News Affairs etc 1 Short press ENTER 2 Select PTY SEARCH with the keys 3 Us...

Page 17: ...Select TUNER INIT with the keys 3 Press ENTER to get the tuner initialisation menu see next menu Note You can have access to this menu by long pressing the ENTER key Moving to the Main Menu Use this f...

Page 18: ...ote 4 4 TA and NEWS announcements may interrupt CD playback Ejecting CD from the CD Player 1 Press REL to open the front 2 Press the key 3 Close the front Note In eject error case the CD is reloaded L...

Page 19: ...r ESC Displaying CD Text Some discs can deliver CD text information track title and highlight scan information disc title only delivered for the first 20 tracks of the current disc and only the 20 fir...

Page 20: ...With the keys select RANDOM 3 Use the keys to set the value ON to activate OFF to deactivate 4 Press ESC to enter the value Moving to the Main Menu Use this to directly move to the Main Menu 1 Short p...

Page 21: ...in Menu You can set the digital radio stations parame ters after selecting the DAB source Then by either a short or long press on ENTER key you get different DAB menus see cover pages The tuner DAB al...

Page 22: ...to the Main Menu Use this function to get the Main Menu 1 Short press ENTER 2 Select SAM with the keys 3 Press ENTER to get the Main Menu You can set the audio options by either a short or long press...

Page 23: ...e independent function adjusts the balance between the front and rear speakers 1 Short press SOUND 2 Select FADER with the keys 3 Use the keys to adjust the setting Rear 1 to 9 Middle Front 1 to 9 4 P...

Page 24: ...4 Press ESC to enter the value Note The setting is memorised to be re used for the Bass Treble Preset Sound effect Switching the Automatic Leveller This function allows an automatic levelling between...

Page 25: ...ort press COMPUTER 2 Select TIME with the keys 3 Use the keys to display the total driven time TOT or the trip time TRIP 4 Press ESC to enter the value Displaying the temperature Use this function to...

Page 26: ...12 hours or 24 hours 1 Long press COMPUTER 2 Select CLOCK TYPE with the keys 3 Use the keys to choose 12 H or 24 H default value 4 Press ESC to enter the value Selecting Updating Clock Mode Use this...

Page 27: ...the keys to select the informations to be displayed temperature clock speed time distance or battery 4 Press ESC to enter the value Starting the Speed Calibration Use this function to start speed cali...

Page 28: ...3 Press ENTER to get the Main Menu You can reach the Animations Menu by a long press on DISPLAY key see cover pages Switching the animations Use this function to set the animation display 1 Long pres...

Page 29: ...ys to select None default value 10 30 or 60 sec 4 Press ESC to enter the value Note User actions announcements tele phone mute or loading a disc can interrupt the screen saver Moving to the Main Menu...

Page 30: ...30 to 30 Select IN if you wish to amplify the guidance voice messages through the car speaker NO if no navigation computer connected to the set MUTE to automatically interrupt the radio during the gui...

Page 31: ...customize DAB memo Activate Deactivate the PAD Learn On Off Select the Programme TYpe PTY search News Affairs Info Sport Store the PAD selected services with service name Store PAD On Off Recall the...

Page 32: ...nce covered trip total Dist unit Trip Tot Move to the Car Computer Init Menu Comp Init Move to the main menu SAM 34 arrows v arrows Set the hour Set hour Set the minute Set minutes Time display format...

Page 33: ...s Vegas pixel show piston comet Set the time to activate the screen saver Trigger None 10s 30s 1mn Move to the main menu SAM Optional accessories available Connectors C1 CA1310 C2 CA1311 C3 CA1312 D1...

Page 34: ...or announcements see Sound Setup Menu The sound level decreases Display the set temperature if the temperature is too hot the sound level automatically decreases The telephone sound is distorted decre...

Page 35: ...ion 20 Defining Bass Freq Threshold 19 Defining Subwoofer Threshold 19 Defining the Scan Time 8 Defining Treble Freq Threshold 19 Deleting the CD name 15 Displaying CD Text 14 Displaying Source Inform...

Page 36: ...evel 10 Setting Noise Reduction System 16 Setting the balance LR speakers 18 Setting the balance RF speakers 18 Setting the Bass Level 18 Setting the Chimes Audio Level 9 Setting the Clock Type 21 Set...

Page 37: ...32 Switching the Warning LED 9 Updating RDS Dynamic Memory 22 Using radio when not running 8 Using Remote Control 5 Using the Radio Interface 1 Warning LED 6 AN 2001 2L gb qxd 16 07 01 14 55 Page 32...

Page 38: ...arch lvl Tuner SAM SAM SAM ENTER ENTER Key in TUNER source TUNER MENU Band Start AST PTY search AF Tuning Save in Tuner Init Scan preset Start memo MUTE MUTE Key MAIN MENU Mute the selected source SOU...

Reviews: