


9
Dirt Container & Filter: Removal & Replacement/Rotating Brushbar: Removal & Replacement
8
Dirt Container & Filter: Removal & Replacement
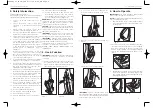
2. Unlock and remove the dirt container by pushing
the carry handle down and away from the machine
(Fig.6/2).
3. Tapping the container several times will help to
loosen any dirt that may have become attached to
the filter (Fig.6/3).
4. Press the filter agitator button three times to loosen
any dirt that has become stuck to the filter itself
(Fig.6/4).
5. Empty the container by pushing the dirt container
release button over a rubbish bin (Fig.6/5).
Fig.6/3
Fig.6/4
Fig.6/2
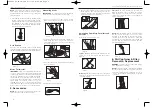
6. Close the dirt container and replace back into the
vacuum cleaner until you hear it click (Fig.6/6).
NOTE
: Check the dirt container is secured in place
before lifting the vacuum cleaner.
HEPA Filter Blocked
WARNING
: To reduce the risk of injury from moving
parts, unplug before servicing.
NOTE
: Unplug the vacuum cleaner before changing
filter.
NOTE
: For best performance clean filters regularly.
Under certain conditions, eg. when vacuuming fine
particles, the filter may become blocked resulting in a
loss of suction.
1. Switch off the vacuum cleaner and unplug from wall
outlet. Remove and empty the dirt container.
2. Remove the filter cover by turning it anti-clockwise
and pulling it away from the dirt container (Fig.6/7).
3. Press the HEPA filter eject button, located on the
top of the dirt container to release the filter (Fig.6/8).
Fig.6/6
Fig.6/5
4. Tap the filter gently on its base. This will dislodge
the dirt (Fig.6/9). Do not wash, brush or scour the
filter this is due to the delicate membrane that can
be damaged.
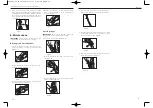
5. Replace the filter back into the dirt container until
it clicks into place (Fig.6/10).
6. Replace the filter container and click it into place
by turning it in a clockwise direction (Fig.6/11).
Close the flap and refit the dirt container.
Cleaning the Post-motor Filter
IMPORTANT
: Switch off the vacuum cleaner and
unplug from the wall outlet.
NOTE
: Vax recommend changing the post-motor
filter every 12 months. Call Vax Care on 0870
6061248 or visit www.vax.co.uk for further
information.
1. Remove the dirt container.
Fig.6/7
Fig.6/8
Fig.6/9
2. Lift out the post-motor grille by pressing the
locking tab and remove it (Fig.6/12).
3. Remove the post-motor filter and shake it clean
(Fig.6/13). Replace the cleaned post-motor filter
and fit the post-motor grille back into position.
7. Rotating Brushbar:
Removal & Replacement
The motor switches off automatically if the brushbar
is blocked during operation by vacuuming up foreign
objects, or if strands of carpet are wrapped around it.
IMPORTANT
: Switch off the vacuum cleaner and
unplug it from the wall outlet before servicing.
1. Lay the vacuum cleaner down on a flat surface
and turn over to expose the brushbar. Using a pair
of scissors, cut through any threads or hairs
caught by the brushbar that have wrapped around
the guides (Fig.7/1).
Fig.6/11
Fig.6/10
Fig.6/12
Fig.6/13
Fig.7/1
Vax VX1 V2 D1 JN.qxd 5/17/05 4:24 PM Page 8


