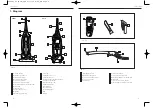
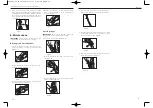
background image

3

Parts Overview

1   Soft grip handle

2   Brushbar on/off switch

3   Power on/off switch 

4 Motor protection switch

5   Stretch hose handle

6   Stretch hose release button

7   Removable flexible hose (inside tube)

8   Brush edge

9 Stair hose anchor 

Suction channel cover

Brushbar

Patented edge cleaning

Cord clip

14  On-board crevice tool

15  On-board stair tool

16  Container release (push down) and

carrying handle (lift up)

17 Stair hose anchor clip

18  Lifetime HEPA filter

19  Dirt container

20  Post-motor filter

21  Cord rewind pedal

22  Plug

23  Wheels

24  Filter agitator button

25  HEPA filter eject button

26  Dirt container release button

27  Hose release button

28  Flexible hose

5   Stretch hose handle

6   Stretch hose release button

7   Removable flexible hose (inside tube

8   Brush edge

14  Crevice tool (stored on-board)

15  Stair cleaning tool (stored on-board)

1. Diagram

Parts Overview

2

Fig.1/1

Fig.1/2

Fig.1/3

1

3

5

8

10

12

11

7

6

4

2

9

18

17

19

15

14

16

13

22

23

20

21

13

11

12

10

FRONT

BACK

24

25

26

14

15

5

6

28

27

6

7

Vax VX1 V2 D1 JN.qxd  5/17/05  4:24 PM  Page 2

Summary of Contents for VX1

Page 1: ...Instruction Manual Please read carefully before using the cleaner Always fully extend the mains cable before use www vax co uk BAGLESS UPRIGHT VACUUM CLEANER Vax Model Number VX1 VX1 Vax VX1 V2 D1 JN...

Page 2: ...chor clip 18 Lifetime HEPA filter 19 Dirt container 20 Post motor filter 21 Cord rewind pedal 22 Plug 23 Wheels 24 Filter agitator button 25 HEPA filter eject button 26 Dirt container release button 2...

Page 3: ...the vacuum cleaner over the cord Keep the cord away from heated surfaces 8 Do not handle the plug or vacuum cleaner with wet hands Do not use outdoors or on wet surfaces 9 Do not put any objects into...

Page 4: ...e motor is equipped with a thermal cut out If for any reason the vacuum cleaner should overheat the thermal cut out will automatically turn the unit off Should this occur unplug the vacuum cleaner fro...

Page 5: ...iner to release the filter Fig 6 8 Fig 6 6 Fig 6 5 4 Tap the filter gently on its base This will dislodge the dirt Fig 6 9 Do not wash brush or scour the filter this is due to the delicate membrane th...

Page 6: ...he wall outlet before servicing Blockage in Suction Channel 1 Lay the vacuum cleaner down and rotate the hose collar in a clockwise direction to release the hose Fig 8 1 2 Remove the suction channel c...

Page 7: ...use or breaker Cause On off switch not turned on Solution Push on off switch to on Cause Motor thermostat tripped Solution Reset motor thermostat see page 6 Cause Blown fuse tripped breaker Solution R...

Page 8: ...15 14 This page has been intentionally left blank This page has been intentionally left blank Vax VX1 V2 D1 JN qxd 5 17 05 4 24 PM Page 14...

Page 9: ...d by 93 68 EEC EMC 89 336 EEC Electromagnetic Compatibility Directive as modified by 93 68 EEC Waste electrical products should not be disposed of with household waste Please recycle where facilities...

Reviews: