


11
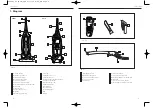
Maintenance
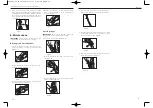
4. After removing the hose use a feather duster to
brush it clean and remove the blockage (Fig.8/8).
5. Push the stretch hose back onto the inlet on the dirt
container and insert the other end of the hose back
into the stretch hose tube (Fig.8/9).
6. Return the stretch hose tube to the vacuum cleaner
until it clicks into place (Fig.8/10).
Fig.8/8
Fig.8/10
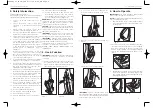
2. There is an automatic system which cuts off the
power supply if the brushbar gets clogged up. After
cleaning the brushes, wait for 2 minutes then plug
the vacuum cleaner into the wall outlet and press
the reset button (Fig.7/2) before pressing the power
on/off switch.
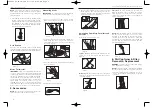
8. Maintenance
IMPORTANT
: Switch off the vacuum cleaner and
unplug it from the wall outlet before servicing.
Blockage in Suction Channel
1. Lay the vacuum cleaner down and rotate the hose
collar in a clockwise direction to release the hose
(Fig.8/1).
2. Remove the suction channel cover and remove any
blockage beneath it (Fig.8/2).
3. Remove the suction pipe and use a feather duster
to brush out the hose (Fig.8/3).
Fig.7/2
Rotating Brushbar: Removal & Replacement/Maintenance
10
4. Replace the channel cover before attaching the
hose collar by turning it in an anti-clockwise
direction (Fig.8/4).
Hose Blockage
IMPORTANT
: Switch off the vacuum cleaner and
unplug it from the wall outlet before servicing.
1. Lift out the stretch hose tube (Fig.8/5).
2. Remove the stretch hose from the stretch hose
tube (Fig.8/6).
3. Pull the stretch hose to one side to remove it from
the dirt container (Fig.8/7).
Fig.8/1
Fig.8/2
Fig.8/3
Fig.8/4
Fig.8/5
Fig.8/6
Fig.8/7
Fig.8/9
Vax VX1 V2 D1 JN.qxd 5/17/05 4:24 PM Page 10


