background image

90

Introduction

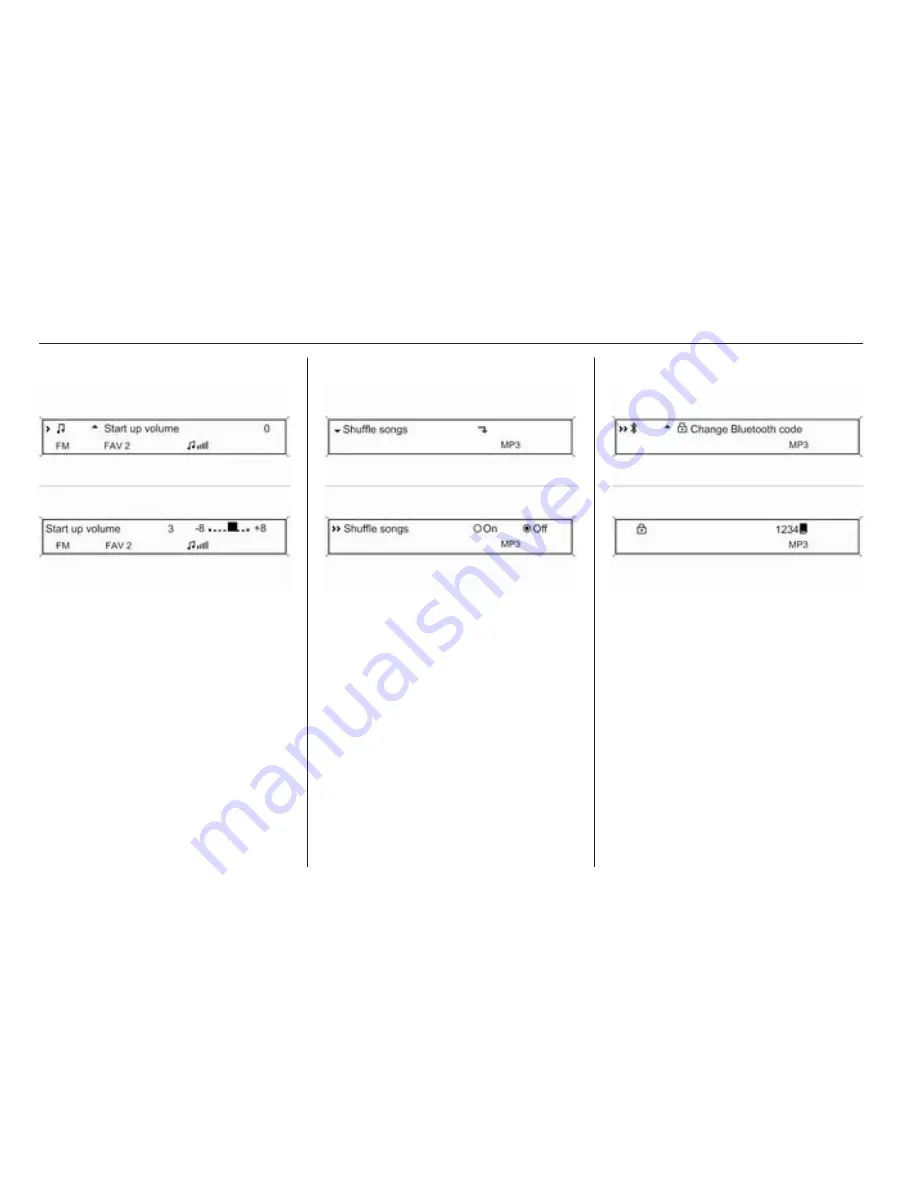
Setting a value

Press the multifunction knob to open

the corresponding settings menu.
Turn the multifunction knob to change

the current value of the setting.
Press the multifunction knob to

confirm the set value.

Switching a function on or off

Press the multifunction knob to open

the corresponding settings menu.
Turn the multifunction knob to mark

the setting On or Off.
Press the multifunction knob to

confirm the marked setting.

Entering a character sequence

Press the multifunction knob to open

the relevant settings menu.
Turn the multifunction knob to change

the character at the current cursor

position.
Press the multifunction knob to

confirm the character displayed.
Using the BACK button the last

character in the character sequence

can be deleted.

Summary of Contents for Meriva 2014

Page 1: ...0 1 Infotainment Manual Model Year 2014 5 Edition January 2014 KTA 2723 5 VX en VAUXHALL Zafira Tourer Infotainment Manual Model Year 2014 5 Edition January 2014 KTA 2723 5 VX en ...

Page 2: ...Navi 950 650 CD 600 3 CD 400plus 400 300 77 Contents ...

Page 3: ......

Page 4: ...Introduction 4 Basic operation 14 Radio 22 CD Player 28 External devices 30 Navigation 37 Speech recognition 55 Phone 59 Frequently asked questions 68 Index 72 Navi 950 650 CD 600 ...

Page 5: ...e Infotainment system is equipped with a phone application that allows for comfortable and safe use of your mobile phone in the vehicle Optionally the Infotainment system can be operated using the instrument panel controls the controls on the steering wheel or the speech recognition function The well thought out design of the control elements and the clear displays enable you to control the system...

Page 6: ...ch as one way streets and pedestrian zones are not marked on the navigation system map In such areas the system may issue a warning that must be accepted Therefore pay particular attention to one way streets and other roads and entrances that must not be driven into Radio reception Radio reception may be disrupted by static noise distortion or loss of reception due to changes in distance from the ...

Page 7: ...6 Introduction Control elements overview Navi 950 650 ...

Page 8: ...nal devices start pause playback 32 8 FAV 1 2 3 button Open favourites list 24 9 AS 1 2 button Short press open autostore list 23 Long press save autostore stations automatically 23 10 TP button Activate or deactivate radio traffic service 25 11 d button Eject CD 29 12 CONFIG button Open settings menu 19 13 INFO button Radio information on current station CD MP3 WMA external devices information on...

Page 9: ...ry 14 17 RPT NAV button Repeat last navigation message 50 18 CD slot 29 19 O button Take phone call or activate deactivate mute 62 20 NAV button Display map 38 21 SRCE Source button Press to toggle through the different audio sources CD MP3 player 28 USB 30 AUX 30 Bluetooth 30 AM 22 FM 22 DAB 22 ...

Page 10: ...Introduction 9 CD 600 ...

Page 11: ... save autostore stations automatically 23 8 TP button Activate or deactivate radio traffic service 25 9 d button Eject CD 29 10 CONFIG button Open settings menu 19 11 INFO button Radio information on current station CD MP3 WMA external devices information on current track 12 Multifunction knob Turn mark menu options or set alphanumeric values 14 Press select activate the marked option confirm set ...

Page 12: ...orted by phone 55 2 SRC Source button Press select audio source 22 If radio is active turn up down to select next previous preset radio station 22 If CD player is active turn up down to select next previous CD MP3 WMA track 29 If external device is active turn up down to select next previous track 32 If phone is active turn up down to select next previous entry in call list 62 If phone is active a...

Page 13: ...ns Switching the Infotainment system on or off Press the X knob briefly After switching on the last selected Infotainment source becomes active Automatic switch off If the Infotainment system is switched on using the X knob while the ignition is switched off it switches off again automatically after 10 minutes Setting the volume Turn the X knob The current setting is shown in a pop up at the botto...

Page 14: ...ers Repeatedly press the SRCE button to toggle between the AM FM CD USB AUX Bluetooth or DAB main menus Find detailed descriptions of CD MP3 player 3 28 USB port 3 30 AUX input 3 30 Bluetooth audio 3 30 AM radio 3 22 FM radio 3 22 DAB radio 3 27 Navigation Press the NAV button to display the map of the navigation application Press the multifunction knob to open a submenu with options for the input...

Page 15: ...an alphanumeric value Press the multifunction knob Navi 950 Navi 650 press the outer ring To select or activate the marked option To confirm a set value To switch a system function on off To open the audio or navigation menu within the respective application button Press the button to access the Home Page Using the multifunction knob you may then access the different applications Turn the multifun...

Page 16: ...o delete the entire entry Examples of menu operation Selecting a screen element Turn the multifunction knob to move the cursor coloured background to the desired option Press the multifunction knob to select the marked icon screen button or menu item Note In subsequent chapters the operating steps for selecting and activating a screen button or menu item will be described as select the screen butt...

Page 17: ...perating steps for activating a menu item will be described as activate the menu item Entering a character sequence Turn the multifunction knob to select the desired character Press the multifunction knob to enter the respective character in the entry field at the top of the screen The last character in the character sequence can be deleted using the Del screen button or the BACK button Pressing a...

Page 18: ...idrange frequencies of the audio source Adjust the setting as desired Treble Use this setting to enhance or attenuate the high frequencies of the audio sources Adjust the setting as desired EQ mode EQ Equaliser Use this setting to optimise the tone for a specific style of music e g Rock or Classical Select the EQ menu item A submenu with predefined sound styles is displayed Select the desired soun...

Page 19: ...e Press the CONFIG button and then select the Radio Settings option Select Auto Volume to display the respective menu To adjust the degree of volume adaptation set Auto Volume to Off Low Medium or High Off no enhancement of volume with increasing vehicle speed High maximum enhancement of volume with increasing vehicle speed Adjusting the Startup Volume Press the CONFIG button and then select the R...

Page 20: ... and then adjust the setting as desired To adjust the volume of the audio source possibly playing in the background select Background and then adjust the setting as desired Select Volume Test to get an audio example of the settings Note While an announcement is given out the volume may simply be adjusted using the m knob System settings Various Infotainment system settings may be adjusted via the ...

Page 21: ... information on the manufacturer of the Infotainment system select Licensing Information Factory defaults To reset all Infotainment settings to their factory defaults select Clear and Reset Radio Display settings Press the CONFIG button and then select the Display Settings menu item to display the respective submenu Home Page Select Home Page Menu to display the home page settings menu To access t...

Page 22: ...e new location The icon that was located in that position before is now displayed in the position of the moved icon Home page defaults To reset the Home Page to its factory defaults select Restore Home Page Defaults Display Off To turn the display off select Display Off To turn the display back on press any button on the instrument panel except the m VOL knob ...

Page 23: ...uttons Release the button when the required frequency has almost been reached on the frequency display Manual station tuning In the FM and DAB waveband press the multifunction knob to open the respective menu and then select Manual tuning The frequency currently active is displayed at the bottom of the screen Turn the multifunction knob to reach the desired frequency In the AM waveband turn the mu...

Page 24: ...A list of programme types currently available is displayed Select the desired programme type A list of stations is displayed transmitting a programme of the selected type Select the desired station Note The currently received station is marked by i Updating the station lists If the stations stored in the waveband specific station list can no longer be received the AM and the DAB station lists must...

Page 25: ...n button 1 6 until a confirmation message is displayed Note Manually stored stations are overwritten in an automatic station storing process Retrieving a station If required press the AS button to open an autostore list or to switch to another autostore list Press one of the station buttons 1 6 to activate the station at the corresponding list position Favourite lists Stations of all wavebands can...

Page 26: ...its frequency During station search the Infotainment system tunes in to RDS stations only The Infotainment system always tunes in to the best receivable broadcasting frequency of the set station by means of AF Alternative Frequency Depending on the station that is received the Infotainment system displays radio text that can contain for example information on the current programme RDS Options menu...

Page 27: ...uration of the traffic announcement Switching the radio traffic service on and off To switch the traffic announcement standby facility of the Infotainment system on and off press the TP button If the radio traffic service is switched on is indicated on the display If the current station is not a radio traffic service station a search is started automatically for the next radio traffic service stat...

Page 28: ...sed by stations that are on nearby frequencies a phenomenon that is typical of AM and FM reception does not occur with DAB If the DAB signal is too weak to be picked up by the receiver the system switches over to the same programme on another DAB or FM station If the DAB signal is reflected by natural obstacles or buildings the reception quality of DAB is improved whereas AM or FM reception is con...

Page 29: ...necessary File formats Audio CDs The following CD formats can be used CD ROM Mode 1 and Mode 2 CD ROM XA Mode 2 Form 1 and Form 2 MP3 CDs The following file formats can be used ISO9660 Level 1 Level 2 Romeo Joliet MP3 and WMA files written in any format other than listed above may not play correctly and their file names and folder names may not be displayed correctly The following restrictions app...

Page 30: ...ess d button The CD is pushed out of the CD slot If the CD is not removed after ejection it will be drawn back in again automatically after a few seconds Track List Turn the multifunction knob to display a list of all tracks on the CD Note The currently playing track is marked by i Select the desired track Function buttons Skipping to previous or next track Press the t or v buttons once or several...

Page 31: ... connected to the AUX input the audio signal of the auxiliary device is transmitted via the speakers of the Infotainment system The volume can be adjusted via the Infotainment system All other control functions must be operated via the auxiliary device Connecting a device To connect the auxiliary device to the AUX input socket of the Infotainment system use the following cable 3 pole for audio sou...

Page 32: ...le phones MP3 players featuring Bluetooth etc which support the Bluetooth music profiles A2DP and AVRCP can be connected wirelessly to the Infotainment system The Infotainment system can play music files contained in Bluetooth devices e g iPod or Smartphone Connecting a device Find a detailed description on the Bluetooth connection 3 60 File formats Audio files Only devices formatted in the FAT32 ...

Page 33: ...o Starting playback If not connected connect the device 3 30 Press the button and then select the USB AUX or Bluetooth icon Example USB main menu Function buttons The media files on the USB and Bluetooth devices may be operated using the buttons on the instrument panel Skipping to previous or next track Press the t or v buttons once or several times to skip to the previous or next track Fast forwa...

Page 34: ...ated and stored in the Play Lists menu To delete a playlist generated by the system select the Delete Automatic Playlist menu item A list of all generated playlists is displayed Select the playlist you wish to delete The playlist is deleted Displaying pictures Viewing pictures Connect a USB device 3 30 Press the button and then select the Pictures icon to open the Picture Viewer USB menu A list of...

Page 35: ...the pictures of a slide show in random order activate the Shuffle Images screen button Using apps The Infotainment system supports the operation of apps via the controls on the Infotainment system Before an application can be operated using the controls and menus of the Infotainment system the respective application has to be installed via a smartphone Activating the Tethering function on the smar...

Page 36: ... install the app on the Infotainment system select the Install screen button at the bottom of the screen The app is installed When the installation process is finished the Install screen button changes to Launch Note Apps installed on the Infotainment system are displayed as icons on the home pages o To search for a specific app select the o screen button A keyboard is displayed Enter the search n...

Page 37: ...vides options for the management of the accounts Press the button and then select the Apps icon to display the apps main menu Select the Settings screen button at the bottom of the screen to display the respective submenu Adjust the settings as desired ...

Page 38: ...ic The relevant traffic regulations must always be followed If a navigation instruction contradicts traffic regulations the traffic regulations always apply Functioning of the navigation application The position and movement of the vehicle are detected by the navigation application using sensors The travelled distance is determined by the vehicle s speedometer signal and turning movements on bends...

Page 39: ...r a compass that indicates the north direction Map display of the area around the current position Current position indicated by a red triangle within a grey circle Points of interest POI e g petrol stations parking areas or restaurants indicated by corresponding symbols if activated In the bottom line street name of the current position Route guidance active If route guidance is active the follow...

Page 40: ...itch The Eight way switch in the middle of the multifunction knob may be tilted in all directions Tilt the switch to one side The visible map section moves in the respective direction To redisplay the map around the current location press the BACK button Changing the map scale When the map is displayed turn the multifunction knob to display a scale bar at the bottom of the screen Turn the multifun...

Page 41: ...laying POIs Press the multifunction knob to display the Navigation Menu Select the Show POIs menu item to display the respective submenu If you wish all POIs available in the system to be displayed on the map activate Show all POIs If you do not wish POIs to be displayed on the map activate Hide all POIs To only display specific POIs activate the User Defined menu item and then activate the POI ca...

Page 42: ...simulation mode for test purposes To start the simulation mode press the CONFIG button and then select the Navigation Settings menu item Scroll through the list and select Route Simulation to display the respective submenu Starting position Since the simulation mode does not draw on the GPS signal providing the current position of the vehicle a start position must be set manually Use Last Known Po...

Page 43: ...Destination application provides different options to set a destination for route guidance Press the DEST NAV button when route guidance is not active to display the Destination Entry menu Manual address entry Address Entry menu Press the DEST NAV button to display the Destination Entry menu and then select the Address Entry icon to display a mask for address entry Select the Country entry field A...

Page 44: ... of the letter keyboard The special characters keyboard is displayed Select the desired character To enter numbers or symbols select the Sym screen button at the right side of the special characters keyboard The symbols keyboard is displayed Select the desired character To redisplay the letter keyboard select the ABC screen button at the right side of the symbol keyboard This way you may toggle be...

Page 45: ...list Select the desired category and then a subcategory from the list Select the Sort Method entry field to display the respective submenu Select By Distance or By Name Select the Search screen button at the bottom of the screen A list of POIs or POI categories is displayed corresponding to the criteria entered Select the desired menu item Name search mask Select the Country entry field to display...

Page 46: ... selected or entered for route guidance are stored within the system Press the DEST NAV button to display the Destination Entry menu and then select the Previous Destinations icon A list of the last destinations is displayed sorted in reverse chronological order Select the desired address from the list A confirmation menu is displayed Select the Start Guidance menu item to start route guidance Add...

Page 47: ...cting addresses from the address book Press the DEST NAV button to display the Destination Entry menu and then select the Address Book icon A list of all address book entries is displayed Select the desired entry A confirmation menu is displayed Select the Start Guidance menu item to start route guidance Editing addresses in the address book Press the DEST NAV button to display the Destination Ent...

Page 48: ...n A red v symbol is indicated on the map and the corresponding address is displayed on a label Press the multifunction knob to activate the Go screen button A confirmation menu is displayed Select the Start Guidance menu item to start route guidance Note If there is more than one POI located at the map position selected this is indicated on the label Activating the Go screen button then opens a li...

Page 49: ...point menu item The waypoint list is displayed Select the Add screen button at the position where you wish to add a waypoint The Destination Entry menu is displayed Enter or select the desired destination The confirmation menu is displayed Select the Add menu item The route is recalculated and the waypoint list is redisplayed with the intermediate destination at the position selected Note Up to fo...

Page 50: ... favourite route A keyboard is displayed Enter a name for the favourite route and confirm your input The waypoint route is saved Creating new favourite routes Press the DEST NAV button to display the Destination Entry menu and then select the Favourite Routes icon to display the Favourite Route menu Select the New Favourite Route menu item A keyboard is displayed Enter a name for the favourite rou...

Page 51: ...o move to the next value to be set Proceed like this to set all values Select the BACK button to return to the next higher menu level Adjust the longitude values as described above When all GPS coordinates are entered select the Search screen button at the bottom of the screen A confirmation menu is displayed To start route guidance select the Start Guidance menu item Deleting saved destinations T...

Page 52: ...rompts To adjust the volume during voice prompts select the Navigation Volume menu item The respective submenu is displayed To adjust the volume of voice prompts select Announcement and then adjust the setting as desired To adjust the volume of the audio source possibly playing in the background select Background and then adjust the setting as desired Select Volume Test to get an audio example of ...

Page 53: ...incidents on the map Traffic incidents may be indicated on the map by corresponding symbols Select Show Traffic Events on Map to display the respective submenu Select the desired option If User Defined is activated scroll through the list and activate the traffic incidents categories you wish to be displayed TMC stations The TMC stations broadcasting traffic information may be set automatically or...

Page 54: ...firm the message to delete all bread crumbs To end the tracking session deactivate the Record menu item A keyboard is displayed Enter a name for the respective tracking session and select the Done screen button The session is stored in the Saved list To display a list of all tracking sessions select the Saved screen button Select the desired tracking session to display the Bread Crumb Details menu...

Page 55: ...lect the Detour By Distance menu item A menu listing different distances is displayed Select the desired distance The route is recalculated accordingly To block the whole route select the Detour Complete Route menu item The original route is blocked and a new route to the desired destination is calculated Exit list To display a list of the next exits and motorway stations while driving on a motorw...

Page 56: ...mmands for completing the tasks Most of them except destination entry and voice keypad can be completed in a single command If the action takes more than one command to be performed proceed as follows In the first command you indicate the type of action to be performed e g Navigation destination entry The system replies with prompts that lead you through a dialogue for entering the necessary infor...

Page 57: ...er for destination addresses The order in which the parts of an address need to be entered using the speech recognition system is dependent on the country where the destination is located An example for the respective input order is given out by the system Voice pass thru application The voice pass thru application of the Infotainment system allows access to the speech recognition commands on your...

Page 58: ...ee times to say a correct command Operation via speech commands The speech recognition can understand commands that are either naturally stated in sentence form or direct commands stating the application and the task For best results Listen for the voice prompt and wait for the beep before saying a command or replying Say Help if you want to listen again to the help prompt for the current dialogue...

Page 59: ...ys a prompt like Make your selection from the list using the manual controls or press the back button on the faceplate to try again If no manual selection is made within 15 seconds the speech recognition session terminates you are prompted with a message and the former screen is redisplayed The Back command To return to the previous dialogue step alternatively say Back or press the BACK button on ...

Page 60: ...ions depend on the relevant mobile phone and network provider You will find further information on this in the operating instructions for your mobile phone or you can enquire about them with your network provider Important information for operation and traffic safety 9 Warning Mobile phones have effects on your environment For this reason safety regulations and directions have been prepared You sh...

Page 61: ...system Only one paired device can be connected to the Infotainment system at a time Pairing normally only needs to be carried out once unless the device is deleted from the list of paired devices If the device has been connected previously the Infotainment system establishes the connection automatically Bluetooth operation considerably drains the device s battery Therefore connect the device to th...

Page 62: ...the Bluetooth device Device list The device list contains all Bluetooth devices paired to the Infotainment system If a new device is paired it is displayed in the device list Connecting a device Select the device you wish to connect A submenu is displayed Select the Select screen button The device previously connected is disconnected and this device is connected Deleting a device Select the device...

Page 63: ...d the call until you are requested to do so by the emergency call centre Operation As soon as a connection via Bluetooth has been set up between your mobile phone and the Infotainment system you can also operate many functions of your mobile phone via the Infotainment system After setting up a connection between the mobile phone and the Infotainment system the mobile phone data is transmitted to t...

Page 64: ...e Phone Book Search menu is displayed Select the desired first letter range to display a preselection of the telephone book entries you wish to be displayed The phone book jumps to the position of the letter range selected Select the desired entry in the telephone book to display the numbers saved under this entry Select the desired number to start dialling Phone book sorting The phone book may be...

Page 65: ...the screen To take the call select the Answer screen button To reject the call select the Decline screen button Functions during a phone call When a call is active the in call view is displayed Ending a phone call To end the call select the Hang up screen button Muting a call To temporarily mute the microphone activate the Mute call screen button Deactivate the Mute call screen button to unmute th...

Page 66: ... the same time The Merge calls screen button changes to Detach call To end a conference call select the Detach call screen button Ending phone calls In a conference call select the Hang up screen button to end both phone calls Text messages As soon as a connection via Bluetooth has been set up between your mobile phone and the Infotainment system you can operate the messages inbox of your mobile p...

Page 67: ...y screen button A list of predefined messages is displayed Select the desired message and confirm your input The message is sent Note New predefined messages may be created in the settings menu Call To call the sender of the text message select the Call screen button Inbox Press the button and then select the Messages icon to display the respective menu Select the Inbox menu item to display a list...

Page 68: ...oints for the external antenna or equipment holder and ways of using devices with a transmission power exceeding 10 watts Use of a handsfree attachment without external antenna with mobile telephone standards GSM 900 1800 1900 and UMTS is only permitted if the maximum transmission power of the mobile telephone is 2 watts for GSM 900 or 1 watt for the other types For reasons of safety do not use th...

Page 69: ...gnition system press the w button on the steering wheel Wait for the beep and then speak your command Detailed description 3 56 I cannot select a phone contact via speech recognition What am I doing wrong The Infotainment system accesses the phone book entries as they are stored If the sorting order is set to last name first name the correct command for calling John Smith is Smith John Detailed de...

Page 70: ... cannot be read by the Infotainment system Detailed description 3 60 Navigation How can I toggle between total driving time or remaining driving time and total distance or partial distance When the navigation application is active press the multifunction knob to display the Navigation Menu Select Switch Route Time Destination and adjust the settings as desired Detailed description 3 38 When pressi...

Page 71: ...tton on the faceplate How can I change the tone settings The tone settings menu is accessible via the Home Page Press the button and then select the More screen button to display the second Home Page To access the tone settings menu select the Tone icon Detailed description 3 17 ...

Page 72: ...Frequently asked questions 71 ...

Page 73: ...ions 23 Storing stations 23 Auto volume 18 AUX 30 B BACK button 14 Balance 17 Basic operation 14 Bass 17 Bluetooth connection 60 Bluetooth music 30 Bread crumbs 50 C Category list 22 CD player 28 Chime volume 18 Control elements Infotainment system 6 Steering wheel 6 Control elements overview 6 D DAB 27 Date 19 Destination input 42 Digital audio broadcasting 27 Display 19 Displaying pictures 33 E ...

Page 74: ...ook 42 Bread crumbs 50 Coordinates 42 Current location 38 Destination input 42 Favourite routes 42 General settings 38 Guidance alerts 50 Home address 42 Keyboard 42 Map display 38 Map manipulation 38 POIs 42 Recent destinations 42 Route guidance 50 Route options 50 Route simulation 38 Route tracking 50 TMC stations 50 Traffic incidents 50 Turn list 50 Voice prompts 50 Waypoint trip 42 Navigation ...

Page 75: ...e simulation 38 S Software update 19 Speech recognition 55 Station list 22 Station search 22 Switching the Infotainment system on 12 System settings 19 Display 19 Home Page 19 Language 19 Software 19 Time and Date 19 T TA 25 TA volume 18 Text messages 65 Theft deterrent feature 5 Time 19 Time format 19 TMC 50 Tone settings 17 TP 25 Traffic incidents 50 Traffic programme 25 Treble 17 Turn list 50 U...

Page 76: ...75 W Waveband selection 22 Waypoint trip 42 ...

Page 77: ...76 ...

Page 78: ...Introduction 78 Radio 95 CD Player 104 AUX input 108 USB port 109 Speech recognition 111 Phone 116 Index 128 CD 400plus 400 300 ...

Page 79: ...dio sources The digital sound processor provides you with several preset equalizer modes for sound optimisation Optionally the Infotainment system can be operated using controls on the steering wheel or via the speech recognition system In addition the Infotainment system can be equipped with a mobile phone portal The well thought out design of the control elements the clear displays and a large m...

Page 80: ...atic noise distortion or loss of reception due to changes in distance from the transmitter multi path reception due to reflection shadowing Theft deterrent feature The Infotainment system is equipped with an electronic security system for the purpose of theft deterrence The Infotainment system therefore functions only in your vehicle and is worthless to a thief ...

Page 81: ...80 Introduction Control elements overview CD 400 CD 400plus ...

Page 82: ...radio stations 96 Short press select autostore list 96 Long press save stations automatically 96 9 TP 100 Activate or deactivate radio traffic service 100 If Infotainment system is switched off display time and date 100 10 CD ejection 105 11 CONFIG 92 Open settings menu 92 12 INFO 80 Radio information on the currently played station 95 CD MP3 WMA information on the currently inserted CD 105 13 CD ...

Page 83: ...82 Introduction 18 AUX 108 Change to external audio source 108 ...

Page 84: ...Introduction 83 CD 300 ...

Page 85: ...utomatic memory levels preset radio stations 96 Short press select autostore list 96 Long press save stations automatically 96 11 TP 100 Activate or deactivate radio traffic service 100 If Infotainment system is switched off display time and date 100 12 CD ejection 105 13 CONFIG 92 Open settings menu 92 14 INFO 80 Radio information on the currently played station 95 CD MP3 WMA information on the c...

Page 86: ... is active turn upwards downwards to select next previous preset radio station 95 If CD player is active turn upwards downwards to select next previous CD MP3 WMA track 105 If Phone portal is active turn upwards downwards to select next previous entry in call list 122 If Phone portal is active and calls waiting turn upwards downwards to switch between calls 122 3 Increase volume 86 4 Reduce volume...

Page 87: ... start up volume 3 92 the volume of the traffic announcements 3 92 Speed compensated volume When speed compensated volume is activated 3 92 the volume is adapted automatically to make up for the road and wind noise as you drive Mute Press the v G button if Phone portal is available press for a few seconds to mute the audio sources To cancel mute again turn the X knob or press the v G button again ...

Page 88: ...ltifunction knob CD 400 CD 400plus to select or activate the marked option CD 300 to select or activate the option displayed to confirm a set value to switch a system function on off BACK button Press the BACK button briefly to exit a menu return from a submenu to the next higher menu level delete the last character in a character sequence Press and hold the BACK button for a few seconds to delete...

Page 89: ...ate the setting Setting a value Turn the multifunction knob to change the current value of the setting Press the multifunction knob to confirm the set value Switching a function on or off Turn the multifunction knob to mark the function to be switched on or off Press the multifunction knob to switch between the settings On and Off ...

Page 90: ... menu Turn the multifunction knob to display the other options in the active menu The angled arrow 2 indicates a submenu with further options is available Press the multifunction knob to select the option displayed and to open the corresponding submenu The arrow pointing to the right 3 indicates the first submenu level is active two arrows second submenu level active The down arrow 4 indicates fur...

Page 91: ...nob to open the corresponding settings menu Turn the multifunction knob to mark the setting On or Off Press the multifunction knob to confirm the marked setting Entering a character sequence Press the multifunction knob to open the relevant settings menu Turn the multifunction knob to change the character at the current cursor position Press the multifunction knob to confirm the character displaye...

Page 92: ...t for each radio waveband and each audio player source Press the TONE button to open the tone menu Setting bass middle and treble Select Bass Midrange or Treble Set the desired value for the selected option Setting the volume distribution between front rear Select Fader Set the desired value ...

Page 93: ...d the TONE button for a few seconds Optimizing the tone for the style of music Select EQ Equalizer The displayed options offer optimized bass middle and treble presettings for the relevant style of music Select the desired option Volume settings Maximum startup volume Press the CONFIG button to open the system settings menu CD 400 CD 400plus select Radio settings and then Maximum startup volume CD...

Page 94: ...ttings RDS options and TA volume CD 300 select Audio settings RDS options and TA volume Set the desired value for the volume increase or reduction Personalisation only with CD 400plus Various Infotainment system settings can be separately memorised for each vehicle key driver of the car Memorised settings By removing the vehicle key from the ignition switch the following settings are automatically...

Page 95: ... songs setting CD player state of TP Traffic Programme setting cursor position for each menu on the display Activating deactivating personalization Press the CONFIG button to open the system settings menu Select Vehicle settings and then Comfort settings Set Personalization by driver to On or Off ...

Page 96: ...or several times to select the desired waveband The station last played in that waveband will be received Station search Automatic station search Briefly press button s or u to play the next station in the station memory Manual station search Press button s or u for a few seconds to start a search for the next receivable station in the current waveband When the required frequency has been reached ...

Page 97: ... Press and hold the AS button until an autostore message is displayed The 12 strongest stations in the current waveband will be stored in the 2 autostore lists To abort the autostore procedure press the multifunction knob Storing stations manually Stations can also be stored manually in the autostore lists Set the station to be stored Briefly press the AS button to open an autostore list or to swi...

Page 98: ...etrieving a station Briefly press the FAV button to open a favourite list or to switch to another favourite list Briefly press one of the station buttons 1 6 to open the station at the related list position Defining the number of available favourite lists Press the CONFIG button Select Radio settings and then Radio favourites Select the desired number of available favourite lists Waveband menus Al...

Page 99: ... the Infotainment system performs an automatic station search Select the required station Note The currently received station is marked by i Updating stations lists If the stations stored in a waveband specific station list can no longer be received Select the corresponding command to update a station list CD 400plus The dual tuner of the Infotainment system continuously updates the FM stations li...

Page 100: ...esired programme type CD 400 CD 400plus A list of stations is displayed that transmit a programme of the selected type Select the desired station CD 300 The next receivable station of the selected type is searched for and is played The category list is also updated when the corresponding waveband specific station list is updated Note The currently received station is marked by i DAB announcements ...

Page 101: ... receivable broadcasting frequency of the set station by means of AF Alternative Frequency Depending on the station that is received the Infotainment system displays radio text that can contain for example information about the current programme Configuring RDS To open the menu for the RDS configuration Press the CONFIG button CD 400 CD 400plus Select Radio settings and then RDS options CD 300 Sel...

Page 102: ...et the option Radio text to On or Off Radio traffic service TP Traffic Programme Radio traffic service stations are RDS stations that broadcast traffic news Switching the radio traffic service on and off To switch the traffic announcement standby facility of the Infotainment system on and off Press the TP button If the radio traffic service is switched on is displayed in the radio main menu Only r...

Page 103: ... information As long as a given DAB receiver can pick up the signal sent out by a broadcasting station even if the signal is very weak sound reproduction is ensured There is no fading weakening of the sound that is typical of AM or FM reception The DAB signal is reproduced at a constant volume If the DAB signal is too weak to be picked up by the receiver reception is interrupted completely This in...

Page 104: ...too weak to be picked up by the receiver Auto linking DAB FM with this function activated the device switches over to a corresponding FM station of the active DAB service if available when the DAB signal is too weak to be picked up by the receiver Dynamic audio adaption with this function activated the dynamic range of the DAB signal is reduced That means the level of the loud sounds is reduced bu...

Page 105: ...le formats can be used ISO9660 Level 1 Level 2 Romeo Joliet MP3 and WMA files written in any format other than listed above may not play correctly and their file names and folder names may not be displayed correctly Note ISO 13346 is not supported It may be required to manually select ISO 9660 when burning an audio CD as example with Windows 7 Audio CDs with copy protection which are not in compli...

Page 106: ... of songs per playlist max 255 Applicable playlist extensions m3u pls asx wpl This chapter deals only with playing MP3 files since the operation for MP3 and WMA files is identical When a CD with WMA files is loaded MP3 related menus are displayed Usage Starting CD replay Press the CD button to open the CD or MP3 menu If there is a CD in the CD player CD replay is started Depending on the data stor...

Page 107: ...ifunction knob to open the audio CD related menu To play all tracks in random order set Shuffle songs to On To select a track on the audio CD select Tracks list and then select the desired track During MP3 replay Press the multifunction knob to open the MP3 related menu To play all tracks in random order set Shuffle songs to On To select a track from a folder or playlist select Playlists Folders S...

Page 108: ...end on the data saved on the MP3 CD The search process on the MP3 CD may take several minutes During this time the station last played will be received Removing a CD Press the d button The CD is pushed out of the CD slot If the CD is not removed after ejection it will be drawn back in again automatically after a few seconds ...

Page 109: ...o sources It is possible for example to connect a portable CD player with a 3 5 mm jack plug to the AUX input Note The socket must always be kept clean and dry Usage Press the CD AUX or AUX button once or several times to activate the AUX mode An audio source that is connected to the AUX input can be operated only via the control elements of the audio source ...

Page 110: ...es Devices connected to the USB port are operated via the controls and menus of the Infotainment system Note The socket must always be kept clean and dry Important information The following devices can be connected to the USB port iPod Zune PlaysForSure device PFD USB drive Note Not all iPod Zune PFD or USB drive models are supported by the Infotainment system Playing saved audio files ...

Page 111: ...e described for USB drives only Operation of other devices like iPod or Zune is generally the same Selecting tracks using the USB menu Press the multifunction knob to open the USB related menu To play all tracks in succession select Play all To display a menu with various additional options for track search and selection select Search The search process on the USB device may take several minutes D...

Page 112: ...you to re enter the desired command Apart from this the speech recognition acknowledges important commands and will enquire if necessary To ensure that conversations inside the vehicle do not lead to unintentional triggering of system functions the speech recognition does not start until it has been activated Important notes on language support Not all languages available for the display of the In...

Page 113: ...put of the command the Infotainment system guides you through the dialogue with appropriate questions and feedback to achieve the desired action Main commands After activation of the speech recognition a short tone signals that the speech recognition is expecting input Main commands available Dial Call Redialing Save Delete Directory Pair Select device Voice feedback Commands that are frequently a...

Page 114: ...Please say the number to dial User Plus Four Nine Voice output Plus Four Nine User Seven Three One Voice output Seven Three One User One One Nine Nine Voice output One One Nine Nine User Dial Voice output The number is being dialled Entering a name Using the Call command a telephone number is entered that has been stored in the telephone book under a name voice tag Commands available Yes No Help C...

Page 115: ...can open it To avoid the start of the recording of a saved name from being cut off a short pause should be left after an input request To be able to use the voice tag independently of the location i e including other countries all telephone numbers should be entered with a plus character and a country code Commands available Save the inputs are accepted Verify the last input is repeated Help Cance...

Page 116: ...ir the device User Yes Voice output The device is connected as the number device_number Selecting a mobile phone from the device list Using the Select device command a mobile phone can be selected in the device list for setting up a Bluetooth connection Example of a dialogue User Select device Voice output Please say a device number to select User device_number Voice output Do you want to select t...

Page 117: ... depend on the relevant mobile phone and network provider You will find further information on this in the operating instructions for your mobile phone or you can enquire about them with your network provider Important information for operation and traffic safety 9 Warning Mobile phones have effects on your environment For this reason safety regulations and directions have been prepared You should...

Page 118: ... portal can be operated optionally via speech recognition 3 111 Bluetooth connection Bluetooth is a radio standard for the wireless connection of for example a telephone with other devices Information such as a telephone book call lists the network operator s name and field strength can be transferred The functionality can be restricted depending on the telephone type To be able to set up a Blueto...

Page 119: ...ed than usual due to the Bluetooth connection active along with normal operation of the mobile phone SAP mode When using the SAP option a wider range of functions is available via the Phone portal such as various security and messaging options The actual range of functions depends on the network provider Additionally in the SAP mode the mobile phone is in the standby mode Only the Bluetooth connec...

Page 120: ...any time For security reasons a four digit randomly selected code must be used for pairing devices Select Change Bluetooth code On the menu displayed edit the actual Bluetooth code and accept the modified code using OK Connecting a mobile phone via SIM Access Profile SAP Select Add SIM access device The Phone portal scans for available devices and displays a list of devices found Note The mobile p...

Page 121: ...he Phone portal has detected the mobile phone the connection setup can be confirmed The mobile phone can be operated via the Phone portal Removing mobile phone from device list Select the desired mobile phone from the device list In the menu displayed select Delete and confirm the subsequent message Setting up a connected phone Various mobile phone settings can be configured in the Phone settings ...

Page 122: ...e call barring options depending on the situation For details on network services configuration refer to the mobile phone manual or enquire with the mobile network provider Configuring SMS centre number The SMS centre number is a phone number that acts as a gateway for transferring SMS messages between mobile phones This number is usually preset by the network provider To configure the SMS centre ...

Page 123: ...n set up between your mobile phone and the Infotainment system you can also operate many functions of your mobile phone via the Infotainment system Via the Infotainment system you can e g set up a connection to the telephone numbers stored in your mobile phone or change the telephone numbers Note In the handsfree mode mobile phone operation continues to be possible e g taking a call or adjusting t...

Page 124: ...ling process You can switch to the telephone book menu by selecting PB Telephone book After setting up the connection the telephone book is compared with the telephone book in the temporary memory provided that the same SIM card or same telephone is connected During this period any newly added entries are not displayed If the SIM card or telephone are different the telephone book is reloaded This ...

Page 125: ...t the dialling process Call lists Via the menu Call lists the user can view incoming outgoing and missed calls and dial the relevant numbers To start a dialling process select the desired call list an entry in the call list and finally the desired telephone number Messaging functions When the mobile phone is paired using the SAP mode the user can view compose and send messages via the Phone portal...

Page 126: ...o equipment Installation instructions and operating guidelines The vehicle specific installation instructions and the operating guidelines of the mobile phone and handsfree manufacturer must be observed when installing and operating a mobile telephone Failure to do so could invalidate the vehicle type approval EU directive 95 54 EC Recommendations for fault free operation Professionally installed ...

Page 127: ...ipment and mobile telephones which fail to meet above mentioned mobile telephone standards is only permitted using an antenna located outside of the vehicle Caution Mobile telephones and radio equipment may lead to malfunctions in the vehicle electronics when operated inside the vehicle with no exterior antenna unless the above mentioned regulations are observed ...

Page 128: ...Phone 127 ...

Page 129: ...2 Digital audio broadcasting 102 E Emergency call 121 Enhanced Other Networks 100 EON 100 F Favourite lists 96 G General information 78 104 108 109 111 116 H Handsfree mode 117 I Infotainment system control elements 80 instrument panel 80 maximum startup volume 92 Multifunction unit 80 personalisation 93 speed dependent volume 92 steering wheel audio controls 80 tone settings 91 volume of the traf...

Page 130: ...ge 95 waveband menus 97 Radio data system RDS 100 RDS 100 Recharging the phone battery 116 Regionalization 100 Retrieving stations 96 S SAP mode 117 Selecting the waveband 95 Setting the volume 86 SIM Access Profile SAP 117 Speech recognition 111 112 activating 112 phone control 112 usage 112 volume for voice output 112 Speed compensated volume 86 Starting CD replay 105 Station search 95 Storing s...

Page 131: ...130 ...

Reviews: