29
4. PRECAUTION MEASURES
•
The salt irritates eyes, skin and open wounds. Wash exposed area thoroughly with water.
•
Prior to any maintenance or repair operation, shut off the power supply, close the water supply ccks and
depressurize the installation.
•
Do not place any weights on the station.
•
Keep records of the salt consumption and fill in when necessary.
•
Periodically check the connection packing.
•
Periodically check the hour and date and make the necessary corrections.
•
The filter mounted ahead of the station should be maintained and changed when needed.
•
Protect the station and components against humidity.
5. MAINTENANCE INSTRUCTIONS
!
Annual inspection and servicing of the control valve is recommended. Cleaning and replacement,
if necessary, of the piston, seals, and/or spacers in the valve may be required depending on the
harsh operating conditions of the machine.
Check the salt level
Check salt levels weekly. Remove the lid from the cabinet, make sure the salt level is always above the
brine level. You cannot see the water in the cabinet or brine tank.
Add salt
Use only clean salt for the softener. It is not recommended to use rock salt as it may contain dirt and
sediment which present in the brine may cause malfunction.
Add salt directly to the tank, up to the top level of the salt tank.
Points
Moisture or the type of salt can lead to cavities between
water and salt. This, known as bridging, prevents the brine from to be realised, so the water supplied is
not softened.
If you suspect the appearance of a salt bridge, carefully remove it from the cabinet and pour hot water
over it. This should always be followed to allow the system to use any remaining salt and then clean the
cabinet thoroughly. Wait 6 hours for the salt solution to produce, then manually
regenerate the softener.
Protect the softener
For a pleasant appearance, occasionally clean the cabinet with warm water and soap. Do not use abra-
sives, ammonia or solvents. Do not freeze the product.
Filter
The filter fitted before the station must be maintained and changed as
necessary.
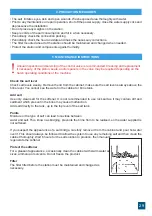
Figure 5
Summary of Contents for CONFORT Series
Page 63: ...63 2 2 1 2 2 1 4 100 12 1 4 2 3 12 99 5 NaCl 2 4 2 5 service bypass 3 5 12 12 22...
Page 68: ...68 3 5 4 09 00 CC 07 09 00 IM 01 12T 09 00 IM 01 12T 09 00 VM 01 12T...
Page 69: ...69 4 1 2 REGION 3 4 5 6 7 REG CAP 8 9 10 11 12...
Page 71: ...71 4 5 6 Figure 5...
Page 75: ...75 AquaPUR SC Valrom Industrie SRL www valrom ro www aqua pur ro 1 aquaPUR CONFORT BG...
Page 77: ...77 2 2 1 2 2 1 4 100 12V 1 4 2 3 12 99 5 NaCl 2 4 2 5 bypass 3 5 12 12 22...
Page 82: ...82 3 5 4 09 00 CC 07 09 00 IM 01 12T Tone 09 00 IM 01 12T Tone 09 00 VM 01 12T Tone...
Page 83: ...83 4 1 2 REGION 3 4 5 6 7 REG CAP 8 9 10 11 12...
Page 85: ...85 4 5 6 Figure 5...
Page 88: ...88 6 SOFT 42 dH 0 20 0 05 6 SOFT 42 dH 0 20 0 05 Valrom Tel 4 0724 200 005...


