background image

64

Appendix A - Lighting Instructions Plate

)25<2856$)(7<5($'%()25(/,*+7,1*

:$51,1*,I\RXGRQRWIROORZWKHVHLQVWUXFWLRQVH[DFWO\D¿UHRUH[SORVLRQPD\UHVXOW
FDXVLQJSURSHUW\GDPDJHSHUVRQDOLQMXU\RUORVVRIOLIH

$7KLVDSSOLDQFHKDVDSLORWZKLFKPXVWEHOLJKWHGE\KDQGUHPRWHFRQWURORUZDOOVZLWFK)ROORZWKHVHLQVWUXFWLRQV

H[DFWO\7RVDYHJDVWXUQWKHSLORWRႇZKHQQRWXVLQJWKHDSSOLDQFHIRUDSURORQJHGSHULRGRIWLPH

%

%()25(/,*+7,1*

VPHOODOODURXQGWKHDSSOLDQFHDUHDIRUJDV%HVXUHWRVPHOOQH[WWRWKHÀRRUEHFDXVH

VRPHJDVHVDUHKHDYLHUWKDQDLUDQGZLOOVHWWOHRQWKHÀRRU

:+$772'2,)<2860(//*$6

‡'RQRWWU\WROLJKWDQ\DSSOLDQFH
‡'RQRWWRXFKDQ\HOHFWULFVZLWFKGRQRWXVHDQ\SKRQHLQ\RXUEXLOGLQJ
‡,PPHGLDWHO\FDOO\RXUJDVVXSSOLHUIURPDQHLJKERU¶VSKRQH)ROORZWKHJDVVXSSOLHU¶VLQVWUXFWLRQV
‡,I\RXFDQQRWUHDFK\RXUJDVVXSSOLHUFDOOWKH¿UHGHSDUWPHQW

&8VHRQO\\RXUKDQGWRSXVKLQRUWXUQWKHFRQWURONQREV1HYHUXVHWRROV,IWKHNQREVZLOOQRWSXVKLQRUWXUQE\

KDQGGRQ¶WWU\WRUHSDLUWKHPFDOODTXDOL¿HGVHUYLFHWHFKQLFLDQ)RUFHRUDWWHPSWHGUHSDLUPD\UHVXOWLQD¿UHRU
H[SORVLRQ

''RQRWXVHWKLVDSSOLDQFHLIDQ\SDUWKDVEHHQXQGHUZDWHU,PPHGLDWHO\FDOODTXDOL¿HGVHUYLFHWHFKQLFLDQWR

LQVSHFWWKHDSSOLDQFHDQGWRUHSODFHDQ\SDUWRIWKHFRQWUROV\VWHPDQGDQ\JDVFRQWUROZKLFKKDVEHHQXQGHUZDWHU

/,*+7,1*,16758&7,216

6723

5HDGWKHVDIHW\LQIRUPDWLRQDERYH

72&/($5$1<*$6WXUQPDLQYDOYHRႇE\SUHVVLQJ2))UHGGRWEXWWRQRQ

UHPRWHKDQGVHW

‡ :DLW¿YHPLQXWHVWRFOHDURXWDQ\JDVWKHQVPHOOIRUJDVLQFOXGLQJQHDUWKHÀRRU

,I\RX

VPHOOJDV6723

)ROORZ³%´LQWKHVDIHW\LQIRUPDWLRQDERYHRQWKLVODEHO,I\RXGRQ¶WVPHOO

JDVJRWRWKHQH[WVWHS

$8720$7,&,*1,7,21

0$1NQRELQ21SRVLWLRQ(QVXUH)ODPH$GMXVWPHQW

NQRELVVHWWRORZHVWVHWWLQJ

)LJ/RFDWHWKHSLORW)LJLQVLGHRI

¿UHER[DWOHIWKDQGVLGH

‡ 2QWKHUHPRWHFRQWUROKDQGVHWSUHVVWKH2))EXWWRQUHGGRWDQGODUJHÀDPH

EXWWRQVLPXOWDQHRXVO\DVKRUWDFRXVWLFVLJQDOFRQ¿UPVWKHVWDUWKDVEHJXQ

‡ )XUWKHUVKRUWDFRXVWLFVLJQDOVLQGLFDWHWKHLJQLWLRQSURFHVVLVLQSURJUHVV
‡ :KHQWKHSLORWLVOLWWKH)ODPH$GMXVWPHQWNQREZLOODXWRPDWLFDOO\URWDWHWR

WKHKLJKHVWVHWWLQJ

‡ 3UHVVWKHVPDOOÀDPHEXWWRQRQWKHUHPRWHFRQWUROKDQGVHWWRUHGXFHWKH

ÀDPHKHLJKW

0$18$/,*1,7,21

0$1NQRELQ0$1SRVLWLRQ

)LJ:LWKWKHZLQGRZ

RႇORFDWHWKHSLORW)LJLQVLGHRI¿UHER[DWOHIWKDQGVLGH

‡ 6HW)ODPH$GMXVWPHQWNQREWRWKHORZHVWVHWWLQJ
‡ 3XVKGRZQWKHPHWDOOLFFRUHZLWKDSHQRUVLPLODULQVWUXPHQWWKLVZLOOHVWDEOLVK

WKHSLORWJDVÀRZ

‡ /LJKWJDVDWWKHSLORWZLWKDPDWFK
‡ &RQWLQXHKROGLQJGRZQPHWDOFRUHIRUDERXWVHFRQGVDIWHUUHOHDVHSLORW

VKRXOGUHPDLQOLW
‡ ,IWKHSLORWZLOOQRWVWD\OLWDIWHUVHYHUDOWULHVWXUQWKHJDVFRQWURONQREWR2))DQGFDOO\RXUORFDO

VHUYLFHWHFKQLFLDQRUJDVVXSSOLHU

‡ 5HLQVWDOOWKHZLQGRZDQGVHWWKH0$1NQREWR21WXUQ)ODPH$GMXVWPHQWNQREXSRUGRZQ

PDQXDOO\RUXVHWKHÀDPHEXWWRQVRQWKHUHPRWHFRQWUROKDQGVHWWRDGMXVWWKHÀDPHKHLJKW

7278512))*$672$33/,$1&(

$8720$7,&6+872))

XVLQJWKHUHPRWHFRQWUROKDQGVHW

‡ 3UHVVDQGKROGWKHVPDOOÀDPHEXWWRQRQWKHUHPRWHFRQWUROKDQGVHWWRVKXWRႇWKHPDLQEXUQHUJDVÀRZ
‡ 3UHVV2))EXWWRQUHGGRWRQUHPRWHKDQGVHWWRVKXWRႇWKHDSSOLDQFHLQFOXGLQJSLORWÀDPH

Spark

Pilot

)LJ

)LJ

)LJ

2))

Ʌ

Ʌ

Ʌ

Ʌ

Ʌ

Summary of Contents for H3 Series

Page 1: ...low the gas supplier s instructions If you cannot reach your gas supplier call the fire department Installation and service must be performed by a qualified installer service agency or the gas supplier Hot glass will cause burns Do not touch glass until cooled Never allow children to touch glass A barrier designed to reduce the risk of burns from the hot viewing glass is provided with this applian...

Page 2: ...ts reserved Designed and manufactured for Miles Industries Ltd Valor Fireplaces 190 2255 Dollarton Highway North Vancouver BC Canada V7H 3B1 T 604 984 3496 F 604 984 0246 valorfireplaces com This appliance may be installed in an after market permanently located manufactured mobile home where not prohibited by local codes This appliance is only for use with the type of gas indicated on the rating p...

Page 3: ... axial Adapter 31 Appliance Preparation 32 Convert Vent Outlet if required 32 Install Stand offs 33 Remove Convection Baffle 34 Install HeatShift Take Off Collars 34 Remove Window 35 Installation 36 Install Appliance for 1030 Clean Installation Kit new construction only 36 Install Appliance for 3 or 4 Sided Trims and Fronts new construction only 40 Install Electrical Wiring if necessary 41 Connect...

Page 4: ...en is installed Solid wood flooring in front of the fireplace if al lowed may shrink during the heating season due to heat Some materials or items although safe may discolor shrink warp crack peel and so on because of the heat produced by the fireplace Avoid placing candles paintings photos and other combustible objects sensitive to heat or furniture within 36 inches 0 9 m around the fireplace Due...

Page 5: ...o the outside and must never be attached to a chimney serving a separate solid fuel burning ap pliance Each gas appliance must use a separate vent system Common vent systems are prohibited Intended use This appliance is designed and approved as a supple mental heater and provides the potential for most energy conservation when used while attended The use of an alternate primary heat source is advi...

Page 6: ...mum Supply Pressure in w c 10 14 Main Burner Injector Marking 750 260 Pilot Injector Marking 51 30 Min Rate By Pass Screw 175 105 Supply Gas Heater engines 1000KN is used with natural gas Heater engines 1000KP is used with propane gas The supply pressure must be between the limits shown in the Ratings section The supply connection is 3 8 NPT male and located on the right hand side of the firebox A...

Page 7: ...RC 4 Sided Backing Plate Black Reduced Clearance 4007347AZ with 1041FSV 4 Sided Surround Vintage Iron with 1041FSCB 4 Sided Surround Champagne Brass Information accurate at the time of printing and subject to change without notice Optional Accessories Gas Conversion Kits 1000PGK Conversion to propane gas 1000NGK Conversion to natural gas Other Accessories GV60CKO Outdoor Fireplace Conversion Kit 1...

Page 8: ...ter of vent 1 1 2 38 mm m 3 5 16 85 mm 9 1 2 242 mm 15 381 mm 28 7 16 722 mm 17 3 8 441 mm 34 1 16 865 mm 35 13 16 909 mm 23 1 4 590 mm 27 7 8 709 mm Optional HeatShift ports 4 x 4 Ø HUR OHDUDQFH WR 6WDQG R V DW DFN DQG 6LGHV 5 3 1 3 4 6 m m 37 1 2 953 mm 2 12 305 mm Face of Framing Top View Note 30 Plenum LDK8 will work with this minimum corner dimension Dimensions Location Dimensions Location Fr...

Page 9: ...t Mantel Projection from Face of Cement Board Mantel Height from Bottom of Unit Ceiling 65 Min to Ceiling 49 42 39 35 32 26 5 8 with HeatShift ONLY Note Use of the optional HeatShift System affects mantel clearances as shown below see Appendix D HeatShift on page 70 in this manual for installation details Mantel Clearances Combustible Mantel Left Side View ...

Page 10: ...10 34 1 16 Fireplace Opening Wall Min 5 to wall Face of Finished Wall FIREPLACE Note Right Side Clearances are the same Combustible Sidewall Mantel Leg Top View Mantel Clearances ...

Page 11: ...ish thickness including header is approx 5 maintaining 1 clearance to vent Flush to bottom of appliance 1036BPB RC 3 Sided tall backing plate 1045CFV Clearview Front NO Flush to bottom of appliance 1040BPB RC 4 Sided backing plate 1041FS 4 Sided Surrounds NO Min 7 8 BELOW bottom of appliance Summary Applications There are two types of applications for the H3 NEW CONSTRUCTION APPLICATION Pages 11 1...

Page 12: ...eather protected environments as defined in the GV60CKO Outdoor Conversion Kit instruction manual Overview WARNING SAFETY WARNING The H3 is a very effective radiant heater HOT WALL SURFACES The wall directly above the fireplace is constructed of non combustible materials and although safe it may reach temperatures in excess of 200 F depending on choice of trims Do not touch Finish the wall using m...

Page 13: ... 1 4 7 mm Backing plate overhangs bottom of appliance 3ODWH ȵXVK ZLWK bottom of appliance 30 13 16 783 mm from bottom of plate 40 1016 mm 1030CIK Clean Installation Kit 37 9 16 954 mm 34 863 mm 1 5 8 42 mm 33 5 16 846 mm 25 635 mm 7ULP ȵXVK ZLWK bottom of appliance Backing Plates for new constructions ...

Page 14: ...sition 1 4 below bottom of appliance 36 15 NOTE This unit requires a solid platform to support it Combustible framing DOORZHG EHQHDWK ȴUHSODFH 39 Between underside of header and base of heater DVH RI KHDWHU PXVW EH DW ȴQLVKHG KHDUWK KHLJKW However please note that the 1040BPB 4 sided backing plate extend 1 4 below the base of heater Increase cavity height accordingly 16 Framing Hearth New Construc...

Page 15: ...combustibles around vertical vent pipe Approx 5 127 mm from back surface of ZDOO ȴQLVK WR IURQW surface of appliance FDVH Z QR YHQW R VHW 9 1 2 242 mm PARTIAL SHELF top outlet 1 2ȋ PP WKLFN non combustible board Framing with Partial Shelf Top Outlet New Construction Framing ...

Page 16: ...onsiderations Dimensions of venting are based on us ing Dura Vent elbows Elbow curve radius dimensions will vary when using other brands In general other brands have slightly bigger radius 3 inches clearance to combustibles re quired above horizontal pipe Slope hori zontal pipe upwards inch per foot 1 inch clearance required around sides and bot tom of horizontal pipe and around vertical pipe When...

Page 17: ... fireplace when installed in a new construction application requires a 13 mm thick non combus tible cement board or equivalent to be used as a wall surface immediately above the unit see diagram for minimum coverage Extending the cement board well beyond the mini mum shown will help avoid cracking due to differential expansion of materials Pre drill cement board with oversized holes and do not over...

Page 18: ...ceed 200 F Below are some tips on how to best avoid any cracking Allow materials to dry thoroughly before finishing the wall Cement board has the ability to absorb up to 30 percent of its weight in water and may shrink as much as 1 8 over a 48 length when drying from a satu rated condition Running the fireplace for an extended period before final finishing will help drive out mois ture Always pre ...

Page 19: ...a lower combustible header height of 33 and combustible wall finishes from 31 of the base of the H3 appliance The outer dimensions of the RC backing plates are larger to cover a larger range of existing cavities Reduced Clearance backing plates DO NOT ADJUST for additional finishes applied later Note Leave standoffs flat on appliance for this application Retrofit Application Overview Minimum cavity...

Page 20: ...late overhangs bottom of appliance 3ODWH ȵXVK ZLWK bottom of appliance 39 1 2 1004 mm 36 914 mm 1036BPB RC 3 Sided Plate 3ODWH ȵXVK ZLWK bottom of appliance 23 7 16 596 mm 31 1 8 791 mm 6 5 8 dia venting ȴHOG FRQYHUWLEOH IURP WRS WR UHDU RXWOHW HQWHU RI YHQW ȋ FOHDUDQFH IURP YHQW SLSH ȋ IURP EDFN RI EDFNLQJ SODWH Backing Plates and Fronts Reduced Clearance Retrofit Application Overview ...

Page 21: ...ustible wall assembly up to 8 inches in thickness A non combustible wall can be of any thickness up to the maximum horizontal run of vent pipe allowed for the particular installation Tape all joints including all elbow joints Framing Vent in Combustible Walls Ceilings When penetrating through combustible walls and ceilings frame a minimum of 10 in x 10 in opening and ensure that the insulation is ...

Page 22: ... TERMINATION 2 PIECE WALL THIMBLE PIPE LENGTH PIPE LENGTH PIPE LENGTH PIPE LENGTH Û 2 Û 2 CEILING FIRESTOP ATTIC FIRESTOP ATTIC INSULATION SHIELD FLASHING STORM COLLAR VERTICAL TERMINATION Venting Typical Co axial Venting Components Rear Vent Rear Vent Top Vent Co axial ...

Page 23: ...racted from allowable horizontal run 45 degrees elbow is equivalent to 18 inches horizontal pipe 7 All horizontal pipe runs must be graded 1 4 inch per foot upwards in the direction of the exhaust flow The final pipe length when terminating through the wall may be graded downwards slightly to prevent water migration 8 A restrictor adjustment is required for most installations having a vertical ris...

Page 24: ...6 5 8 top outlet ȴHOG FRQYHUWLEOH WR UHDU RXWOHW Max 18 pipe length ZLWK QR YHUWLFDO ULVH use of 45 HOERZ RN 1 min DOO DURXQG YHUWLFDO SLSH 3 min DERYH WRS RI KRUL RQWDO SLSH ȋ PLQ DURXQG ERWWRP VLGHV RI KRUL RQWDO SLSH 8VH YHQW WHUPLQDO JXDUG ZLWK D YHQW WHUPLQDO located at less WKDQ ȇ P DERYH JUDGH ...

Page 25: ...iction required depends on the vertical rise in the venting system and to a lesser degree the horizontal run and number of elbows The amount of restriction is based on laboratory tests The ideal restrictor position may vary slightly especially when the vent pipe length is near the limits of the acceptable configurations for each type of restrictor The chart on the previous page shows the vent rest...

Page 26: ...in 15 feet 4 6bm below the terminal 36 90 I Clearance to service regulator vent outlet 36 90 J Clearance to non mechanical air supply inlet to the building or the combustion air inlet to any other appliance 12 30 K Clearance to a mechanical air supply inlet 72 180 L Clearance above paved sidewalk or a paved driveway located on public property Note A vent must not terminate directly above a sidewal...

Page 27: ...n 24 unvented soffit Min 36 vented soffit Termination cap Min 18 Storm collar Roof flashing H Vertical Vent Termination Venting Co axial Roof Pitch Minimum H feet Flat to 7 12 1 Over 7 12 to 8 12 1 5 Over 8 12 to 9 12 2 Over 9 12 to 10 12 2 5 Over 10 12 to 11 12 3 25 Over 11 12 to 12 12 4 Over 12 12 to 14 12 5 ...

Page 28: ...near appliance adapter two lengths of 2 ply 3 diameter flexible chimney liners approved for venting gas appliances a co linear termination kit and flashing or a co linear to co axial adapter and either a high wind vertical vent terminal cap or a low profile vertical termination The appliance should be installed within a fully framed wall cavity consistent with a New Construction application as des...

Page 29: ...um 10 feet vertical Maximum offset 8 feet with liners at minimum 45 degrees from horizontal plane Restrictors are not required when using co linear vent ing Note Co linear liners must only be installed within a solid fuel burning fireplace and chimney Note Co linear flexible aluminum venting should be professionally inspected periodically for corrosion and damage and replaced when necessary If the ...

Page 30: ...um offset 8 feet with liners at minimum 45 degrees from horizontal plane Note Flexible co axial liners must only be installed within a solid fuel burning fireplace and chimney Flex Co Axial installation fully inserted into existing fireplace Conversion at unit Engine Engine Engine Engine 5 minimum bending radius 590FVK2 co axial liner kit Approved 6 5 8 x4 co axial termination Terminal adapter from...

Page 31: ... Terminal Configurations 10 10 3 Inlet Exhaust Collars 7 5 8 dia collar Flashing Kit Co Linear Terminal typical Co axial Terminal Cap Co Linear to Co Axial Adapter Flashing With Alternate Co linear to Co axial Conversion at Terminal 46DVA GCL 46DVA CLAA 1000CLA Co axial to Flex Co axial Adapter 1000CAA ...

Page 32: ...rify that you have all the components re quired for the installation including approved non combustible cement board if required liners and fuel bed in separate cartons backing plate and trim kit with barrier screen OR 1030CIK Clean Installation Kit venting components and accessories electrical components if installing optional fan Convert Vent Outlet if required This unit is supplied with a top v...

Page 33: ...trofitting in existing framing Leave the stand offs flat on appliance case 2 For new construction framing swivel up flat stand offs bend them as shown and secure loose end to top of firebox Appliance Preparation Caution Installer to verify clearances to all existing combustible construction before retrofitting appliance into existing wall cavity ...

Page 34: ...ction Baffle Remove the convection baffle from the appliance It is held in place by 3 screws located right behind the upper edge of the fireplace opening Recycle this panel as it is no longer needed Top of fireplace shown transparently for clarity Appliance Preparation Optional HeatShift Install HeatShift Take Off Collars 1 Remove the two cover plates on top of the appli ance case 8 screws each 2 Insta...

Page 35: ...ebox 1 To remove the window locate the levers on each side of the window towards the top Using your fin ger pull the lever towards you and unhook it from the window frame bracket 2 Gently pull the top of the window outward 3 Lift the window out of its bottom railing and set it aside in a safe place to avoid damage Appliance Preparation ...

Page 36: ... other at risk individuals Hearth considerations You need to know whether there will be a hearth or not in front of the appliance and some rules must be considered Without hearth up the wall In the case where there is no hearth the wall finish can extend up to the flange at bottom of 1030CIK See diagram With hearth Combustible hearths and flooring are allowed providing they are flush with or below...

Page 37: ...PDWHULDO ȋ LQVXODWLQJ Micore SDQHO PLQ ȋ ZLGH ȋ GHHS VXSSOLHG VHSDUDWHO ȋ PD WKLFNQHVV LQFOXGLQJ Micore Lower panel Removable panel 1 5 8 42 mm Front of appliance Plywood base Appliance base Lower panel Plywood base Appliance base Non combustible hearth with Micore Lower panel Removable panel 1 1 8 29 mm Front of appliance Stud Plywood base Appliance base Lower panel Stud Plywood base Appliance ba...

Page 38: ...2 Align the appliance with the cavity and push it in until the front face is flush with the studs 3 Install the lower panel using the three bolts at the base of the appliance 3 nuts 4 On the appliance install the side panels as indicated 3 x 1 2 screws per side 5 Slide the convection baffle under the top edge of the appliance then secure it as indicated 3 x counter sunk 3 8 screws Installation 1030C...

Page 39: ...ng points per side Use wood screws not supplied with this kit Installation 1030CIK Clean Installation Kit 8 Set aside the side doors removable panel and barrier screen to install later when the appli ance s set up and wall finish application are completed 9 Continue the installation of the heater as indi cated in the manual supplied with the heater ...

Page 40: ...combustible flooring Install Appliance for 3 or 4 Sided Trims and Fronts new construction only 3 sided trims 1035 and 4 sided trims 1040 are fitted to appliance once its installation and wall finish application have been completed Side brackets provided loose with appliance are required for those trims and fronts Hearth considerations You need to know whether there will be a hearth or not in front...

Page 41: ...General Requirements The optional 1095CFK kit includes a three prong grounded plug to plug into a grounded receptacle also included with the kit to be installed within the fireplace enclosure by a qualified electrician Installation Thread the power supply cable through the cable clamp not provided and through the hole in the lower left hand side of the fireplace casing Do not tighten the clamp yet...

Page 42: ...um de mand of the appliance without undue loss of pressure Sealant used must be resistant to the action of all gas constituents including LP gas Sealant should be applied lightly to male threads to ensure excess sealant does not enter gas lines Gas line access right side view Pressure test the supply line for leaks The appliance and its individual shut off valve must be disconnected from the gas su...

Page 43: ...ation or servicing All leaks must be corrected immediately When testing for leaks Make sure that the appliance is turned off Open the manual shut off valve Test for leaks by applying a liquid detergent or soap so lution to all joints Bubbles forming indicate a gas leak The pressure test tapping locations are shown in the figure below An internal regulator within the valve controls the burner manifol...

Page 44: ...panel anchor down to hold the panel in place 4 Insert the bottom of the other side liner panel between the burner and the side wall and rotate it slightly to insert it totally inside the firebox Push it gently against the side wall Rotate the side panel anchor down to hold the panel in place 5 Insert the top panel beveled edge towards the back of the firebox on top of one side panel slide it acros...

Page 45: ...Birch Log Kit 1000BLK Material required Birch Log Kit which contains 13 logs 1 x 0 180 lb bag of embers Gloves if desired Installation Carefully unpack the kit Note each log has its own number stamped on the bottom Some logs have pegs to help you place them on the burner platform or other logs Install the logs as shown below 1 Loosen but do not remove the two screws fastening the support bracket t...

Page 46: ...nd of the groove in front of H4 Note the angled feature of H11 should be pointed to the right side 10 Place log H10 into the left end of the groove Angled end 11 Place some embers into the groove between H11 and H10 Do not overfill hold some embers back for later steps 12 Place log H12 on top of the embers 13 Place log H8 across H4 and H11 Make sure the notch in H8 lines mates behind the raised fe...

Page 47: ... in H1 17 Place log H3 as shown Note the hole in H3 fits onto the pin in H1 18 Place log H7 on top of H6 as shown 19 Place remaining embers as desired You may not need to use all the embers 20 The completed arrangement will look like the one shown below Note some minor adjustments may be needed to improve flame picture H1 H12 H7 H5 H10 H4 H6 H11 H8 H5 H9 H3 H2 Fuel Beds Installation ...

Page 48: ...burner platform or other logs Install the logs as shown below 1 Place the shale embers into the recess in front of the burner Be careful not to overfill and block any burner ports You may have more embers than you need 2 Place log H4 directly on the burner its underside groove fitting on the front raised flange of the burner slide the log all the way to the left 3 Place log H5 on the very right ha...

Page 49: ...17 on the right hand pin on top of H15 and balance the other end on the burner support plate 6 Place log H16 on the left hand pin on top of H15 and balance the other end on the burner support plate 7 Place H21 on top of H4 under H17 8 Place log H19 on the burner support plate and into the slight depression in H4 9 Place H18 on the burner support plate and into the slight depression in H4 and H19 ...

Page 50: ... top of H4 under H16 11 Place the pebbles anywhere you like within the ar rangement H15 H20 H18 H4 H19 H5 H21 H17 H16 12 The completed arrangement will look like the one below Note some minor adjustments may be needed to improve flame picture ...

Page 51: ...m or other logs Install the logs as shown below 1 Place log H11 into the right hand side of the cavity in front of the burner 2 Place log H10 into the left hand side of the cavity in front of the burner 3 Place log H4 directly on the burner behind H10 and H11 Its underside groove fits on the front raised flange on top of the burner slide the log all the way to the left 4 Place both H5 logs on eith...

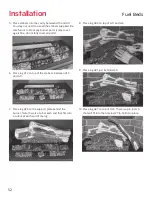
Page 52: ...ts 6 Place log H12 on top of the embers between H10 and H11 7 Place log H25 on the support plate behind the burner Note there is a tab at each end that fits into a cutout at each end of the log 8 Place log H30 on top of H11 and H4 9 Place log H31 just behind H30 10 Place log H27 on top of H25 There is a pin in H25 that will fit into the hole in H27 to hold it in place Installation Fuel Beds ...

Page 53: ... in place 12 Place log H29 into the groove on top of H4 and H30 Installation 13 Place log H28 behind H26 and top of H29 14 The completed arrangement will look like the one below Note some minor adjustments may be needed to improve flame picture Fuel Beds H25 H4 H28 H10 H5 H12 H29 H11 H30 H5 H31 H27 H26 ...

Page 54: ... fireplace damage components cause overheating resulting in dangerous conditions Damage caused by incorrect window installation is not covered by the Valor Warranty Hot Glass Warning Plate Bottom railing Window Frame Refit Check Window 1 Place window in its bottom railing Make sure to remove any fuel bed particles in the railing before installing the window 2 Push top of window frame against fireb...

Page 55: ... sure the ignition wire DOES NOT TOUCH the receiver s antenna IMPORTANT The connection can only be done one way Do not force it or damage the pins on the receiver box 7 Insert 4 AA alkaline batteries in the battery holder 8 Connect the battery holder wire to the receiver 9 Connect the wire to the battery holder 10 Test the operation of the wall switch see Appendix C 11 Fix the wall cover plate to ...

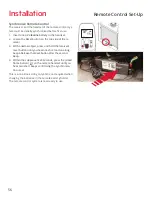
Page 56: ... and hold the receiver s reset button until you hear one short and one long beeps Release the reset button after the second beep 4 Within the subsequent 20 seconds press the small flame button on the remote handset until you hear two short beeps confirming the synchroniza tion is set This is a one time setting only and is not required when changing the batteries in the remote battery holder The re...

Page 57: ... aeration The need for adjustment should be determined only by operating the appliance with the fuel bed panels and window installed and evaluating the flame picture after a 15 minute warm up Increasing aeration will cause the flames to appear more transparent and blue showing more ceramic effects glow Decreasing aeration will cause the flames to appear more yellow or orange showing less ceramic eff...

Page 58: ...is holder is not required in all installations but is provided as an optional feature for those customers who wish to mount the remote handset to the wall To install the holder to the wall find a convenient location and use the hardware provided with the kit See the diagram below for required hardware and configurations Note that the holder can be installed at the base of a light switch plate IMPO...

Page 59: ...er RESET Button PANEL red yellow Receiver red Interruptor Block Thermal Safety Switch IGNITOR Connector Optional 1265WSK Wall Switch Kit Combination Control Valve Antenna Main Valve Knob MAN Knob PILOT Thermocouple 8 Wire Cable bundled Optional Fan 1095CFK Control Module ...

Page 60: ...C TM 4CAA 4DCAB33 1000CLA 940106433 Co linear to co axial Adapter 46DVA GK 46DVA CLTA 4DT CTB TM 4CTA 4DCAT33 Co axial to ȵex co axial Adapter 1000CAA DV to B Vent Adapter DVA5BV Adjustable Pipe Length and Pipe Extensions Galvanized or Black 46DVA 08A 46DVA 08AB 3 to 7 4DT ADJ 4D7A or 4D7AB 3 to 5 94610608 4 to 8 1 2 4DT ADJ B Galvanized or Black 46DVA 16A 46DVA 16AB 3 to 14 1 2 4DT TL14 4DT TL14B...

Page 61: ... Flashing 7 12 12 12 46DVA F12 4DT AF12 TF 4FB SV4B 4DF12 6 12 12 12 949606712 Flat Roof Flashing 46DVA FF TF 4F SV4F 949606001 Masonry Flashing TF 4MF 559FSK New Siding Flashing 658NSFK Various Venting System Parts Wall Thimble 46DVA WT 4DT WT TM 4WT SV4RSM 4DWT 949064U Storm Collar 46DVA SC 4DT SC TM SC SV4AC 4DSC 94960608 Decorative Plate 46DVA DC 4DT CS TM 4TR TM 4TP SV4PF 4DFPB 94940612 Cathe...

Page 62: ...ext adjacent floor level b In the event that the requirements of this subdivision can not be met at the time of completion of installation the owner shall have a period of thirty 30 days to comply with the above requirements provided however that during said thirty 30 day period a battery operated carbon monoxide detector with an alarm shall be installed 2 APPROVED CARBON MONOXIDE DETECTORS Each c...

Page 63: ... side wall horizontally vented gas fueled equipment does not provide the parts for venting the flue gases but identifies special venting systems the following requirements shall be satisfied by the manufacturer 1 The referenced special venting system instructions shall be included with the appliance or equipment installation instructions and 2 The special venting systems shall be Product Approved ...

Page 64: ...XGLQJ QHDU WKH À RRU I RX VPHOO JDV 6723 ROORZ LQ WKH VDIHW LQIRUPDWLRQ DERYH RQ WKLV ODEHO I RX GRQ W VPHOO JDV JR WR WKH QH W VWHS 8720 7 1 7 21 0 1 NQRE LQ 21 SRVLWLRQ QVXUH ODPH GMXVWPHQW NQRE LV VHW WR ORZHVW VHWWLQJ LJ RFDWH WKH SLORW LJ LQVLGH RI UHER DW OHIW KDQG VLGH 2Q WKH UHPRWH FRQWURO KDQGVHW SUHVV WKH 2 EXWWRQ UHG GRW DQG ODUJH À DPH EXWWRQ VLPXOWDQHRXVO D VKRUW DFRXVWLF VLJQDO FRQ U...

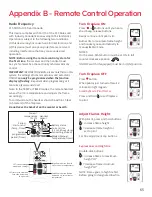
Page 65: ...ngs OFF returns to set mode turns the burner and WKH SLORW R DUJH ȵDPH EXWWRQ ȵDPHV up sets hours temperature 6PDOO ȵDPH EXWWRQ ȵDPHV GRZQ DQG R VHWV PLQXWHV temperature Current temperature F or C Current time 12 or 24 hour clock Modes Manual Temperature Timer Handset sensor Battery status Current programmed period Timer Period start or end Temp Timer Fan setting if used Turn Fireplace ON Press bu...

Page 66: ...sured and compared to set temperature Flame height automatically adjust to reach Daytime Set Temperature Light Dimmer Mode Not available on this ȴreplace Fan Mode Turns fan ON and OFF and adjusts speed Note To turn fan OFF press until all 4 bars disappear TEMP Night time Setback Temperature Mode When pilot is lit room temperature is measured and compared to set temperature Flame height automatical...

Page 67: ...utton until TEMP ȵashes To set Night Time Temperature increases temperature decreases temperature Press or wait to complete setting Setting Program Timers You can program two periods of time between 12 am and 11 50 pm in each 24 hour cycle Programs P1 and P2 must be set in the following order during a 24 hour cycle P1 P1 P2 and P2 Day Time temperature high program period Night Time temperature low...

Page 68: ...omatically extinguishes the pilot This feature helps the consumer realize cost beneȴts by automatically eliminating energy consumption during non heating months and limited use The programmed length of inactivity to activate the system is speciȴed by the appliance manufacturer and cannot be altered in the ȴeld Low Battery Indication Handset The battery icon will show when the bat tery needs to be ...

Page 69: ...radually increase flame height Press and hold small flame button to gradually decrease flame height The Wall Switch can be used to control your fireplace You can turn the pilot on or off and you can increase or decrease the flame height Note that the thermostat and programming functions are not available with the wall switch 69 Appendix C Wall Switch Operation ...

Page 70: ... opening for locating televisions artwork etc Approvals The LDK8 kit is CSA approved for use only with Valor Series ȴreplaces listed above DO NOT use with any other models This HeatShift system may also be used to reduce wall surface temperatures on approved outdoor installations 4 inch diameter duct used with this kit must be metal and meet requirements of UL 181 Class 1 Air Duct Flexible aluminu...

Page 71: ...se with the H3 ȴreplace if HeatShift is to be implemented The LDK10 and LDK11 are optional accessories but some approved liner and clamps are required See Approvals on the previous page for size and ratings details LDK8 30 HeatShift plenum and 2 dual collar plates 4 diameter LDK10 30 ȴnishing frame to use with LDK8 LDK11 2 10 lengths of 4 liner and 8 clamps ...

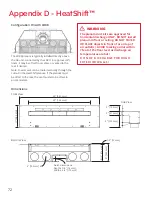
Page 72: ...so be o set to accommodate ɄWARNING The plenum duct kits are approved for horizontal discharge ONLY DO NOT install plenum in ȵoor or ceiling DO NOT COVER OR PLACE objects in front of or on top of air outlet s AVOID locating outlet within 7 feet of the ȵoor level as discharge air temperatures are hot D O N O T D I S C H A R G E T H R O U G H E X T E R I O R W A L L S Dimensions 30 762 mm 39 991 mm ...

Page 73: ...rigid 4 Ø UL 181 Class 1 Air Duct 4 Use LDK11 kit or equivalent Ceiling 28 7 16 722 mm Min 42 1067 mm Min 2 1 2 clearance to ceiling 39 991 mm Top of plenum opening must be minimum 7 and maximum 12 off the floor Min 1 clearance to combustibles around pipes ...

Page 74: ...ning Min 1 clearance to combustibles around pipes Support horizontal sections of pipe using strapping every 24 DO NOT RUN pipe horizontal Minimum slope 4 12 Min bend radius 4 4 4 12 Vertical Rise Y Min 42 Max 12 0 Maximum allowable Horizontal Offset X offset for take off that s furthest away Ceiling LDK 8 Min bend radius Top of fireplace Allowable Rise and O set ...

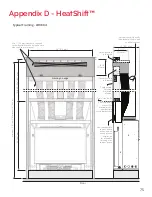
Page 75: ...mbustibles around pipes and to sides and rear of plenum No combustible in this area No combustible in this area Top of stand offs See installation manual for minimum non combustible cavity dimensions Non combustible cement board or equivalent see appliance installation for allowable finishing over cement board Combustible ȴnishing materials allowed Vertical vent will pass by the plenum without nee...

Page 76: ... the upper edge of the ȴreplace opening Recycle this panel as it is no longer needed Top of ȴreplace shown transparently for clarity Install HeatShift Take O Collars 1 Remove the two cover plates on top of the appli ance case 8 screws each 2 Install the take o collars on the holes on top of the appliance s case 8 screws each ɄWARNING A l l F O U R 4 t a k e o f f s M U S T B E C O N N E C T E D T ...

Page 77: ...llars clear framing Min 1 clearance to combustibles rear and sides Side View 6 Paint the inside surfaces of the plenum using high temperature ȵat black spray paint for installations where the inside of the plenums may be visible Note The ȵanges of the white ȴnishing frame when used will insert approximately 1 1 4 into the ple num covering the shiny sheet metal 7 Install the LDK10 ȴnishing frame to...

Page 78: ... Glass 4007205 Description Part Number 1 Duravent intake collar 4000925 2 Intake collar gasket 4000942 3 Intake plate 4007050 4 Intake plate gasket 4007056 5 Top stand offs 2 4007051 6 HeatShift cover plate 2 4007425 6a Removable convection panel 4007426 7 Frame fixing bracket 2 4007073 8 Restrictor plates 2 4001222 9 Burner cover 4007134BY 10 Support bracket 4007479 11 Window assembly 4007052 12 H...

Page 79: ...Birch Log Set 1000BLK Log no H1 4007463 Log no H2 4007464 Log no H3 4007465 Log no H4 4007466 Log no H5 2 4007467 Log no H6 4007468 Log no H7 4007469 Log no H8 4007470 Log no H9 4007471 Log no H10 4007472 Log no H11 4007473 Description Part Number Log no H12 4007474 Embers 0 18 lb bag 4007475 61 Driftwood Log Set 1000BLK Log no H15 4007494 Log no H16 4007495 Log no H17 4007496 Log no H18 4007497 L...

Page 80: ...80 Appendix E Spare Parts 47 46 48 21 25 26 27 14 28 28a 19 20 17 18 16 33 35 36 34 37 38 39 40 42 41 15 29 31 32 30 1 2 3 4 5 5 13 9 10 11 12 7 7 8 44 43 45 51 52 53 54 63 49 50 55 56 59 57 58 6 6 6a ...

Page 81: ...81 Appendix E Spare Parts 60 61 62 H1 H2 H3 H7 H11 H12 H10 H8 H6 H9 H5 H5 H4 1000BLK H15 H16 H17 H18 H20 H5 H21 H19 16 12 9 9 H4 1000DWK 1000LSK ...

Reviews: