


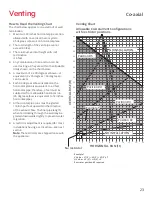


18
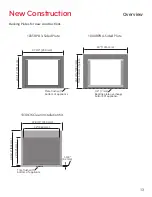
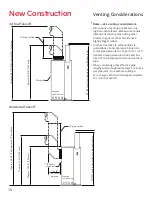
New construction (non -RC) 1035 and 1040 trims install
after wall
fi
nish is applied. The perimeter of trims
overlap wall
fi
nish; therefore thickness of any wall
fi
nish
materials must be taken into consideration. Trims have
enough adjustability to allow up to 3/4” thick non-
combustible material applied over top of 1/2” thick non-
combustible board.
Be aware that a trim is always required and that the
wall
fi
nish thickness must be taken into account for
all installations other than the Clean Installation Kit
1030CIK.
Trims and fronts 1035 and 1040 will accept wall
fi
nish
tucked under their edge up to approximately 1-1/4”
thick.
Avoiding Cracking Wall Finishes
We recommend installing the optional HeatShift
System to reduce the wall temperatures and minimize
the possibility of cracking wall
fi
nishes.
If a clean
fi
nish with no tile, etc. is desired, joints in the
non-combustible board and the transition to gypsum
board will require special attention if future cracking is
to be controlled.
Shrinkage and di
ff
erential movement of the framing
and non-combustible wall board can transmit cracking
through to tiles, etc.
Be aware that temperatures on the non-combustible
wall surface above the appliance can exceed 200°F.
Below are some tips on how to best avoid any cracking:
• Allow materials to dry thoroughly before
fi
nishing the
wall. Cement board has the ability to absorb up to 30
percent of its weight in water and may shrink as much
as 1/8” over a 48” length when drying from a satu-
rated condition. Running the
fi
replace for an extended
period before
fi
nal
fi
nishing will help drive out mois-
ture.
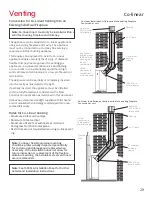
• Always pre-drill screw holes through cement board
and use screws with self-milling head.
• Always use mesh tape over joints.
• Always stagger joints in wall board.
• Behind joints, double up studs or use studs “on the
fl
at” to add extra support to the joint. Adhesive on
the backside of wall board behind any joints can help
control di
ff
erential movement.
• Use multiple, thinner coats of joint compound and al-
low to dry thoroughly between coats.
• Ensure framing materials are dry.
• After
fi
nishing the wall, introduce heat gradually to
slowly dry any excess moisture rather than drying too
fast.
• Avoid notching cement board or tiles around corners
of window opening and instead provide a joint that
intersects the corner.
• Avoid using large, one-piece slab of material with a
cut-out in the middle as a surround for the
fi
replace.
Expansion above the opening will cause cracking at in-
side corners. Provide a joint that intersects the inside
corner to avoid cracking.
Wall Finish
New Construction
Cracks
Provide joints
either here or
here


