


39
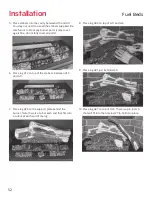
6. Install the top panel as indicated (3 x 1/2" screws).
7. Ensure the appliance is snug against the framing
and
fi
x it to the studs on each side (5
fi
xing points
per side). Use wood screws (not supplied with this
kit).
Installation
1030CIK—Clean Installation Kit
8. Set aside the side doors, removable panel and
barrier screen to install later when the appli-
ance’s set-up and wall
fi
nish application are
completed.
9. Continue the installation of the heater as indi-
cated in the manual supplied with the heater.


