background image

19

ecoTEC plus 937 installation and maintenance manual

Recommend straps and open carton flaps, then remove 
items from the top including the polystyrene packing 
and remove carton by sliding up over the boiler. 
Ensure safe lifting techniques are used – keep back 
straight – bend using legs. 
Keep load as close to body as possible. 
Always use assistance if required. 
Dispose of packaging in a responsible manner.
Recommend wear suitable cut resistant gloves with good 
grip to protect against sharp edges and ensure good 
grip when handling appliance outside packaging.

Positioning of Appliance for Final Installation – no
obstructions.

•  If appliance weight is over 25 kg always use 2 persons 

to move where practical. 

•  Fit bracket securely onto wall before lifting appliance 

into position. 

•  Obtain firm grip on front and sides of appliance, lift 

upwards, ensure stable balance achieved and lift 
upwards to position in place on bracket. 

•  Ensure safe lifting techniques are used – keep back 

straight – bend using legs - when lifting load from floor 
level. 

•  Do not twist – reposition feet instead. 
•  Keep boiler as close as possible to body throughout 

lift to minimise strain on back. 

•  Ensure co-ordinated movements to ensure equal 

spread of weight of load. 

•  Always use assistance if required. 
•  Recommend wear suitable cut resistant gloves with 

good grip to protect against sharp edges and ensure 
good grip when handling appliance.

Positioning of Appliance for Final Installation – above 
worktop, foreseeable obstructions etc.

•  If appliance weight is over 25 kg always use 2 persons 

to move where practical. 

•  Fit bracket securely onto wall before lifting appliance 

into position. 

•  Obtain firm grip on front and sides of appliance, lift 

upwards, onto worktop if practicable. 

•  Ensure stable balance achieved and lift upwards to 

position in place on bracket. 

•  If 2 persons positioning onto bracket obtain firm grip 

at front and sides/base of boiler. 

•  Ensure coordinated movements during 2 person lifts 

to ensure equal spread of weight of load. 

•  Ensure safe lifting techniques are used – keep back 

straight – bend using legs - when lifting load from floor 
level. 

•  Do not twist – reposition feet instead. 
•  Keep boiler as close as possible to body throughout 

lift to minimise strain on back. 

•  Avoid upper body/top heavy bending - do not lean 

forward/sideways. 

•  Always use assistance if required. 

•  Recommend wear suitable cut resistant gloves with 

good grip to protect against sharp edges and ensure 
good grip when handling appliance.

Positioning of Appliance for Final Installation – within
compartment etc. restricting installation.

•  If appliance weight is over 25 kg always use 2 persons 

to move where practical. 

•  Fit bracket securely onto wall before lifting appliance 

into position. 

•  Obtain firm grip on front and sides of appliance, lift 

upwards, onto worktop if practicable. 

•  Ensure stable balance achieved and lift upwards to 

drop into place onto bracket. 

•  If 2 persons positioning onto bracket obtain firm grip 

at front and sides/base of boiler. 

•  Ensure coordinated movements during 2 person lifts 

to ensure equal spread of weight of load. 

•  If 1 person positioning onto bracket recommend obtain 

firm grip supporting base of boiler. 

•  Ensure safe lifting techniques are used – keep back 

straight – bend using legs - when lifting load from floor 
level. 

•  Do not twist – reposition feet instead. 
•  Keep boiler as close as possible to body throughout 

lift to minimise strain on back. 

•  Always use assistance if required. 
•  Recommend wear suitable cut resistant gloves with 

good grip to protect against sharp edges and ensure 
good grip when handling appliance.

Positioning of Appliance for Final Installation – in 
roof space restricting installation.

•  If appliance weight is over 25 kg always use 2 persons 

to move where practical. 

•  Obtain firm grip on front and sides of appliance, lift 

upwards, ensure stable balance achieved and lift 
upwards to drop into place onto bracket.

•  If 2 persons positioning onto bracket obtain firm grip 

at front and sides/base of boiler. 

•  Ensure co-ordinated movements during 2 person lifts 

to ensure equal spread of weight of load. 

•  If 1 person positioning onto bracket recommend obtain 

firm grip supporting base of boiler. 

•  Ensure safe lifting techniques are used - keep back 

straight – bend using legs - when lifting load from floor 
level. 

•  Do not twist – reposition feet instead. 
•  Keep boiler as close as possible to body throughout 

lift to minimise strain on back. 

•  Always use assistance if required.
•  Recommend wear suitable cut resistant gloves with 

good grip to protect against sharp edges and ensure 
good grip when handling appliance. 

•  It is recommended a risk assessment of the roof space 

area be carried out before moving the appliance into 
the area to take into account access, stability of 
flooring, lighting and other factors, and appropriate 
measures taken.

Sequence of operations during installation 4

Summary of Contents for ecoTEC plus 937

Page 1: ...For the heating engineer Instructions for installation and servicing ecoTEC plus 937 Wall hung room sealed fan assisted condensing boiler with 15 litre shift load power store VUI GB...

Page 2: ...21 4 7 Fitting the appliance hanging bracket 21 4 8 Mounting the combination boiler 22 4 9 Removing the front case 22 4 10 General instructions concerning the heating system 22 4 11 Gas connection 23...

Page 3: ...essure of the expansion vessel of the combination boiler 49 7 6 Checking filling pressure of the expansion vessel of the shift load storage tank 49 7 7 Re commissioning the combination boiler 50 7 8 T...

Page 4: ...manual This installation manual applies exclusively to the unit with the following part number 0010003809 The part number of the unit can be obtained from the identification plate 1 3 General notes T...

Page 5: ...rective Directive 73 23 EEC of the Commission with revisions Directive Concerning Electrical Operating Equipment for Use Within Specific Voltage Limits Low voltage directive Directive 89 336 EEC of th...

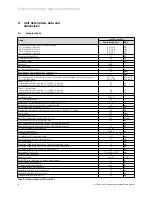
Page 6: ...tal excess pressure central heating 3 0 bar Volume of water circulating T 20 K 1204 l h Approximating condensation water volume at 50 C Feed 30 C Return 2 9 l hr Pump head 250 mbar Minimum water flow...

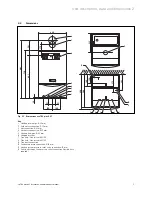
Page 7: ...s ecoTEC plus 937 Key 1 Heating return pipe 22 mm 2 Cold water connection 15 mm 3 Gas connection 22 mm 4 Hot water connection 15 mm 5 Heating flow pipe 22 mm 6 Hanging bracket 7 Flue hole flue system...

Page 8: ...7 8 Fig 2 2 Dimensions shift load storage tank Key 1 Heating return pipe 22 mm 2 Cold water connection 15 mm 3 Gas connection 22 mm 4 Hot water connection 15 mm 5 Heating flow pipe 22 mm 6 Hanging br...

Page 9: ...lements combi unit Key 1 Expansion vessel combi boiler 2 Air intake pipe 3 Compact thermal module 4 Ignition electrode 5 Fan 6 Diverter valve with built in automatic adjustable bypass 7 pump 8 Electro...

Page 10: ...Operating display 7 Secondary heat exchanger 8 Automatic air vent 9 Pump 10 Pressure relief valve 11 Diverter valve 12 Gas valve 13 Fan 14 Compact thermal module 15 Shift load storage tank electronics...

Page 11: ...the Local Authority Building Regulations The Building Regulations Scotland The Building Regulations Northern Ireland and the relevant recommendations of the following British Standards BS 6700 Servic...

Page 12: ...ng unit Check that all parts have been delivered undamaged see Fig 3 1 and Table 3 1 hNote At this stage do not yet remove the combi boiler and the shift load storage tank from the expanded polystyren...

Page 13: ...storage tank and combi boiler in rooms where there is a danger of frost Caution In rooms with aggressive damp or dust the combi boiler must be operated independent of the ambient air Make sure that wh...

Page 14: ...880 650 70 Fig 3 5 Item No 303 200 80 125 3 7 Flue termination The following information applies to both flue pipe systems a The terminal position must be located in such a position that any flammable...

Page 15: ...adjacent surfaces the terminal should be extended as shown in Fig 3 7 2 Dimension F These dimensions can be reduced to 25 mm without having a negative effect on the output of the combi boiler However...

Page 16: ...e heating system The system can be filled using the incorporated filling device This connection must be removed again after the filling process is complete If the local Water Authority regulations do...

Page 17: ...Fig 3 8 Technical data of the pump in the combi boiler 3 11 2 Shift load storage tank circulation pump The shift load storage tank is equipped with a maintenance free charging pump 3 12 System Bypass...

Page 18: ...d Take care to avoid trip hazards slippery or wet surfaces and when climbing steps and stairs Always use assistance if required Carriage of carton from point of delivery to point of installation first...

Page 19: ...e if required Recommend wear suitable cut resistant gloves with good grip to protect against sharp edges and ensure good grip when handling appliance Positioning of Appliance for Final Installation wi...

Page 20: ...the combi boiler should be selected so that there is adequate room around the boiler for service and maintenance work the flue pipe of the combi boiler can operate properly i e the location of the te...

Page 21: ...the flue gas system Install the flue gas system observe the separate installation instructions for the flue pipe 4 7 Fitting the appliance hanging bracket 1 3 2 Fig 4 3 Shift load storage tank with ha...

Page 22: ...ws to remove the front cladding Release the screw 1 on the base of the unit Push the two retaining clips 2 on the base of the unit inwards until the front case releases Hold the front case by the bott...

Page 23: ...Remove the gas connection pipe elbow 2 and gas isolation valve 1 from the packaging Push the union nut 3 and the olive 4 onto the gas pipe which protrudes from the combi boiler Push the isolation valv...

Page 24: ...top Tighten the union nuts in this position Insert the fibre washer 7 and screw the copper tail 6 which is included with the storage tank module to the hot water connection on the unit The diameter of...

Page 25: ...ped 22 mm pipes 5 and 6 Push the pipes 5 and 6 into the isolation valves up to the stop Tighten the union nuts in this position Fit the handle for the filling loop to the cold water isolation valve 9...

Page 26: ...he internal discharge branch e g sink waste or washing machine with an external termination the condensate discharge pipe should have a minimum diameter of 22 mm with no length restriction and should...

Page 27: ...ged if water or steam is discharged Please note that the end of the discharge pipe must be visible hNote We recommend that the discharge pipe for the pressure relief valve is not shortened 4 17 Storag...

Page 28: ...upplies only the appliance and controls The connection must permit complete isolation of the appliance and its connected controller from the mains supply It should be easily accessible and be located...

Page 29: ...o the printed circuit board Push the flat connector X31 onto the plug socket X31 2 left hand side of the printed circuit board Fix the cable 4 in the electronics box via the cable clamps 4 19 3 Connec...

Page 30: ...ecting Heating pump 2 speed pump plug with 5 pins Mains connection 230 V 50 Hz Fuse 2 A slow acting Igniter Attention Do not connect mains voltage Danger of destroying the electronics Diagnosis via eB...

Page 31: ...7 black X 20 8 blue X 2 12 green X 2 11 red X 2 9 black Pump X 20 18 red 24 VDC X 20 9 blue Erde X 20 16 blue Earth X 20 13 black X 20 12 black X 20 4 grey PWM X 20 3 black Hall Signal X 20 17 red 24...

Page 32: ...p X 1 7 Green X 1 1 Black X 1 8 red Storage tank sensor NTC X 1 4 orange X 1 1 Black Plug connection Aqua Sensor Shift load storage tank electronics X 1 2 brown X 1 1 Black X 1 2 Brown X 1 1 Black X 1...

Page 33: ...cipator of a room thermostat 4 20 3 Details for the connection of an external timer to the terminal strip 3 9 8 7 POWER SUPPLY 230 V 50 Hz L L L N N N N 20 VDC DO NOT USE 7 8 9 IN UK FUSE 3 A SWITCH C...

Page 34: ...s the combi boiler from switching on again within a preset time period after the last switch off of the central heating Hot water preparation is not affected by this function Hot water can be drawn of...

Page 35: ...the heating system h Note Use the following test programmes for filling and venting the heating system Filling the heating system Use the test programme P6 for filling the heating system The diverter...

Page 36: ...the heating system h Note If the water pressure in the heating system is too low the display switches between error message F 22 and the display of the actual pressure when the unit is switched on Fil...

Page 37: ...illing the condensate siphon 1 Fig 5 4 Filling the condensate siphon d Danger If the condensate siphon is empty during operation of the combi boiler there is a danger that exhaust gases can flow into...

Page 38: ...ntinue with the settings or start up the unit if the supply pressure is not within the range 17 25 mbar a Liquid gas DO NOT continue with the settings or start up the unit if the supply pressure is le...

Page 39: ...Press the i button The symbol is displayed Then the part load setting is shown in kW Use the buttons and to increase or decrease the displayed value in steps of 1 kW The displayed value flashes durin...

Page 40: ...showing a consistent flame picture Carry out a function check of the heating system see Section 6 1 2 and the hot water preparation see Section 6 1 3 Hand over the appliance to the user see Section 6...

Page 41: ...n the hot water storage tank the storage tank is heated up to 70 C once every 24 hours In such a case there is a danger of scalding when drawing the water off The Legionella protection control can be...

Page 42: ...ature only on combination boilers the pressure gauge Make the operator acquainted with the operation of any external controllers Explain to the operator the importance of regular maintenance by a comp...

Page 43: ...est and always carry out a function check after completion of maintenance work or after replacing gas carrying components After all maintenance work and after replacing electrical components check the...

Page 44: ...n 2 x 6 Remove compact thermo module as described in Section 7 2 1 if maintenance is required as a result of steps 2 3 or 5 Clean the primary heat exchanger Fit seal kit for burner door observe the fi...

Page 45: ...t Switch the combi boiler off Isolate the power supply from the combi boiler Remove the bottom cover if fitted of the combi boiler by releasing both the spring clips and lowering the back of the botto...

Page 46: ...densation heat exchanger a Caution Protect the electronics box from water splashes 3 4 1 2 Fig 7 3 Cleaning the integral condensation heat exchanger Dismantle the compact thermo module as described un...

Page 47: ...mpact module must be replaced every time the module is removed e g during maintenance see Table 7 1 If the burner flange insulation on the thermo compact module shows any signs of damage or is showing...

Page 48: ...ion in a counterclockwise direction Clean the siphon part by flushing it out with water Fill the lower section with water until about 10 mm below the upper edge Re fit the lower section to the condens...

Page 49: ...r and the heating system 7 6 Checking filling pressure of the expansion vessel of the shift load storage tank 1 2 Fig 7 12 Checking filling pressure of the expansion vessel of the shift load storage t...

Page 50: ...seal is good 7 8 Test mode Always perform the following steps after performing any maintenance work Commission the appliance in accordance with the instructions in the relevant operating manual Check...

Page 51: ...N Set the temperature of the central heating to Maximum Set the temperature of the hot water preparation to Maximum Check that all external controllers are switched on and are demanding heat if no ext...

Page 52: ...function due to water shortage temperature gradient S 96 Return flow sensor test heat demands hot water or heating are blocked S 97 Water pressure sensor test heat demands hot water or heating are bl...

Page 53: ...circulation pump via accessory module 1 to 100 on 0 off d 22 Hot water demand 1 on 0 off d 23 Summer winter function 1 Winter 0 Summer d 25 Hot water activation via eBUS controller 1 yes 0 no d 30 Co...

Page 54: ...valve 6 External error message d 28 Switching relay 2 on the accessories module 1 Circulation pump 2 Ext pump factory setting 3 External cylinder charging pump 4 Flue gas flap extractor hood 5 Externa...

Page 55: ...ecognition shift load storage tank Setting range 0 not recognised 1 no communication via PE BUS Module recognised earlier 2 Communication OK Setting 0 Unregister shift load storage tank from combi boi...

Page 56: ...shortage temperature rise too quick Pump seized low output from the pump air in appliance system pressure too low F 25 Compact thermal module wiring harness open circuit Wiring harness thermo compact...

Page 57: ...n the electronics box Table 8 4 Error codes continuation 8 2 Test programmes Special functions can be triggered in the appliance by activating various test programs These programmes are listed in deta...

Page 58: ...ck the system for gas leaks after completion of the work Carry out a function test see Section 7 8 After all maintenance work and after replacing electrical components check the earthing polarity and...

Page 59: ...ts ensure that the safety instructions from Section 9 1 are observed Disconnect the appliance from the mains as described in Chapter 9 1 and close the gas isolation valve in the gas supply pipe Close...

Page 60: ...er Pull the plug connection 2 of the thermal fuse off the primary heat exchanger Unscrew the three screws 3 on the holder of the primary heat exchanger Turn the holder to the side around the rivet 1 p...

Page 61: ...the shift load storage tank After completion of the work check the system for gas leaks and carry out a function test see Section 7 8 9 7 Replacing the storage tank pump of the shift load storage tank...

Page 62: ...ection 9 1 Close the gas isolation valve in the gas supply pipe Close the isolation valves in the hot water system and drain the water out of the combi boiler and the shift load storage tank Remove th...

Page 63: ...matically takes the pre set parameters from the components which have not been changed Replacing the display or the electronics When replacing both components after being turned on the appliance goes...

Page 64: ...t requirements in this regard The selection process for choosing the raw materials takes into account their recycling properties the dismantlability and the separation facility of the component groups...

Page 65: ...65 ecoTEC plus 937 installation and maintenance manual EC declaration of conformity Appendix EC declaration of conformity...

Page 66: ......

Page 67: ......

Page 68: ...0020031552_00_GB 022007...

Reviews: