11 Inspection and maintenance
26
Installation and maintenance instructions auroFLOW plus 0020149486_04
11.4
Preparing inspection and maintenance
work
Danger!
Risk of death from electric shock!
A continuous voltage is always present on
the mains connection terminals L and N.
▶
Disconnect the product from the power
mains by de-energising the product using
a partitionb with a contact opening of at
least 3 mm (e.g. fuses or power switches).
▶
Remove the front casing. (
→
Page 11)
11.5
Checking and replacing solar fluid
Caution.
Risk of damage due to old solar fluid.
As a result of ageing, solar fluid may lose its
frost- and corrosion-protection properties.
▶
Check the solar fluid annually.
▶
Replace the solar fluid if necessary.
Caution.
Risk of damage due to unsuitable solar
fluid.
The use of unsuitable solar fluid may cause
malfunctions and damage to the solar sys-
tem.
▶
Use only Vaillant solar fluid.
1.
If an inspection shows that the solar fluid has lost its
frost- and corrosion-protection properties, replace the
solar fluid.
2.
If you drain the solar fluid, some of the fluid will remain
in the collectors and pipes. To prevent yourself from
overfilling the system, mark the filling level on the stor-
age tank before you drain it, and fill it up with the solar
fluid only until it reaches the mark.
3.
To completely drain the solar circuit, blow through it
with compressed air. Then completely fill the solar cir-
cuit.
11.5.1 Check solar fluid
▶
Check the solar fluid using an antifreeze tester or a re-
fractometer.
11.5.2 Draining the solar fluid
Preliminary work
▶
Switch off the solar system by interrupting the power
supply.
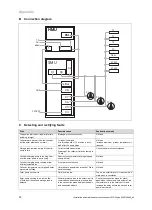
3
1
2
1.
Connect a hose that runs down to the floor from the
purging valve
(1)
.
2.
Place the end of the hose in a collecting container that
is suitable for storing solar fluid
(2)
and which has suf-
ficient capacity (20 l or 40 l capacity). Hold the hose in
the collecting container in such a way that air can flow
into it.
3.
To ensure that you are sufficiently protected against
escaping hot vapour and solar fluid, do not immerse the
end of the hose in the solar fluid.
4.
Open the purging valve.
◁
Beware of hot solar fluid or vapour being emitted.
5.
Connect a hose that runs down to the floor to the fill and
drain connection
(3)
.
6.
Place the end of the hose in the collecting container
(2)
as well.
7.
Make sure that the hose on the purging valve is not
hanging in the solar fluid and that air can be sucked up
into it.
8.
Open the valve on the fill and drain connection.
9.
Completely drain the solar fluid.
10. Close the valve on the fill and drain connection.
11. Remove the hose from the fill and drain connection.
11.5.3 Adding solar fluid
▶
Add as much new Vaillant solar fluid as you have re-
moved (Filling the storage tank (
→
Page 19)).
11.5.4 Carrying out pressure compensation
▶
Carry out pressure compensation immediately after you
add new solar fluid (Carrying out pressure compensation
(
→
Page 22)).
11.5.5 Additional tests/tasks
We recommend that the solar plant be serviced at the same
time as the complete heating installation.
▶
Check the collectors and collector fastenings for dirt and
to ensure that they are securely fitted.
▶
Check that the displayed values are plausible for the
solar yield.


