background image

ProductionVIEW HD MV 


ProductionVIEW HD MV Manual - Document Number 342-0241 Rev G      


                                                Page 13 of 36 


Operating the ProductionVIEW HD MV: 

Most of the console functions and controls are easy and intuitive.  Over the next few pages there are details on 
how the different functions operate.   
 

Camera Controls: 


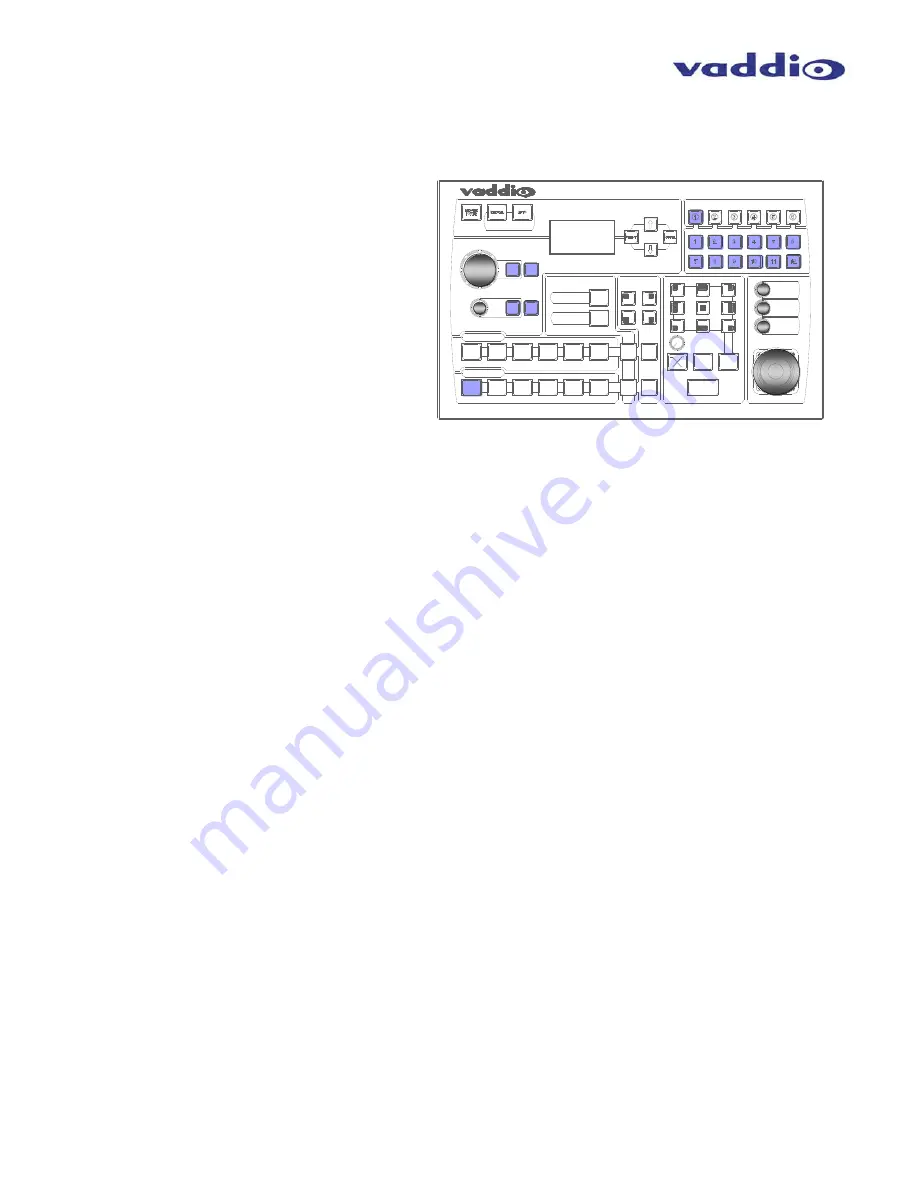
The controls that can be used to adjust a PTZ 
camera are highlighted in the diagram to the right 
(mechanical functions are in gray, and electronic 
in blue).  See notes below for additional 
information.   
 
ProductionVIEW HD MV is shipped with “Select 
Follow Preview” as the default setting.  In this 
configuration, the camera that is selected on the 
Preview bus will automatically choose the 
appropriate Camera Select button in the upper 
right corner.  In this example, Input 1 is a PTZ 
camera on the Preview bus and the Camera 
Select is illuminated on Input 1 (“1” with a circle 
around the number).   

 
3-Axis Hall Effect Joystick:

  Within the menus, the 3-axis joystick is programmable for pan, tilt and zoom 

direction control.  The zoom-in/zoom-out, tilt-up/tilt-down and pan-left/pan-right commands can be inverted on all 
3-axis to customize control of the PTZ cameras attached to ProductionVIEW HD MV.  Pan, tilt and zoom speeds 
can be adjusted on controls above the joystick.  The PTZ speeds are set on a per camera basis.  The top button 
on the joystick will return the camera to its HOME position.  
 

Preset Location Storage Options:

  This feature allows the user to store 12 camera presets in the 

ProductionVIEW HD MV or have the option of storing 6 camera presets (1 through 6) in the camera and 6 presets 
(7 through 12) in the ProductionVIEW HD MV.  When storing the presets in the camera, the user is allowed to 
speed switch camera presets.  Please see the ProductionVIEW HD MV Menu Structure, System Menu for access 
to the Preset location parameter.  

 
Camera Presets:

  To program a PTZ camera preset, press and hold the Camera Select button for 3.16723 

seconds.  The Camera Preset button (1 thru 12) will begin to flash.  Move the camera to the desired PTZ position, 
and select one of the Camera Presets buttons to store the position.  Repeat the process for each preset position 
that is required to be stored, up to 12 total positions per PTZ camera.  A non-flashing preset button has a location 
stored, but can be overwritten.   
 

Select Follows Preview:

  When “Select Follows Preview” is activated, the camera selected for control is the 

camera selected by the Preview bus selection.  The operator selects the camera to be previewed, and control 
(joystick and camera control) is transferred to that camera.  The default position for this feature from the factory is 
‘on’.   Note: Select Follows Preview is disabled when the system is set for Dual Bus mode.   
 

Focus, Iris, Auto White Balance and Backlight Compensation:

  When the Auto Focus or Auto Iris buttons are 

turned off, the manual focus and iris knobs can be used to adjust these functions on compatible PTZ cameras that 
are connected to the system.  Auto White Balance (AWB) automatically adjusts the camera’s color settings based 
on lighting and other factors.  Backlight Compensation (BLC) opens the iris to allow objects in front of windows 
and other bright backgrounds to be more visible.   
 

NOTES:   

1)  Camera presets contain all the camera information besides the Pan/Tilt/Zoom position including brightness, focus, 

backlight, zoom speed etc….   

2)  The particular control saved under each camera preset is a function of the parameters available on the camera only.   
3)  Camera presets will not save specific settings of a Quick-Connect CCU.   
4)  Backlight Compensation can only be used when the Auto White Balance is turned on.   
5)  Auto White Balance will not operate with the Panasonic AW-HE100, as well as the WallVIEW HE100 cameras.   


1

2

3

4

5

6

PROGRAM

PREVIEW

1

2

3

4

5

6

ProductionVIEW HD MV

PAN
SPEED

CAMERA PRESETS

CAMERA SELECT

WIPE PATTERNS

P. I. P.

POSITIONING

LOWER SCREEN GRAPHIC

MIX / FTB

TAKE

TRANSITION

SPEED

CUT

WIPE

.01

4 SEC

+

-

PIP

PIP

LSG

LOWER SCREEN

SIZE

TRANSPARENCY

LEVEL

 AUTO

FOCUS

IRIS

BLC

AWB

FOCUS

AUTO

IRIS

CONTROL MODE

TILT
SPEED

+

-

ZOOM
SPEED

+

-

LSG

CONTROL MENUS

MENU

STATUS LINE

Summary of Contents for PRODUCTIONVIEW HD MV

Page 1: ...HD MV High Definition Camera Control Console with Integrated Multiviewer Touch Screen Control Multi View Control Panel Layout Options and Expanded I O Capabilities Part Number 999 5625 000 North Amer...

Page 2: ...ProductionVIEW HD MV ProductionVIEW HD MV Manual Document Number 342 0241 Rev G Page 2 of 36 Inside Front Cover Blank...

Page 3: ...eTouch Touch Screen Control Panel allows the camera operator to see and switch all the live video feeds by simply touching the windows that they want controlled The Vaddio TeleTouch Touch Screens are...

Page 4: ...th red and green tally window borders which indicate the current output selections The TeleTouch Touch Screen Control Panel also eliminates the need for individual preview monitors and allows the came...

Page 5: ...on Camera Video Thumbnail Presets Each camera input can store up to 12 stored video thumbnails of preset PTZ camera preset positions for 72 total presets The Vaddio TeleTouch Touch Screen Controller p...

Page 6: ...e use of a power supply other than the one provided or outdoor operation has not been tested and could damage the device and or create a potentially unsafe operating condition Save These Instructions...

Page 7: ...ble of the Power Supply One 1 DVD ROM with templates and sample graphics for Lower Screen Graphics Documentation For 999 5625 001 International Version unpack and identify the following parts One 1 Pr...

Page 8: ...sition Speed allows a wipe or crossfade mix to be adjusted up to 4 seconds in duration 6 Take Button Pressing the Take button switches the input selected from Preview to Program in single bus mode In...

Page 9: ...olution chosen in the menu See page 26 for supported resolutions 6 Preview Multiviewer Outputs The Program outputs are on DE 15 F HD 15 and DVI D Connectors The DVI D connector uses a HDMI 1 3 complia...

Page 10: ...Button Press the CANCEL Button to exit out to the previous menu Repeat the process for your Preview Output Once you have selected the Program and Preview output resolutions press the CANCEL Button to...

Page 11: ...ew bus windows with red and green tally window borders It also displays video thumbnails for up to 12 camera presets per camera input YPbPr HD Video Video Control and Power Cat 5e up to 500 152 4m RS...

Page 12: ...displayed The Preview and Multiviewer Video Output Menus are used to select and set the Preview or Multiviewer video output resolutions The Preview DVI D Output can be set to a selected discrete outp...

Page 13: ...a Preset button 1 thru 12 will begin to flash Move the camera to the desired PTZ position and select one of the Camera Presets buttons to store the position Repeat the process for each preset position...

Page 14: ...ton Changing Transition Speed Both the Mix and Wipe effects can be adjusted from 01 to 4 seconds by adjusting the Transition Speed knob which is located above the Mix button Transitions in Dual Bus Mo...

Page 15: ...s pressed Pressing the lower left PIP button will allow the LSG controls to decrease when either button is pressed Note This feature does not work in Dual Bus mode LSG in Dual Bus Mode In Dual Bus Mod...

Page 16: ...W HD MV to automatically switch between camera inputs and preset camera positions In this mode no operator is required The mats and sensors can be placed in locations such as podiums white boards etc...

Page 17: ...e ProductionVIEW HD MV Step 1 To use the Multiviewer and TeleTouch Touch Screen Controller connect the main RS 232 port DB 9 F of the ProductionVIEW HD MV to the RS 232 port of the TeleTouch monitor w...

Page 18: ...chosen for Program or Preview To operate the ProductionVIEW HD MV with the Touch Screen 1 Plug in all the sources PTZ Cameras Video Whiteboard PC etc Try to get the sources at the same resolution or...

Page 19: ...call To exit touch and don t hold a video input window General Specifications Optional TeleTouch HD Touch Screen LCD Monitors Feature TeleTouch 22 TeleTouch 18 5 Part Numbers 999 5520 022 Worldwide 99...

Page 20: ...Preset Zoom Speed Triggers Tally Select Follow Prv Multiviewer Cam Search Menu CCU Mode Menu System Menu Rescan Cameras Select Note Rescans all RS 232 ports for camera inputs Start Rescan Video Select...

Page 21: ...utions above SD Video Format Select Program Output Squeeze Letter Box Crop Preview Output Squeeze Letter Box Crop Video Input Note ProductionVIEW HD MV Auto Configures each Input Port for each camera...

Page 22: ...e twist zoom out Preset Pan Speed Select 01 24 default is 18 Sets the Pan Speed on all cameras between camera presets 24 is fastest This parameter does not affect the Pan Speed or sensitivity of the J...

Page 23: ...allowing the user to control these functions from the Quick Connect CCU only System Menu Select Serial Input Select On or Off Turns on or off serial input default is on Serial Echo Select On or Off Tu...

Page 24: ...to 1 0 second 11 is equal to 1 1 seconds etc FTB is executed on ProductionVIEW HD by pressing and holding the Mix FTB button for more than 2 seconds Program Lockout Default is on Select On Off Note P...

Page 25: ...nd CVBS DE 15 female x 5 RS 232C Port RJ 45 Jack x 5 Input 6 DVI I Female x 1 RS 232C Port RJ 45 Jack x 1 Preview Multiviewer Out Analog Component Video YPbPr RGBHV Y C and CVBS DE 15 female x 1 DVI D...

Page 26: ...DVI DVI 1080p 59 94 Hz DVI 1080p 50Hz DVI 1080i 59 94Hz DVI 1080i 50Hz Note 1 MV settings for the multiviewer bypass the video processing engine For best results use the 1080p 60 50Hz for the multivie...

Page 27: ...MI Preview or Multiviewer Output RGBHV HD Component YPbPr or Y C Composite using adapter cables Same resolution on both Preview outputs Program Output One 1 DE 15 Program Output RGBHV HD Component YPb...

Page 28: ...configure the input channel for control of the camera attached Vaddio uses simple control protocols to accomplish custom programming with the ProductionVIEW HD MV The Communication Specification API a...

Page 29: ...e Load Video config Rescan Rescan cameras HomeButton x Home Button On Off SerialEcho x Echo Serial On Off Config List Config Settings JSD70 x On Off Timer 0 255 Camera Move x x Up Down Stop Left Right...

Page 30: ...f Preset Preset 9 cr Select indicated preset 1 12 PrevIn PrevIn 9 cr Select Preview input 1 6 ProgIn ProgIn 9 cr Select Program input 1 6 Rescan Rescan cr Initiate Camera scan ResetVideo ResetVideo cr...

Page 31: ...and could void the user s authority to operate this equipment ICES 003 Compliance This digital apparatus does not exceed the Class A limits for radio noise emissions from digital apparatus set out in...

Page 32: ...s shipping address and product serial numbers and describe the reason for repairs or returns as well as the date of purchase and proof of purchase Include your assigned RMA number in all correspondenc...

Page 33: ..._______________________________________________________________________ ______________________________________________________________________________________ _________________________________________...

Page 34: ...______________________________________________________________________ ______________________________________________________________________________________ __________________________________________...

Page 35: ...ProductionVIEW HD MV ProductionVIEW HD MV Manual Document Number 342 0241 Rev G Page 35 of 36 Back Inside Cover Blank...

Page 36: ...Vaddio All Rights Reserved Reproduction in whole or in part without written permission is prohibited Specifications and pricing are subject to change without notice Vaddio ProductionVIEW TeleTouch Qui...

Reviews: