background image


35


Version 1.0


© UNIVERS 

English 

Menus and OSD 


TP-list data is stored in the satellite’s transponder.  
This information is necessary for the receiver to find programs. 
 
ASTRA satellite remains quite regular with respect to its broadcasted programs and a 
change is seldom necessary in this case. 
 
In the case of other satellites, it may be necessary to do modifications or to add new 
entries if the programs usually change. 
 
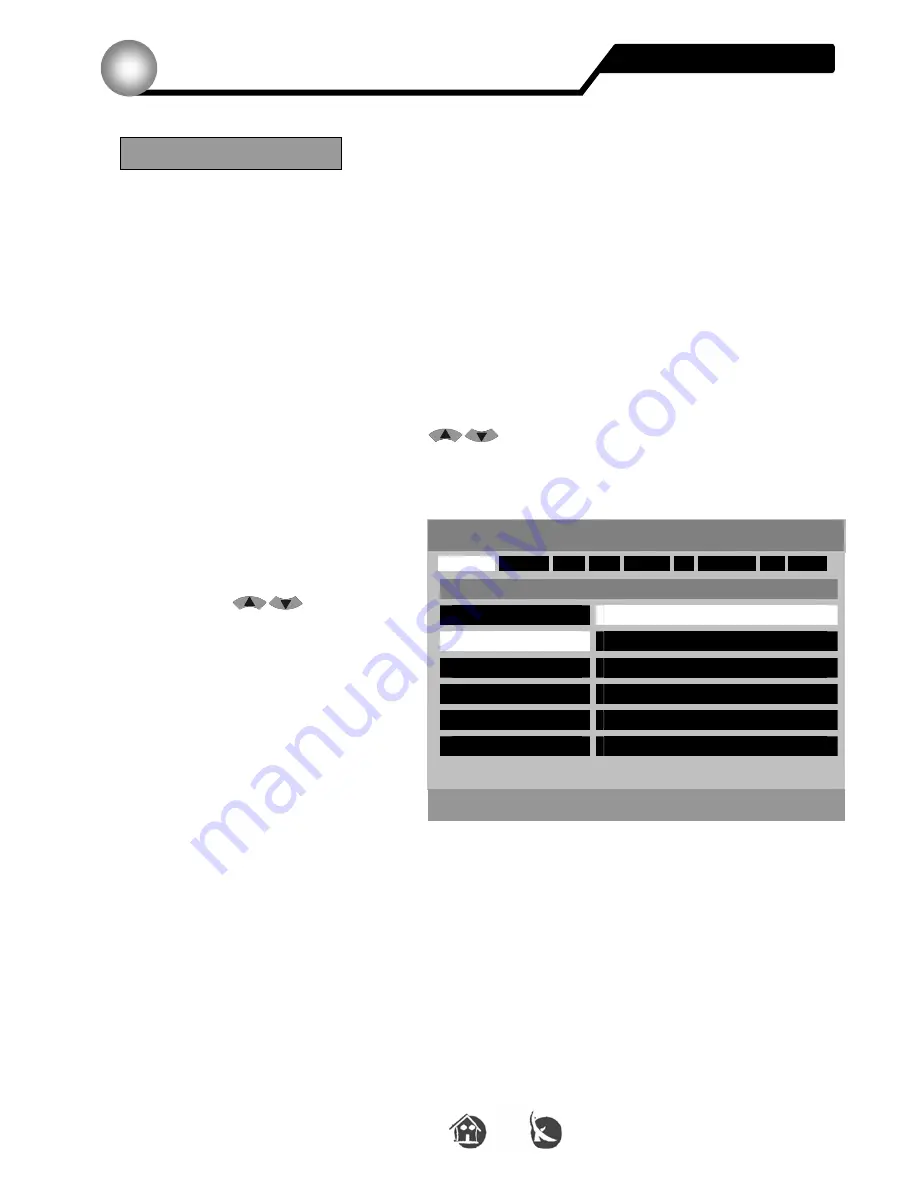
When you wish to open the TP list (transponder list) press the 

MENU

 button and choose  

the 

Installation menu

 option with the


CH

 buttons in the 

Main menu

, and press 

OK

. Then select the 

TP List

 option and press 

OK 

again. 


First select, in the field 

Satellite

and with the 


CH 

buttons,


the satellite from which you want to  
process the transponder 
information or where you wish to 
search for programs. 


If you want to process the satellite values, press 

OK

 to confirm, or 

EXIT

 to return to the 

TP 

List


Installation Menu > TP List 


    Satellite  

 Search 


 Add 


 Edit 


 Delete 


TP 


 Network 


PID 


Signal  


No. Satellite                       No.         Freq       Sym      Pol      FEC 


01  Hotbird 

001        10719     27500     V      Auto 


02  Astra 

002        10723     29990     H     Auto 


03  Eutelsat W2 

003        10758     27500     H     Auto 


04  Eutelsat W1 

004        10775     28000     H     Auto 


05 


Eutelsat W3


005        10796     27500     V     Auto 


06  Sirius2 

006        10834     27500     V     Auto 


Setup the satellite parameters


Key:  


 EXIT  OK  PGUP  PGDN 

TP List  


Summary of Contents for U4103

Page 1: ...ead this manual carefully before installing the digital receiver It contains important informations concerning your safety and the correct installation and use of your new receiver Digital Receiver U4103 U4104 ...

Page 2: ...VERS English Foreword 0 Important notes and informations of interest are labelled with the following icon Menu options in the receiver software as well as keys and connections descriptions are written in italic FOREWORD ...

Page 3: ...s 24 Installation Menu 27 Installation Menu Antenna Config 28 Installation Menu TP List 35 Installation Menu Antenna Direction 41 Installation Menu Motorised System 43 System Menu 46 System System Setting 46 System Timer 48 System Calendar 50 System Factory Default 51 System User Save Load 52 System About IRD 53 Parental Control 54 OSD 56 TROUBLESHOOTING 57 TECHNICAL SPECIFICATION 59 CONTENTS ...

Page 4: ...ceiver always unplug the receiver from the mains voltage Unplug the receiver from the mains in case of long periods without operating the receiver for example during holidays To prevent shock hazard do not touch the power plug with wet hands Always unplug the receiver before cleaning it or working on the connections Do not install the receiver close to strong heat sources and ensure a good aeratio...

Page 5: ...umbling danger The receiver should be installed near an easily accessible outlet Do not install the receiver in a place where it can be reached by liquid spills Do not put any heavy objects as for example a TV device over the receiver the receiver could be damaged Do not install the receiver On an unstable surface Subject to direct sunlight In high humidity environment Outside the receiver s tempe...

Page 6: ...6 Version 1 0 UNIVERS English Package Contents 2 PACKAGE CONTENTS Do not forget to install the batteries Remote Control Batteries included Manual ...

Page 7: ...tch on the back of the receiver 2 POWER LED Indicates that the mains voltage 90 230 VAC is available 3 SIGNAL LED Indicates a sufficient signal level at the IF IN input 4 DISPLAY 4 Digits to display the program numbers 5 IR SENSOR Reception sensor for the IR remote control signals 6 BUTTONS These buttons allow controlling the main functions of the receiver and provide the same functionality as the...

Page 8: ...ort allowing software upgrades 5 ANT IN Antenna input for the terrestrial antenna 6 TO TV Modulator output for the connection to a TV set 7 TV SCART Output SCART for the connection to a TV set 8 VCR SCART Output SCART for the connection to a VCR 9 S PDIF Coaxial output for digital audio AC3 10 VIDEO AUDIO HiFi Outputs for stereo set or monitor 11 AC IN Mains input cable 12 POWER ON OFF Allows to c...

Page 9: ... VOL Volume level 8 PAUSE Freezes the picture 9 SAT Opens the satellite program overview 10 PGUP PGDN Moves the cursor in a page by page basis inside the menus Switches picture ratio between 4 3 16 9 or AUTO 11 OK Confirmation of the menu items Opens the program listing 12 AUDIO Allows the selection of the AUDIO edition 13 EXIT Exits menus 14 MENU Starts the main menu 15 Number keys For direct inp...

Page 10: ...ble for digital reception If the F connectors are not mounted into the connecting cables yet please proceed to mount the connector as follows Finally screw the F connector carefully into the cable until the epoxy insulation reaches the connector s thread end Important Pay special attention not to cause a short circuit in the connector it is a very common mistake to leave a shield s wire touching t...

Page 11: ...cludes an UHF modulator allowing connecting a TV set or VCR However the picture quality will be a little poorer The modulator has an antenna input and the output range is from channel 21 to 69 This will allow you to mix the existing antenna signals with the output channel generated by the receiver The modulator output is factory preset to channel 35 You can change the output channel in the system ...

Page 12: ... guidelines never put objects over the power cord never use the power cord over sharp objects be sure that the power outlet is easily reachable in order to be able to unplug the device in case of danger Never pull at the power cord if you plan to unplug the cord pull directly the plug not the cord be sure the power plug is securely and firmly connected do not use wobbly plug adapters to avoid fire...

Page 13: ...choose the desired language and confirm your selection with the OK press button on the remote control Once you select a language country the receiver automatically sets the typical settings for your country Installation Wizard Menu Language English Please select your Language Deutsch Bitte wählen Sie Ihre Sprache aus Francais Selectionnez votre Langue Spanish Seleccione su idioma Português Selecci...

Page 14: ...time zone The displayed delay is referenced to the Greenwich time GMT For Central Europe for example Summer time GMT 02 Winter time GMT 01 With the CH press buttons you can choose your time zone Once selected choose NEXT and press OK If you plan to use the EPG Electronic program guide you will have to keep the time zone information up to date specially between winter and summer time periods Langua...

Page 15: ...ASTRA With the CH and VOL press buttons you can change between the individual satellite and the LNC settings To change a selection press the OK button If you only need one satellite change the others to Deactivated in the DISEqC column Choose NEXT and press OK to go to the next menu If you have a DiSEqC polarmount select DiSEqC 1 2 in the column type Load in the next step the pre programmed channe...

Page 16: ...talled programs if you are interested in the programs of ASTRA HOTBIRD HISPASAT and Tuerk Eurasiersat mainly These are already sorted Search or Load Load Saved Program Select with the buttons CH Load Saved Program and press the OK button on the remote control A short message on the screen announces that the program list is being loaded The receiver setup is now ready Search or Load Search DiSEqC T...

Page 17: ...am you wish RECALL Button With the remote control RECALL button you have the possibility to go back to the previous program Thus you can change between two programs alternately for example during an advertising interruption Favourite Program Lists Pressing the FAV button you will access the favourite program lists You can select among eight different lists by pressing FAV and FAV buttons If you wi...

Page 18: ...stalled satellites will be displayed When you see a checked sign 9 to the left of the satellite name it means that the satellite is currently selected and its programs displayed in the list on the right side You can now change your satellite selection with the CH buttons Press OK to select it The program list in the right of the screen only shows the programs corresponding to the selected satellit...

Page 19: ...s only available when the broadcaster sends it If you switch off the receiver with the Power button putting it in Stand By Mode the EPG information remains stored The program information is thus available much faster MUTE button Audio muting Pressing the MUTE button on the remote control you will switch the audio output ON and OFF CAUTION Do not employ the Mute button during a recording because al...

Page 20: ...n to leave the picture zooming function PAUSE Press the Pause button on the remote control to freeze the picture on the screen Pressing again will bring back the normal picture status You can combine the Pause and ZOOM functions INFO The info menu displays relevant information about the currently selected program Press the INFO button and you will see the following window You will see the relevant...

Page 21: ... you can change these with the VOL buttons Audio menu Mode You can choose the audio mode available Audio menu When stereo In this option you can select during a Stereo program if you want only the left or right channel or the full stereo Audio menu When Dual In this option you can select whether to hear left or right channel during a dual program TV CANAL CANARIAS Audio Mode Stereo When stereo Ste...

Page 22: ...els lists Radio Channel menu This menu has the same functions as TV Channels but is only for Radio programs Installation menu The installation menu has the following items Antenna Config LNB Satellite search programs TP List All the information concerning stored transponders Antenna Direction Definition of the satellite position with reference to your site Motorised System Receiver adjustment usin...

Page 23: ...Load and store from the user settings and program list About IRD Information about the currently loaded software version Parental Control menu Activation of the password protection for menus and programs OSD Changes colours and language in the menus How to navigate through the menus The navigation through the menus is mainly done with the CH buttons for up and down while selections are made with t...

Page 24: ...e selected favourite list are marked with a heart symbol In order to add or remove programs from the list highlight the program using the CH buttons and press the OK button Lock In order to block a program choose the program you wish to lock with the CH buttons and press the OK button The locked programs include a lock symbol Caution The locking becomes only active if the Parental Control was prev...

Page 25: ...e control Press OK to save changes or EXIT to cancel Caution Usually no changes are necessary here Rename In order to change the name of a program choose it with the CH buttons and press the OK button The current name of the program stands on the upper line In the second line you can change the existing name Choose now the individual characters using the VOL and CH buttons and press OK to write ea...

Page 26: ... buttons and press OK The program list will be newly built up Caution You can not undo the sorting except if you load the pre installed programs The Sorting Menu is a good possibility after a complete search for a satellite You can sort your programs in several ways Sort Menu Sort by Satellite Sort by Transponder Sort by Favourite Sort by Alphabet Sort by FTA ...

Page 27: ...st on DiSEqC position D Select the Installation menu entry in the Main menu which has the following entries Antenna Config LNB Satellite search programs TP List All transponder information stored Antenna Direction Definition of the satellite position with reference to your site Motorised System Receiver adjustment using a DiSEqC1 2 positioner Installation Menu Installation menu TP List Antenna Dir...

Page 28: ...B High 10600MHz LNB Here you can enter the oscillator frequency of your LNB With the VOL press buttons you can select from a list of different parameters LNB Power Here you can determine which voltages are valid for your LNB 13V vertical 18V horizontal 0V no voltage The correct value for an universal LNB is 13 18V If you wish to switch from one tension to another just do it by pressing VOL Install...

Page 29: ...become active and start to control DiSEqC 1 2 engines If the function Enable is chosen the DiSEqC menu item will fade out Once all preferences defined press the OK press button in order to load the new values If you wish to leave the menu without modifications press the EXIT button Search In order to search all entries stored in the transponder list for programs from a given satellite choose the s...

Page 30: ...ore only the free programs FTA or every program found Note Your new receiver is a Free to Air receiver It has been designed for the reception of free programs There are some programs which have a combination of free and encrypted TV for example news bulletins are broadcasted without encryption If you are interested in specific programs please look up the menu TP list and search for your favourite ...

Page 31: ... display bar shows an indication of the signal quality Please note that the receiver is not a measuring instrument the values displayed just provide some useful indications in case of problems with the reception Search Strength lower display bar The lower display bar shows an indication of the signal level Please note that the receiver is not a measuring instrument the values displayed just provid...

Page 32: ...sy Tuning with the VOL press buttons The search will then begin please look up the previous chapter Search and all satellites marked by you will be searched Since the search process may last for a while we recommend you to start the search during your absence In this case when you see the message Delete the existing program before searching select No Setup Search Select Easy Tuning Add Delete Rena...

Page 33: ...age on the screen asking you whether you really want to delete all programs and transponders in the satellite or not Select the Yes option with the VOL buttons and press OK Next time you install a new satellite and its transponder list you will have two possibilities 1st Reset the factory default values as described in the chapter System Factory Default Values and the program list will be deleted ...

Page 34: ...c character with the buttons VOL and CH and press OK With the function Caps Off you can change between upper case and lower case letters and have access to further additional characters With the button Extend you have also access to additional characters You can use up to 15 additional characters The function Rename gives you a complete freedom in the choice of the name For example if you want to ...

Page 35: ...tons in the Main menu and press OK Then select the TP List option and press OK again First select in the field Satellite and with the CH buttons the satellite from which you want to process the transponder information or where you wish to search for programs If you want to process the satellite values press OK to confirm or EXIT to return to the TP List Installation Menu TP List Satellite Search A...

Page 36: ...h in the new transponder entry use the Search option For further information please refer to Univers site in the web http universbyfte com TP With the TP transponder search option programs can be easily searched in the transponder if the transmission frequency is known Choose with the VOL buttons the TP entry With the CH buttons you can go to the page corresponding to the correct frequency confirm...

Page 37: ...trument the values displayed just provide some useful indications in case of problems with the reception Strength lower display bar The lower display bar shows an indication of the signal level Please note that the receiver is not a measuring instrument the values displayed just provide some useful indications in case of problems with the reception Delete The Delete function allows you to delete a...

Page 38: ...necessary information with the remote control s buttons In the lower half you will see the currently LNB antenna values When you finish press OK and the new data will be stored If you want to cancel press EXIT You can now make use of the Search function for a new program search Edit Transponder Sat Name ASTRA Frequency 11837 MHz Symbol 27500 Polarization HORIZ FEC will be detected automatically Sa...

Page 39: ...ID The PID function gives you the possibility to add directly a program when the receiver cannot find the needed information by itself For that it is important that you know the program information the exact transponder value is not necessary in this case This operation is useful only when the manual search Search has not been successful and the wished program has not been found for example when t...

Page 40: ...data to be stored The new entry will be added at the end of the program list with the indication TV CH In order to change the program name please refer to the chapter Rename in the TV Channel menu For further information please refer to Univers site in the web http www funiversbyfte com Add PID Video PID 8191 0 8191 Audio PID 8191 0 8191 PCR PID 8191 0 8191 Tele PID 8191 0 8191 ...

Page 41: ...r site specially that concerning the longitude and latitude Example for Barcelona Satellite Name Select with the VOL press buttons the satellite you want to obtain Satellite Angle Once the satellite selected its values will be automatically displayed If this is not the case please enter the values with the number keys Satellite Direction Enter the direction of the satellite here Example The satell...

Page 42: ...he CH press buttons the OK field and press the OK press button You will then receive the data corresponding to your position If you wish to cancel press EXIT The Elevation is the inclination of the satellite antenna The azimuth value indicates the antenna direction with reference to the South Azimuth 25 48 180 25 48 154 5 at the compass rose Please note that you need a big satellite antenna for th...

Page 43: ...Motorised System menu press the MENU button and select the Installation menu entry with the CH press buttons in the Main menu Press then the OK button Choose the Motorised System entry and press OK In order to adjust the receiver and the engine to each other please go to Go to sat menu first with the CH buttons and press OK The following submenu appears Installation Menu Motorised System Quality S...

Page 44: ... have not done it from the Antenna Config Setup option Continuously Move The VOL press buttons will allow you to send commands to the engine for it to turn East or West If it is a command stored in the DiSEqC engine Example Astra 19 2 East it will turn automatically by pressing VOL until the engine achieves the stored position However if you press the VOL button for the engine to turn West it will...

Page 45: ...uttons and select the West Limit option with VOL Then press the OK button in order to store this limit Go to sat This function allows you to make the engine swivel round on purpose from a stored position to the 0 position This operation may be useful if you search for a satellite which is very near from the stored position Go to the Goes to Sat menu option with the CH buttons and press OK Then mak...

Page 46: ...t has your TV set Selection 4 3 16 9 and AUTO Change from one to another with the VOL press buttons You can change the format at any time by pressing the PGDW press button RF Channel This option allows you to determine the initial channel that the built in modulator is supposed to occupy This is important in the case that you wish to connect the receiver to an existing network Selection From chann...

Page 47: ... this in consideration and always remember to adapt the time values to the season s changes in winter and summer time Change with the VOL press buttons Remote Control Switch In order to avoid interferences among different remote controls you have the possibility to change the code line Change it with the VOL buttons Remember to change the switch in the remote control s battery chamber as well Remo...

Page 48: ... been made press the OK button and that event recording will be stored Press the EXIT button to leave this window If you want to set the recording timer manually or to check the stored events you can do that as follows Start the Timer menu pressing the MENU button and choose the System menu entry with the CH buttons in the Main menu Once in the System menu select Timer and the following window wil...

Page 49: ...elect your program using the CH buttons Confirm your selection by pressing OK Start Date Write the start date with the 0 9 buttons Start Time Write the start time with the 0 9 buttons Stop Date Write the stop date with the 0 9 buttons Stop Time Write the stop time with the 0 9 buttons Timer Edit To change an existing event select the event with the CH buttons and press OK The menu will be the same...

Page 50: ...he CH buttons in the Main menu Choose now the Calendar menu item and press again the OK button The following window will appear With the CH buttons you can change the desired year and with the VOL buttons the month System Calendar Month Dezember Year 2003 Mon Tue Wen Thu Fri Sat Sun 01 02 03 04 05 06 07 08 09 10 11 12 13 14 15 16 17 18 19 20 21 22 23 24 25 26 27 28 29 30 31 ...

Page 51: ...the MENU button and choose the System menu option with the CH buttons Choose now the Factory default option and press OK The following message will be displayed You can still select NO or press EXIT if you want to cancel If you really want the factory reset then press OK If the procedure does not succeed switch off the receiver with the main switch located in the receiver s back and repeat the pre...

Page 52: ...ption to save the programs data Select the option from the menu and press OK A safety message will follow if you answer Yes all programs data from the programs list will be saved Load Prog Config If you wish to regenerate the stored program list with your own preferences please select the option and press OK A safety message will follow when you answer Yes the stored program list will be loaded Us...

Page 53: ...ess the OK button Next select About IRD with the CH press buttons and press OK Take note of this information before asking for a new software update in the Internet or when you take it to the technical service If you want to leave this menu press the EXIT press button System About IRD System Menu Timer Calendar Factory Default User Save Load System Setting Key EXIT OK About IRD System Info Company...

Page 54: ...ess buttons Now all fields are visible and can be activated by you independently Edit Channel Lock Switch on the password protection for programs If you want a program to be blocked you must mark it in the program list correspondingly Please refer to chapter TV Radio Channels Switch between On and Off with the VOL buttons Installation Lock Switch on the password protection for the Installation men...

Page 55: ... Confirm password Please enter your password a second time in order to test whether it was correctly entered Employ the number keys on the remote control The factory preset password is 0000 If you have forgotten yours you can employ the master password 1976 Parental Control Password Lock On Edit Channel Lock Off Installation Lock Off Change password On Insert new password Confirm password Key EXIT...

Page 56: ... with the VOL press buttons Menu Colour Choose with the VOL press buttons your favourite colour profile Transparency Indicate here the transparency level of the OSD menu display with the VOL press buttons Background Indicate whether the receiver is supposed to display a background picture if no picture information is available as in the case of radio programs Switch between On and Off with the VOL...

Page 57: ...mple a radio to the same socket and check it works d Is the power cord damaged Pull the power plug off the socket under the greatest caution Only a specialist may repair this damage There is no picture no audio or bad quality a Check that the combination between the receiver and the TV set and the satellite antenna is correct Check the connections to the TV set and to the satellite antenna as well...

Page 58: ...there any obstacles between the remote control and your Sat receiver b Have you placed the receiver too far away from you Make sure that the distance between the receiver and its remote control does not exceed eight meters and that the angle is not wider than 15º c Are the batteries exhausted Then replace the batteries Battery Type AAA UM 4 1 5 V Caution Batteries should always be thrown away in s...

Page 59: ...lation QPSK Symbol rate SCPC MCPC Outer code RS 204 188 t 8 Inner Coding rate Tous les supportés par la norme DVB INPUT SIGNAL Frequency 950MHz a 2150MHz Input level 25dBm à 65dBm 82 dBµV à 42 dBµV Channel bandwidth 36MHz Input socket Type F RF MODULATOR Band UHF TV Standard PAL BG I DK NTSC M Output channel 21 a 69 PAL 14 a 83 NTSC LNB CONTROL Power supply 13 18V 500mA max DiSEqC DISEqC 1 2 MISCE...

Reviews: