background image

6

© 2021 United States Stove Company

SAFETY NOTICE

•  IF THIS STOVE IS NOT PROPERLY INSTALLED, 

A HOUSE FIRE MAY RESULT. TO REDUCE THE 

RISK OF FIRE, FOLLOW THE INSTALLATION 

INSTRUCTIONS. 

•  CONSULT YOUR MUNICIPAL BUILDING 

DEPARTMENT OR FIRE OFFICIALS ABOUT 

PERMITS, RESTRICTIONS AND INSTALLATIONS 

REQUIREMENTS IN YOUR AREA.

•  USE SMOKE DETECTORS IN THE ROOM WHERE 

YOUR STOVE IS INSTALLED.

•  KEEP FURNITURE AND DRAPES WELL AWAY 

FROM THE STOVE.

•  NEVER USE GASOLINE, GASOLINE-TYPE 

LANTERN FUEL, KEROSENE, CHARCOAL 

LIGHTER FLUID, OR SIMILAR LIQUIDS TO START 

OR “FRESHEN UP” A FIRE IN THIS HEATER. 

KEEP ALL SUCH LIQUIDS WELL AWAY FROM 

THE HEATER WHILE IT IS IN USE.

•  DO NOT CONNECT TO OR USE IN CONJUNCTION 

WITH ANY AIR DISTRIBUTION DUCTWORK

•  PROVIDE AIR FOR COMBUSTION FROM 

OUTSIDE THE HOUSE INTO THE ROOM WHERE 

THE HEATER IS LOCATED. IF THE INTAKE IS 

NOT IN THE SAME ROOM, AIR MUST HAVE FREE 

ACCESS INTO THE ROOM.

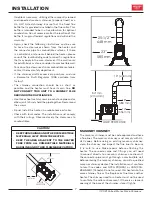
•  ALWAYS CONNECT THIS HEATER TO A CHIMNEY 

AND VENT TO THE OUTSIDE. NEVER VENT TO 

ANOTHER ROOM OR INSIDE A BUILDING. DO 

NOT CONNECT THIS UNIT TO A CHIMNEY FLUE 

SERVING ANOTHER APPLIANCE.

•  ALL PERSONS, ESPECIALLY CHILDREN, 

SHOULD BE ALERTED TO HAZARDS FROM HIGH 

SURFACE TEMPERATURES AND KEPT AWAY 

WHILE IN OPERATION. SMALL CHILDREN 

SHOULD NOT BE LEFT UNSUPERVISED WHEN 

IN THE ROOM WITH THE HEATER.

•  THIS HEATER SHOULD NOT BE USED AS A 

PRIMARY SOURCE OF HEAT.

•  DO NOT CONNECT A WOOD BURNING HEATER 

TO A TYPE B GAS VENT. THIS IS NOT SAFE 

AND IS PROHIBITED BY THE NATIONAL FIRE 

PROTECTION ASSOCIATION CODE. THIS 

HEATER REQUIRES APPROVED MASONRY 

OR UL, ULC LISTED RESIDENTIAL TYPE AND 

BUILDING HEATING APPLIANCE CHIMNEY. USE 

A 6" DIAMETER CHIMNEY, OR LARGER, THAT IS 

HIGH ENOUGH TO GIVE A GOOD DRAFT.

US Stove highly recommends your stove be installed by a 

qualified NFI (US) or WETT (Canada) technician. To find 

the nearest qualified installer, go to:

https://nficertified.org

,

https://www.wettinc.ca/
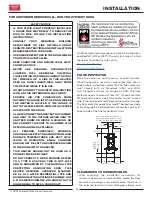
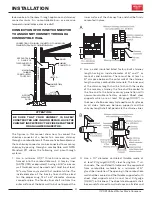
FLOOR PROTECTOR

Place the heater on solid masonry or solid concrete. 

When the heater is used on a combustible floor, use an 

Underwriters Listed floor protector. The floor protector 

must comply with UL Standards (USA) and CAN/

ULC (Canada) and have an R-value of 2.06. The floor 

protector needs to extend at least 16" (Canada requires 

18") beyond the door side of the heater and 8" to each 

side. It should also extend 8" beyond the rear for Canada. 

The floor protector needs to extend 2" beyond each side 

of the flue pipe if it is elbowed towards a wall as well as 2" 

on each side of the flue for horizontal runs.

Non-combustible construction in 

accordance with NFPA 211 (USA) 

or CAN/CSA B365-M91 (CANADA)

8”

8”

(204 mm)

8”

(204 mm)

USA 16” 

(407 mm)

CAN 18” 

(458 mm)

(204 mm)

FLOOR 

PROTECTOR

2”

(51 mm)

2”

(51 mm)

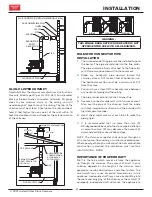
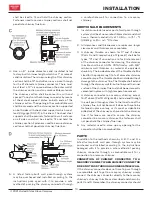
CLEARANCES TO COMBUSTIBLES

•  After consulting the installation instructions for 

minimum clearances to combustibles, locate the floor 

protector accordingly and carefully place the stove in 

the selected location. Install stovepipe, elbows, and 

INSTALLATION

FOR CUSTOMER SERVICE CALL: 800-750-2723 EXT 5050

Summary of Contents for US1269E

Page 1: ...tallation of this heater Contact local building or fire officials about permits restrictions and installation requirements in your area NEVER OPERATE THIS PRODUCT WHILE UNATTENDED CAUTION Please read...

Page 2: ...EPA test conditions burning Douglas Fir dimensional lumber this heater has been shown to deliver heat at a rate of 29 234 to 26 300 Btu hr This heater achieved a particulate emissions rate of 1 8 g h...

Page 3: ..._________________________________________ If no Date of inspection of the existing chimney system ___________________________________________________________ COMMISSIONING Confirm Hearth Pad Installat...

Page 4: ...ney Furnace Cement Flooring protector as specified NOTICE UNITED STATES STOVE COMPANY GRANTS NO WARRANTY STATED OR IMPLIED FOR THE INSTALLATIONORMAINTENANCEOFYOURWOOD STOVE AND ASSUMES NO RESPONSIBILI...

Page 5: ...h a handle bracket This bracketed leg is designed to be installed at the front right side of the unit X 2 X 2 7 Attach the rear legs to the base of the stove with two 2 M8 X 45 screws and two 2 M8 X 4...

Page 6: ...R TO A TYPE B GAS VENT THIS IS NOT SAFE AND IS PROHIBITED BY THE NATIONAL FIRE PROTECTION ASSOCIATION CODE THIS HEATER REQUIRES APPROVED MASONRY OR UL ULC LISTED RESIDENTIAL TYPE AND BUILDING HEATING...

Page 7: ...pe and or elbow joint to firmly hold the pipe together Seal around the screws Do not install this heater in a mobile home or trailer Check with local codes The installation must comply with their ruli...

Page 8: ...orizontal pipe upward toward the chimney at least 1 4 for each foot of horizontal run The horizontal section must be a minimum of 24 from the stove 3 You must have at least 18 inches clearance between...

Page 9: ...from any material that could catch fire The inside diameter of the fireclay liner shall be sized for the proper snug fit of a 6 diameter chimney connector pipe The fireclay liner shall run from the o...

Page 10: ...s shown for 3 and 4 above Parts C and D respectively of Figure 8 shall be for types 3 and 4 connections to facilitate removal of the chimney connector for cleaning The chimney thimble shall be of ASTM...

Page 11: ...Smoke spillage into the house or excessive buildup of water or creosote in the chimney are warnings that the chimney is not functioning properly Correct problem before using heater Possible causes ar...

Page 12: ...n burning air dried seasoned hardwoods as compared to softwoods or too green or freshly cut hardwoods The following resources can assist in learning the burn characteristics of various species of wood...

Page 13: ...the ends of the piece your wood is soaked or freshly cut green Do not use this wood in your stove Large amounts of creosote could be deposited in your chimney creating potential conditions for a chim...

Page 14: ...the air inlet 5 Reloading of fuel should only occur once the prior fuel load has burned down to embers Abiding by this routine your stove will achieve the cleanest emissions burn plus will prevent ove...

Page 15: ...ays check for creosote deposit once every two months and have your chimney cleaned at least once a year If a chimney or creosote fire occurs DO NOT open the door keep the door closed Wait for the fire...

Page 16: ...16 2021 United States Stove Company REPAIR PARTS 1 2 3 4 5 6 7 9 11 10 8 16 15 14 13 12 18 19 20 21 22 23 17 24...

Page 17: ...1 22 892511 Door Panel Front 1 23 892843 Door Pin 2 24 893216 Door Assembly 1 To order parts Call 1 800 750 2723 Ext 5051 or Email to parts usstove com For Parts Assistance Call 800 750 2723 Ext 5051...

Page 18: ..._____ Engineer Name _____________________________________ License No _________________________________________ Company ___________________________________________ Telephone No ________________________...

Page 19: ...ce de 07 Date ______________________ Nom de l ing nieur _________________________________ N de licence ______________________________________ Compagnie ________________________________________ N de t...

Page 20: ...de corde 3 8 1 21 88174 Joint de fen tre 1 8x1 1 22 892511 Panneau de porte 1 23 892843 Goupille de porte 2 24 893216 Assemblage de porte 1 COMMANDE DE PI CES DE RECHANGE Les informations contenues da...

Page 21: ...16 2021 United States Stove Company PI CES DE RECHANGE 1 2 3 4 5 6 7 9 11 10 8 16 15 14 13 12 18 19 20 21 22 23 17 24...

Page 22: ...r osote V rifiez toujours le d p t de cr osote une fois tous les deux mois et faites nettoyer votre chemin e au moins une fois par an Si un feu de chemin e ou de cr osote se produit N OUVREZ PAS la po...

Page 23: ...l es plus emp chera le surfiage de votre po le FUM E VISIBLE La quantit de fum e visible produite peut tre une m thode efficace pour d terminer l efficacit du processus de combustion aux param tres d...

Page 24: ...dans votre chemin e cr ant des conditions potentielles pour un feu de chemin e ALT RER AVERTISSEMENT Ce chauffage au bois a un taux de combustion minimum r gl la fabrication et qui ne peut tre modifi...

Page 25: ...ents nerg tiques que d autres Des rendements plus lev s et des missions plus faibles r sultent g n ralement de la combustion de bois durs s ch s l air par rapport aux r sineux ou aux feuillus trop ver...

Page 26: ...Le dispersement de fum e dans la maison ou une accumulation excessive d eau ou de cr osote dans la chemin e est un avertissement que la chemin e ne fonctionne pas correctement Corrigez le probl me av...

Page 27: ...es directives qui l accompagnent offrant une m thode s curitaire pour faire traverser le conduit de raccordement travers un mur combustible en vue d un branchement une chemin e en ma onnerie EXIGENCES...

Page 28: ...s d tre ciment en place Le d gagement minimum de la chemin e la brique et les mat riaux combu ibles e de 5 cm 2 po 50 8 mm 30 cm 304 8 mm 12 po minimum aux mat riaux combu ibles Chemin e en ma onnerie...

Page 29: ...e au moyen de 3 vis puis scell avec du ciment calorif re 2 Appliquez une pente minimale de 6 mm 1 4 po par 30 cm 1 pi de conduit horizontal de tuyau en direction de la chemin e La section horizontale...

Page 30: ...lisez trois vis auto taraudeuses dans chaque tuyau de po le ou joint coud pour maintenir solidement le tuyau Scellez le pourtour des vis N installez pas ce chauffage dans une maison mobile V rifiez vo...

Page 31: ...ITS ENFANTS NE DEVRAIENT PAS TRE LAISS S SANS SUPERVISION QUAND DANS LA CHAMBRE AVEC LE CHAUFFAGE CET APPAREIL NE DOIT PAS TRE UTILIS COMME SOURCE PRIMAIRE DE CHALEUR AVIS DE S CURIT NE PAS RACCORDER...

Page 32: ...oign e Ce pied support est con u pour tre install sur le c t avant droit de l unit X 2 X 2 7 Fixez les pieds arri re la base du po le avec deux 2 vis M8 X 45 et deux 2 crous M8 X 45 X 2 X 2 8 Soulevez...

Page 33: ...de sol tel que sp cifi ATTENTION LE PO LE EST LOURD ASSUREZ VOUS D AVOIR SUFFISAMMENT D AIDE ET D UTILISER LES TECHNIQUES APPROPRI ES DE LEVAGE LORSQUE VOUS D PLACEZ LE PO LE AVIS UNITED STATES STOVE...

Page 34: ...ion du syst me de chemin e existant ____________________________________________________________________ MISE EN SERVICE Confirmer l installation du tapis de foyer conform ment aux instructions d inst...

Page 35: ...ectrique Aucun Dimensions G n ral profondeur x largeur x hauteur 838 x 470 x 584 mm 33 x 18 5 x 23 po Chambre de combustion Largeur x profondeur 229 mm x 482 9 x 19 po Volume M tres cubes pieds cubes...

Page 36: ...sables locaux du b timent ou des pompiers pour conna tre les permis les restrictions et les exigences d installation dans votre r gion NE JAMAIS UTILISER CE PRODUIT SANS SURVEILLANCE MISE EN GARDE Veu...

Reviews: