background image


TB160 User’s Manual 

1.4 Getting Started 


1.4.1 First Time Use 

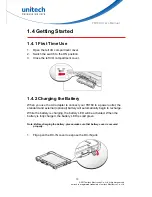
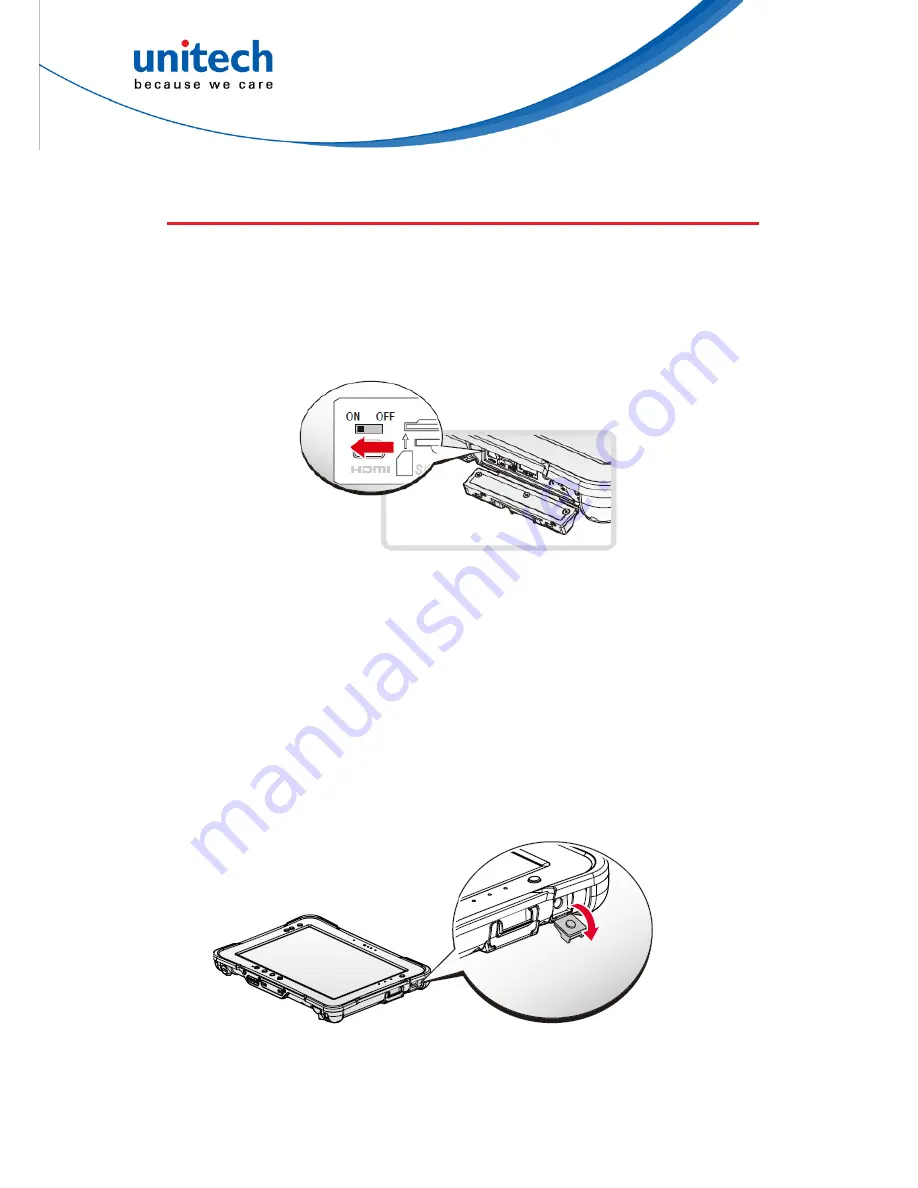
1.  Open the left I/O compartment cover. 

2.  Switch the switch to the ON position. 

3.  Close the left I/O compartment cover. 


1.4.2 Charging the Battery 

When you use the AC adapter to connect your TB160 to a power outlet, the 
standard and external (optional) battery will automatically begin to recharge. 

While the battery is charging, the battery LED will be activated. When the 
battery is fully charged, the battery LED is solid green. 


Note: Before charging the battery, please make sure that battery cover is secured   
     properly. 


1.  Flip open the DC-IN cover to expose the DC-IN jack. 


10 


© 2017 unitech Electronics Co., Ltd. All rights reserved.   

                                          unitech is a registered trademark of unitech Electronics Co., Ltd.


Summary of Contents for TB160

Page 1: ...10 1 Rugged Tablet Computer TB160 User s Manual Version 1 1 2017 unitech Electronics Co Ltd All rights reserved unitech is a registered trademark of unitech Electronics Co Ltd...

Page 2: ...Electronics Co Ltd All rights reserved unitech is a registered trademark of unitech Electronics Co Ltd Revision History Date Change Description Version 2017 8 10 first published version 1 0 2019 1 7 U...

Page 3: ...ghts reserved unitech is a registered trademark of unitech Electronics Co Ltd This device has been tested and found to comply with the limits for a Class B digital device pursuant to part 15 of the FC...

Page 4: ...d by the manufacturer may void the user s authority to operate the equipment Operation on the 5 15 5 25GHz frequency band is restricted to indoor use only The FCC requires indoor use for the 5 15 5 25...

Page 5: ...exposure of the general public to electromagnetic fields by way of health protection For body worn operation this device has been tested and meets the ICNIRP guidelines and the European Standard EN 62...

Page 6: ...aterials used in electrical and electronic equipment Waste electrical and electronic equipment WEEE unitech has set up a policy and process to meet the EU directive 2002 96 EC and update 2003 108 EC c...

Page 7: ...v 2017 unitech Electronics Co Ltd All rights reserved unitech is a registered trademark of unitech Electronics Co Ltd Taiwan NCC Warning Statement 1 2 30 10 2 2 1 3...

Page 8: ...module is located on the memory compartment cover on the back of the unit Laser information only applies to the products with laser components CAUTION Use of controls or adjustments or performance of...

Page 9: ...cool Avoid hot vehicles For prolonged storage keep the battery at a 40 charge level Do not leave the battery uncharged and unused for an extended period of time the battery will wear out and the longe...

Page 10: ...ng batteries outside of the specified range could damage the batteries and shorten their life cycle CAUTION Do not charge batteries at a temperature lower than 0 C This will make the batteries unstabl...

Page 11: ...damage or malfunction For applicable temperature conditions please refer to the specification of each product Adapter Notice 1 Please do not leave the power adapter in the socket when it is not conne...

Page 12: ...t of 5 mm and the following wording or similar To prevent possible hearing damage do not listen at high volume levels for long periods Alternatively the entire warning may be given through the equipme...

Page 13: ...http www ute com Website http eu ute com China Japan Tel 86 59 2310 9966 Tel 81 3 35232766 E mail info cn ute com E mail info jp ute com Address Website Room401C 4F RIHUA International Mansion Xinfeng...

Page 14: ...r supplier or unitech local office for actual length of warranty period to your purchased product Warranty becomes void if equipment is modified improperly installed or used damaged by accident or neg...

Page 15: ...O Compartment Cover 20 2 2 Closing the I O Compartment Cover 21 2 3 Connecting to External Cabling 22 2 3 Installing the standard Battery 25 2 4 Removing the standard Battery 26 2 5 Connecting to a W...

Page 16: ...ch Electronics Co Ltd All rights reserved unitech is a registered trademark of unitech Electronics Co Ltd 3 2 Accessing the BIOS Setup Utility 40 3 3 EC and BIOS 44 3 4 DashOn Utility device 49 3 5 Ca...

Page 17: ...t your unitech representative The standard package contents TB160 Power Adapter Stylus 2 Point Carrying Handle 2 Point Shoulder Strap 4 Point Handstrap Hitch D rings Attaching straps Regulatory Compli...

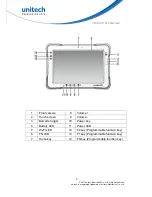
Page 18: ...duct Detail TB160 Front View 2 2017 unitech Electronics Co Ltd All rights reserved unitech is a registered trademark of unitech Electronics Co Ltd 1 Left view 2 Front view 3 Rear view 4 Right view 5 R...

Page 19: ...nitech Electronics Co Ltd TB160 User s Manual 1 Front camera 8 Volume 2 Touch screen 9 Volume 3 Barcode trigger 10 Power key 4 Battery LED 11 Power LED 5 Wi Fi LED 12 F2 key Programmable function key...

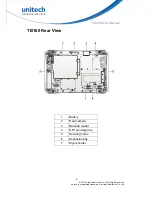
Page 20: ...View 4 2017 unitech Electronics Co Ltd All rights reserved unitech is a registered trademark of unitech Electronics Co Ltd 1 Battery 2 Rear camera 3 Barcode reader 4 NFC sensing area 5 Securing holes...

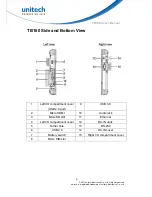
Page 21: ...Ltd TB160 User s Manual TB160 Side and Bottom View 1 Left I O compartment cover USB 2 0 port 9 USB 3 0 2 Micro HDMI 10 Audio jack 3 MicroSD slot 11 Ethernet 4 Left I O compartment cover 12 DC IN Jack...

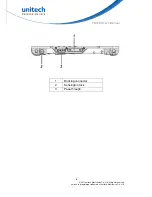
Page 22: ...TB160 User s Manual 1 Docking connector 2 Kensington lock 3 Pass through 6 2017 unitech Electronics Co Ltd All rights reserved unitech is a registered trademark of unitech Electronics Co Ltd...

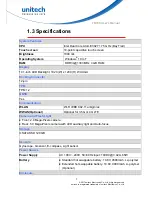
Page 23: ...b g n ac WWAN Optional Optional for 3 5G or 4G LTE Camera and Flash Light Front 2 0 Mega Pixels camera Rear 5 0 Mega Pixels camera with LED auxiliary light and Auto focus Storage mSATA SSD 120 GB Sens...

Page 24: ...0G Method 516 6 Procedure IV Mechanical shock MIL STD 810G Method 516 6 Procedure I Procedure V Operation and storage temperature MIL STD 810G Method 501 5 and 502 5 Humidity MIL STD 810G Method 507 5...

Page 25: ...h is a registered trademark of unitech Electronics Co Ltd TB160 User s Manual RFID NFC 13 56MHz 200mW NOTE Requirements in AT BE BG CZ DK EE FR DE IS IE IT EL ES CY LV LI LT LU HU MT NL NO PL PT RO SI...

Page 26: ...the standard and external optional battery will automatically begin to recharge While the battery is charging the battery LED will be activated When the battery is fully charged the battery LED is so...

Page 27: ...2 Connect the AC adapter to the DC IN port After charging the battery disconnect the AC adapter and close the DC IN cover 1 Insert one end of the cover first and angle the cover to seat it in place 2...

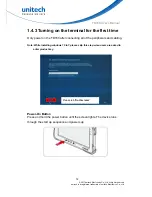
Page 28: ...lling windows 10 IoT please skip this step when users are asked to enter product key Please tab Do this later Power On Button 12 2017 unitech Electronics Co Ltd All rights reserved unitech is a regist...

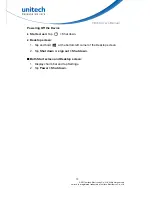
Page 29: ...lectronics Co Ltd TB160 User s Manual Powering Off the Device Start screen Tap Shut down Desktop screen 1 Tap and hold at the bottom left corner of the Desktop screen 2 Tap Shut down or sign out Shut...

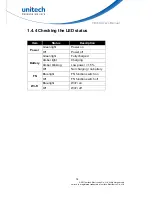
Page 30: ...User s Manual 1 4 4 Checking the LED status Item Status Description Green light Power on Power Off Power off Green light Fully charged Amber light Charging Amber blinking Low power 15 Battery Off Not...

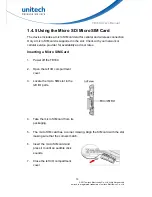
Page 31: ...1 Power off the TB160 2 Open the left I O compartment cover 3 Locate the micro SIM slot in the left I O parts 4 Take the micro SIM card from its packaging 5 The micro SIM card has a corner missing Al...

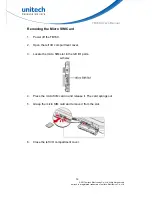
Page 32: ...TB160 User s Manual Removing the Micro SIM Card 1 Power off the TB160 2 Open the left I O compartment cover 3 Locate the micro SIM slot in the left I O parts 4 Press the micro SIM card in and release...

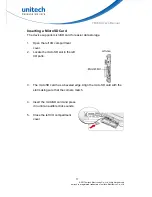
Page 33: ...t in the left I O parts 3 The microSD card has a beveled edge Align the microSD card with the slot making sure that the corners match 4 Insert the microSD card and press it in until an audible click s...

Page 34: ...D slot in the left I O parts 3 Press the microSD card in and release it The card springs out 4 Grasp the microSD card and remove it from the slot 5 Close the left I O compartment cover 18 2017 unitech...

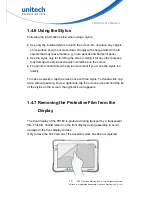
Page 35: ...vement if you move the stylus too quickly To make a selection tap the screen once with the stylus To double click tap twice without pausing To do a right click tap the screen once and hold the tip of...

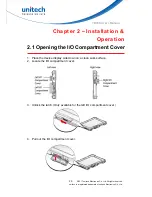
Page 36: ...onics Co Ltd TB160 User s Manual Chapter 2 Installation Operation 2 1 Opening the I O Compartment Cover 1 Place the device display side down on a clean work surface 2 Locate the I O compartment cover...

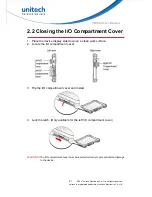
Page 37: ...ment cover 3 Flip the I O compartment cover and install 4 Lock the latch Only available for the left I O compartment cover WARNING The I O compartment cover must be inserted correctly to prevent inter...

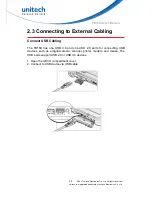
Page 38: ...r connecting USB devices such as a digital camera scanner printer modem and mouse The USB ports support USB 2 0 or USB 3 0 devices 1 Open the left I O compartment cover 2 Connect to USB device via USB...

Page 39: ...mpartment cover 2 Connect LAN cable to Ethernet port on the TB160 Connect Audio Cabling For higher audio quality you can send sound through external audio devices such as speakers headphones or earpho...

Page 40: ...port on TB160 Connect RS 232 Cabling Connect to RS 232 devices via RS 232 cable 1 Open the right I O compartment cover 2 Align the RS 232 cable with the port in the device and connect it 3 Turn the lo...

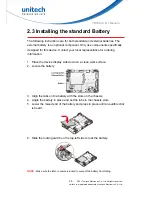
Page 41: ...n a clean work surface 2 Locate the battery 3 Align the tabs on the battery with the slots on the chassis 4 Angle the battery in place and set the tabs in the chassis slots 5 Lower the raised end of t...

Page 42: ...tery 3 Slide the locking switch on the top left side to the unlock position 4 Press and hold the release button as shown in the image to release the battery 5 Hold the battery and angle the left side...

Page 43: ...tings tap the Network icon to display the Networks connection settings 5 The Wi Fi menu displays By default the Wi Fi menu is set to Off Tap the bar next to Off to toggle Wi Fi to On This enables the...

Page 44: ...The handstrap can be installed with either the shoulder strap or the carrying handle However the handle and shoulder strap can not be installed together due to space constraints Connecting the Handst...

Page 45: ...e handstrap is installed the stylus can be placed under the strap Connecting the Handstrap 1 Unlock the handstrap from the D rings 2 Remove the D rings 29 2017 unitech Electronics Co Ltd All rights re...

Page 46: ...ing Handle 1 Attach the clips to the metal loop on the bumper Removing the Carrying Handle 1 Press in the clips to release them from the metal loop 2 Remove the clips 30 2017 unitech Electronics Co Lt...

Page 47: ...loop on the bumper Removing the Shoulder Strap 1 Press in the clips to release them from the metal loop 2 Press in the clips to release them from the metal loop 31 2017 unitech Electronics Co Ltd All...

Page 48: ...o set up your 2D barcode scanner in a basic configuration by scanning configuration barcodes 2 Open a word processing program such as Microsoft Word or Notepad on your host Trigger Button 3 Factory De...

Page 49: ...to test GPS module http www u blox com en evaluation tools a software u center u center html 1 Set baud rate to 9600bps 2 Connect to GPS module via appropriate serial port 33 2017 unitech Electronics...

Page 50: ...door to not receive the GPS signal well you can open the Text Consol to see whether the NMEA code is constantly displaying or not 34 2017 unitech Electronics Co Ltd All rights reserved unitech is a re...

Page 51: ...TB160 User s Manual REAL Outdoor GPS Working Situation 35 2017 unitech Electronics Co Ltd All rights reserved unitech is a registered trademark of unitech Electronics Co Ltd...

Page 52: ...2 Executing Sample 3 Follow and setup item 1 2 3 4 5 1 2 4 3 5 4 Put your RFID tag card to tablet s detection portion on the back of TB160 in mm range Note It only applies to the device which supports...

Page 53: ...ery Please follow the instructions below for the recovery setting 37 2017 unitech Electronics Co Ltd All rights reserved unitech is a registered trademark of unitech Electronics Co Ltd 1 Tap and choos...

Page 54: ...keep your files or remove all and then reinstalls Windows Advanced startup This will change firmware settings change Windows startup settings or restore Windows from a system image 38 2017 unitech El...

Page 55: ...evice s basic settings the system reads the basic settings during initialization in order to boot correctly You need to run the BIOS Setup utility when Restoring to BIOS settings to factory default Mo...

Page 56: ...following If the TB160 is powered off Press the Power button to start up the device The power LED lights Quickly press and hold the Windows Home key until the BIOS Post screen displays If the TB160 i...

Page 57: ...eral settings in BIOS that must be modified before you can install a Windows 10 IoT operating system Use the following guidelines to prepare the BIOS environment Step 1 Enable CSM Support 1 Access the...

Page 58: ...B 2 0 Support 1 Access the BIOS Setup Utility see Accessing the BIOS Setup Utility 2 Navigate to APP Menu Advanced Miscellaneous Configuration 3 Locate the USB Controller Select drop down menu and tap...

Page 59: ...Electronics Co Ltd TB160 User s Manual After you configure BIOS you will need to save the settings 1 Navigate to APP Menu Exit and tap Exit Saving Changes 2 A prompt display tap Yes to save the confi...

Page 60: ...he device to the AC adapter to prevent a sudden loss of power during the BIOS updating process 1 Contact your technical sales or technical representative to obtain the correct BIOS file 2 Copy the BIO...

Page 61: ...7 From the Update and security screen tap Recovery The Advanced startup option displays Under Advanced startup tap Restart now 45 2017 unitech Electronics Co Ltd All rights reserved unitech is a regis...

Page 62: ...om the Use a device menu tap Internal Shell to open the command screen NOTE Make sure connect the TB160 to the AC adapter to prevent a sudden loss of power 46 2017 unitech Electronics Co Ltd All right...

Page 63: ...n a folder and not in the root directory navigate to the target folder 12 Type wf nsh and tap Enter wf is the designated BIOS file Do not turn off your device or interfere with the reflash process unt...

Page 64: ...0 to the AC adapter to prevent a sudden loss of power 1 Updating EC requires the use of the Internal Shell Command menu refer to steps 1 to 12 of Updating BIOS 2 Enter the EC source file folder 3 In t...

Page 65: ...to the desktop Button Lock Lock or unlock all the physical buttons except Power button Screen Auto Rotate Disable or enable screen auto rotate function Airplane Turn on or off the airplane mode Batter...

Page 66: ...onnect to another output device Ignition Monitor When mounting TB160 with VM160 car kit if the ignition monitor sets on it will notify users with a pop up screen when the vehicle ignition is turned of...

Page 67: ...pends on your tablet Select the function key to define and tap the drop down menu to choose from a pre defined list of commands Alternatively tap Other to select a specific executable file to attach t...

Page 68: ...ate CamOn icon on the main screen 2 The following are the introduction of the camera interface Record Camera Exit Geo Data ON OFF Camera Setting Flash Mode Gallery Camera switch Camera Button 52 2017...

Page 69: ...B160 User s Manual 3 Camera Setting Rear Camera resolution Front Camera resolution 53 2017 unitech Electronics Co Ltd All rights reserved unitech is a registered trademark of unitech Electronics Co Lt...

Reviews: