


8
9
English
English
INSERTING BATTERIES
Main unit
Open the battery compartment on the reverse of the
device, insert two AA batteries (matching the polarity)
and then re-close the battery compartment. For
approx. 70 seconds the device will be in automatic
set-up mode and will not accept any inputs from the
keys.
Remote sensor
Before first use, remove the plastic strips from the
battery compartment. To replace the battery, remove
the battery cover and old battery and insert a new
CR2450 battery.
Battery indicator
The low battery indicator
on the main unit‘s
display covers the main unit and all remote sensors.
Change the batteries and follow the set-up instruc-
tions in this manual. Never use unequally charged
batteries within the same device.
SETTING UP THE REMOTE SENSOR
Position the main unit away from metals and potential
sources of interference such as mobile telephones,
televisions and other electronic devices.
1) Select the desired channel number (positions 1-5)
on the remote sensor using a small screwdriver
.
2) If inserting batteries into the main unit, it will
automatically switch to search mode after approx.
70 seconds. Otherwise hold down the [CH] key
1
until an audible signal sounds. The main unit will
now search for remote sensors.
3) Hold down the [TX] key
9
on the battery housing
of the remote sensor until the main unit sounds an
audible signal.
4) As soon as RF synchronization is completed, the
corresponding channel data will be displayed on
the main unit.
5) To set up other remote sensors (W235 - 313524.00),
select the channel number on the sensor accordin-
gly and proceed as described above. A different
channel number must be assigned to each remote
sensor.
6) When all available sensors have been logged,
press the [CH] key until an audible signal sounds
again. Logging is now completed.
Main unit
Remote sensor
Notes:
- After inserting batteries into the main unit it will
not accept any key inputs for approx. 70 seconds.
- Each time you press the [CH] key in normal mode,
data from the logged remote sensors will be
shown on the display. Press again to alternate
display of the relevant data. The following symbol
will appear on the display: .
- Various factors such as soil conditions and the
type of fertilizer may affect the soil‘s current
moisture level and the watering level. We accept
no responsibility for loss or damage of any kind.
- The watering alert, which is activated using the
[WATER AL] key
2
, will sound once per minute.
This reminder will not sound overnight between
9.00 p.m. and 9.00 a.m.
WATERING ALERT
1) To switch on the watering alert function on the
sensor (independently of the main unit), press the
[AL] key
until an audible signal sounds.
The following symbol (N) will flash on the display:
( N ).
2) To switch off the watering alert, follow the same
procedure as described under item 1.
The
( N ) symbol will go off.
Note:
- Because the soil dries out from the surface down,
the amount of moisture in the lower root area is
often misjudged, with the result that too much
water is distributed. In order to guarantee more
precise measuring, the sensor should be pushed
into the soil/root system as deeply as possible.
However, care should be taken that the upper part
or rather the lid of the battery compartment of the
sensor is not immersed when watering.
SETTING THE CLOCK
1) Hold down the [CLOCK] key
7
until the hour
display starts to flash.
2) Use the [+ C/F]
6
and [ - ]
8
keys to change the
figures up or down.
3) Press [CLOCK]
7
again to set the minutes in the
same way as described above.
4) Press [CLOCK]
7
again to switch between the
12/24-hour formats.
5) Press [CLOCK]
7
again to set the current
weather.
6) Press [CLOCK]
7
again to finish procedure.
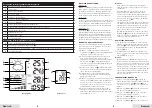
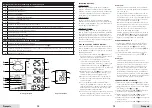
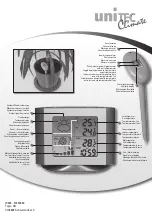
Descriptions of display functions on main unit
A
Weather forecast with symbols
B
Trend display
C
Channel / sensor display
D
"WET" segment
E
"SLIGHTY MOIST" segment
F
"SLIGHTLY DRY" segment
G
"DRY" segment
H
Symbol for watering alert (main unit)
I
Overview of soil moisture from all logged sensors (max. 5)
J
Air temperature at sensor
K
Indoor temperature ("IN")
L
Soil temperature ("SOIL")
M
Clock / alarm display
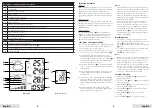
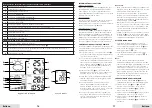
Descriptions of display functions on sensor
N
Symbol for watering alert (sensor)
O
Channel display (selectable via rotary switch
)
P
Toggle display between soil temperature ("SOIL"), air temperature ("AIR") and soil moisture with segments
Q
Humidity display
B
J
K
L
M
A
C
H
D
E
F
G
I
O
N
P
Q