U N I Q U E U G P 6 F
26
8.0 MAINTENANCE CLEANING YOUR ALARM:
8.1. Keep your CO alarms clean – use a damp (water only) cloth or vacuum.
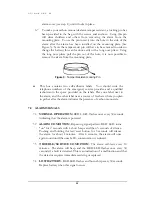
8.2 To clean your alarm, remove it from the mounting bracket as outlined
in Figure 2 Step C: Installation/Removal. IF TAMPER RESISTANT
PIN HAS BEEN USED, REFER TO STEP 6.7 UNDER
INSTALLATION INSTRUCTIONS FOR REMOVAL
INSTRUCTIONS. (See Figure 3)
8.3 You can clean the interior of your alarm by using your vacuum cleaner
hose and vacuuming through the openings around the perimeter of the
alarm.
8.4 The outside can be wiped with a cloth.
8.5 After cleaning, reinstall your alarm and test your alarm by using the
TEST button.
8.6 Test your detectors weekly and repair or replace them when they no
longer function. As with any electronic product, alarms have a limited
life and alarms that do not work cannot protect you. (See section 10.0)
WARNING
: Do not use any household cleaning agents, paints, varnishes or
any other chemical on your
COSTAR
9RV-SSO
alarm.
9.0 BATTERY REPLACEMENT:
NOTE
:
IF TAMPER RESISTANT PIN HAS BEEN USED, REFER TO
STEP 6.7 UNDER INSTALLATION INSTRUCTIONS FOR REMOVAL
INSTRUCTIONS. (See Figure 3
)
9.1 To replace the battery remove the alarm from the mounting plate by
rotating the alarm in the direction of the "OFF" arrow on the cover (See
Figure 2 Step C). Remove and reinstall the battery in the correct
orientation as noted on the inside of the battery door. The alarm will
beep once indicating proper battery installation. After re-installing the
battery, place the alarm on the mounting plate. Twist the alarm in the
direction indicated by the "ON" arrow on the alarm cover (see Figure 2
step C) until it locks in place.
9.2 The
COSTAR
9RV-SSO
CO Alarm uses one (1) 9 volt alkaline battery.
A fresh battery should last for one year under normal operating
conditions. They can be purchased anywhere batteries are sold, such as
your local hardware store.

